浅析MyBatis(四):全自动写代码的MyBatis逆向工程
在前面几篇文章中,笔者介绍了 MyBatis 的运行流程,在此基础上简单介绍了手写 MyBatis 简易框架与自定义 MyBatis 插件的步骤,相信大家对于 MyBatis 框架的使用流程已经游刃有余了。然而,面对实际开发过程中大量的数据库表单,传统的 MyBatis 使用步骤已经显得繁琐不堪,本文介绍的就是利用 MyBatis 逆向工程把 MyBatis 框架使用的前期配置准备工作交给代码生成器完成,从而节省时间提高开发效率。本文涉及到的代码已上传至 GitHub: mybatis-generator-demo 。
话不多说,现在开始!
1. MyBatis逆向工程简介
所谓 MyBatis 逆向工程,就是 MyBatis 根据数据库中已经设计好的表单自动生成 domain、mapper、mapper.xml 以及 example 类(用于添加条件),从而大大提高开发效率。在实际开发中,只要敲定了数据库的表结构就可以通过 MyBatis 逆向工程生成表单对应的基本配置,省去了手动写 mapper 的工作,然后就可以根据实际业务需求来进行进一步的开发。下面将介绍 MyBatis 的官方生成器插件 MyBatis Generator 以及用户 itfsw 在 GitHub 开源的一个特别好用的生成器增强插件 mybatis-generator-plugin 。
2. MyBatis逆向工程插件
2.1 MBG插件简介
MyBatis 提供了官方的代码生成器 MyBatis Generator(MBG),能够为所有版本的 MyBatis 以及 2.2.0 之后的 iBatis 版本生成代码。官方的 MBG 插件能够生成与数据库进行简单交互的 CRUD 操作,在使用时需要在 pom.xml 文件中引入插件的依赖:
<plugin>

  <groupId>org.mybatis.generator</groupId>

  <artifactId>mybatis-generator-maven-plugin</artifactId>

  <version>1.3.7</version>

</plugin>
2.2 MBG增强插件简介
在 MyBatis 的官方 MBG 插件的基础上,有很多开发者开发了优秀的增强插件并发布在 GitHub 上。本节中介绍的就是用户 itfsw 开发的 MBG 的增强插件,详情可见:https://github.com/itfsw/mybatis-generator-plugin 。这是一个 MBG 插件的拓展插件包,方便和减少了代码开发量。该插件集成了查询单条数据插件(SelectOneByExamplePlugin)、MySQL分页插件(LimitPlugin)、数据Model链式构建插件(ModelBuilderPlugin)、Example Criteria 增强插件(ExampleEnhancedPlugin)、Example 目标包修改插件(ExampleTargetPlugin)、批量插入插件(BatchInsertPlugin)、逻辑删除插件(LogicalDeletePlugin)、数据Model属性对应Column获取插件(ModelColumnPlugin)、存在即更新(UpsertPlugin)等等插件。在实际项目中使用时需要引入插件的依赖:
<dependency>

  <groupId>com.itfsw</groupId>

  <artifactId>mybatis-generator-plugin</artifactId>

  <version>1.3.2</version>

</dependency>
3. MyBatis逆向工程实践
在介绍了两款与 MyBatis 逆向工程相关的插件之后,下面将通过一个实际项目来实践 MyBatis 的逆向工程。
3.1 前期准备
3.1.1 构建SpringBoot项目并集成MyBatis
本文中采用 SpringBoot + MyBatis 来构建项目,这种构建方式也是目前实际开发中常用的方式。项目构建完成后新建对应的 package 用于存放生成器生成的代码,如下图所示。
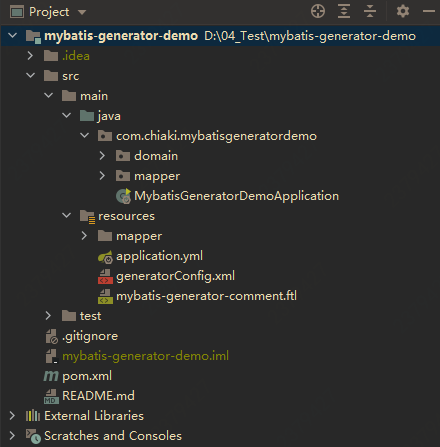
在上图中,domain 文件夹用于存放根据数据库表单生成的 POJO 类,mapper 文件夹用于存放生成器生成的表单对应的接口,而在文件夹 resoucres/mapper 下存放的是生成的 mapper 接口对应的 xml 配置文件。
3.1.2 配置pom.xml文件
进一步需要在 pom.xml 文件中配置项目相关的 MBG 依赖、MySQL 依赖、Lombok 依赖等等,如下所示:
<?xml version="1.0" encoding="UTF-8"?>

<project xmlns="http://maven.apache.org/POM/4.0.0" xmlns:xsi="http://www.w3.org/2001/XMLSchema-instance"

         xsi:schemaLocation="http://maven.apache.org/POM/4.0.0 https://maven.apache.org/xsd/maven-4.0.0.xsd">

  <modelVersion>4.0.0</modelVersion>

  <parent>

    <groupId>org.springframework.boot</groupId>

    <artifactId>spring-boot-starter-parent</artifactId>

    <version>2.4.3</version>

    <relativePath/> <!-- lookup parent from repository -->

  </parent>

  <groupId>com.chiaki</groupId>

  <artifactId>mybatis-generator-demo</artifactId>

  <version>0.0.1-SNAPSHOT</version>

  <packaging>jar</packaging>

  <name>mybatis-generator-demo</name>

  <description>Demo project for Spring Boot</description>

  <properties>

    <java.version>1.8</java.version>

  </properties>

  <dependencies>

    <dependency>

      <groupId>org.springframework.boot</groupId>

      <artifactId>spring-boot-starter-web</artifactId>

    </dependency>

    <!--lombok插件-->

    <dependency>

      <groupId>org.projectlombok</groupId>

      <artifactId>lombok</artifactId>

      <optional>true</optional>

    </dependency>

    <dependency>

      <groupId>org.springframework.boot</groupId>

      <artifactId>spring-boot-starter-test</artifactId>

      <scope>test</scope>

    </dependency>

    <dependency>

      <groupId>mysql</groupId>

      <artifactId>mysql-connector-java</artifactId>

      <version>5.1.42</version>

    </dependency>

    <dependency>

      <groupId>org.mybatis.spring.boot</groupId>

      <artifactId>mybatis-spring-boot-starter</artifactId>

      <version>2.0.0</version>

    </dependency>

    <dependency>

      <groupId>junit</groupId>

      <artifactId>junit</artifactId>

      <scope>test</scope>

    </dependency>

  </dependencies>

  <build>

    <plugins>

      <plugin>

        <groupId>org.springframework.boot</groupId>

        <artifactId>spring-boot-maven-plugin</artifactId>

        <configuration>

          <excludes>

            <exclude>

              <groupId>org.projectlombok</groupId>

              <artifactId>lombok</artifactId>

            </exclude>

          </excludes>

        </configuration>

      </plugin>

      <plugin>

        <!--MBG插件-->

        <groupId>org.mybatis.generator</groupId>

        <artifactId>mybatis-generator-maven-plugin</artifactId>

        <version>1.3.7</version>

        <configuration>

          <!-- 是否覆盖,true表示会替换生成的Java文件,false则不覆盖 -->

          <overwrite>true</overwrite>

          <verbose>true</verbose>

        </configuration>

        <dependencies>

          <!--mysql驱动包-->

          <dependency>

            <groupId>mysql</groupId>

            <artifactId>mysql-connector-java</artifactId>

            <version>5.1.42</version>

          </dependency>

          <!-- MBG扩展包 -->

          <dependency>

            <groupId>com.itfsw</groupId>

            <artifactId>mybatis-generator-plugin</artifactId>

            <version>1.3.2</version>

          </dependency>

        </dependencies>

      </plugin>

    </plugins>

  </build>

</project>
3.1.3 配置application.yml文件
接下来需要配置 SpringBoot 项目的 application.yml 配置文件,如下所示:
# spring配置

spring:

  # 数据库配置

  datasource:

    driver-class-name: com.mysql.jdbc.Driver

    url: jdbc:mysql://localhost:3306/mybatis_generator_demo?useUnicode=true&characterEncoding=utf-8

    username: root

    password: admin

# mybatis配置

mybatis:

  # 指定xml文件的位置

  mapper-locations: classpath:mapper/*.xml

  # 指定domain文件的位置

  type-aliases-package: com.chiaki.domain

  # 添加日志实现类以打印日志

  configuration:

    log-impl: org.apache.ibatis.logging.stdout.StdOutImpl

# 服务器配置

server:

  # 指定端口

  port: 8079
在 SpringBoot 集成 MyBatis 的项目中,只需要将 MyBatis 的相关配置写道 SpringBoot 的配置文件中即可。如上图所示,配置相应的 MySQL 数据源以及相应的 MyBatis 设置以及指定访问端口。
3.1.4 准备数据库表单
准备逆向工程需要的表单,这里准备 student_info 以及 class_info 两张表,如下所示:
CREATE DATABASE /*!32312 IF NOT EXISTS*/`mybatis_generator_demo` /*!40100 DEFAULT CHARACTER SET utf8 */;

/*Table structure for table `class_info` */

DROP TABLE IF EXISTS `class_info`;

CREATE TABLE `class_info` (

  `class_id` int(10) NOT NULL COMMENT '班级ID',

  `class_name` varchar(20) DEFAULT NULL COMMENT '班级名称',

  PRIMARY KEY (`class_id`)

) ENGINE=InnoDB DEFAULT CHARSET=utf8;

/*Data for the table `class_info` */

insert  into `class_info`(`class_id`,`class_name`) values

(202101,'A班'),

(202102,'B班'),

(202103,'C班');

/*Table structure for table `student_info` */

DROP TABLE IF EXISTS `student_info`;

CREATE TABLE `student_info` (

  `id` int(10) NOT NULL AUTO_INCREMENT COMMENT '学生ID',

  `name` varchar(20) DEFAULT NULL COMMENT '姓名',

  `sex` varchar(20) DEFAULT NULL COMMENT '性别',

  PRIMARY KEY (`id`)

) ENGINE=InnoDB AUTO_INCREMENT=5 DEFAULT CHARSET=utf8;

/*Data for the table `student_info` */

insert  into `student_info`(`id`,`name`,`sex`) values

(1,'张三','男'),

(2,'托尼·李四','男'),

(3,'王五','女'),

(4,'赵六','男');
3.2 编写MBG配置文件
3.2.1 配置generatorConfig.xml文件
做好以上配置之后就来到最为关键的一步,即编写逆向工程需要的 generatorConfig.xml 生成器配置文件,如下所示。在实际开发中可以借鉴官网的 MyBatis Generator 配置文件以及自己的业务需求自行编写。
<?xml version="1.0" encoding="UTF-8"?>
<!DOCTYPE generatorConfiguration
PUBLIC "-//mybatis.org//DTD MyBatis Generator Configuration 1.0//EN"
"http://mybatis.org/dtd/mybatis-generator-config_1_0.dtd">
<generatorConfiguration>
<context id="Tables" targetRuntime="MyBatis3">
<!-- 批量插入插件 -->
<plugin type="com.itfsw.mybatis.generator.plugins.BatchInsertPlugin">
<property name="allowMultiQueries" value="false"/>
</plugin>
<!--重命名查询class名称-->
<plugin type="org.mybatis.generator.plugins.RenameExampleClassPlugin" >
<property name="searchString" value="Example$"/>
<property name="replaceString" value="Criteria"/>
</plugin>
<!-- 查询单条数据插件 -->
<plugin type="com.itfsw.mybatis.generator.plugins.SelectOneByExamplePlugin"/>
<!-- MySQL分页插件 -->
<plugin type="com.itfsw.mybatis.generator.plugins.LimitPlugin">
<!-- 通过配置startPage影响Example中的page方法开始分页的页码,默认分页从0开始 -->
<property name="startPage" value="1"/>
</plugin>
<!-- 自定义注释插件 -->
<plugin type="com.itfsw.mybatis.generator.plugins.CommentPlugin">
<!-- 自定义模板路径 -->
<property name="template" value="src/main/resources/mybatis-generator-comment.ftl" />
</plugin>
<!-- Lombok插件 -->
<plugin type="com.itfsw.mybatis.generator.plugins.LombokPlugin">
<!-- @Builder 必须在 Lombok 版本 >= 1.18.2 的情况下 -->
<property name="@Builder" value="false"/>
<!-- @NoArgsConstructor 和 @AllArgsConstructor 使用规则和Lombok一致 -->
<property name="@AllArgsConstructor" value="false"/>
<property name="@NoArgsConstructor" value="false"/>
</plugin>
<!-- xml重新生成时覆盖 -->
<plugin type="org.mybatis.generator.plugins.UnmergeableXmlMappersPlugin"/>
<!-- 注释 -->
<commentGenerator>
<property name="javaFileEncoding" value="UTF-8"/>
</commentGenerator>
<!-- JDBC连接 -->
<jdbcConnection
driverClass="com.mysql.jdbc.Driver"
connectionURL="jdbc:mysql://localhost:3306/mybatis_generator_demo?useUnicode=true&characterEncoding=utf-8&serverTimezone=GMT%2B8"
userId="root"
password="admin">
<!-- 针对mysql数据库 -->
<property name="useInformationSchema" value="true"/>
</jdbcConnection>
<!-- 非必需,类型处理器,在数据库类型和java类型之间的转换控制-->
<!-- 默认false,把JDBC DECIMAL 和 NUMERIC 类型解析为 Integer,为 true时把JDBC DECIMAL 和
NUMERIC 类型解析为java.math.BigDecimal -->
<javaTypeResolver>
<!-- 是否使用bigDecimal, false可自动转化以下类型(Long, Integer, Short, etc.) -->
<property name="forceBigDecimals" value="false" />
</javaTypeResolver>
<!-- domain领域模型 其中targetPackage需要根据你自己创建的目录进行改动 -->
<javaModelGenerator targetPackage="com.chiaki.mybatisgeneratordemo.domain" targetProject="src/main/java">
<!-- 从数据库返回的值被清理前后的空格 -->
<property name="trimStrings" value="true" />
<!-- enableSubPackages:是否让schema作为包的后缀 -->
<property name="enableSubPackages" value="true" />
</javaModelGenerator>
<!-- mapper xml文件 -->
<sqlMapGenerator targetPackage="mapper" targetProject="src/main/resources">
<!-- enableSubPackages:是否让schema作为包的后缀 -->
<property name="enableSubPackages" value="true" />
</sqlMapGenerator>
<!-- Mapper接口 -->
<javaClientGenerator targetPackage="com.chiaki.mybatisgeneratordemo.mapper" targetProject="src/main/java" type="XMLMAPPER">
<property name="enableSubPackages" value="true" />
</javaClientGenerator>
<!-- 配置表信息 -->
<!-- tableName为对应的数据库表 -->
<table tableName="student_info">
<property name="useActualColumnNames" value="false"/>
<generatedKey column="id" sqlStatement="Mysql" identity="true" />
</table>
<table tableName="class_info">
<property name="useActualColumnNames" value="false"/>
<generatedKey column="id" sqlStatement="Mysql" identity="true" />
</table>
</context>
</generatorConfiguration>
3.2.2 配置mybatis-generator-comment.ftl文件
在上述配置文件中,我们使用了 itfsw 的 MBG 增强插件,其中包括自定义的注释插件,其配置如下所示。具体的配置细节可参考 itfsw 的 Github 对应的项目。
<?xml version="1.0" encoding="UTF-8"?>

<template>

    <!-- 调用此方法可将文件级注释添加到生成的Java文件中 -->

    <comment ID="addJavaFileComment"></comment>

    <comment ID="addComment"></comment>

    <comment ID="addRootComment"></comment>

    <!-- 将数据库表字段的注释添加到相应实体的变量上 -->

    <comment ID="addFieldComment">

        <![CDATA[

        <#if introspectedColumn??>

            <#if introspectedColumn.remarks?? && introspectedColumn.remarks != ''>

                <#list introspectedColumn.remarks ? split("\n") as remark>

                    /**  ${remark}  **/

                </#list>

            </#if>

        </#if>

        ]]>

    </comment>

    <!-- 为模型类添加注释 -->

    <comment ID="addModelClassComment">

        <![CDATA[

        <#if introspectedTable.remarks?? && introspectedTable.remarks != ''>

            <#list introspectedTable.remarks?split("\n") as remark>

                /**

                * ${remark}

                **/

            </#list>

        </#if>

        ]]>

    </comment>

    <!-- 为内部类添加注释 -->

    <comment ID="addClassComment">

        <![CDATA[

        /**

        * ${introspectedTable.fullyQualifiedTable}

        **/

        ]]>

    </comment>

    <comment ID="addEnumComment"></comment>

    <comment ID="addInterfaceComment"></comment>

    <comment ID="addGetterComment"></comment>

    <comment ID="addSetterComment"></comment>

    <comment ID="addGeneralMethodComment"></comment>

</template>
3.3 运行MBG生成器生成代码
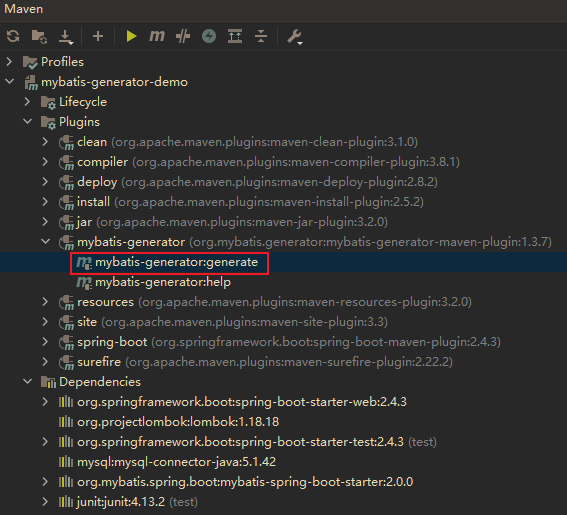
在设置好上述的配置文件之后,就可以执行 maven 命令开始生成代码了,这里可以通过 maven 命令生成:
mvn mybatis-generator:generate
也可以找到 maven 插件双击生成:
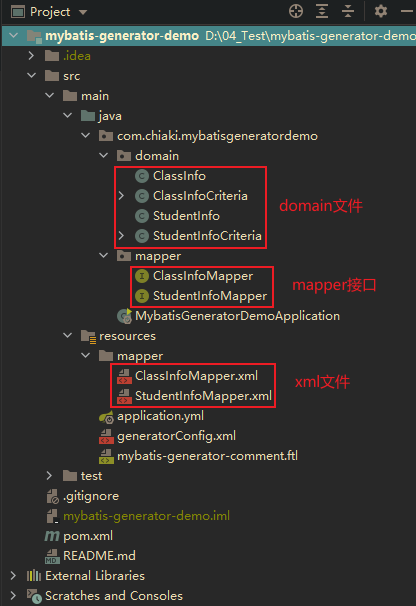
运行之后可以在目录中看到已经生成的代码文件,如下所示:
3.4 生成代码测试
生成代码后编写相应的测试类 testQuery 对生成的代码进行测试,如下所示:
@RunWith(SpringRunner.class)

@SpringBootTest()

public class testQuery {

  // mapper注入

  @Resource

  StudentInfoMapper studentInfoMapper;

  @Resource

  ClassInfoMapper classInfoMapper;

  @Test

  public void testQueryStudentInfo() {

    // 测试根据主键查找学生信息

    StudentInfo studentInfo = studentInfoMapper.selectByPrimaryKey(2);

    System.out.println(studentInfo);

  }

  @Test

  public void testQueryStudentInfoByConditions() {

    // 增强查询

    StudentInfoCriteria studentInfoCriteria = new StudentInfoCriteria();

    // 条件组合

    studentInfoCriteria.createCriteria()

        // id字段在{1, 3, 4}当中

        .andIdIn(Arrays.asList(1, 3, 4))

        // sex = "男"

        .andSexEqualTo("男");

    // 得到查询结果列表

    List<StudentInfo> studentInfos = studentInfoMapper.selectByExample(studentInfoCriteria);

    System.out.println(studentInfos);

    ClassInfoCriteria classInfoCriteria = new ClassInfoCriteria();

    // 查询条件:class_id = 202101

    classInfoCriteria.createCriteria().andClassIdEqualTo(202101);

    // 得到查询结果

    List<ClassInfo> classInfos = classInfoMapper.selectByExample(classInfoCriteria);

    System.out.println(classInfos);

  }

}
如上所示编写了查询 student_info 与 class_info 表的测试方法,可以看出 MyBatis 逆向工程生成的代码可以包含了基本查询方法,同时也支持组合条件进行查询。在运行测试方法前,还需要再 SpringBoot 项目的启动类上加入 @MapperScan("com.chiaki.mybatisgeneratordemo.mapper") 来扫描 mapper 接口。然后运行测试方法得到如下结果:
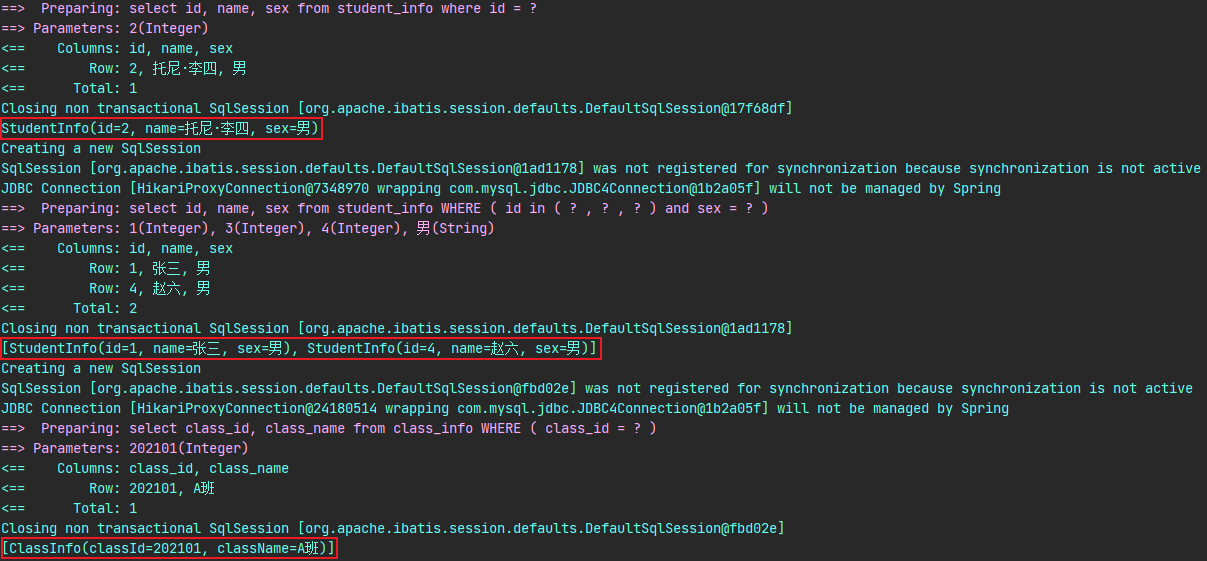
从运行结果来看,逆向工程生成的代码能够经得起检验,测试结果也完全正确。
总结
本文首先介绍了 MyBatis 逆向工程的概念,然后介绍了与逆向工程相关的 MBG 插件与增强插件,最后通过一个 SpringBoot 集成 MyBatis 的项目进行了逆向工程的实践并取得了正确的效果。在当今的互联网开发中,时间就是效率,如果只会简单的 CRUD 操作恐怕已经无法满足企业对后端开发工程师的要求,因此需要掌握这种自动生成代码的技巧,同时加油不断提升自己!
参考资料
MBG 官方社区:http://mybatis.org/generator/
iffsw 增强插件项目:https://github.com/itfsw/mybatis-generator-plugin
浅析MyBatis(一):由一个快速案例剖析MyBatis的整体架构与运行流程
浅析MyBatis(二):手写一个自己的MyBatis简单框架
浅析MyBatis(三):聊一聊MyBatis的实用插件与自定义插件
觉得有用的话就点个推荐吧~
浅析MyBatis(四):全自动写代码的MyBatis逆向工程的更多相关文章
- mybatis(八)手写简易版mybatis
一.画出流程图 二.设计核心类 二.V1.0 的实现 创建一个全新的 maven 工程,命名为 mebatis,引入 mysql 的依赖. <dependency> <groupId ...
- 【优雅写代码系统】springboot+mybatis+pagehelper+mybatisplus+druid教你如何优雅写代码
目录 spring基本搭建 整合mybatis pom配置 mybatis配置 设置数据源 设置sqlsessionfactory 设置扫描 设置开启事务 资源放行 测试 结果 思考&& ...
- 寻找写代码感觉(五)之Mybatis官方代码生成器的使用
一.Mybatis Generator生成器 见名知意,官方给出的代码生成器.好处就是不用自己写实体类.接口.xml文件了,应对简单增删改查是可以的.复杂的还是需要自己手写sql的. 二.Mybati ...
- springboot学习随笔(四):Springboot整合mybatis(含generator自动生成代码)
这章我们将通过springboot整合mybatis来操作数据库 以下内容分为两部分,一部分主要介绍generator自动生成代码,生成model.dao层接口.dao接口对应的sql配置文件 第一部 ...
- Mybatis自己主动生成代码
在mybatis自己主动生成代码有两种方式: 方式一:是通过使用eclipse作为开发工具.採用maven来构建项目生成的.以下的演示是通过第一种方式. 今天来记录下mybatis-generator ...
- mybatis 自动生成代码(mybatis generator)
pom.xml 文件配置 引入 mybatis generator <properties> <mysql.connector.version>5.1.44</mysql ...
- IDEA Maven Mybatis generator 自动生成代码
IDEA Maven Mybatis generator 自动生成代码 一.安装配置maven以及在Idea中配置maven 安装过程步骤可以看上面的博文,里面介绍得很详细. 二.建数据表 DROP ...
- 手写简易的Mybatis
手写简易的Mybatis 此篇文章用来记录今天花个五个小时写出来的简易版mybatis,主要实现了基于注解方式的增删查改,目前支持List,Object类型的查找,参数都是基于Map集合的,可以先看一 ...
- mybatis generator配置生成代码的问题
接触第二种orm两天下来,一脸懵逼.mybatis是大多数公司所推崇的,相比于hibernate性能较为好的,操作更为方便的轻量级工具,所以小富就搞起这个orm.好吧,都说mybatis有个配置可以自 ...
随机推荐
- 使用 HTML5 & CSS 实现一个自定义开关按钮 switch button
使用 HTML5 & CSS 实现一个自定义开关按钮 switch button switch button <div class="switch"> < ...
- js 运算符的执行顺序
js 运算符的执行顺序 js 运算符优先级 Operator Precedence 下表从最高(21)到最低(1)优先顺序排列 left-to-right 从左到右 / 先左后右 right-to-l ...
- 2018 free pdf ebooks
2018 free pdf ebooks https://gist.github.com/xgqfrms-GitHub/f606efb0d4bce884c873518647e79f2f https:/ ...
- docthis & VS code
docthis & VS code JSDoc 3 http://usejsdoc.org/ http://usejsdoc.org/about-getting-started.html ht ...
- shit 钉钉
shit 钉钉 钉钉 圈子 入口, 没有 https://www.dingtalk.com/qidian/help-detail-1000131196.html shit bug 全员圈 这个好像是要 ...
- js operate svg
js operate svg js dynamic create svg https://stackoverflow.com/questions/20539196/creating-svg-eleme ...
- web项目中各工具的作用
一.HTML:用于搭建基础网页,展示网页的内容 Hyper Text Markup Language 超文本标记语言 ,是最基础的网页开发语言. * 超文本: * 超文本是用超链接的方法,将各种不同空 ...
- 二分图最小点覆盖构造方案+König定理证明
前言 博主很笨 ,如有纰漏,欢迎在评论区指出讨论. 二分图的最大匹配使用 \(Dinic\) 算法进行实现,时间复杂度为 \(O(n\sqrt{e})\),其中, \(n\)为二分图中左部点的数量, ...
- OAuth2理解
OAuth2: 1.他是针对特定问题的一种解决方案 OAuth2主要可以解决两个问题: (1)开放系统间的授权问题 例如:当你想要一个打印机器去打印自己百度网盘中的照片时,该机器并没有访问自己百度网盘 ...
- Linux下搭建ZooKeeper集群
摘要 Zookeeper是针对大型分布式系统的高可靠的协调系统.它基于对Paxos算法的实现,使该框架保证了分布式环境中数据的强一致性,也正是基于这样的特性,使得ZooKeeper解决很多分布式问题. ...