
SSM框架整合核心内容
所需要的jar包及其版本
Spring 版本:4.3.18 tx、aop、beans、core、web、web-mvc、context、expression、jdbc
MyBatis:3.4.6
mybatis-spring:1.3.2
mysql-connector 连接数据库:5.1.44
fastjson 生成json:1.2.13
druid 数据源:1.1.9
jsr 303 数据校验:hibernate-validate4.3.2、jboss-loggin3.1.0CR2、validation-api1.0GA
面向切面:aopaliance、aspectjweaver1.8.13
文件上传:commons-io、commons-fileupload、commons-loggin1.2
jsp、jstl:jstl.jar、standart.jar
log4j:1.2.17
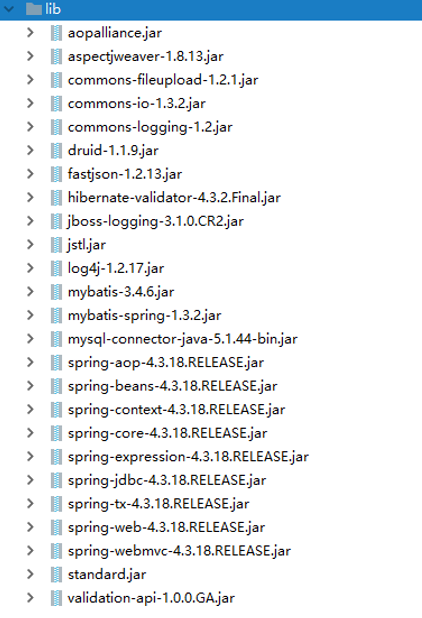
准备配置文件:
database.properties 连接数据库
log4j.properties 输出日志
mybatis-config.xml mybatis配置文件
applicationContext-mybatis.xml spring配置数据操作的配置文件
springmvc-servlet.xml springmvc的配置文件
web.xml 项目配置文件
mybatis-config.xml
<?xml version='1.0' encoding='UTF-8'?>

<!DOCTYPE configuration

         PUBLIC "-//mybatis.org//DTD Config 3.0//EN"         "http://mybatis.org/dtd/mybatis-3-config.dtd">

 <configuration>

       <settings>

         <!--日志实现-->

         <setting name="logImpl" value="log4j"/>

         <!--非懒加载-->

         <setting name="lazyLoadingEnabled" value="false"/>

     </settings>

     <!--实体类别名-->

     <typeAliases>

         <package name="cn.smbms.pojo"/>

     </typeAliases>

</configuration>
applicationContext-mybatis.xml
<!--引入database.properties-->

 <bean  class="org.springframework.beans.factory.config.PropertyPlaceholderConfigurer">     <property name="location">         <value>classpath:database.properties</value>

     </property>

 </bean>

<!--数据源-->

<bean class="com.alibaba.druid.pool.DruidDataSource" id="dataSource">     <property name="driver" value="${jdbc.driver}"/>     <property name="url" value="${jdbc.url}"/>     <property name="username" value="${jdbc.user}"/>     <property name="password" value="${jdbc.pwd}"/>

 </bean>

<!--sqlSessionFactoryBean-->

<bean class="org.mybatis.spring.SqlSessionFactoryBean"  id="sqlSessionFactoryBean">     <property name="dataSource" ref="dataSource"/>

     <!--mybatis-config.xml文件-->     <property name="configLocation" value="classpath:mybatisconfig.xml"/>     <!--mapper文件路径-->

    <property name="mapperLocations">

         <list>

             <!--模糊匹配-->             <value>classpath:cn/smbms/dao/**/*.xml</value>

         </list>

     </property>

 </bean>

<!--批量注入映射器实现 MapperScannerConfigurer--> <bean class="org.mybatis.spring.mapper.MapperScannerConfigurer">     <property name="basePackage" value="cn.smbms.dao"/>

 </bean>

<!--事务管理器-->

<bean  class="org.springframework.jdbc.datasource.DataSourceTransactionManager"       id="txManager">

    <property name="dataSource" ref="dataSource"/>

 </bean>

<!--启用声明式事务注解-->

<tx:annotation-driven transaction-manager="txManager"/>

<!--启用aop的增强注解-->

<aop:aspectj-autoproxy/>
springmvc-servlet.xml
<?xml version="1.0" encoding="UTF-8"?> <beans xmlns="http://www.springframework.org/schema/beans"        xmlns:xsi="http://www.w3.org/2001/XMLSchema-instance"        xmlns:aop="http://www.springframework.org/schema/aop"        xmlns:context="http://www.springframework.org/schema/context"        xmlns:tx="http://www.springframework.org/schema/tx"        xmlns:mvc="http://www.springframework.org/schema/mvc"        xmlns:p="http://www.springframework.org/schema/p"        xsi:schemaLocation="http://www.springframework.org/schema/beans        http://www.springframework.org/schema/beans/spring-beans.xsd        http://www.springframework.org/schema/aop        http://www.springframework.org/schema/aop/spring-aop.xsd        http://www.springframework.org/schema/context        http://www.springframework.org/schema/context/spring-context.xsd        http://www.springframework.org/schema/tx        http://www.springframework.org/schema/tx/spring-tx.xsd        http://www.springframework.org/schema/mvc        http://www.springframework.org/schema/mvc/spring-mvc.xsd">     <!--支持注解配置Bean-->     <context:component-scan base-package="cn.smbms.controller"/>

    <!--视图对应-->     <bean class="org.springframework.web.servlet.view.InternalResourceViewResolver">         <property name="prefix" value="/WEB-INF/jsp/"/>         <property name="suffix" value=".jsp"/>     </bean>

<!--静态资源-->

<mvc:resources mapping="/statics/**" location="/statics/"/>

<!--spring mvc 注解支持 和消息转换器-->

<mvc:annotation-driven>

<mvc:message-converters>

<!--spring 消息转换器 防止中文乱码-->

<bean

class="org.springframework.http.converter.StringHttpMessageConverter">

<property name="supportedMediaTypes">

<list>

<value>application/json;charset=utf-8</value>

</list>

</property>

</bean>

<!--fastJson 消息转换器 格式化日期-->

<bean

class="com.alibaba.fastjson.support.spring.FastJsonHttpMessageConverter">

<property name="supportedMediaTypes">

<list>

<value>application/json;charset=utf-8</value>

</list>

</property>

<property name="features">

<list>

<value>WriteDateUseDateFormat</value>

</list>

</property>

</bean>

</mvc:message-converters>

</mvc:annotation-driven>

<!--文件上传-->

<bean

class="org.springframework.web.multipart.commons.CommonsMultipartResolver">

<property name="defaultEncoding" value="utf-8"/>

<property name="maxUploadSize" value="2000000"/>

</bean>

<!--拦截器-->

<mvc:interceptors>

<mvc:interceptor>

<!--拦截的路径-->

<mvc:mapping path="/sys/**"/>

<bean class="cn.smbms.interceptor.SysInterceptor"/>

</mvc:interceptor>

</mvc:interceptors>

</beans>
web.xml
<?xml version="1.0" encoding="UTF-8"?>

<web-app xmlns="http://java.sun.com/xml/ns/javaee"

xmlns:xsi="http://www.w3.org/2001/XMLSchema-instance"

xsi:schemaLocation="http://java.sun.com/xml/ns/javaee

http://java.sun.com/xml/ns/javaee/web-app_3_0.xsd"

version="3.0">

<!--springmvc过滤器-->

<servlet>

<servlet-name>springmvc</servlet-name>

<servlet-class>org.springframework.web.servlet.DispatcherServlet</servlet-class>

<!--加载springmvc配置文件-->

<init-param>

<param-name>contextConfigLocation</param-name>

<param-value>classpath:springmvc-servlet.xml</param-value>

</init-param>

<load-on-startup>1</load-on-startup>

</servlet>

<servlet-mapping>

<servlet-name>springmvc</servlet-name>

<url-pattern>/</url-pattern>

</servlet-mapping>

<!--springmvc 请求编码过滤器-->

<filter>

<filter-name>encodingFilter</filter-name>

<filter-class>org.springframework.web.filter.CharacterEncodingFilter</filter-class>

<init-param>

<param-name>encoding</param-name>

<param-value>utf-8</param-value>

</init-param>

<!--请求和响应都设置-->

<init-param>

<param-name>forceEncoding</param-name>

<param-value>true</param-value>

</init-param>

</filter>

<filter-mapping>

<filter-name>encodingFilter</filter-name>

<url-pattern>/*</url-pattern>

</filter-mapping>

<!--spring监听器-->

<listener>

<listener-class>org.springframework.web.context.ContextLoaderListener</listenerclass>

</listener>

<!--上下文参数,指定spring配置文件所在目录-->

<context-param>

<param-name>contextConfigLocation</param-name>

<param-value>classpath:applicationContext-*.xml</param-value>

</context-param>

</web-app>
SSM框架整合核心内容的更多相关文章
- SpringMVC札集(10)——SSM框架整合
自定义View系列教程00–推翻自己和过往,重学自定义View 自定义View系列教程01–常用工具介绍 自定义View系列教程02–onMeasure源码详尽分析 自定义View系列教程03–onL ...
- (转)淘淘商城系列——SSM框架整合之Dao层整合
http://blog.csdn.net/yerenyuan_pku/article/details/72721093 一个项目中往往有三层即Dao层.Service层和Web层,看标题就知道了,本文 ...
- SSM框架整合模板
SSM框架整合--MAVEN依赖 spring方面(包含了springmvc): spring-webmvc:spring与mvc的整合依赖,主要包括spring的核心包和springmvc需要的包 ...
- 【计理01组08号】SSM框架整合
[计理01组08号]SSM框架整合 数据库准备 本次课程使用 MySQL 数据库.首先启动 mysql : sudo service mysql start 然后在终端下输入以下命令,进入到 MySQ ...
- SpringMVC详解及SSM框架整合项目
SpringMVC ssm : mybatis + Spring + SpringMVC MVC三层架构 JavaSE:认真学习,老师带,入门快 JavaWeb:认真学习,老师带,入门快 SSM框架: ...
- SpringMVC--从理解SpringMVC执行流程到SSM框架整合
前言 SpringMVC框架是SSM框架中继Spring另一个重要的框架,那么什么是SpringMVC,如何用SpringMVC来整合SSM框架呢?下面让我们详细的了解一下. 注:在学习SpringM ...
- struts2框架的核心内容
Struts1和Struts2的区别和对比: Action 类: • Struts1要求Action类继承一个抽象基类.Struts1的一个普遍问题是使用抽象类编程而不是接口,而struts2的Ac ...
- SSM框架整合项目 :租房管理系统
使用ssm框架整合,oracle数据库 框架: Spring SpringMVC MyBatis 导包: 1, spring 2, MyBatis 3, mybatis-spring 4, fastj ...
- springmvc(二) ssm框架整合的各种配置
ssm:springmvc.spring.mybatis这三个框架的整合,有耐心一步步走. --WH 一.SSM框架整合 1.1.整合思路 从底层整合起,也就是先整合mybatis与spring,然后 ...
随机推荐
- 跟我一起学.NetCore之配置变更监听
前言 通常程序中配置少不了,配置的修改也避免不了,配置的热更新为此给应用程序带来很大的便捷,不用重启,提高用户体验:但往往有时候需要对修改进行审计,也就是需要记录,有时候也会针对配置修改的时候触发相关 ...
- Jmeter 常用函数(25)- 详解 __V
如果你想查看更多 Jmeter 常用函数可以在这篇文章找找哦 https://www.cnblogs.com/poloyy/p/13291704.html 作用 执行变量名表达式,并返回执行结果 它可 ...
- JavaScript学习系列博客_30_JavaScript Date 日期对象
Date - 日期的对象,在JS中通过Date对象来表示一个时间 - 创建一个当前的时间对象 var d = new Date(); - 创建一个指定的时间对象 var d = new Date(&q ...
- 区块链入门到实战(35)之Solidity – 变量作用域
局部变量的作用域仅限于定义它们的函数,但是状态变量可以有三种作用域类型. Public – 公共状态变量可以在内部访问,也可以通过消息访问.对于公共状态变量,将生成一个自动getter函数. Inte ...
- 焦大:seo思维光年(下)seo操作如何度量化
http://www.wocaoseo.com/thread-57-1-1.html 如果不能度量就无法进行改进,所以度量化或数据化是网站分析和网站研究必须进行的一个方面,seo也不能例外.我在上篇文 ...
- 大数据计算的基石——MapReduce
MapReduce Google File System提供了大数据存储的方案,这也为后来HDFS提供了理论依据,但是在大数据存储之上的大数据计算则不得不提到MapReduce. 虽然现在通过框架的不 ...
- EXCEL 引用autocad vba,自动加载其类型库
Sub AutoADDAutoCADTypeLib() Dim Ref As Variant Dim hasAutoTypeLib As Boolean, hasAXDBLib As Boolean, ...
- Selenium多浏览器处理
当我们在执行自动化测试过程中,往往会针对不同的浏览器做兼容性测试,那么我们在代码中,可以针对执行命令传过来的参数,选择对应的浏览器来执行测试用例 代码如下: 在终端中执行命令如上图红框中所示: bro ...
- mysql 8.0.11安装教程
安装环境:win7 1. 下载安装包 下载地址:https://dev.mysql.com/downloads/file/?id=476233 2. 解压zip包 3. 初始化my.ini 创建my. ...
- Spring Cloud:Consul基础知识
一.基本概念 Consul是一套开源的分布式服务发现和配置管理系统,由HashiCorp公司用Go开发. 它提供微服务系统中的服务治理.配置中心.控制总线等功能. 服务发现:提供HTTP和DNS两种发 ...