JavaFX ImageView
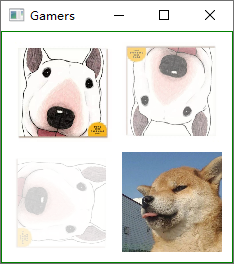
例子1:显示4个狗头。正常显示左上角、右下角的狗头;右上角的狗头旋转180°,并设置了透明度;左下角的狗头旋转90°,也设置了透明度。
 1 import javafx.application.Application;

 2 import javafx.geometry.Insets;

 3 import javafx.scene.Scene;

 4 import javafx.scene.image.Image;

 5 import javafx.scene.image.ImageView;

 6 import javafx.scene.layout.GridPane;

 7 import javafx.stage.Stage;

 8

 9 public class Main extends Application {

10

11     public static void main(String[] args) {

12         launch(args);

13     }

14

15     @Override

16     public void start(Stage primaryStage) throws Exception {

17

18         // Create a pane to hold the images

19         GridPane pane = new GridPane();

20         pane.setStyle("-fx-border-color: green;");

21         pane.setPadding(new Insets(10));

22         pane.setHgap(10);            // The width of the horizontal gaps between columns.

23         pane.setVgap(10);            // The height of the vertical gaps between rows.

24

25         // Create a image view to hold a image

26         ImageView ivGamer1 = new ImageView("image/Gamer1.jpg");

27         ivGamer1.setFitWidth(100);

28         ivGamer1.setFitHeight(100);

29         pane.add(ivGamer1, 0, 0);    // Add image view to pane

30

31         // Create a image view to hold a image

32         ImageView ivGamer2 = new ImageView("image/Gamer1.jpg");

33         ivGamer2.setFitWidth(100);

34         ivGamer2.setFitHeight(100);

35         ivGamer2.setStyle("-fx-rotate: 180; -fx-opacity: 0.6;");

36         pane.add(ivGamer2, 1, 0);

37

38         // Create a image view to hold a image

39         ImageView ivGamer3 = new ImageView("image/Gamer1.jpg");

40         ivGamer3.setFitWidth(100);

41         ivGamer3.setFitHeight(100);

42         ivGamer3.setStyle("-fx-rotate: 90; -fx-opacity: 0.2;");

43         pane.add(ivGamer3, 0, 1);

44

45         // Create a image view to hold a image

46         Image iGamer4 = new Image("image/Gamer2.jpg");

47         ImageView ivGamer4 = new ImageView(iGamer4);

48         ivGamer4.setFitWidth(100);

49         ivGamer4.setFitHeight(100);

50         pane.add(ivGamer4, 1, 1);

51

52         // Create a scene

53         Scene scene = new Scene(pane);

54

55         primaryStage.setScene(scene);

56         primaryStage.setTitle("Gamers");

57         primaryStage.setResizable(true);

58         primaryStage.show();

59     }

60 }
运行效果:
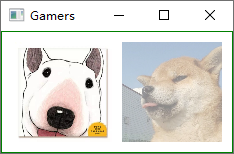
例子2:以半透明的状态显示两个狗头,当点击其中某一个狗头,就让它变成不透明,另一个保持半透明。当将鼠标移进某一狗头所在的区域,而不点击时,该狗头变成不透明,另一个狗头变成半透明;当鼠标移出该狗头所在的区域,恢复两个狗头原来的状态。
  1 import javafx.application.Application;

  2 import javafx.event.EventHandler;

  3 import javafx.geometry.Insets;

  4 import javafx.scene.Scene;

  5 import javafx.scene.image.Image;

  6 import javafx.scene.image.ImageView;

  7 import javafx.scene.input.MouseEvent;

  8 import javafx.scene.layout.GridPane;

  9 import javafx.stage.Stage;

 10

 11 public class Main extends Application {

 12

 13     String opacityOfGamer1 = "-fx-opacity: 0.5;";

 14     String opacityOfGamer2 = "-fx-opacity: 0.5;";

 15

 16     public static void main(String[] args) {

 17         launch(args);

 18     }

 19

 20     @Override

 21     public void start(Stage primaryStage) throws Exception {

 22         // Create a pane to hold the images

 23         GridPane pane = new GridPane();

 24         pane.setStyle("-fx-border-color: green;");

 25         pane.setPadding(new Insets(10));

 26         pane.setHgap(10);            // The width of the horizontal gaps between columns.

 27         pane.setVgap(10);            // The height of the vertical gaps between rows.

 28

 29         // Create a image view to hold a image

 30         ImageView ivGamer1 = new ImageView("image/Gamer1.jpg");

 31         ivGamer1.setFitWidth(100);

 32         ivGamer1.setFitHeight(100);

 33         ivGamer1.setStyle("-fx-opacity: 0.5;");

 34         pane.add(ivGamer1, 0, 0);    // Add image view to pane

 35

 36         // Create a image view to hold a image

 37         Image iGamer2 = new Image("image/Gamer2.jpg");

 38         ImageView ivGamer2 = new ImageView(iGamer2);

 39         ivGamer2.setFitWidth(100);

 40         ivGamer2.setFitHeight(100);

 41         ivGamer2.setStyle("-fx-opacity: 0.5;");

 42         pane.add(ivGamer2, 1, 0);

 43

 44

 45         ivGamer1.setOnMouseClicked(new EventHandler<MouseEvent>() {

 46             @Override

 47             public void handle(MouseEvent event) {

 48                 ivGamer1.setStyle("-fx-opacity: 1;");

 49                 ivGamer2.setStyle("-fx-opacity: 0.5;");

 50                 opacityOfGamer1 = ivGamer1.getStyle();

 51                 opacityOfGamer2 = ivGamer2.getStyle();

 52                 System.out.println("The opacity of the Gamer 1: " + opacityOfGamer1);

 53                 System.out.println("The opacity of the Gamer 2: " + opacityOfGamer2);

 54                 System.out.println();

 55             }

 56         });

 57

 58         ivGamer1.setOnMouseEntered(new EventHandler<MouseEvent>() {

 59             @Override

 60             public void handle(MouseEvent event) {

 61                 ivGamer1.setStyle("-fx-opacity: 1;");

 62                 ivGamer2.setStyle("-fx-opacity: 0.5;");

 63             }

 64         });

 65

 66         ivGamer1.setOnMouseExited(new EventHandler<MouseEvent>() {

 67             @Override

 68             public void handle(MouseEvent event) {

 69                 ivGamer1.setStyle(opacityOfGamer1);

 70                 ivGamer2.setStyle(opacityOfGamer2);

 71             }

 72         });

 73

 74         ivGamer2.setOnMouseClicked(new EventHandler<MouseEvent>() {

 75             @Override

 76             public void handle(MouseEvent event) {

 77                 ivGamer1.setStyle("-fx-opacity: 0.5;");

 78                 ivGamer2.setStyle("-fx-opacity: 1;");

 79                 opacityOfGamer1 = ivGamer1.getStyle();

 80                 opacityOfGamer2 = ivGamer2.getStyle();

 81                 System.out.println("The opacity of the Gamer 1: " + opacityOfGamer1);

 82                 System.out.println("The opacity of the Gamer 2: " + opacityOfGamer2);

 83                 System.out.println();

 84             }

 85         });

 86

 87         ivGamer2.setOnMouseEntered(new EventHandler<MouseEvent>() {

 88             @Override

 89             public void handle(MouseEvent event) {

 90                 ivGamer1.setStyle("-fx-opacity: 0.5;");

 91                 ivGamer2.setStyle("-fx-opacity: 1;");

 92             }

 93         });

 94

 95         ivGamer2.setOnMouseExited(new EventHandler<MouseEvent>() {

 96             @Override

 97             public void handle(MouseEvent event) {

 98                 ivGamer1.setStyle(opacityOfGamer1);

 99                 ivGamer2.setStyle(opacityOfGamer2);

100             }

101         });

102

103

104         // Create a scene

105         Scene scene = new Scene(pane);

106

107         primaryStage.setScene(scene);

108         primaryStage.setTitle("Gamers");

109         primaryStage.setResizable(true);

110         primaryStage.show();

111     }

112 }
运行效果:

JavaFX ImageView的更多相关文章
- 问题记录:JavaFx 鼠标滑轮滚动事件监听!
问题描述: 在listview的item里面添加鼠标拖拽排序功能.代码如下: setOnMouseDragged(event -> { //设定鼠标长按0.3秒后才可拖拽 防止误操作 isCan ...
- javafx之CSS初探
文档:http://www.haogongju.net/art/1807238 javafx中的css元素必须有-fx-前缀. 一.介绍 java8中新增了javafx.css开放了css相关api. ...
- JavaFX Application应用实例
下面代码演示的是JavaFX进程命令行参数的实例.大家可以参阅一下. /*原文地址:http://www.manongjc.com/article/134.html */ import java.ut ...
- JavaFX引入资源问题
描述 - 使用javafx 引入资源的时候 抛出异常 在swing引入资源 采取相对路径即可,而javafx不是 ImageView imageNode = (ImageView) root.look ...
- 【javaFX学习】(二) 控件手册
这里写的控件可能不是所有的控件,但是应该是比较齐全并足够用的了,后面还有图表类的,3d模型类,放在后面来写吧,太多了.javafx的功能比以前想象中的要强大.而且也很方便,所有的控件写完后再用Scen ...
- javafx由浅到深的 认识(一)
javafx是一款比较新兴的语言框架,随着javafx越来越实用,估计许多程序员也会慢慢接触它,故我在这里对它由浅到深进行介绍一下. 首先,要了解javafx,就应该先知道.xml文件的布局软件,以往 ...
- JavaFX——简单的日记系统
前言 在学习Swing后,听老师说使用Java写界面还可以使用JavaFX.课后,便去了解.JavaFX是甲骨文公司07年推出的期望应用于桌面开发领域的技术.在了解了这个技术几天后,便使用它完成Jav ...
- JavaFx 中常见的包和类(javafx笔记 )
JavaFx 中常见的包和类(javafx笔记 ) 更多详细内容请参考<Pro JavaFX 8>. javafx.stage 包包含以下类: Stage 类 Stage 类是任何 J ...
- JAVAFX 2.0 javascript中调用java代码
现在你已经知道如何在JavaFX中调用JavaScript.在本章中,你将了解到相反的功能——在web页面中调用JavaFX. 大体上的理念是在JavaFX程序中创建一个接口对象,并通过调用JSObj ...
随机推荐
- 路由策略Routing Policy和策略路由PBR的区别
这是面试的时候问道的一个问题,这里跟大家分享一下 路由策略(Routing Policy)是为了改变网络流量所经过的途径而修改路由信息的技术: PBR(policy-based-route)是一种依据 ...
- 网络协议HTTP、TCP/IP、Socket
网络协议HTTP.TCP/IP.Socket 网络七层由下往上分别为物理层.数据链路层.网络层.传输层.会话层.表示层和应用层. 其中物理层.数据链路层和网络层通常被称作媒体层,是网络工程师所研究的 ...
- element.ui 自定义样式问题
方法有很多种 自定义类名 <el-button class="search_button" @click="search">查询</el-bu ...
- 06_Python异常处理机制
1.异常概述 1.什么是错误: 错误是指有逻辑或语法等导致一个程序无法正常执行的问题 2.什么是异常: 异常时程序出错时标识的一种状态,程序不会向下执行而转去调用此函数的地方等待处理错误并恢复 ...
- github学生认证——申请学生开发包
写在前面 申请学生认证的好处: GitHub学生的免费AWS Educate入门帐户,价值100美元. 专业的桌面IDE:IntelliJ IDEA,PyCharm等.学生的免费订阅,每年更新一次. ...
- vue项目前端导出word文件(bug解决)
摘要:之前项目中导出价格表是由后端实现,前端只需要调用接口下载word即可,后来业务改变比较大,word模版需要一直改动,后端改起来相对麻烦,后来直接前端自己定义模版,实现下载word文档. 一.需要 ...
- 预处器的对比——Sass、LESS和Stylus
http://www.w3cplus.com/css/sass-vs-less-vs-stylus-a-preprocessor-shootout.html
- linux基础一(目录结构)
一.linux目录结构 1.根目录/下 bin:用户二进制文件,常用命令都在此目录下 sbin;这个目录下的linux命令通常由系统管理员使用 etc:包含所有程序所需的配置文件,以及服务的启动文件 ...
- 吴恩达《深度学习》-第五门课 序列模型(Sequence Models)-第三周 序列模型和注意力机制(Sequence models & Attention mechanism)-课程笔记
第三周 序列模型和注意力机制(Sequence models & Attention mechanism) 3.1 序列结构的各种序列(Various sequence to sequence ...
- 大揭秘| 我司项目组Gitlab Flow && DevOps流程
长话短说,本文全景呈现我司项目组gitlab flow && devops Git Flow定义了一个项目发布的分支模型,为管理具有预定发布周期的大型项目提供了一个健壮的框架. Dev ...