STL—— 容器(vector)的数据写入、修改和删除
1. 通过 push_back() 尾部增加一个元素 :
vector 可以通过 “push_back ” 写入数据,通过 push_back 可以将数据直接写入至 vector 的末尾,push_back 会自动申请内存,并且多次 push_back 后会自动预先分配内存,如下代码:
1 #include <iostream>
2 #include <vector>
3
4 using namespace std;
5
6 int main()
7 {
8 //第一部分:容器 vector
9 vector<int> num;
10
11 cout << "num 的元素个数:" << num.size() << endl;
12 cout << "num 容器的大小:" << num.capacity() << endl;
13
14 num.push_back(1); //push_back:往 vector 最后放置1个元素 “1”
15 num.push_back(2);
16 num.push_back(3);
17 num.push_back(4);
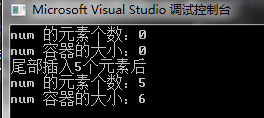
18 num.push_back(3);
19
20 cout << "尾部插入5个元素后" << endl;
21 cout << "num 的元素个数:" << num.size() << endl;
22 cout << "num 容器的大小:" << num.capacity() << endl;
23
24 return 0;
25 }
运行结果:
插入5个元素后打印内存大小,结果发现这时的 vector 占用了6个 int 元素的内存
2.通过 pop_back() 删除尾部的一个元素:
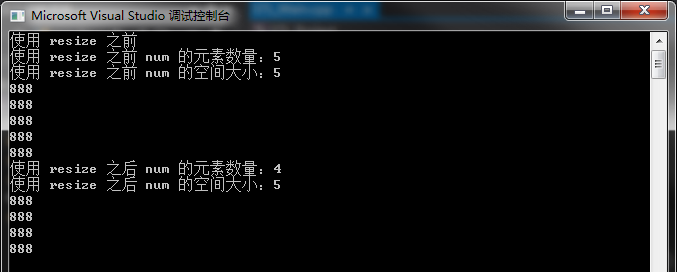
vector 可以通过 “pop_back” 删除尾部一个元素,pop_back 删除尾部的元素后,元素个数会变少,但空间并不会缩小,如下代码:
 1 #include <iostream>

 2 #include <vector>

 3

 4 using namespace std;

 5

 6 int main()

 7 {

 8     vector<int>num(5, 888);

 9

10     printf("使用 resize 之前\n");

11     cout << "使用 resize 之前 num 的元素数量:" << num.size() << endl;

12     cout << "使用 resize 之前 num 的空间大小:" << num.capacity() << endl;

13

14     for (int i = 0; i < num.size(); i++)

15     {

16         cout << num[i] << endl;

17     }

18

19     num.pop_back();

20

21     cout << "使用 resize 之后 num 的元素数量:" << num.size() << endl;

22     cout << "使用 resize 之后 num 的空间大小:" << num.capacity() << endl;

23     for (int i = 0; i < num.size(); i++)

24     {

25         cout << num[i] << endl;

26     }

27

28     return 0;

29 }
打印结果:
3. 使用下标进行数据修改:
如果使用下标进行数据写入,需要一个前提,那就是 vector 已经进行了内存分配,如果像下方代码:vector 没有进行带参构造,这时不能直接通过下标去写 vector 的数据。
1 vector<int> num;

2

3 num[0] = 1;     //不能这样通过下标去访问,因为vector是进行默认构造的,这时并没有相关内存
以下几种带参构造的 vector 是可以进行下标数据写入的:
//例1

int main()

{

    vector<int> num(10);

    num[0] = 1;

    num[1] = 2;

    return 0;

}

//例2

int main()

{

    vector<int> num(10);

    vector<int>num_1(num);

    num_1[0] = 1;

    num_1[1] = 2;

    return 0;

}

//例3

int main()

{

    int test[] = { 1,2,3,4,5 };

    vector<int> num(test, test + 2);

    num[0] = 1;

    num[1] = 2;

    return 0;

}
4. 使用 vectorName.at() 进行数据修改:
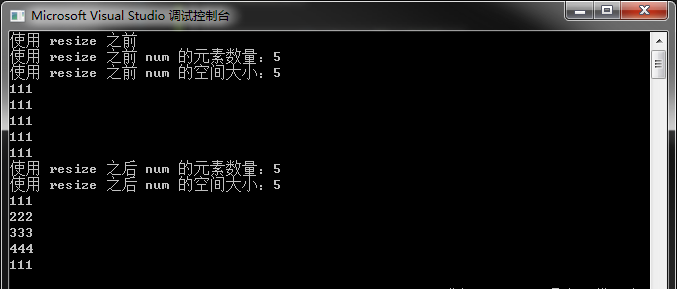
这种用法与下标修改类似,at() 这个方法返回的是一个引用,可以吧一个常量 int 赋值给它,如下代码:
 1 #include <iostream>

 2 #include <vector>

 3

 4 using namespace std;

 5

 6 int main()

 7 {

 8     vector<int>num(5, 111);

 9

10     printf("使用 resize 之前\n");

11     cout << "使用 resize 之前 num 的元素数量:" << num.size() << endl;

12     cout << "使用 resize 之前 num 的空间大小:" << num.capacity() << endl;

13

14     for (int i = 0; i < num.size(); i++)

15     {

16         cout << num[i] << endl;

17     }

18

19     num.at(1) = 222;

20     num.at(2) = 333;

21     num.at(3) = 444;

22

23     cout << "使用 resize 之后 num 的元素数量:" << num.size() << endl;

24     cout << "使用 resize 之后 num 的空间大小:" << num.capacity() << endl;

25     for (int i = 0; i < num.size(); i++)

26     {

27         cout << num[i] << endl;

28     }

29

30     return 0;

31 }
打印结果:
5. 使用 assign 进行重写操作
assign 可以改变原来的 vector 中的元素个数和值,如下代码:
 1 #include <iostream>

 2 #include <vector>

 3

 4 using namespace std;

 5

 6 int main()

 7 {

 8     vector<int>num(10, 666);

 9

10     printf("使用 assign 之前\n");

11     cout << "使用 assign 之前 num 的元素数量:" << num.size() << endl;

12     cout << "使用 assign 之前 num 的空间大小:" << num.capacity() << endl;

13

14     num[0] = 1;

15     num[1] = 2;

16

17     for (int i = 0; i < num.size(); i++)

18     {

19         cout << num[i] << endl;

20     }

21     num.assign(2,888);              //第一种 assign 的用法

22     printf("使用 assign 之后\n");

23     cout << "使用 assign 之后 num 的元素数量:" << num.size() << endl;

24     cout << "使用 assign 之后 num 的空间大小:" << num.capacity() << endl;

25     for (int i = 0; i < num.size(); i++)

26     {

27         cout << num[i] << endl;

28     }

29

30     return 0;

31 }
打印结果:
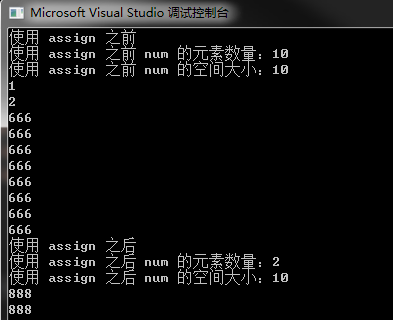
我们会发现,使用 assign 之后元素数量变为了2,但 vector 的空间大小并没有变。
assign 还可以搭配迭代器用:
1 #include <iostream>
2 #include <vector>
3
4 using namespace std;
5
6 int main()
7 {
8 vector<int>num(10, 111);
9 vector<int>num_1(10, 888);
10
11 printf("使用 assign 之前\n");
12 cout << "使用 assign 之前 num_1 的元素数量:" << num_1.size() << endl;
13 cout << "使用 assign 之前 num_1 的空间大小:" << num_1.capacity() << endl;
14
15 num_1[0] = 1;
16 num_1[1] = 2;
17
18 for (int i = 0; i < num_1.size(); i++)
19 {
20 cout << num_1[i] << endl;
21 }
22 num_1.assign(2,888); //第一种 assign 的用法
23 num_1.assign(num.begin() + 3, num.end()); //第二种 配合迭代器的用法
24
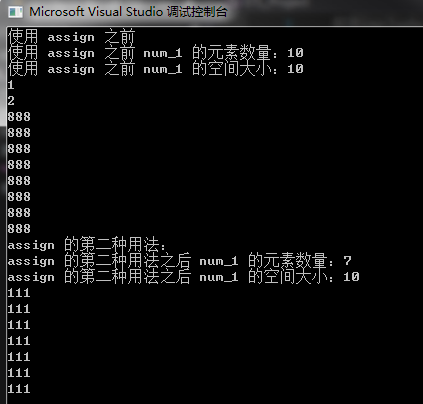
25 printf("assign 的第二种用法:\n");
26 cout << "assign 的第二种用法之后 num_1 的元素数量:" << num_1.size() << endl;
27 cout << "assign 的第二种用法之后 num_1 的空间大小:" << num_1.capacity() << endl;
28 for (int i = 0; i < num_1.size(); i++)
29 {
30 cout << num_1[i] << endl;
31 }
32
33 return 0;
34 }
打印如下:
既然使用迭代器可以这样玩,那么使用数组也一样可以,如下:
 1 #include <iostream>

 2 #include <vector>

 3

 4 using namespace std;

 5

 6 int main()

 7 {

 8     int test[] = { 111,222,333,444,555,666,777,888,999 };

 9     vector<int>num(10, 888);

10

11     printf("使用 assign 之前\n");

12     cout << "使用 assign 之前 num_1 的元素数量:" << num.size() << endl;

13     cout << "使用 assign 之前 num_1 的空间大小:" << num.capacity() << endl;

14

15     num[0] = 1;

16     num[1] = 2;

17

18     for (int i = 0; i < num.size(); i++)

19     {

20         cout << num[i] << endl;

21     }

22     num.assign(2,888);                        //第一种 assign 的用法

23     num.assign(test, test + 5);          //第二种 使用迭代器一样的用法 用数组进行重新赋值

24

25     printf("assign 的第二种用法:\n");

26     cout << "assign 的第二种用法之后 num_1 的元素数量:" << num.size() << endl;

27     cout << "assign 的第二种用法之后 num_1 的空间大小:" << num.capacity() << endl;

28     for (int i = 0; i < num.size(); i++)

29     {

30         cout << num[i] << endl;

31     }

32

33     return 0;

34 }
打印如下:

6. 获取&修改 vector 容器的第一个和最后一个元素的值:
获取:使用 vectorName.front() 与 vectorName.back() 来获取 vector 的第一个元素与最后一个元素的引用,如下代码:
1 #include <iostream>
2 #include <vector>
3
4 using namespace std;
5
6 int main()
7 {
8 int test[] = { 111,222,333,444,555,666,777,888,999 };
9 vector<int>num(test, test + 9);
10
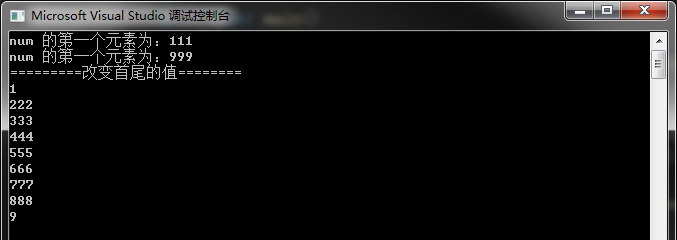
11 cout << "num 的第一个元素为:" << num.front() << endl;
12 cout << "num 的第一个元素为:" << num.back() << endl;
13
14 return 0;
15 }
打印结果:

赋值:因为返回的是其引用,那么我们也可以进行赋值操作,如下代码:
 1 #include <iostream>

 2 #include <vector>

 3

 4 using namespace std;

 5

 6 int main()

 7 {

 8     int test[] = { 111,222,333,444,555,666,777,888,999 };

 9     vector<int>num(test, test + 9);

10

11     cout << "num 的第一个元素为:" << num.front() << endl;

12     cout << "num 的第一个元素为:" << num.back() << endl;

13

14     cout << "=========改变首尾的值========" << endl;

15     num.front() = 1;

16     num.back() = 9;

17

18     for (int i = 0; i < num.size(); i++)

19     {

20         cout << num.at(i) << endl;

21     }

22

23     return 0;

24 }
打印结果:
=======================================================================================================================
STL—— 容器(vector)的数据写入、修改和删除的更多相关文章
- 从零开始写STL—容器—vector
从0开始写STL-容器-vector vector又称为动态数组,那么动态体现在哪里?vector和一般的数组又有什么区别?vector中各个函数的实现原理是怎样的,我们怎样使用会更高效? 以上内容我 ...
- STL容器 vector,list,deque 性能比较
C++的STL模板库中提供了3种容器类:vector,list,deque对于这三种容器,在觉得好用的同时,经常会让我们困惑应该选择哪一种来实现我们的逻辑.在少量数据操作的程序中随便哪一种用起来感觉差 ...
- [C++]STL容器Vector的内存释放
直接抛出两句话,说明到底应该如何释放Vector占用的内存. “vector的clear不影响capacity,你应该swap一个空的vector.” <Effective STL>中的“ ...
- STL容器vector应用注意事项
[1]提前分配足够空间以免不必要的重新分配和复制代价 关于vector容器重新分配和复制及析构释放的代价,请参见随笔<STL容器之vector>. 应用示例对比代码如下: #include ...
- Thinkphp 数据的修改及删除操作
一.数据修改操作 save() 实现数据修改,返回受影响的记录条数 具体有两种方式实现数据修改,与添加类似(数组.AR方式) 1.数组方式: a) $goods = D(“Goods ...
- 6月17 ThinkPHP连接数据库------数据的修改及删除
1.数据修改操作 save() 实现数据修改,返回受影响的记录条数 具体有两种方式实现数据修改,与添加类似(数组.AR方式) 1.数组方式 a) $goods = D(“Goods” ...
- STL容器 -- Vector
核心:Vector 是 STL 里的一个向量容器,可以像数组那样进行随机访问,能在尾部插入元素,对于元素的删除和插入可以动态管理内存. 头文件: #include <vector> 构造函 ...
- STL - 容器 - vector简单应用
VectorTest.cpp #include <vector> #include <iostream> #include <string> #include &l ...
- STL——容器(deque) 构造 & 头尾添加删除元素
1.deque容器概念 deque是"double-ended queue"的缩写,和vector一样都是STL的容器,唯一不同的是:deque是双端数组,而vector是单端的. ...
- [Oracle]Oracle数据库数据被修改或者删除恢复数据
1.SELECT * FROM CT_FIN_RiskItem--先查询表,确定数据的确不对(cfstatus第一行缺少)2.select * from CT_FIN_RiskItem as of t ...
随机推荐
- 如何统计Ceph的RBD真实使用容量
前言 ceph的rbd一直有个问题就是无法清楚的知道这个分配的空间里面到底使用了多少,这个在Jewel里面提供了一个新的接口去查询,对于老版本来说可能同样有这个需求,本篇将详细介绍如何解决这个问题 查 ...
- ubuntu无法关机
在/etc/default/halt 增加下面 INIT_HALT = POWEROFF 另一种方法: I have the same problem and found a solution whi ...
- Linux——CentOS 7 systemctl和防火墙firewalld命令
一.防火墙的开启.关闭.禁用命令 (1)设置开机启用防火墙:systemctl enable firewalld.service (2)设置开机禁用防火墙:systemctl disable fire ...
- [web安全原理]PHP命令执行漏洞基础
前言 PHP命令执行漏洞 应用程序的某些功能功能需要调用可以执行系统命令的函数,如果这些函数或者函数的参数被用户控制,就有可能通过命令连接符将恶意命令拼接到正常的函数中,从而随意执行系统命令,这就是命 ...
- php(tp5)生成条形码
因为公司业务需要,研究了一下条形码 1.下载barcodegen扩展包 官网地址:https://www.barcodebakery.com 2.下载完后解压至 extend 文件夹里面,然后复制以下 ...
- mac中怎么完成移动硬盘分区这个操作
移动硬盘在出厂时只有一个区,不方便我们存储和查阅文件,移动硬盘分区可以防止硬盘发生错误,以免造成资料丢失,也可以防止产生无用文件. 移动硬盘基本上都是用Windows系统进行分区的,但是现在很多人使用 ...
- 模拟赛38 B. T形覆盖 大模拟
题目描述 如果玩过俄罗斯方块,应该见过如下图形: 我们称它为一个 \(T\) 形四格拼板 .其中心被标记为\(×\). 小苗画了一个 \(m\) 行 \(n\) 列的长方形网格.行从 \(0\) 至 ...
- 课时一:JS操作数据
课时一:JS操作数据 JSAPI请求头 xmlhttp.setRequestHeader("Content-Type", "application/json; chars ...
- kafka 副本机制和容错处理 -2
文章来源于本人的印象笔记,如出现格式问题可访问该链接查看原文 原创声明:作者:Arnold.zhao 博客园地址:https://www.cnblogs.com/zh94 副本机制 Kafka的副本机 ...
- 冰河开源了全网首个完全开源的分布式全局有序序列号(分布式ID)框架!!
写在前面 mykit-serial框架的设计参考了李艳鹏大佬开源的vesta框架,并彻底重构了vesta框架,借鉴了雪花算法(SnowFlake)的思想,并在此基础上进行了全面升级和优化.支持嵌入式( ...