Android布局管理详解(1)—— LinearLayout 线性布局
Android的布局方式共有6种,分别是LinearLayout(线性布局)、TableLayout(表格布局)、FrameLayout(帧布局)、RelativeLayout(相对布局)、GridLayout(网格布局)以及AbsoluteLayout(绝对布局)。
本次主要介绍 LinearLayout 线性布局,其余布局留待以后介绍。
线性布局由 LinearLayout 类来代表, LinearLayout 可以控制各组件横向或纵向排列。
LinearLayout 常用属性介绍
1. android:orientation
设置布局管理器内组件的排列方式,可设置为 horizon (水平排列)、vertical (垂直排列)。
 <?xml version="1.0" encoding="utf-8"?>

 <LinearLayout xmlns:android="http://schemas.android.com/apk/res/android"

     android:orientation="horizontal"

     android:layout_width="match_parent"

     android:layout_height="match_parent">

     <Button

         android:id="@+id/btn1"

         android:layout_width="wrap_content"

         android:layout_height="wrap_content"

         android:text="@string/btn1"/>

     <Button

         android:id="@+id/btn2"

         android:layout_width="wrap_content"

         android:layout_height="wrap_content"

         android:text="@string/btn2"/>

     <Button

         android:id="@+id/btn3"

         android:layout_width="wrap_content"

         android:layout_height="wrap_content"

         android:text="@string/btn3"/>

 </LinearLayout>
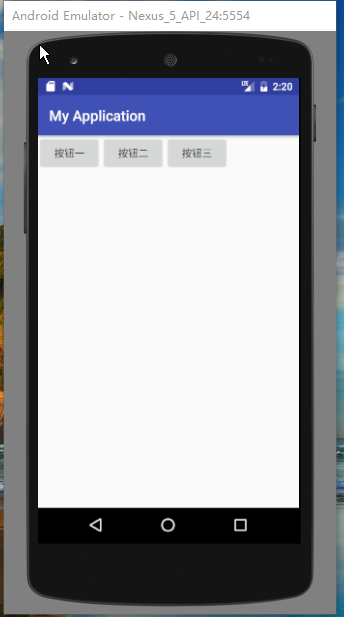
上述代码设置了三个按钮(Button),第 3 行代码设置其排列方式为 horizon 水平排列,效果图如图 1:
图 1 : 图 2 : 图 3 :
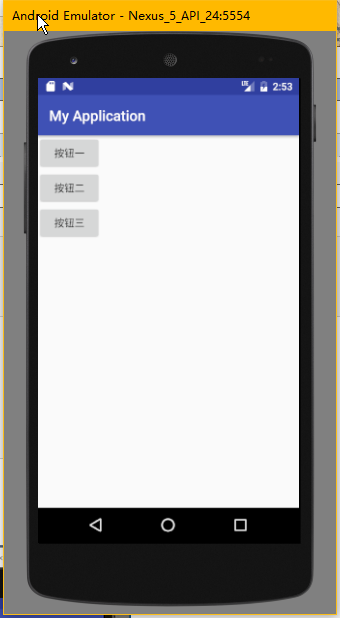
将上述代码的第 3 行中 orientation 的值由 horizon 改为 vertical (如下代码),则按钮的排列方式变为垂直排列 ,如图 2
 <?xml version="1.0" encoding="utf-8"?>

 <LinearLayout xmlns:android="http://schemas.android.com/apk/res/android"

     android:orientation="vertical"

     android:layout_width="match_parent"

     android:layout_height="match_parent">

     <Button

         android:id="@+id/btn1"

         android:layout_width="wrap_content"

         android:layout_height="wrap_content"

         android:text="@string/btn1"/>

     <Button

         android:id="@+id/btn2"

         android:layout_width="wrap_content"

         android:layout_height="wrap_content"

         android:text="@string/btn2"/>

     <Button

         android:id="@+id/btn3"

         android:layout_width="wrap_content"

         android:layout_height="wrap_content"

         android:text="@string/btn3"/>

 </LinearLayout>
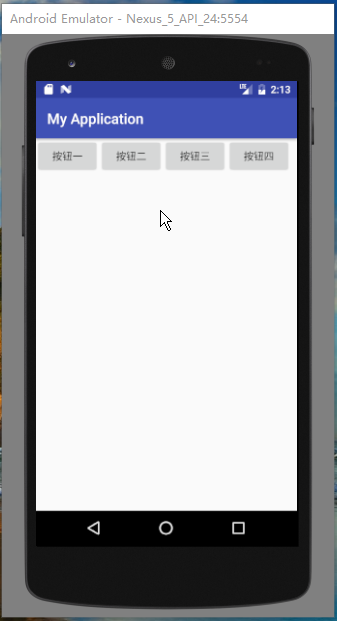
注意: Android 的线性布局不会换行,当组件一个挨着一个的排列到头之后,剩下的组件将不会被显示出来
例:
 <?xml version="1.0" encoding="utf-8"?>

 <LinearLayout xmlns:android="http://schemas.android.com/apk/res/android"

     android:orientation="horizontal"

     android:layout_width="match_parent"

     android:layout_height="match_parent">

     <Button

         android:id="@+id/btn1"

         android:layout_width="wrap_content"

         android:layout_height="wrap_content"

         android:text="@string/btn1"/>

     <Button

         android:id="@+id/btn2"

         android:layout_width="wrap_content"

         android:layout_height="wrap_content"

         android:text="@string/btn2"/>

     <Button

         android:id="@+id/btn3"

         android:layout_width="wrap_content"

         android:layout_height="wrap_content"

         android:text="@string/btn3"/>

     <Button

         android:id="@+id/btn4"

         android:layout_width="wrap_content"

         android:layout_height="wrap_content"

         android:text="@string/btn4"/>

     <Button

         android:id="@+id/btn5"

         android:layout_width="wrap_content"

         android:layout_height="wrap_content"

         android:text="@string/btn5"/>

 </LinearLayout>
上述代码定义了 5 个按钮,使其水平排列,但其效果如上图 3 所示,只显示了四个按钮,第 5 个按钮没有被显示出来。
2. android:gravity
设置布局管理器内组件的对齐方式,该属性值可设为 top(顶部对齐) 、bottom(底部对齐) 、left(左对齐) 、right(右对齐) 、center_vertical(垂直方向居中) 、 fill_vertical(垂直方向填充) 、 center_horizontal(水平方向居中) 、 fill_horizontal(水平方向填充) 、center(垂直与水平方向都居中) 、 fill (填充)、 clip_vertical(垂直方向裁剪) 、 clip_horizontal(水平方向裁剪) 。
可同时指定多种对其方式的组合,中间用“|”连接,如下方代码设置对齐方式为 left|center_vertical 表示出现在屏幕左边且垂直居中,效果图如图 4 。
 <?xml version="1.0" encoding="utf-8"?>

 <LinearLayout xmlns:android="http://schemas.android.com/apk/res/android"

     android:orientation="horizontal"

     android:layout_width="match_parent"

     android:layout_height="match_parent"

     android:gravity="left|center_vertical">

     <Button

         android:id="@+id/btn1"

         android:layout_width="wrap_content"

         android:layout_height="wrap_content"

         android:text="@string/btn1"/>

     <Button

         android:id="@+id/btn2"

         android:layout_width="wrap_content"

         android:layout_height="wrap_content"

         android:text="@string/btn2"/>

     <Button

         android:id="@+id/btn3"

         android:layout_width="wrap_content"

         android:layout_height="wrap_content"

         android:text="@string/btn3"/>

 </LinearLayout>
图 4 :
除以上两个常用属性外,LinearLayout 的属性还有以下几个:
android:baselineAligned 该属性设为 false ,将会阻止该布局管理器与它的子元素的基线对其。
android:divider 设置垂直布局时两个按钮直接的分隔条。
android:measureWithLargestChild 该属性设为 true 时,所有带权重的子元素都会具有最大子元素的最小尺寸。
最后介绍一下 LinearLayout 子元素支持的常用属性:
android:layout_gravity 指定该子元素在 LinearLayout 中的对其方式
android:layout_weight 指定该子元素在 LinearLayout 中所占的权重
以上就是关于 android 布局中 LinearLayout 的介绍,如有疏漏或错误,欢迎指正。
本文为博主原创文章,转载请在明显位置注明出处:
原文地址 http://www.cnblogs.com/zzulihao
Android布局管理详解(1)—— LinearLayout 线性布局的更多相关文章
- 弹性布局学习-详解flex-wrap(五)
目录 弹性布局学习-介绍(一) 弹性布局学习-详解 flex-direction[决定主轴的方向](二) 弹性布局学习-详解 justify-content(三) 弹性布局学习-详解 align-i ...
- 弹性布局学习-详解 align-items(四)
目录 弹性布局学习-介绍(一) 弹性布局学习-详解 flex-direction[决定主轴的方向](二) 弹性布局学习-详解 justify-content(三) 弹性布局学习-详解 align-i ...
- Android 布局学习之——Layout(布局)详解二(常见布局和布局参数)
[Android布局学习系列] 1.Android 布局学习之——Layout(布局)详解一 2.Android 布局学习之——Layout(布局)详解二(常见布局和布局参数) 3.And ...
- Android零基础入门第25节:最简单最常用的LinearLayout线性布局
原文:Android零基础入门第25节:最简单最常用的LinearLayout线性布局 良好的布局设计对于UI界面至关重要,在前面也简单介绍过,目前Android中的布局主要有6种,创建的布局文件默认 ...
- Android开发之详解五大布局
http://bbs.chinaunix.net/thread-3654213-1-1.html 为了适应各式各样的界面风格,Android系统提供了5种布局,这5种布局分别是: LinearLayo ...
- android 59 LinearLayout 线性布局
##常见的布局* LinearLayout 线性布局线性布局往左右拉是拉不动的,> 线性布局的朝向 vertical|horizontal> 线性布局的权重 weight 和 0dip一起 ...
- Android精通:View与ViewGroup,LinearLayout线性布局,RelativeLayout相对布局,ListView列表组件
UI的描述 对于Android应用程序中,所有用户界面元素都是由View和ViewGroup对象构建的.View是绘制在屏幕上能与用户进行交互的一个对象.而对于ViewGroup来说,则是一个用于存放 ...
- Android layout 布局 属性详解
第一类:属性值 true或者 false android:layout_centerHrizontal 水平居中 android:layout_centerVertical ...
- 2.2.1 LinearLayout(线性布局)
本节引言 本节开始讲Android中的布局,Android中有六大布局,分别是: LinearLayout(线性布局), RelativeLayout(相对布局), TableLayout(表格布局) ...
随机推荐
- 关于solaris中 crontab -e 出现数字0的解决办法
解决方法: 通过网络,发现要设置编辑器的环境变量 $ EDITOR=vi $ export EDITOR$ echo $EDITORvi$ crontab -e OK
- Prolog 外部不能有 DOCTYPE 声明。处理资源 'http://192.168.115.152:8082/api/EmpApi.aspx' 时出错。第 3 行,位置: 11
在Default.aspx代码中删除以下代码(其他窗口也是这样删除): <!DOCTYPE html PUBLIC "-//W3C//DTD XHTML 1.0 Transitiona ...
- Recurrent Neural Network系列3--理解RNN的BPTT算法和梯度消失
作者:zhbzz2007 出处:http://www.cnblogs.com/zhbzz2007 欢迎转载,也请保留这段声明.谢谢! 这是RNN教程的第三部分. 在前面的教程中,我们从头实现了一个循环 ...
- HDU1394(线段树||树状数组)
Minimum Inversion Number Time Limit: 2000/1000 MS (Java/Others) Memory Limit: 65536/32768 K (Java ...
- 玩转spring boot——结合阿里云持续交付
前言 在互联网项目中,项目测试.部署往往需要花费大量时间.传统方式是在本地打包.测试完毕程序,然后通过ftp上传至服务器,再把测试的配置文件修改为生产环境的配置文件,最后重新运行服务.这一过程如果交给 ...
- 【G】开源的分布式部署解决方案(一) - 开篇
做这个开源项目的意义是什么?(口水自问自答,不喜可略过) 从功能上来说,请参考 预告篇,因自知当时预告片没有任何含金量,所以并没有主动推送到首页,而是私下的给一些人发的. 从个人角度上来说,我希望.n ...
- [转载] 编程每一天(Write Code Every Day)
转载自:http://kb.cnblogs.com/page/536779/ 英文原文:Write Code Every Day 去年秋天,我的个人项目似乎走到了尽头:我一直没能取得必要的进展,在不牺 ...
- Oracle VS DB2 数据类型
=========================Oracle VS DB2==================================== 本文转自:http://www.bitscn.co ...
- vs调试时底部输出调试信息“无法查找或打开 PDB 文件”解决办法
用VS调试程序时,有时会在VS底部的"输出"框中提示"无法查找或打开 PDB 文件".这该怎么解决呢? 下面,我们以VS2013为例,来教大家解决办法. 工具/ ...
- ActiveMQ消息队列用法
pom.xml文件如下: <project xmlns="http://maven.apache.org/POM/4.0.0" xmlns:xsi="http:// ...