Android布局管理详解(1)—— LinearLayout 线性布局
Android的布局方式共有6种,分别是LinearLayout(线性布局)、TableLayout(表格布局)、FrameLayout(帧布局)、RelativeLayout(相对布局)、GridLayout(网格布局)以及AbsoluteLayout(绝对布局)。
本次主要介绍 LinearLayout 线性布局,其余布局留待以后介绍。
线性布局由 LinearLayout 类来代表, LinearLayout 可以控制各组件横向或纵向排列。
LinearLayout 常用属性介绍
1. android:orientation
设置布局管理器内组件的排列方式,可设置为 horizon (水平排列)、vertical (垂直排列)。
 <?xml version="1.0" encoding="utf-8"?>

 <LinearLayout xmlns:android="http://schemas.android.com/apk/res/android"

     android:orientation="horizontal"

     android:layout_width="match_parent"

     android:layout_height="match_parent">

     <Button

         android:id="@+id/btn1"

         android:layout_width="wrap_content"

         android:layout_height="wrap_content"

         android:text="@string/btn1"/>

     <Button

         android:id="@+id/btn2"

         android:layout_width="wrap_content"

         android:layout_height="wrap_content"

         android:text="@string/btn2"/>

     <Button

         android:id="@+id/btn3"

         android:layout_width="wrap_content"

         android:layout_height="wrap_content"

         android:text="@string/btn3"/>

 </LinearLayout>
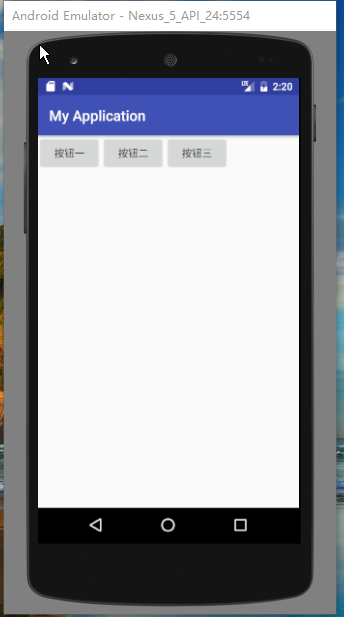
上述代码设置了三个按钮(Button),第 3 行代码设置其排列方式为 horizon 水平排列,效果图如图 1:
图 1 : 图 2 : 图 3 :
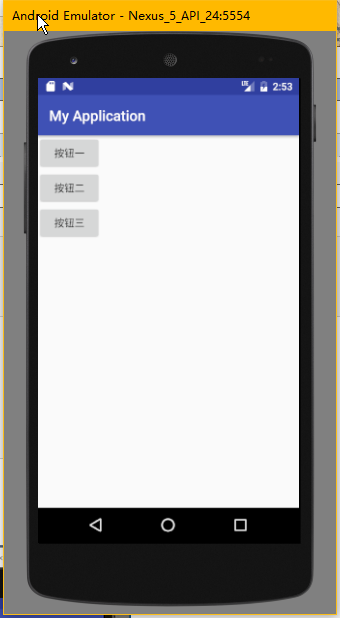
将上述代码的第 3 行中 orientation 的值由 horizon 改为 vertical (如下代码),则按钮的排列方式变为垂直排列 ,如图 2
 <?xml version="1.0" encoding="utf-8"?>

 <LinearLayout xmlns:android="http://schemas.android.com/apk/res/android"

     android:orientation="vertical"

     android:layout_width="match_parent"

     android:layout_height="match_parent">

     <Button

         android:id="@+id/btn1"

         android:layout_width="wrap_content"

         android:layout_height="wrap_content"

         android:text="@string/btn1"/>

     <Button

         android:id="@+id/btn2"

         android:layout_width="wrap_content"

         android:layout_height="wrap_content"

         android:text="@string/btn2"/>

     <Button

         android:id="@+id/btn3"

         android:layout_width="wrap_content"

         android:layout_height="wrap_content"

         android:text="@string/btn3"/>

 </LinearLayout>
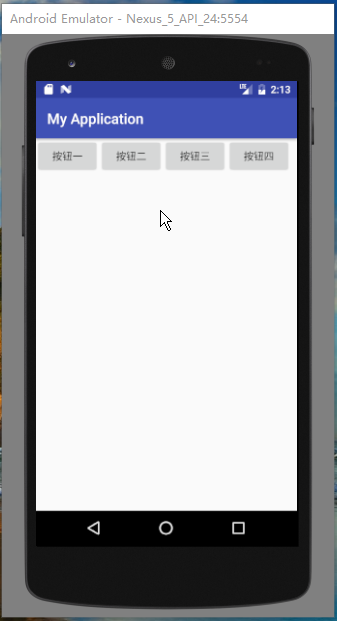
注意: Android 的线性布局不会换行,当组件一个挨着一个的排列到头之后,剩下的组件将不会被显示出来
例:
 <?xml version="1.0" encoding="utf-8"?>

 <LinearLayout xmlns:android="http://schemas.android.com/apk/res/android"

     android:orientation="horizontal"

     android:layout_width="match_parent"

     android:layout_height="match_parent">

     <Button

         android:id="@+id/btn1"

         android:layout_width="wrap_content"

         android:layout_height="wrap_content"

         android:text="@string/btn1"/>

     <Button

         android:id="@+id/btn2"

         android:layout_width="wrap_content"

         android:layout_height="wrap_content"

         android:text="@string/btn2"/>

     <Button

         android:id="@+id/btn3"

         android:layout_width="wrap_content"

         android:layout_height="wrap_content"

         android:text="@string/btn3"/>

     <Button

         android:id="@+id/btn4"

         android:layout_width="wrap_content"

         android:layout_height="wrap_content"

         android:text="@string/btn4"/>

     <Button

         android:id="@+id/btn5"

         android:layout_width="wrap_content"

         android:layout_height="wrap_content"

         android:text="@string/btn5"/>

 </LinearLayout>
上述代码定义了 5 个按钮,使其水平排列,但其效果如上图 3 所示,只显示了四个按钮,第 5 个按钮没有被显示出来。
2. android:gravity
设置布局管理器内组件的对齐方式,该属性值可设为 top(顶部对齐) 、bottom(底部对齐) 、left(左对齐) 、right(右对齐) 、center_vertical(垂直方向居中) 、 fill_vertical(垂直方向填充) 、 center_horizontal(水平方向居中) 、 fill_horizontal(水平方向填充) 、center(垂直与水平方向都居中) 、 fill (填充)、 clip_vertical(垂直方向裁剪) 、 clip_horizontal(水平方向裁剪) 。
可同时指定多种对其方式的组合,中间用“|”连接,如下方代码设置对齐方式为 left|center_vertical 表示出现在屏幕左边且垂直居中,效果图如图 4 。
 <?xml version="1.0" encoding="utf-8"?>

 <LinearLayout xmlns:android="http://schemas.android.com/apk/res/android"

     android:orientation="horizontal"

     android:layout_width="match_parent"

     android:layout_height="match_parent"

     android:gravity="left|center_vertical">

     <Button

         android:id="@+id/btn1"

         android:layout_width="wrap_content"

         android:layout_height="wrap_content"

         android:text="@string/btn1"/>

     <Button

         android:id="@+id/btn2"

         android:layout_width="wrap_content"

         android:layout_height="wrap_content"

         android:text="@string/btn2"/>

     <Button

         android:id="@+id/btn3"

         android:layout_width="wrap_content"

         android:layout_height="wrap_content"

         android:text="@string/btn3"/>

 </LinearLayout>
图 4 :
除以上两个常用属性外,LinearLayout 的属性还有以下几个:
android:baselineAligned 该属性设为 false ,将会阻止该布局管理器与它的子元素的基线对其。
android:divider 设置垂直布局时两个按钮直接的分隔条。
android:measureWithLargestChild 该属性设为 true 时,所有带权重的子元素都会具有最大子元素的最小尺寸。
最后介绍一下 LinearLayout 子元素支持的常用属性:
android:layout_gravity 指定该子元素在 LinearLayout 中的对其方式
android:layout_weight 指定该子元素在 LinearLayout 中所占的权重
以上就是关于 android 布局中 LinearLayout 的介绍,如有疏漏或错误,欢迎指正。
本文为博主原创文章,转载请在明显位置注明出处:
原文地址 http://www.cnblogs.com/zzulihao
Android布局管理详解(1)—— LinearLayout 线性布局的更多相关文章
- 弹性布局学习-详解flex-wrap(五)
目录 弹性布局学习-介绍(一) 弹性布局学习-详解 flex-direction[决定主轴的方向](二) 弹性布局学习-详解 justify-content(三) 弹性布局学习-详解 align-i ...
- 弹性布局学习-详解 align-items(四)
目录 弹性布局学习-介绍(一) 弹性布局学习-详解 flex-direction[决定主轴的方向](二) 弹性布局学习-详解 justify-content(三) 弹性布局学习-详解 align-i ...
- Android 布局学习之——Layout(布局)详解二(常见布局和布局参数)
[Android布局学习系列] 1.Android 布局学习之——Layout(布局)详解一 2.Android 布局学习之——Layout(布局)详解二(常见布局和布局参数) 3.And ...
- Android零基础入门第25节:最简单最常用的LinearLayout线性布局
原文:Android零基础入门第25节:最简单最常用的LinearLayout线性布局 良好的布局设计对于UI界面至关重要,在前面也简单介绍过,目前Android中的布局主要有6种,创建的布局文件默认 ...
- Android开发之详解五大布局
http://bbs.chinaunix.net/thread-3654213-1-1.html 为了适应各式各样的界面风格,Android系统提供了5种布局,这5种布局分别是: LinearLayo ...
- android 59 LinearLayout 线性布局
##常见的布局* LinearLayout 线性布局线性布局往左右拉是拉不动的,> 线性布局的朝向 vertical|horizontal> 线性布局的权重 weight 和 0dip一起 ...
- Android精通:View与ViewGroup,LinearLayout线性布局,RelativeLayout相对布局,ListView列表组件
UI的描述 对于Android应用程序中,所有用户界面元素都是由View和ViewGroup对象构建的.View是绘制在屏幕上能与用户进行交互的一个对象.而对于ViewGroup来说,则是一个用于存放 ...
- Android layout 布局 属性详解
第一类:属性值 true或者 false android:layout_centerHrizontal 水平居中 android:layout_centerVertical ...
- 2.2.1 LinearLayout(线性布局)
本节引言 本节开始讲Android中的布局,Android中有六大布局,分别是: LinearLayout(线性布局), RelativeLayout(相对布局), TableLayout(表格布局) ...
随机推荐
- 解决Centos 7 下 tomcat字体异常 Font '宋体' is not available to the JVM
错误提示: SEVERE: Servlet.service() for servlet [example] in context with path [/myproject] threw except ...
- redhat6 + 11G RAC 双节点部署
一.配置网络环境 node1 [root@node1 ~]#vi/etc/sysconfig/network NETWORKING=yes NETWORKING_IPV6=no HOSTNAME= ...
- HTML <div> 和<span>
HTML <div> 和<span> HTML 可以通过 <div> 和 <span>将元素组合起来. HTML 区块元素 大多数 HTML 元素被定义 ...
- #最小生成树# #kruskal# ----- OpenJudge丛林中的路
最小生成树 一个有 n 个结点的连通图的生成树是原图的极小连通子图,且包含原图中的所有 n 个结点,并且有保持图连通的最少的边.最小生成树可以用kruskal(克鲁斯卡尔)算法或prim(普里姆)算法 ...
- QJsonObject和QJsonArray的巨坑
最近用Qt的QJsonObject和QJsonArray当做类变量来存储运行信息,发现这两货真的是巨坑.让人有一种JJ fly的感觉/(ㄒoㄒ)/~~. 写了个例子来说明下: MainWindow:: ...
- Bootstrap入门(三)<p>标签的css样式
Bootstrap入门(三)<p>标签的css样式 前提:引入css文件,内容放在一个class为container的div中 <p>标签属性 1.“ text-left ...
- 抓取QQ空间相册
某天,想下载某人的相册,发现一张一张下载,工作量巨大,所以写了这个工具. 使用到的工具 Fiddler(抓包工具) python(脚本语言) intellij 步骤 分析包 获取相册分类链接信息 打开 ...
- 利用apache的mod_rewrite做URL规则重写
使用mod_rewrite做url重写,伪静态,做过很多次,这次用几个例子记下来,便于后面查用. 使用方法: 1.在conf目录的httpd.conf文件中找到: LoadModule rewrite ...
- ubuntu开机自动关闭独显,使用集成显卡
我的本子是联想y470p-ise,因为是有双显卡,而ubuntu在开机后,双显卡默认是同时工作,会产生巨大的发热,导致很不爽.而且在ubuntu下基本我也不用独显,所以有开机关闭独显的需求. ubun ...
- sass纯新手(一)
说是教程还真是有点不敢当,只是将自己今天上手sass的流程给记录下来,给一些和我一样的小白菜一点参考而已,照着走一遍应该就会对sass有基本的认识了,也请大神们不吝赐教. 很久之前同事做了一个关于sa ...