
qt 使用qtxlsx 读写excel
https://github.com/dbzhang800/QtXlsxWriter 下载qtxlsx地址
QtXlsx is a library that can read and write Excel files. It doesn't require Microsoft Excel and can be used in any platform that Qt5 supported. The library can be used to
- Generate a new .xlsx file from scratch
- Extract data from an existing .xlsx file
- Edit an existing .xlsx file
Getting Started
- For linux user, if your Qt is installed through package manager tools such "apt-get", make sure that you have installed the Qt5 develop package qtbase5-private-dev
Usage(1): Use Xlsx as Qt5's addon module
Building the module
Note: Perl is needed in this step.
Download the source code.
Put the source code in any directory you like
Go to top directory of the project in a terminal and run
    qmake

    make

    make install
The library, the header files, and others will be installed to your system.
make html_docscan be used to generate documentations of the library, andmake checkcan be used to run unit tests of the library.
Using the module
- Add following line to your qmake's project file:
QT += xlsx
- Then, using Qt Xlsx in your code
    #include <QtXlsx>

    int main()

    {

        QXlsx::Document xlsx;

        xlsx.write("A1", "Hello Qt!");

        xlsx.saveAs("Test.xlsx");

        return 0;

    }
Usage(2): Use source code directly
The package contains a qtxlsx.pri file that allows you to integrate the component into applications that use qmake for the build step.
Download the source code.
Put the source code in any directory you like. For example, 3rdparty:
    |-- project.pro

    |-- ....

    |-- 3rdparty\

    |     |-- qtxlsx\

    |     |
- Add following line to your qmake project file:
include(3rdparty/qtxlsx/src/xlsx/qtxlsx.pri)
Note: If you like, you can copy all files from src/xlsx to your application's source path. Then add following line to your project file:
include(qtxlsx.pri)
> **Note**: If you do not use qmake, you need to define the following macro manually

> ```

    XLSX_NO_LIB
- Then, using Qt Xlsx in your code
    #include "xlsxdocument.h"

    int main()

    {

        QXlsx::Document xlsx;

        xlsx.write("A1", "Hello Qt!");

        xlsx.saveAs("Test.xlsx");

        return 0;

    }
在构建的时候,可能会有如下的错误,
xlsxzipreader.cpp: In member function ‘void QXlsx::ZipReader::init()’:

xlsxzipreader.cpp:51:66: error: conversion from ‘QVector<QZipReader::FileInfo>’ to non-scalar type ‘QList<QZipReader::FileInfo>’ requested

     QList<QZipReader::FileInfo> allFiles = m_reader->fileInfoList();
这里只需要吧出错的文件添加 :
#include <QVector>
然后把出错的地方的"QList" 用"QVector" 替换掉重新构建就可以了。
对于Qt Xlsx ( QtXlsxWriter ) 的安装请参考:
http://blog.csdn.net/woshidahuaidan2011/article/details/52724452
这里主要介绍其基本的编程使用方法。
首先我们想到就是对xlsx文件进行读写,因此我们有如下的代码:
#include <QtCore>

#include "xlsxdocument.h"

#include "xlsxformat.h"

#include "xlsxcellrange.h"

#include "xlsxchart.h"

int main()

{

    QXlsx::Document xlsx("book1.xlsx");/*打开一个book1的文件*/

    QXlsx::Format format1;/*设置该单元的样式*/

    format1.setFontColor(QColor(Qt::red));/*文字为红色*/

    format1.setPatternBackgroundColor(QColor(152,251,152));/*北京颜色*/

    format1.setFontSize(15);/*设置字体大小*/

    format1.setHorizontalAlignment(QXlsx::Format::AlignHCenter);/*横向居中*/

    format1.setBorderStyle(QXlsx::Format::BorderDashDotDot);/*边框样式*/

    xlsx.write("A1", "Hello Qt!", format1);/*写入文字,应该刚才设置的样式*/

    xlsx.write(2, 1, 12345, format1);/*写入文字,应该刚才设置的样式*/

    QXlsx::Format format2;/*重新设置另一个单元的样式*/

    format2.setFontBold(true);/*设置加粗*/

    format2.setFontUnderline(QXlsx::Format::FontUnderlineDouble);/*下双划线*/

    format2.setFillPattern(QXlsx::Format::PatternLightUp);/*填充方式*/

    xlsx.write("A4", "=44+33", format2);/*写入文字,应该刚才设置的样式*/

    xlsx.write("C4", true, format2);

    xlsx.saveAs("book1.xlsx");/*保存*/

    QXlsx::Document xlsx2("Book1.xlsx");/*复制book1到book2*/

    xlsx2.saveAs("Book2.xlsx");

    return 0;

}
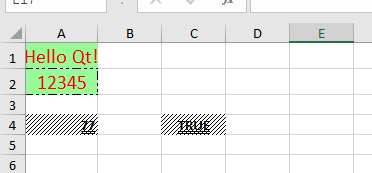
其运行效果如下:
接下来我们处理数据的是很多时候需要插入折线图、饼状图等等来图像化的处理数据,因此我们可以可以在原有代码上添加一段代码,使之添加一个sheet而且插入饼状图及其条形图:
#include <QtCore>

#include "xlsxdocument.h"

#include "xlsxformat.h"

#include "xlsxcellrange.h"

#include "xlsxchart.h"

int main()

{

    QXlsx::Document xlsx("book1.xlsx");/*打开一个book1的文件*/

    QXlsx::Format format1;/*设置该单元的样式*/

    format1.setFontColor(QColor(Qt::red));/*文字为红色*/

    format1.setPatternBackgroundColor(QColor(152,251,152));/*北京颜色*/

    format1.setFontSize(15);/*设置字体大小*/

    format1.setHorizontalAlignment(QXlsx::Format::AlignHCenter);/*横向居中*/

    format1.setBorderStyle(QXlsx::Format::BorderDashDotDot);/*边框样式*/

    xlsx.write("A1", "Hello Qt!", format1);/*写入文字,应该刚才设置的样式*/

    xlsx.write(2, 1, 12345, format1);/*写入文字,应该刚才设置的样式*/

    QXlsx::Format format2;/*重新设置另一个单元的样式*/

    format2.setFontBold(true);/*设置加粗*/

    format2.setFontUnderline(QXlsx::Format::FontUnderlineDouble);/*下双划线*/

    format2.setFillPattern(QXlsx::Format::PatternLightUp);/*填充方式*/

    xlsx.write("A4", "=44+33", format2);/*写入文字,应该刚才设置的样式*/

    xlsx.write("C4", true, format2);

    if(!xlsx.selectSheet("ziv")){/*在当前打开的xlsx文件中,找一个名字为ziv的sheet*/

        xlsx.addSheet("ziv");//找不到的话就添加一个名为ziv的sheet

    }

    for (int i=10; i<20; ++i) {/*写入一串数字*/

        xlsx.write(i, 1, i*i*i);   //A10:A19

        xlsx.write(i, 2, i*i); //B10:B19

        xlsx.write(i, 3, i*i-1); //C10:C19

    }

    QXlsx::Chart *pieChart = xlsx.insertChart(3, 5, QSize(300, 300));/*在3行5列的位置插入一个图标*/

    pieChart->setChartType(QXlsx::Chart::CT_Pie);/*插入一个饼形图*/

    pieChart->addSeries(QXlsx::CellRange("A10:A19"));/*饼形图添加数据*/

    pieChart->addSeries(QXlsx::CellRange("B10:B19"));

    pieChart->addSeries(QXlsx::CellRange("C10:C19"));

    QXlsx::Chart *barChart = xlsx.insertChart(3, 13, QSize(300, 300));/*在3行13列的位置插入一个图标*/

    barChart->setChartType(QXlsx::Chart::CT_Bar);/*条形图*/

    barChart->addSeries(QXlsx::CellRange("A10:C19"));/*给条形图加入数据*/

    xlsx.saveAs("book1.xlsx");/*保存*/

    QXlsx::Document xlsx2("Book1.xlsx");/*复制book1到book2*/

    xlsx2.saveAs("Book2.xlsx");

    return 0;

}
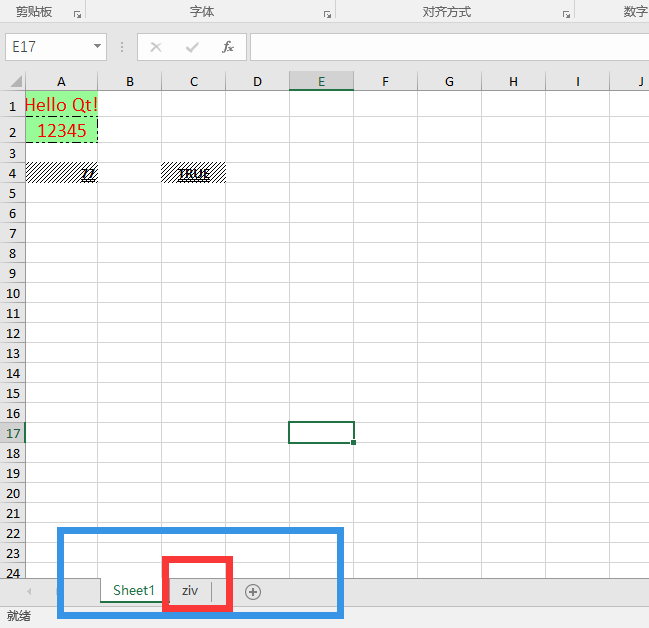
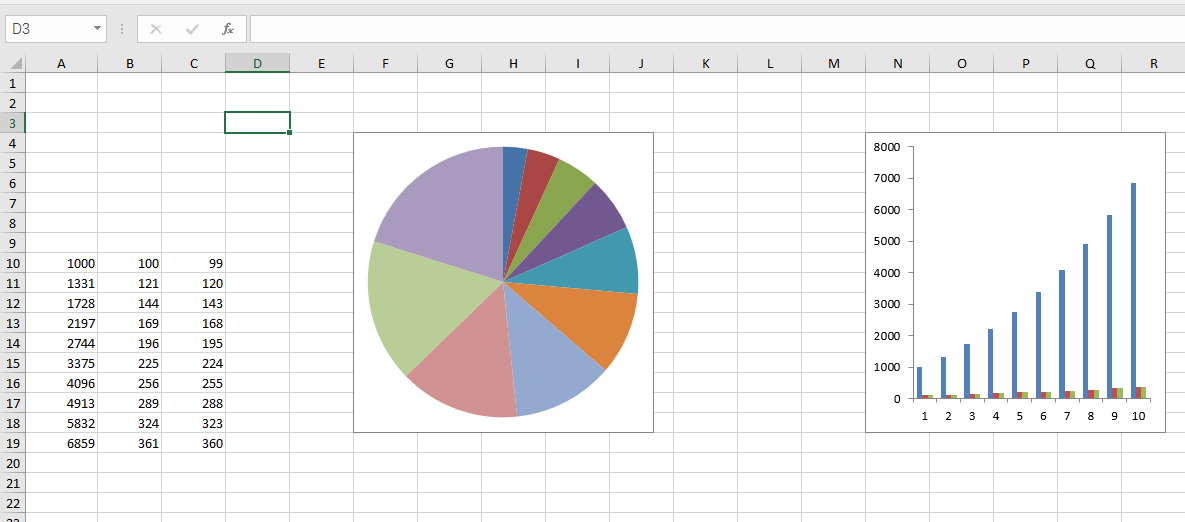
上面代码中运行效果如下:
很多时候我们还需要添加图表来美化表格,代码如下:
#include <QtCore>

#include <QtGui>

#include "xlsxdocument.h"

#include "xlsxformat.h"

#include "xlsxcellrange.h"

#include "xlsxchart.h"

int main()

{

    QXlsx::Document xlsx("book1.xlsx");/*打开一个book1的文件*/

    QXlsx::Format format1;/*设置该单元的样式*/

    format1.setFontColor(QColor(Qt::red));/*文字为红色*/

    format1.setPatternBackgroundColor(QColor(152,251,152));/*北京颜色*/

    format1.setFontSize(15);/*设置字体大小*/

    format1.setHorizontalAlignment(QXlsx::Format::AlignHCenter);/*横向居中*/

    format1.setBorderStyle(QXlsx::Format::BorderDashDotDot);/*边框样式*/

    xlsx.write("A1", "Hello Qt!", format1);/*写入文字,应该刚才设置的样式*/

    xlsx.write(2, 1, 12345, format1);/*写入文字,应该刚才设置的样式*/

    QXlsx::Format format2;/*重新设置另一个单元的样式*/

    format2.setFontBold(true);/*设置加粗*/

    format2.setFontUnderline(QXlsx::Format::FontUnderlineDouble);/*下双划线*/

    format2.setFillPattern(QXlsx::Format::PatternLightUp);/*填充方式*/

    xlsx.write("A4", "=44+33", format2);/*写入文字,应该刚才设置的样式*/

    xlsx.write("C4", true, format2);

    if(!xlsx.selectSheet("ziv")){/*在当前打开的xlsx文件中,找一个名字为ziv的sheet*/

        xlsx.addSheet("ziv");//找不到的话就添加一个名为ziv的sheet

    }

    for (int i=10; i<20; ++i) {/*写入一串数字*/

        xlsx.write(i, 1, i*i*i);   //A10:A19

        xlsx.write(i, 2, i*i); //B10:B19

        xlsx.write(i, 3, i*i-1); //C10:C19

    }

    QXlsx::Chart *pieChart = xlsx.insertChart(3, 5, QSize(300, 300));/*在3行5列的位置插入一个图标*/

    pieChart->setChartType(QXlsx::Chart::CT_Pie);/*插入一个饼形图*/

    pieChart->addSeries(QXlsx::CellRange("A10:A19"));/*饼形图添加数据*/

    pieChart->addSeries(QXlsx::CellRange("B10:B19"));

    pieChart->addSeries(QXlsx::CellRange("C10:C19"));

    QXlsx::Chart *barChart = xlsx.insertChart(3, 13, QSize(300, 300));/*在3行13列的位置插入一个图标*/

    barChart->setChartType(QXlsx::Chart::CT_Bar);/*条形图*/

    barChart->addSeries(QXlsx::CellRange("A10:C19"));/*给条形图加入数据*/

    QImage image(40, 100, QImage::Format_RGB32);/*新建一个Qimage,大小40*100*/

    image.fill(Qt::green);/*填充绿色*/

    xlsx.insertImage(1, 1, image);/*插入图片*/

    xlsx.saveAs("book1.xlsx");/*保存*/

    QXlsx::Document xlsx2("Book1.xlsx");/*复制book1到book2*/

    xlsx2.saveAs("Book2.xlsx");

    return 0;

}
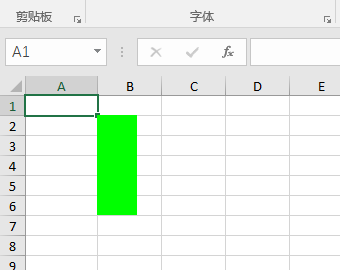
效果如下:
到此为止对于Qt Xlsx 的使用应该可以满足大部分的需求,如有疑问欢迎留言指正,原文地址:
http://blog.csdn.net/woshidahuaidan2011/article/details/53349163
qt 使用qtxlsx 读写excel的更多相关文章
- Qt 下快速读写Excel指南(尘中远)
Qt Windows 下快速读写Excel指南 很多人搜如何读写excel都会看到用QAxObject来进行操作,很多人试了之后都会发现一个问题,就是慢,非常缓慢!因此很多人得出结论是QAxObjec ...
- C++读写EXCEL文件OLE,java读写excel文件POI 对比
C++读写EXCEL文件方式比较 有些朋友问代码的问题,将OLE读写的代码分享在这个地方,大家请自己看.http://www.cnblogs.com/destim/p/5476915.html C++ ...
- C/C++读写excel文件 的几种方式
因为有些朋友问代码的问题,将OLE读写的代码分享在这个地方,大家请自己看. http://blog.csdn.net/fullsail/article/details/8449448 C++读取Exc ...
- windows下Qt编译Qtxlsx库和qtxlsx库的使用方法
最近接了个项目,合作的学长让用Qt写,而其中最重要的需求是将数据库的数据写入excel表格中和将excel的数据导入到数据库中,自己查阅了和多资料,最后决定使用qtxlsx开源库来操作excel,在编 ...
- MFC vs2012 Office2013 读写excel文件
近期在忙一个小项目(和同学一起搞的),在这里客户要求不但读写txt,而且可以读写excel文件,这里本以为很简单,结果...废话少说,过程如下: 笔者环境:win7 64+VS2012+Office2 ...
- C# 使用 NPOI 库读写 Excel 文件(转载)
NPOI 是开源的 POI 项目的.NET版,可以用来读写Excel,Word,PPT文件.在处理Excel文件上,NPOI 可以同时兼 容xls 和 xlsx.官网提供了一份Examples,给出了 ...
- Python3.4如何读写Excel
在python3.x(散仙使用的版本是python3.4)里,我们应该如何操作excel. 首先在python3.4里,我们可以使用新的python类库,来支持3.x之后的读写excel 针对 03版 ...
- 用Python读写Excel文件(转)
原文:google.com/ncr 虽然天天跟数据打交道,也频繁地使用Excel进行一些简单的数据处理和展示,但长期以来总是小心地避免用Python直接读写Excel文件.通常我都是把数据保存为以TA ...
- 使用NPOI读写Excel、Word
NPOI 是 POI 项目的 .NET 版本.POI是一个开源的Java读写Excel.WORD等微软OLE2组件文档的项目. 使用 NPOI 你就可以在没有安装 Office 或者相应环境的机器上对 ...
随机推荐
- 练习 DOUBLE INSERT
练习 DOUBLE INSERT 目标:从一张表取数据插入到另一张表中,此外需要为插入的目标表做一个应用级的日志表,也就是说在插入目标表的同时,还需要将相同的数据插入到日志表中. 在案例一中,我们 ...
- C# DataTable 用法
1.创建DataTable DataTable dataTable = new DataTable(); //创建一个空表 2.创建DataRow DataRow row = dataTable.Ne ...
- [原]SuperMap GIS(JavaScript) 拉框放大和缩小功能实现
版权声明:本文为博主原创文章,未经博主允许不得转载. var ZoomControl; /* * 拉框缩小 */ function ZoomOut(){ if(ZoomControl==null||Z ...
- (转)用mysql自带工具mysqlslap对数据库进行压力测试
http://aolens.blog.51cto.com/7021142/1901557-------用mysql自带工具mysqlslap对数据库进行压力测试 mysqlslap是mysql自带的工 ...
- Flexbox 完全指南
Flexbox 完全指南 我不是这篇文章的原创作者,我只是好文章的搬运工.原文地址 A Complete Guide to Flexbox 应用于 flex container 的属性 display ...
- JavaScript技巧45招(转)
原文:45 Useful JavaScript Tips, Tricks and Best Practices作者:Saad Mousliki 在这篇文章里,我将分享一些JavaScript的技巧.秘 ...
- JavaScript设计模式系列学习笔记目录
说明 本系列笔记参考书籍<JavaScript设计模式>.<JavaScript高级程序设计3> 参考博客:汤姆大叔博客:http://www.cnblogs.com/TomX ...
- css用hover制作下拉菜单
首先我们的需求就是 制作一个鼠标移动到某个区域就会有下拉菜单的弹出,这样会有更多的子类内容,示例代码如下: <!DOCTYPE html> <html lang="en&q ...
- 虚拟机centos笔记整理,持续更新~~
远程拷贝文件:scp -r 文件名 主机名:完整路径名(冒号不能少)拷贝当前windows系统的文件到当前目录:rz -y 查找文件:updatedb 修改数据库locate 文件名 即可查找文件
- encodeURI和 encodeURIComponent 的作用及应用
首先解释下 encodeURIComponent 的作用:将文本字符串编码为一个有效的统一资源标识符 (URI).为什么要用这个是因为我想把 username 整个当做参数传递给 CGI, 而不让 C ...