
第六章 dubbo源码解析目录
从 9.1 客户端发起请求源码 的客户端请求总体流程图中,截取部分如下:
//代理发出请求

proxy0.sayHello(String paramString)

-->InvokerInvocationHandler.invoke(Object proxy, Method method, Object[] args)

  -->new RpcInvocation(method, args)

  -->MockClusterInvoker.invoke(Invocation invocation)//服务降级的地方
dubbo就是通过MockClusterInvoker来实现服务降级的。
一、示例
1 public interface DemoService {

2 //    String sayHello(String name);

3     Car sayHello(String name);

4 }
将dubbo-demo中的服务接口定义一个返回模型Car。提供者实现如下:

1 public class DemoServiceImpl implements DemoService {

2     public Car sayHello(String name) {

3         Car car = new Car();

4         car.setCarNum("浙A10000");

5         car.setGoMile(100);

6         return car;

7     }

8 }
消费者使用如下:
 1 public class Consumer {

 2     public static void main(String[] args) {

 3         ClassPathXmlApplicationContext context = new ClassPathXmlApplicationContext(new String[]{"META-INF/spring/dubbo-demo-consumer.xml"});

 4         context.start();

 5         DemoService demoService = (DemoService) context.getBean("demoService"); // get remote service proxy

 6

 7         while (true) {

 8             try {

 9                 Thread.sleep(1000);

10                 Car hello = demoService.sayHello("world"); // call remote method

11                 System.out.println(hello.getCarNum() + "-" + hello.getGoMile()); // get result

12             } catch (Throwable throwable) {

13                 throwable.printStackTrace();

14             }

15         }

16     }

17 }
二、使用方式
实际使用中,会通过直接在dubbo-admin中设置服务降级策略,这里使用dubbo用户手册中的方式来更清晰的看一下服务降级的配置(实际上就是进行配置覆盖)
配置规则:
1、使用自定义mock类(接口名+Mock)
- mock = default => DemoServiceMock
- mock = true => DemoServiceMock
- mock = fail => DemoServiceMock
- mock = force => DemoServiceMock
2、先普通执行,执行失败之后再执行相应的mock逻辑
- mock = fail:throw => throw new RpcException(" mocked exception for Service degradation. ");
- mock = fail:throw XxxException => throw new RpcException(RpcException.BIZ_EXCEPTION, XxxException);
- mock = fail:return => return null
- mock = fail:return xxx => return xxx
- mock = fail:return empty => return new Car()
3、直接执行相应的mock逻辑
- mock = force:throw => throw new RpcException(" mocked exception for Service degradation. ");
- mock = force:throw XxxException => throw new RpcException(RpcException.BIZ_EXCEPTION, XxxException);
- mock = force:return => return null
- mock = force:return xxx => return xxx
- mock = force:return empty => return new Car()
进行配置:
 1 public class DegradeTest {

 2     public static void main(String[] args) {

 3         RegistryFactory registryFactory = ExtensionLoader.getExtensionLoader(RegistryFactory.class).getAdaptiveExtension();

 4         Registry registry = registryFactory.getRegistry(URL.valueOf("zookeeper://10.211.55.5:2181"));

 5         // return null;

 6         registry.register(URL.valueOf("override://0.0.0.0/com.alibaba.dubbo.demo.DemoService?category=configurators&dynamic=false&application=demo-consumer&mock=force:return"));

 7         registry.register(URL.valueOf("override://0.0.0.0/com.alibaba.dubbo.demo.DemoService?category=configurators&dynamic=false&application=demo-consumer&mock=force:return+null"));

 8         // return 空对象;

 9         registry.register(URL.valueOf("override://0.0.0.0/com.alibaba.dubbo.demo.DemoService?category=configurators&dynamic=false&application=demo-consumer&mock=force:return+empty"));

10         // return value;

11         registry.register(URL.valueOf("override://0.0.0.0/com.alibaba.dubbo.demo.DemoService?category=configurators&dynamic=false&application=demo-consumer&mock=force:return+hello"));

12         // throw exception

13         registry.register(URL.valueOf("override://0.0.0.0/com.alibaba.dubbo.demo.DemoService?category=configurators&dynamic=false&application=demo-consumer&mock=force:throw"));

14         // throw custom-msg exception

15         registry.register(URL.valueOf("override://0.0.0.0/com.alibaba.dubbo.demo.DemoService?category=configurators&dynamic=false&application=demo-consumer&mock=force:throw+com.alibaba.dubbo.Test.MyRuntimeException"));

16         // 执行mock类

17         registry.register(URL.valueOf("override://0.0.0.0/com.alibaba.dubbo.demo.DemoService?category=configurators&dynamic=false&application=demo-consumer&mock=force:com.alibaba.dubbo.demo.DemoServiceMock"));

18     }

19 }
上述需要注意的是需要配置为“force:return+null”的格式而非“force:return null”。(实际上空格的url encode就是+号),上述代码的执行,实际上是在zk上创建configurators的子节点:

关于覆盖配置:http://dubbo.io/books/dubbo-user-book/demos/config-rule.html
override://表示数据采用覆盖方式,支持override和absent,可扩展,必填。0.0.0.0表示对所有 IP 地址生效,如果只想覆盖某个 IP 的数据,请填入具体 IP,必填。com.alibaba.dubbo.demo.DemoServicecategory=configurators表示该数据为动态配置类型,必填。dynamic=false表示该数据为持久数据,当注册方退出时,数据依然保存在注册中心,必填。enabled=true覆盖规则是否生效,可不填,缺省生效。application=demo-consumer表示只对指定应用生效,可不填,表示对所有应用生效。mock=force:return+nulloverride的 URL 参数上。
三、源码分析
 1 public class MockClusterInvoker<T> implements Invoker<T> {

 2     private final Directory<T> directory; //RegistryDirectory:存储invoker列表

 3     private final Invoker<T> invoker; //FailoverClusterInvoker:容错策略

 4

 5     public Result invoke(Invocation invocation) throws RpcException {

 6         Result result = null;

 7

 8         String value = directory.getUrl().getMethodParameter(invocation.getMethodName(), Constants.MOCK_KEY, Boolean.FALSE.toString()).trim();

 9         if (value.length() == 0 || value.equalsIgnoreCase("false")) {

10             //no mock

11             result = this.invoker.invoke(invocation);

12         } else if (value.startsWith("force")) {

13             ...

14             //force:direct mock

15             result = doMockInvoke(invocation, null);

16         } else {

17             //fail-mock

18             try {

19                 result = this.invoker.invoke(invocation);

20             } catch (RpcException e) {

21                 if (e.isBiz()) {

22                     throw e;

23                 } else {

24                     ...

25                     result = doMockInvoke(invocation, e);

26                 }

27             }

28         }

29         return result;

30     }

31 }
首先去获取mock参数,
- 如果没有配置,则直接使用FailoverClusterInvoker去正常的向provider发出请求;
- 如果配置为以force开头的,则直接执行doMockInvoke(Invocation invocation, RpcException e),不再向provider发送请求;
- 如果配置为以fail开头的,则先使用FailoverClusterInvoker去正常的向provider发出请求,如果失败抛出了非业务异常,则执行doMockInvoke(Invocation invocation, RpcException e);
 1     private Result doMockInvoke(Invocation invocation, RpcException e) {

 2         Result result = null;

 3         Invoker<T> minvoker;

 4

 5         List<Invoker<T>> mockInvokers = selectMockInvoker(invocation); //获取mock类型的Invoker

 6         if (mockInvokers == null || mockInvokers.size() == 0) {

 7             minvoker = (Invoker<T>) new MockInvoker(directory.getUrl()); //如果没有配置mock类型的Invoker,则自己创建一个MockInvoker

 8         } else {

 9             minvoker = mockInvokers.get(0);

10         }

11         try {

12             result = minvoker.invoke(invocation); //执行MockInvoker的invoke(Invocation invocation)方法

13         } catch (RpcException me) {

14             if (me.isBiz()) {

15                 result = new RpcResult(me.getCause());

16             } else { //非业务异常

17                 throw new RpcException(me.getCode(), getMockExceptionMessage(e, me), me.getCause());

18             }

19         } catch (Throwable me) {

20             throw new RpcException(getMockExceptionMessage(e, me), me.getCause());

21         }

22         return result;

23     }
从RegistryDirectory中获取MockInvoker:
 1     /**

 2      * Return MockInvoker

 3      * Contract:

 4      * directory.list() will return a list of normal invokers if Constants.INVOCATION_NEED_MOCK is present in invocation, otherwise, a list of mock invokers will return.

 5      * if directory.list() returns more than one mock invoker, only one of them will be used.

 6      *

 7      * @param invocation

 8      * @return

 9      */

10     private List<Invoker<T>> selectMockInvoker(Invocation invocation) {

11         List<Invoker<T>> invokers = null;

12         //TODO generic invoker?

13         if (invocation instanceof RpcInvocation) {

14             //Note the implicit contract (although the description is added to the interface declaration, but extensibility is a problem. The practice placed in the attachement needs to be improved)

15             ((RpcInvocation) invocation).setAttachment(Constants.INVOCATION_NEED_MOCK, Boolean.TRUE.toString());

16             //directory will return a list of normal invokers if Constants.INVOCATION_NEED_MOCK is present in invocation, otherwise, a list of mock invokers will return.

17             try {

18                 invokers = directory.list(invocation);

19             } catch (RpcException e) {

20                 if (logger.isInfoEnabled()) {

21                     logger.info("Exception when try to invoke mock. Get mock invokers error for service:"

22                             + directory.getUrl().getServiceInterface() + ", method:" + invocation.getMethodName()

23                             + ", will contruct a new mock with 'new MockInvoker()'.", e);

24                 }

25             }

26         }

27         return invokers;

28     }
首先使用RegistryDirectory获取出方法名为sayHello的Invoker列表,之后使用MockInvokersSelector(Router)选取出MockInvoker。
 1 public class MockInvokersSelector implements Router {

 2

 3     public <T> List<Invoker<T>> route(final List<Invoker<T>> invokers,

 4                                       URL url, final Invocation invocation) throws RpcException {

 5         if (invocation.getAttachments() == null) {

 6             return getNormalInvokers(invokers);

 7         } else {

 8             String value = invocation.getAttachments().get(Constants.INVOCATION_NEED_MOCK);

 9             if (value == null)

10                 return getNormalInvokers(invokers);

11             else if (Boolean.TRUE.toString().equalsIgnoreCase(value)) {

12                 return getMockedInvokers(invokers);

13             }

14         }

15         return invokers;

16     }

17

18     private <T> List<Invoker<T>> getMockedInvokers(final List<Invoker<T>> invokers) {

19         if (!hasMockProviders(invokers)) {

20             return null;

21         }

22         List<Invoker<T>> sInvokers = new ArrayList<Invoker<T>>(1);

23         for (Invoker<T> invoker : invokers) {

24             if (invoker.getUrl().getProtocol().equals(Constants.MOCK_PROTOCOL)) {

25                 sInvokers.add(invoker);

26             }

27         }

28         return sInvokers;

29     }

30

31     private <T> boolean hasMockProviders(final List<Invoker<T>> invokers) {

32         boolean hasMockProvider = false;

33         for (Invoker<T> invoker : invokers) {

34             if (invoker.getUrl().getProtocol().equals(Constants.MOCK_PROTOCOL)) {

35                 hasMockProvider = true;

36                 break;

37             }

38         }

39         return hasMockProvider;

40     }

41 }
这里获取到的是空列表。
所以会先创建一个MockInvoker对象,之后执行其invoker方法。
MockInvoker:
 1     public Result invoke(Invocation invocation) throws RpcException {

 2         String mock = getUrl().getParameter(invocation.getMethodName() + "." + Constants.MOCK_KEY); //sayHello.mock

 3         if (invocation instanceof RpcInvocation) {

 4             ((RpcInvocation) invocation).setInvoker(this);

 5         }

 6         if (StringUtils.isBlank(mock)) {

 7             mock = getUrl().getParameter(Constants.MOCK_KEY); //mock

 8         }

 9

10         if (StringUtils.isBlank(mock)) {

11             throw new RpcException(new IllegalAccessException("mock can not be null. url :" + url));

12         }

13         mock = normallizeMock(URL.decode(mock));

14         if (Constants.RETURN_PREFIX.trim().equalsIgnoreCase(mock.trim())) { // return

15             RpcResult result = new RpcResult();

16             result.setValue(null);

17             return result;

18         } else if (mock.startsWith(Constants.RETURN_PREFIX)) { // return value(包括return null)

19             mock = mock.substring(Constants.RETURN_PREFIX.length()).trim();

20             mock = mock.replace('`', '"');

21             try {

22                 Type[] returnTypes = RpcUtils.getReturnTypes(invocation);

23                 Object value = parseMockValue(mock, returnTypes);

24                 return new RpcResult(value);

25             } catch (Exception ew) {

26                 throw new RpcException("mock return invoke error. method :" + invocation.getMethodName() + ", mock:" + mock + ", url: " + url, ew);

27             }

28         } else if (mock.startsWith(Constants.THROW_PREFIX)) { // throw xxx

29             mock = mock.substring(Constants.THROW_PREFIX.length()).trim();

30             mock = mock.replace('`', '"');

31             if (StringUtils.isBlank(mock)) {// throw

32                 throw new RpcException(" mocked exception for Service degradation. ");

33             } else { // user customized class : throw xxx

34                 Throwable t = getThrowable(mock);

35                 throw new RpcException(RpcException.BIZ_EXCEPTION, t);

36             }

37         } else { //impl mock: 自定义mock类

38             try {

39                 Invoker<T> invoker = getInvoker(mock);

40                 return invoker.invoke(invocation);

41             } catch (Throwable t) {

42                 throw new RpcException("Failed to create mock implemention class " + mock, t);

43             }

44         }

45     }
首先获取到mock配置,例如:mock=force:return+null,之后进行url解码为mock=force:return null,最后进行处理为mock=return null,然后根据规则走分支。
mock参数的处理函数:
 1     /**

 2      * 一、使用自定义mock类

 3      * mock = default => DemoServiceMock

 4      * mock = true => DemoServiceMock

 5      * mock = fail => DemoServiceMock

 6      * mock = force => DemoServiceMock

 7      *

 8      * 二、先普通执行,执行失败之后再执行相应的mock逻辑

 9      * mock = fail:throw => throw new RpcException(" mocked exception for Service degradation. ");

10      * mock = fail:throw XxxException => throw new RpcException(RpcException.BIZ_EXCEPTION, XxxException);

11      * mock = fail:return => return null

12      * mock = fail:return xxx => return xxx

13      *

14      * 三、直接执行相应的mock逻辑

15      * mock = force:throw => throw new RpcException(" mocked exception for Service degradation. ");

16      * mock = force:throw XxxException => throw new RpcException(RpcException.BIZ_EXCEPTION, XxxException);

17      * mock = force:return => return null

18      * mock = force:return xxx => return xxx

19      *

20      * @param mock

21      * @return

22      */

23     private String normallizeMock(String mock) {

24         if (mock == null || mock.trim().length() == 0) {

25             return mock;

26         } else if (ConfigUtils.isDefault(mock) || "fail".equalsIgnoreCase(mock.trim()) || "force".equalsIgnoreCase(mock.trim())) {

27             mock = url.getServiceInterface() + "Mock";

28         }

29         if (mock.startsWith(Constants.FAIL_PREFIX)) {

30             mock = mock.substring(Constants.FAIL_PREFIX.length()).trim();

31         } else if (mock.startsWith(Constants.FORCE_PREFIX)) {

32             mock = mock.substring(Constants.FORCE_PREFIX.length()).trim();

33         }

34         return mock;

35     }
我们这里来看一下自定义mock类。消费端编写:
 1 public class DemoServiceMock implements DemoService {

 2

 3     @Override

 4     public Car sayHello(String name) {

 5         Car car = new Car();

 6         car.setCarNum("mock中");

 7         car.setGoMile(666);

 8         return car;

 9     }

10 }
配置覆盖:
1 registry.register(URL.valueOf("override://0.0.0.0/com.alibaba.dubbo.demo.DemoService?category=configurators&dynamic=false&application=demo-consumer&mock=force:com.alibaba.dubbo.demo.DemoServiceMock"));
MockInvoker.invoke
1             try {

2                 Invoker<T> invoker = getInvoker(mock);

3                 return invoker.invoke(invocation);

4             } catch (Throwable t) {

5                 throw new RpcException("Failed to create mock implemention class " + mock, t);

6             }
 1     private Invoker<T> getInvoker(String mockService) {

 2         Invoker<T> invoker = (Invoker<T>) mocks.get(mockService);

 3         if (invoker != null) {

 4             return invoker;

 5         } else {

 6             Class<T> serviceType = (Class<T>) ReflectUtils.forName(url.getServiceInterface());

 7             if (ConfigUtils.isDefault(mockService)) {

 8                 mockService = serviceType.getName() + "Mock";

 9             }

10

11             Class<?> mockClass = ReflectUtils.forName(mockService);

12             if (!serviceType.isAssignableFrom(mockClass)) {

13                 throw new IllegalArgumentException("The mock implemention class " + mockClass.getName() + " not implement interface " + serviceType.getName());

14             }

15

16             if (!serviceType.isAssignableFrom(mockClass)) {

17                 throw new IllegalArgumentException("The mock implemention class " + mockClass.getName() + " not implement interface " + serviceType.getName());

18             }

19             try {

20                 T mockObject = (T) mockClass.newInstance(); // 获取自定义mock类实例

21                 invoker = proxyFactory.getInvoker(mockObject, (Class<T>) serviceType, url); // 和普通类一样创建Invoker

22                 if (mocks.size() < 10000) {

23                     mocks.put(mockService, invoker);

24                 }

25                 return invoker;

26             } catch (InstantiationException e) {

27                 throw new IllegalStateException("No such empty constructor \"public " + mockClass.getSimpleName() + "()\" in mock implemention class " + mockClass.getName(), e);

28             } catch (IllegalAccessException e) {

29                 throw new IllegalStateException(e);

30             }

31         }

32     }
上边看了return和自定义mock类,最后来看一下throw异常。
默认抛出RpcException,异常信息:mocked exception for Service degradation. 也可以自定义异常,例如:
1 public class MyRuntimeException extends RuntimeException {

2     private String msg;

3

4     public MyRuntimeException(String msg){

5         this.msg = msg;

6     }

7 }
自定义异常必须具有单参构造器且参数为String。
配置覆盖:
MockInvoker.invoke
1 registry.register(URL.valueOf("override://0.0.0.0/com.alibaba.dubbo.demo.DemoService?category=configurators&dynamic=false&application=demo-consumer&mock=force:throw+com.alibaba.dubbo.Test.MyRuntimeException"));
 1     private Throwable getThrowable(String throwstr) {

 2         Throwable throwable = (Throwable) throwables.get(throwstr);

 3         if (throwable != null) {

 4             return throwable;

 5         } else {

 6             Throwable t = null;

 7             try {

 8                 Class<?> bizException = ReflectUtils.forName(throwstr);

 9                 Constructor<?> constructor;

10                 constructor = ReflectUtils.findConstructor(bizException, String.class);

11                 t = (Throwable) constructor.newInstance(new Object[]{" mocked exception for Service degradation. "});

12                 if (throwables.size() < 1000) {

13                     throwables.put(throwstr, t);

14                 }

15             } catch (Exception e) {

16                 throw new RpcException("mock throw error :" + throwstr + " argument error.", e);

17             }

18             return t;

19         }

20     }
服务降级结束!!!
dubbo提供了三种结果缓存机制:
- lru:基于最近最少使用原则删除多余缓存,保持最热的数据被缓存
- threadlocal:当前线程缓存
- jcache:可以桥接各种缓存实现
一、使用方式
1     <dubbo:reference id="demoService" check="false" interface="com.alibaba.dubbo.demo.DemoService">

2         <dubbo:method name="sayHello" timeout="60000" cache="lru"/>

3     </dubbo:reference>
添加cache配置。
注意:dubbo结果缓存有一个bug,https://github.com/alibaba/dubbo/issues/1362,当cache="xxx"配置在服务级别时,没有问题,当配置成方法级别的时候,不管怎么配置,都睡使用LruCache。
二、LRU缓存源码解析
 1 /**

 2  * CacheFilter

 3  * 配置了cache配置才会加载CacheFilter

 4  */

 5 @Activate(group = {Constants.CONSUMER, Constants.PROVIDER}, value = Constants.CACHE_KEY)

 6 public class CacheFilter implements Filter {

 7     private CacheFactory cacheFactory;

 8

 9     public void setCacheFactory(CacheFactory cacheFactory) {

10         this.cacheFactory = cacheFactory;

11     }

12

13     public Result invoke(Invoker<?> invoker, Invocation invocation) throws RpcException {

14         if (cacheFactory != null && ConfigUtils.isNotEmpty(invoker.getUrl().getMethodParameter(invocation.getMethodName(), Constants.CACHE_KEY))) {

15             // 使用CacheFactory$Adaptive获取具体的CacheFactory,然后再使用具体的CacheFactory获取具体的Cache对象

16             Cache cache = cacheFactory.getCache(invoker.getUrl().addParameter(Constants.METHOD_KEY, invocation.getMethodName()));

17             if (cache != null) {

18                 // 缓存对象的key为arg1,arg2,arg3,...,arg4

19                 String key = StringUtils.toArgumentString(invocation.getArguments());

20                 // 获取缓存value

21                 Object value = cache.get(key);

22                 if (value != null) {

23                     return new RpcResult(value);

24                 }

25                 Result result = invoker.invoke(invocation);

26                 // 响应结果没有exception信息,则将相应结果的值塞入缓存

27                 if (!result.hasException()) {

28                     cache.put(key, result.getValue());

29                 }

30                 return result;

31             }

32         }

33         return invoker.invoke(invocation);

34     }

35 }
从@Activate(group = {Constants.CONSUMER, Constants.PROVIDER}, value = Constants.CACHE_KEY)中我们可以看出,consumer端或provider端配置了cache="xxx",则会走该CacheFilter。
首先获取具体Cache实例:CacheFilter中的cacheFactory属性是CacheFactory$Adaptive实例。
 1 public class CacheFactory$Adaptive implements com.alibaba.dubbo.cache.CacheFactory {

 2     public com.alibaba.dubbo.cache.Cache getCache(com.alibaba.dubbo.common.URL arg0) {

 3         if (arg0 == null) throw new IllegalArgumentException("url == null");

 4         com.alibaba.dubbo.common.URL url = arg0;

 5         String extName = url.getParameter("cache", "lru");

 6         if (extName == null)

 7             throw new IllegalStateException("Fail to get extension(com.alibaba.dubbo.cache.CacheFactory) name from url(" + url.toString() + ") use keys([cache])");

 8         // 获取具体的CacheFactory

 9         com.alibaba.dubbo.cache.CacheFactory extension = (com.alibaba.dubbo.cache.CacheFactory) ExtensionLoader.getExtensionLoader(com.alibaba.dubbo.cache.CacheFactory.class).getExtension(extName);

10         // 使用具体的CacheFactory获取具体的Cache

11         return extension.getCache(arg0);

12     }

13 }
这里extName使我们配置的lru,如果不配置,默认也是lru。这里获取到的具体的CacheFactory是LruCacheFactory。
 1 @SPI("lru")

 2 public interface CacheFactory {

 3     @Adaptive("cache")

 4     Cache getCache(URL url);

 5 }

 6

 7 public abstract class AbstractCacheFactory implements CacheFactory {

 8     private final ConcurrentMap<String, Cache> caches = new ConcurrentHashMap<String, Cache>();

 9

10     public Cache getCache(URL url) {

11         String key = url.toFullString();

12         Cache cache = caches.get(key);

13         if (cache == null) {

14             caches.put(key, createCache(url));

15             cache = caches.get(key);

16         }

17         return cache;

18     }

19

20     protected abstract Cache createCache(URL url);

21 }

22

23 public class LruCacheFactory extends AbstractCacheFactory {

24     protected Cache createCache(URL url) {

25         return new LruCache(url);

26     }

27 }
调用LruCacheFactory.getCache(URL url)方法,实际上调用的是其父类AbstractCacheFactory的方法。逻辑是:创建一个LruCache实例,之后存储在ConcurrentMap<String, Cache> caches中,key为url.toFullString()。
再来看LruCache的创建:
 1 public interface Cache {

 2     void put(Object key, Object value);

 3     Object get(Object key);

 4 }

 5

 6 public class LruCache implements Cache {

 7     private final Map<Object, Object> store;

 8

 9     public LruCache(URL url) {

10         final int max = url.getParameter("cache.size", 1000);

11         this.store = new LRUCache<Object, Object>(max);

12     }

13

14     public void put(Object key, Object value) {

15         store.put(key, value);

16     }

17

18     public Object get(Object key) {

19         return store.get(key);

20     }

21 }
默认缓存存储的最大个数为1000个。之后创建了一个LRUCache对象。
 1 public class LRUCache<K, V> extends LinkedHashMap<K, V> {

 2     private static final long serialVersionUID = -5167631809472116969L;

 3

 4     private static final float DEFAULT_LOAD_FACTOR = 0.75f;

 5

 6     private static final int DEFAULT_MAX_CAPACITY = 1000;

 7     private final Lock lock = new ReentrantLock();

 8     private volatile int maxCapacity;

 9

10     public LRUCache(int maxCapacity) {

11         /**

12          * 注意:

13          * LinkedHashMap 维护着一个运行于所有Entry的双向链表:此链表定义了迭代顺序,该迭代顺序可以是插入顺序或者是访问顺序

14          * 而真正存储的数据结构还是其父类HashMap的那个Entry[]数组,上述的双向链表仅用于维护迭代顺序(帮助实现lru算法等)

15          *

16          * LinkedHashMap(int initialCapacity, float loadFactor, boolean accessOrder)

17          * 第三个参数accessOrder:false(插入顺序),true(访问顺序)

18          */

19         super(16, DEFAULT_LOAD_FACTOR, true);

20         this.maxCapacity = maxCapacity;

21     }

22

23     /**

24      * 是否需要删除最老的数据(即最近没有被访问的数据)

25      * @param eldest

26      * @return

27      */

28     @Override

29     protected boolean removeEldestEntry(java.util.Map.Entry<K, V> eldest) {

30         return size() > maxCapacity;

31     }

32

33     @Override

34     public V get(Object key) {

35         try {

36             lock.lock();

37             return super.get(key);

38         } finally {

39             lock.unlock();

40         }

41     }

42

43     @Override

44     public V put(K key, V value) {

45         try {

46             lock.lock();

47             return super.put(key, value);

48         } finally {

49             lock.unlock();

50         }

51     }

52

53     @Override

54     public V remove(Object key) {

55         try {

56             lock.lock();

57             return super.remove(key);

58         } finally {

59             lock.unlock();

60         }

61     }

62

63     @Override

64     public int size() {

65         try {

66             lock.lock();

67             return super.size();

68         } finally {

69             lock.unlock();

70         }

71     }

72     ...

73 }
注意:
- LinkedHashMap维护着一个运行于所有Entry的双向链表:此链表定义了迭代顺序,该迭代顺序可以是插入顺序或者是访问顺序(真正存储的数据结构还是其父类HashMap的那个Entry[]数组,上述的双向链表仅用于维护迭代顺序)
- 当指定了LinkedHashMap(int initialCapacity, float loadFactor, boolean accessOrder)第三个参数accessOrder=true时,每次执行get(Object key)时,获取出来的Entry都会被放到尾节点,也就是说双向链表的header节点是最久以前访问的,当执行put(Object key, Object value)的时候,就执行removeEldestEntry(java.util.Map.Entry<K, V> eldest)来判断是否需要删除这个header节点。(这些是LinkedHashMap实现的,具体源码分析见 https://yikun.github.io/2015/04/02/Java-LinkedHashMap%E5%B7%A5%E4%BD%9C%E5%8E%9F%E7%90%86%E5%8F%8A%E5%AE%9E%E7%8E%B0/ http://wiki.jikexueyuan.com/project/java-collection/linkedhashmap.html)
三、ThreadLocal缓存源码解析
根据文章开头提到的bug,cache=""只能配置在服务级别。
1 <dubbo:reference id="demoService" check="false" interface="com.alibaba.dubbo.demo.DemoService" cache="threadlocal"/>
 1 public class ThreadLocalCacheFactory extends AbstractCacheFactory {

 2     protected Cache createCache(URL url) {

 3         return new ThreadLocalCache(url);

 4     }

 5 }

 6

 7 public class ThreadLocalCache implements Cache {

 8     private final ThreadLocal<Map<Object, Object>> store;

 9

10     public ThreadLocalCache(URL url) {

11         this.store = new ThreadLocal<Map<Object, Object>>() {

12             @Override

13             protected Map<Object, Object> initialValue() {

14                 return new HashMap<Object, Object>();

15             }

16         };

17     }

18

19     public void put(Object key, Object value) {

20         store.get().put(key, value);

21     }

22

23     public Object get(Object key) {

24         return store.get().get(key);

25     }

26 }
ThreadLocalCache的实现是HashMap。
监控总体图:
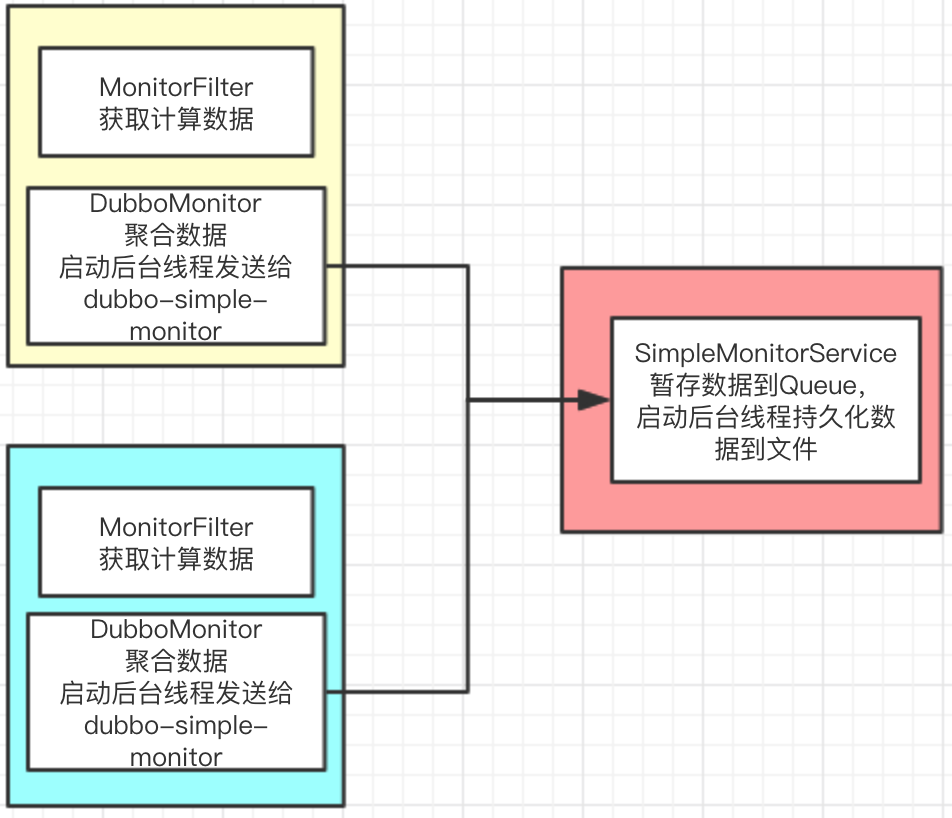
红色:监控中心 - dubbo-simple-monitor
黄色:provider
蓝色:consumer
统计总体流程:
- MonitorFilter向DubboMonitor发送数据
- DubboMonitor将数据进行聚合后(默认聚合1min中的统计数据)暂存到ConcurrentMap<Statistics, AtomicReference<long[]>> statisticsMap,然后使用一个含有3个线程(线程名字:DubboMonitorSendTimer)的线程池每隔1min钟,调用SimpleMonitorService遍历发送statisticsMap中的统计数据,每发送完毕一个,就重置当前的Statistics的AtomicReference<long[]>
- SimpleMonitorService将这些聚合数据塞入BlockingQueue<URL> queue中(队列大写为100000)
- SimpleMonitorService使用一个后台线程(线程名为:DubboMonitorAsyncWriteLogThread)将queue中的数据写入文件(该线程以死循环的形式来写)
- SimpleMonitorService还会使用一个含有1个线程(线程名字:DubboMonitorTimer)的线程池每隔5min钟,将文件中的统计数据画成图表
注意:
- SimpleMonitorService理解为一个服务提供者;而provider和consumer都是一个服务消费者,所以二者的DubboMonitor中的MonitorService实例都是一个代理实例。
- dubbo-monitor计数监控不支持异步调用下的数据监控
一、dubbo-monitor使用
在配置文件中添加:
1 <dubbo:monitor address="10.211.55.5:9090" />
即开启了monitor监控,并且指定了监控中心服务器为“10.211.55.5:9090”。
9090端口是Prometheus的默认端口,dubbo提供的监控中心比较简陋,我们后续会使用Prometheus作为监控中心来存储监控数据。
二、服务端加载monitor配置
doExportUrlsFor1Protocol(ProtocolConfig protocolConfig, List<URL> registryURLs)中:
 1             if (!Constants.SCOPE_LOCAL.toString().equalsIgnoreCase(scope)) {

 2                 ...

 3                 if (registryURLs != null && registryURLs.size() > 0) {

 4                     for (URL registryURL : registryURLs) {

 5                         ...

 6                         URL monitorUrl = loadMonitor(registryURL);

 7                         if (monitorUrl != null) {

 8                             url = url.addParameterAndEncoded(Constants.MONITOR_KEY, monitorUrl.toFullString());

 9                         }

10                        ...

11                     }

12                 } else {

13                     ...

14                 }

15             }
其中loadMonitor(URL registryURL)方法主要用于创建MonitorConfig对象(如果monitor配置在dubbo.properties中的话),并且设置属性,之后设置到数据总线Url中。
 1     protected URL loadMonitor(URL registryURL) {

 2         if (monitor == null) {

 3             String monitorAddress = ConfigUtils.getProperty("dubbo.monitor.address");

 4             String monitorProtocol = ConfigUtils.getProperty("dubbo.monitor.protocol");

 5             if ((monitorAddress == null || monitorAddress.length() == 0) && (monitorProtocol == null || monitorProtocol.length() == 0)) {

 6                 return null;

 7             }

 8

 9             monitor = new MonitorConfig();

10             if (monitorAddress != null && monitorAddress.length() > 0) {

11                 monitor.setAddress(monitorAddress);

12             }

13             if (monitorProtocol != null && monitorProtocol.length() > 0) {

14                 monitor.setProtocol(monitorProtocol);

15             }

16         }

17         appendProperties(monitor);

18         ...

19     }
三、消费端加载monitor配置
createProxy(Map<String, String> map)中:
 1                 List<URL> us = loadRegistries(false);

 2                 if (us != null && us.size() > 0) {

 3                     for (URL u : us) {

 4                         URL monitorUrl = loadMonitor(u);

 5                         if (monitorUrl != null) {

 6                             map.put(Constants.MONITOR_KEY, URL.encode(monitorUrl.toFullString()));

 7                         }

 8                         ...

 9                     }

10                 }
四、MonitorFilter收集监控数据
consumer端在发起调用之前会先走filter链;provider端在接收到请求时也是先走filter链,然后才进行真正的业务逻辑处理。默认情况下,在consumer和provider的filter链中都会有Monitorfilter。
  1 /**

  2  * MonitorFilter. (SPI, Singleton, ThreadSafe)

  3  */

  4 @Activate(group = {Constants.PROVIDER, Constants.CONSUMER})

  5 public class MonitorFilter implements Filter {

  6

  7     private static final Logger logger = LoggerFactory.getLogger(MonitorFilter.class);

  8

  9     // key: 接口名.方法名 value: 当前的并发数

 10     private final ConcurrentMap<String, AtomicInteger> concurrents = new ConcurrentHashMap<String, AtomicInteger>();

 11

 12     private MonitorFactory monitorFactory;// MonitorFactory$Adaptive

 13

 14     public void setMonitorFactory(MonitorFactory monitorFactory) {

 15         this.monitorFactory = monitorFactory;

 16     }

 17

 18     // intercepting invocation

 19     public Result invoke(Invoker<?> invoker, Invocation invocation) throws RpcException {

 20         if (invoker.getUrl().hasParameter(Constants.MONITOR_KEY)) {// 开启了monitor监控

 21             RpcContext context = RpcContext.getContext(); // provider must fetch context before invoke() gets called

 22             String remoteHost = context.getRemoteHost();

 23             long start = System.currentTimeMillis(); // record start timestamp

 24             getConcurrent(invoker, invocation).incrementAndGet(); // 并发数+1

 25             try {

 26                 Result result = invoker.invoke(invocation); // proceed invocation chain

 27                 collect(invoker, invocation, result, remoteHost, start, false);// 收集统计数据

 28                 return result;

 29             } catch (RpcException e) {

 30                 collect(invoker, invocation, null, remoteHost, start, true);// 发生异常时收集统计数据

 31                 throw e;

 32             } finally {

 33                 getConcurrent(invoker, invocation).decrementAndGet(); // 并发数-1

 34             }

 35         } else {

 36             return invoker.invoke(invocation);

 37         }

 38     }

 39

 40     // collect info

 41     private void collect(Invoker<?> invoker, Invocation invocation, Result result, String remoteHost, long start, boolean error) {

 42         try {

 43             // ---- service statistics ----

 44             long elapsed = System.currentTimeMillis() - start; // 此次调用花费的时间

 45             int concurrent = getConcurrent(invoker, invocation).get(); // current concurrent count

 46             String application = invoker.getUrl().getParameter(Constants.APPLICATION_KEY);

 47             String service = invoker.getInterface().getName(); // service name

 48             String method = RpcUtils.getMethodName(invocation); // method name

 49             URL url = invoker.getUrl().getUrlParameter(Constants.MONITOR_KEY);

 50             Monitor monitor = monitorFactory.getMonitor(url);//根据monitorUrl获取Monitor实现(默认使用DubboMonitor)

 51             if (monitor == null) {

 52                 return;

 53             }

 54             int localPort;

 55             String remoteKey;

 56             String remoteValue;

 57             if (Constants.CONSUMER_SIDE.equals(invoker.getUrl().getParameter(Constants.SIDE_KEY))) {

 58                 // ---- for service consumer ----

 59                 localPort = 0;

 60                 remoteKey = MonitorService.PROVIDER;

 61                 remoteValue = invoker.getUrl().getAddress();

 62             } else {

 63                 // ---- for service provider ----

 64                 localPort = invoker.getUrl().getPort();

 65                 remoteKey = MonitorService.CONSUMER;

 66                 remoteValue = remoteHost;

 67             }

 68             String input = "", output = "";

 69             if (invocation.getAttachment(Constants.INPUT_KEY) != null) {

 70                 input = invocation.getAttachment(Constants.INPUT_KEY);

 71             }

 72             if (result != null && result.getAttachment(Constants.OUTPUT_KEY) != null) {

 73                 output = result.getAttachment(Constants.OUTPUT_KEY);

 74             }

 75             monitor.collect(new URL(Constants.COUNT_PROTOCOL,

 76                     NetUtils.getLocalHost(), localPort,

 77                     service + "/" + method,

 78                     MonitorService.APPLICATION, application,

 79                     MonitorService.INTERFACE, service,

 80                     MonitorService.METHOD, method,

 81                     remoteKey, remoteValue,

 82                     error ? MonitorService.FAILURE : MonitorService.SUCCESS, "1",// 成功失败数

 83                     MonitorService.ELAPSED, String.valueOf(elapsed),// 调用消耗的时间

 84                     MonitorService.CONCURRENT, String.valueOf(concurrent),// 并发数

 85                     Constants.INPUT_KEY, input,

 86                     Constants.OUTPUT_KEY, output));

 87         } catch (Throwable t) {

 88             logger.error("Failed to monitor count service " + invoker.getUrl() + ", cause: " + t.getMessage(), t);

 89         }

 90     }

 91

 92     // concurrent counter

 93     private AtomicInteger getConcurrent(Invoker<?> invoker, Invocation invocation) {

 94         String key = invoker.getInterface().getName() + "." + invocation.getMethodName();

 95         AtomicInteger concurrent = concurrents.get(key);

 96         if (concurrent == null) {

 97             concurrents.putIfAbsent(key, new AtomicInteger());

 98             concurrent = concurrents.get(key);

 99         }

100         return concurrent;

101     }

102

103 }
调用之前,记录调用开始时间、并发数,之后进行调用,最后进行统计数据收集:
- 获取计算各种统计数据(调用消耗时间、调用成功/错误数等)
- 使用MonitorFactory获取Monitor
- 将统计数据构造成url
- 使用Monitor收集这些统计数据
获取Monitor的源码后续再说。这里获取到的是DubboMonitor实例。
五、DubboMonitor聚合监控数据
 1     private static final int LENGTH = 10;

 2     private final ConcurrentMap<Statistics, AtomicReference<long[]>> statisticsMap = new ConcurrentHashMap<Statistics, AtomicReference<long[]>>();

 3

 4     // 聚合统计数据

 5     public void collect(URL url) {

 6         // data to collect from url

 7         int success = url.getParameter(MonitorService.SUCCESS, 0);

 8         int failure = url.getParameter(MonitorService.FAILURE, 0);

 9         int input = url.getParameter(MonitorService.INPUT, 0);

10         int output = url.getParameter(MonitorService.OUTPUT, 0);

11         int elapsed = url.getParameter(MonitorService.ELAPSED, 0);

12         int concurrent = url.getParameter(MonitorService.CONCURRENT, 0);

13         // init atomic reference

14         Statistics statistics = new Statistics(url);

15         AtomicReference<long[]> reference = statisticsMap.get(statistics);

16         if (reference == null) {

17             statisticsMap.putIfAbsent(statistics, new AtomicReference<long[]>());

18             reference = statisticsMap.get(statistics);

19         }

20         // use CompareAndSet to sum

21         long[] current;

22         long[] update = new long[LENGTH];

23         do {

24             current = reference.get();

25             if (current == null) {

26                 update[0] = success;

27                 update[1] = failure;

28                 update[2] = input;

29                 update[3] = output;

30                 update[4] = elapsed;

31                 update[5] = concurrent;

32                 update[6] = input;

33                 update[7] = output;

34                 update[8] = elapsed;

35                 update[9] = concurrent;

36             } else {

37                 update[0] = current[0] + success;

38                 update[1] = current[1] + failure;

39                 update[2] = current[2] + input;

40                 update[3] = current[3] + output;

41                 update[4] = current[4] + elapsed;

42                 update[5] = (current[5] + concurrent) / 2;

43                 update[6] = current[6] > input ? current[6] : input;

44                 update[7] = current[7] > output ? current[7] : output;

45                 update[8] = current[8] > elapsed ? current[8] : elapsed;

46                 update[9] = current[9] > concurrent ? current[9] : concurrent;

47             }

48         } while (!reference.compareAndSet(current, update));

49     }
实际上这里聚合了1min钟的统计数据到statisticsMap中。
六、Monitor使用MonitorService存储数据到队列
 1     private final ScheduledExecutorService scheduledExecutorService = Executors.newScheduledThreadPool(3, new NamedThreadFactory("DubboMonitorSendTimer", true));

 2     private final ScheduledFuture<?> sendFuture;

 3     private final long monitorInterval;

 4

 5     public DubboMonitor(Invoker<MonitorService> monitorInvoker, MonitorService monitorService) {

 6         this.monitorInvoker = monitorInvoker;

 7         this.monitorService = monitorService;

 8         this.monitorInterval = monitorInvoker.getUrl().getPositiveParameter("interval", 60000);

 9         // collect timer for collecting statistics data

10         sendFuture = scheduledExecutorService.scheduleWithFixedDelay(new Runnable() {

11             public void run() {

12                 // collect data

13                 try {

14                     send();

15                 } catch (Throwable t) {

16                     logger.error("Unexpected error occur at send statistic, cause: " + t.getMessage(), t);

17                 }

18             }

19         }, monitorInterval, monitorInterval, TimeUnit.MILLISECONDS);

20     }
 1     public void send() {

 2         if (logger.isInfoEnabled()) {

 3             logger.info("Send statistics to monitor " + getUrl());

 4         }

 5         String timestamp = String.valueOf(System.currentTimeMillis());

 6         for (Map.Entry<Statistics, AtomicReference<long[]>> entry : statisticsMap.entrySet()) {

 7             // get statistics data

 8             Statistics statistics = entry.getKey();

 9             AtomicReference<long[]> reference = entry.getValue();

10             long[] numbers = reference.get();

11             long success = numbers[0];

12             long failure = numbers[1];

13             long input = numbers[2];

14             long output = numbers[3];

15             long elapsed = numbers[4];

16             long concurrent = numbers[5];

17             long maxInput = numbers[6];

18             long maxOutput = numbers[7];

19             long maxElapsed = numbers[8];

20             long maxConcurrent = numbers[9];

21

22             // send statistics data

23             URL url = statistics.getUrl()

24                     .addParameters(MonitorService.TIMESTAMP, timestamp,

25                             MonitorService.SUCCESS, String.valueOf(success),

26                             MonitorService.FAILURE, String.valueOf(failure),

27                             MonitorService.INPUT, String.valueOf(input),

28                             MonitorService.OUTPUT, String.valueOf(output),

29                             MonitorService.ELAPSED, String.valueOf(elapsed),

30                             MonitorService.CONCURRENT, String.valueOf(concurrent),

31                             MonitorService.MAX_INPUT, String.valueOf(maxInput),

32                             MonitorService.MAX_OUTPUT, String.valueOf(maxOutput),

33                             MonitorService.MAX_ELAPSED, String.valueOf(maxElapsed),

34                             MonitorService.MAX_CONCURRENT, String.valueOf(maxConcurrent)

35                     );

36             monitorService.collect(url);

37

38             // reset

39             long[] current;

40             long[] update = new long[LENGTH];

41             do {

42                 current = reference.get();

43                 if (current == null) {

44                     update[0] = 0;

45                     update[1] = 0;

46                     update[2] = 0;

47                     update[3] = 0;

48                     update[4] = 0;

49                     update[5] = 0;

50                 } else {

51                     update[0] = current[0] - success;

52                     update[1] = current[1] - failure;

53                     update[2] = current[2] - input;

54                     update[3] = current[3] - output;

55                     update[4] = current[4] - elapsed;

56                     update[5] = current[5] - concurrent;

57                 }

58             } while (!reference.compareAndSet(current, update));

59         }

60     }
- 首先从聚合数据存储器statisticsMap中获取相关统计数据并存储到数据总线Url中
- 之后调用MonitorService(这里是SimpleMonitorService),将统计数据存储到一个BlockingQueue中
注意:这里有一个改进点
- 由于monitorService.collect(url)是远程调用,这里在for循环体中执行远程调用,实际上是不合适的,我们可以将所有的url先暂存在一个List<URL>中,最后,使用一次monitorService.collect(urlList)即可 - 此时,可适当缩短数据发送时间。
SimpleMonitorService:
1     private final BlockingQueue<URL> queue;

2

3     public void collect(URL statistics) {

4         queue.offer(statistics);

5         if (logger.isInfoEnabled()) {

6             logger.info("collect statistics: " + statistics);

7         }

8     }
七、MonitorService将数据写入本地文件
 1     private final ScheduledExecutorService scheduledExecutorService = Executors.newScheduledThreadPool(1, new NamedThreadFactory("DubboMonitorTimer", true));

 2     private final ScheduledFuture<?> chartFuture;

 3     private final Thread writeThread;

 4     private final BlockingQueue<URL> queue;

 5     private String statisticsDirectory = "statistics";

 6     private String chartsDirectory = "charts";

 7     private volatile boolean running = true;

 8

 9     public SimpleMonitorService() {

10         queue = new LinkedBlockingQueue<URL>(Integer.parseInt(ConfigUtils.getProperty("dubbo.monitor.queue", "100000")));

11         writeThread = new Thread(new Runnable() {

12             public void run() {

13                 while (running) {

14                     try {

15                         write(); // write statistics

16                     } catch (Throwable t) {

17                         logger.error("Unexpected error occur at write stat log, cause: " + t.getMessage(), t);

18                         try {

19                             Thread.sleep(5000); // retry after 5 secs

20                         } catch (Throwable t2) {

21                         }

22                     }

23                 }

24             }

25         });

26         writeThread.setDaemon(true);

27         writeThread.setName("DubboMonitorAsyncWriteLogThread");

28         writeThread.start();

29         chartFuture = scheduledExecutorService.scheduleWithFixedDelay(new Runnable() {

30             public void run() {

31                 try {

32                     draw(); // draw chart

33                 } catch (Throwable t) {

34                     logger.error("Unexpected error occur at draw stat chart, cause: " + t.getMessage(), t);

35                 }

36             }

37         }, 1, 300, TimeUnit.SECONDS);

38         statisticsDirectory = ConfigUtils.getProperty("dubbo.statistics.directory");

39         chartsDirectory = ConfigUtils.getProperty("dubbo.charts.directory");

40     }
write()将统计数据写入文件,draw()将统计数据画成图片。这两种方式在实际使用中都不会用到。
最后来看一下获取Monitor实例的过程(帮助我们开发自定义的Monitor):
1 Monitor monitor = monitorFactory.getMonitor(url);
MonitorFilter中的monitorFactory实例是:MonitorFactory$Adaptive。
 1 package com.alibaba.dubbo.monitor;

 2

 3 import com.alibaba.dubbo.common.extension.ExtensionLoader;

 4

 5 public class MonitorFactory$Adaptive implements com.alibaba.dubbo.monitor.MonitorFactory {

 6     public com.alibaba.dubbo.monitor.Monitor getMonitor(com.alibaba.dubbo.common.URL arg0) {

 7         if (arg0 == null) throw new IllegalArgumentException("url == null");

 8         com.alibaba.dubbo.common.URL url = arg0;

 9         String extName = (url.getProtocol() == null ? "dubbo" : url.getProtocol());

10         if (extName == null)

11             throw new IllegalStateException("Fail to get extension(com.alibaba.dubbo.monitor.MonitorFactory) name from url(" + url.toString() + ") use keys([protocol])");

12         com.alibaba.dubbo.monitor.MonitorFactory extension = (com.alibaba.dubbo.monitor.MonitorFactory) ExtensionLoader.getExtensionLoader(com.alibaba.dubbo.monitor.MonitorFactory.class).getExtension(extName);

13         return extension.getMonitor(arg0);

14     }

15 }
首先,根据输入的url中的protocol来获取相关的MonitorFactory(这里protocol默认是dubbo,所以获取的是DubboMonitorFactory,可以通过指定dubbo:monitor标签中的protocol属性来自定义获取XxxMonitorFactory),之后调用DubboMonitorFactory.getMonitor(arg0)。该方法在其父类AbstractMonitorFactory中:
 1 /**

 2  * AbstractMonitorFactory. (SPI, Singleton, ThreadSafe)

 3  */

 4 public abstract class AbstractMonitorFactory implements MonitorFactory {

 5     private static final Logger logger = LoggerFactory.getLogger(AbstractMonitorFactory.class);

 6

 7     // lock for getting monitor center

 8     private static final ReentrantLock LOCK = new ReentrantLock();

 9

10     // monitor centers Map<RegistryAddress, Registry>

11     private static final Map<String, Monitor> MONITORS = new ConcurrentHashMap<String, Monitor>();

12

13     private static final Map<String, ListenableFuture<Monitor>> FUTURES = new ConcurrentHashMap<String, ListenableFuture<Monitor>>();

14

15     private static final ExecutorService executor = new ThreadPoolExecutor(0, 10, 60L, TimeUnit.SECONDS, new SynchronousQueue<Runnable>(), new NamedThreadFactory("DubboMonitorCreator", true));

16

17     public static Collection<Monitor> getMonitors() {

18         return Collections.unmodifiableCollection(MONITORS.values());

19     }

20

21     public Monitor getMonitor(URL url) {

22         url = url.setPath(MonitorService.class.getName()).addParameter(Constants.INTERFACE_KEY, MonitorService.class.getName());

23         String key = url.toServiceStringWithoutResolving();// dubbo://10.211.55.5:9090/com.alibaba.dubbo.monitor.MonitorService

24         Monitor monitor = MONITORS.get(key);

25         Future<Monitor> future = FUTURES.get(key);

26         if (monitor != null || future != null) {

27             return monitor;

28         }

29

30         LOCK.lock();

31         try {

32             monitor = MONITORS.get(key);

33             future = FUTURES.get(key);

34             if (monitor != null || future != null) {

35                 return monitor;

36             }

37

38             final URL monitorUrl = url;

39             // 使用另外的线程MonitorCreator来创建Monitor实例(原因是:即使Monitor创建失败,也不会影响主流程)

40             final ListenableFutureTask<Monitor> listenableFutureTask = ListenableFutureTask.create(new MonitorCreator(monitorUrl));

41             listenableFutureTask.addListener(new MonitorListener(key));

42             executor.execute(listenableFutureTask);

43             FUTURES.put(key, listenableFutureTask);

44

45             return null;

46         } finally {

47             // unlock

48             LOCK.unlock();

49         }

50     }

51

52     protected abstract Monitor createMonitor(URL url);

53

54     // Callable和Runnable一样,也是创建一个线程去执行,只是Callable有返回值(T call()),而Runnable无返回值(void run())

55     class MonitorCreator implements Callable<Monitor> {

56

57         private URL url;

58

59         public MonitorCreator(URL url) {

60             this.url = url;

61         }

62

63         @Override

64         public Monitor call() throws Exception {

65             Monitor monitor = AbstractMonitorFactory.this.createMonitor(url);//调用子类的createMonitor方法创建Monitor

66             return monitor;

67         }

68     }

69

70     class MonitorListener implements Runnable {

71

72         private String key;

73

74         public MonitorListener(String key) {

75             this.key = key;

76         }

77         // listenableFutureTask一旦isDone()完成(正常完成、抛出异常、被中断等),就会立即执行该方法

78         @Override

79         public void run() {

80             try {

81                 ListenableFuture<Monitor> listenableFuture = AbstractMonitorFactory.FUTURES.get(key);

82                 AbstractMonitorFactory.MONITORS.put(key, listenableFuture.get());

83                 AbstractMonitorFactory.FUTURES.remove(key);

84             } catch (InterruptedException e) {

85                 logger.warn("Thread was interrupted unexpectedly, monitor will never be got.");

86                 AbstractMonitorFactory.FUTURES.remove(key);

87             } catch (ExecutionException e) {

88                 logger.warn("Create monitor failed, monitor data will not be collected until you fix this problem. ", e);

89             }

90         }

91     }

92 }
来看DubboMonitorFactory.createMonitor(url):
 1 /**

 2  * DefaultMonitorFactory

 3  */

 4 public class DubboMonitorFactory extends AbstractMonitorFactory {

 5

 6     private Protocol protocol;

 7

 8     private ProxyFactory proxyFactory;

 9

10     public void setProtocol(Protocol protocol) {

11         this.protocol = protocol;

12     }

13

14     public void setProxyFactory(ProxyFactory proxyFactory) {

15         this.proxyFactory = proxyFactory;

16     }

17

18     @Override

19     protected Monitor createMonitor(URL url) {

20         url = url.setProtocol(url.getParameter(Constants.PROTOCOL_KEY, "dubbo"));

21         if (url.getPath() == null || url.getPath().length() == 0) {

22             url = url.setPath(MonitorService.class.getName());

23         }

24         String filter = url.getParameter(Constants.REFERENCE_FILTER_KEY);

25         if (filter == null || filter.length() == 0) {

26             filter = "";

27         } else {

28             filter = filter + ",";

29         }

30         url = url.addParameters(Constants.CLUSTER_KEY, "failsafe", Constants.CHECK_KEY, String.valueOf(false),

31                 Constants.REFERENCE_FILTER_KEY, filter + "-monitor");

32         // 创建Invoker<MonitorService>,内部会构造与MonitorService实现类SimpleMonitorService所在的检测中心dubbo-simple-monitor的长连接

33         Invoker<MonitorService> monitorInvoker = protocol.refer(MonitorService.class, url);

34         // 获取MonitorService的代理

35         MonitorService monitorService = proxyFactory.getProxy(monitorInvoker);

36         return new DubboMonitor(monitorInvoker, monitorService);

37     }

38

39 }
注意:这里的SimpleMonitorService其实会部署在dubbo-simple-monitor中,被provider和consumer中的DubboMonitor调用。
第六章 dubbo源码解析目录的更多相关文章
- 第零章 dubbo源码解析目录
第一章 第一个dubbo项目 第二章 dubbo内核之spi源码解析 2.1 jdk-spi的实现原理 2.2 dubbo-spi源码解析 第三章 dubbo内核之ioc源码解析 第四章 dubb ...
- 第六章 ReentrantLock源码解析2--释放锁unlock()
最常用的方式: int a = 12; //注意:通常情况下,这个会设置成一个类变量,比如说Segement中的段锁与copyOnWriteArrayList中的全局锁 final Reentrant ...
- 第六章 HashSet源码解析
6.1.对于HashSet需要掌握以下几点 HashSet的创建:HashSet() 往HashSet中添加单个对象:即add(E)方法 删除HashSet中的对象:即remove(Object ke ...
- dubbo源码解析五 --- 集群容错架构设计与原理分析
欢迎来我的 Star Followers 后期后继续更新Dubbo别的文章 Dubbo 源码分析系列之一环境搭建 博客园 Dubbo 入门之二 --- 项目结构解析 博客园 Dubbo 源码分析系列之 ...
- dubbo源码解析-spi(一)
前言 虽然标题是dubbo源码解析,但是本篇并不会出现dubbo的源码,本篇和之前的dubbo源码解析-简单原理.与spring融合一样,为dubbo源码解析专题的知识预热篇. 插播面试题 你是否了解 ...
- Dubbo 源码解析四 —— 负载均衡LoadBalance
欢迎来我的 Star Followers 后期后继续更新Dubbo别的文章 Dubbo 源码分析系列之一环境搭建 Dubbo 入门之二 --- 项目结构解析 Dubbo 源码分析系列之三 -- 架构原 ...
- dubbo源码解析-spi(4)
前言 本篇是spi的第四篇,本篇讲解的是spi中增加的AOP,还是和上一篇一样,我们先从大家熟悉的spring引出AOP. AOP是老生常谈的话题了,思想都不会是一蹴而就的.比如架构设计从All in ...
- dubbo源码解析-spi(3)
前言 在上一篇的末尾,我们提到了dubbo的spi中增加了IoC和AOP的功能.那么本篇就讲一下这个增加的IoC,spi部分预计会有四篇,因为这东西实在是太重要了.温故而知新,我们先来回顾一下,我们之 ...
- 第十四章 Executors源码解析
前边两章介绍了基础线程池ThreadPoolExecutor的使用方式.工作机理.参数详细介绍以及核心源码解析. 具体的介绍请参照: 第十二章 ThreadPoolExecutor使用与工作机理 第十 ...
- 第九章 LinkedBlockingQueue源码解析
1.对于LinkedBlockingQueue需要掌握以下几点 创建 入队(添加元素) 出队(删除元素) 2.创建 Node节点内部类与LinkedBlockingQueue的一些属性 static ...
随机推荐
- 一文彻底弄懂Spring IOC 依赖注入
Spring IOC(Inversion of Control,控制反转)依赖注入是 Spring 框架的核心特性之一,旨在实现对象之间的松耦合,提升代码的可维护性.可测试性和可扩展性.下面我们将从以 ...
- php如何解决高并发
PHP交流群 656679284 为PHP广大爱好者提供技术交流,有问必答,相互学习相互进步! 1.应用和静态资源分离 将静态资源(js,css,图片等)放到专门的服务器中. 2.页面缓存 将应用 ...
- 【转载】 TensorFlow中CNN的两种padding方式“SAME”和“VALID”
原文地址: http://blog.csdn.net/wuzqchom/article/details/74785643 --------------------------------------- ...
- chapter1 events and probability
第一章 事件和概率 1.1 Appication: verifying polynomial identities 1.2 Axioms of probability 1.3 Application ...
- 软件项目技术点(12)——绘制生成的图表到canvas
AxeSlide软件项目梳理 canvas绘图系列知识点整理 插入图表 首先介绍我们的图表功能,点击插入图表弹出如下数据表格窗口,可以填写表格数据,点击确定,默认生成表格图 编辑图表 表格图选中, ...
- python中的多继承理解
在python的多继承中,父类的初始化顺序遵循所谓方法解析顺序(Method Resolution Order,MRO)的机制.python使用C3线性化算法来确定多继承类的MRO: 1. 目标:创建 ...
- Solr 4.0 基础教程
本文只是Solr 4.0的基础教程,本人不经常写东西,写的不好请见谅,欢迎到群233413850进行讨论学习. 转载请标明原文地址:http://my.oschina.net/zhanyu/blog/ ...
- WinUI(WASDK)使用BotSharp框架开发多智能体桌面机器人管理助手(生图开关灯不在话下)
前言 大语言模型(Large Language Models, LLMs)近年来在各行各业中展现出了巨大的潜力和影响力.从自然语言处理到自动化客服,从内容生成到智能助手,LLMs正在改变我们与技术互动 ...
- PythonDay4Advance
PythonDay4Advance 函数 引言:比如植物大战僵尸,这个游戏本身也是由代码编写,现在假设有一种豌豆射手,每发射一次 炮弹会执行100行逻辑代码 如果我在程序,每当需要发射炮弹的时候,都要 ...
- idea springboot 微服务批量启动
概要 在使用IDEA开发微服务的时候,微服务比较多,启动起来比较麻烦,下面介绍一下使用批量启动微服务的方法. 方法 编辑当前项目根目录下的 .idea\workspace.xml 文件. 找到 < ...