C基础 数据序列化简单使用和讨论
前言
C中对序列化讨论少, 因为很多传输的内容都有自己解析的轮子. 对于序列化本质是统一编码, 统一解码的方式.
本文探讨是一种简单的序列化方案. 保证不同使用端都能解析出正确结果.
在文章一开始, 看一个最简单的序列化代码 如下
#include <stdio.h>

#include <stdlib.h>

#define _INT_NAME        (64)

#define _STR_TXT        "student.struct"

struct student {

    int id;

    char sex;

    int age;

    char name[_INT_NAME + ];

    double high;

    double weight;

};

// struct student 结构体序列化到文件的方法

static void _student_serialize(struct student* stu, FILE* txt) {

    fprintf(txt, "%d %c %d %s %lf %lf ", stu->id, stu->sex,

        stu->age, stu->name, stu->high, stu->weight);

}

// struct student 结构体反序列化

static void _student_deserialize(struct student* stu, FILE* txt) {

    fscanf(txt, "%d %c %d %s %lf %lf ", &stu->id, &stu->sex,

        &stu->age, stu->name, &stu->high, &stu->weight);

}

// 简单打印数据

static void _student_print(struct student* stu) {

    static int _idx;

    printf("%d: %d %c %d %s %lf %lf \n", _idx++, stu->id,

        stu->sex, stu->age, stu->name, stu->high, stu->weight);

}

/*

 * 一种最简单的通用序列化方法

 */

int main(int argc, char* argv[]) {

    FILE* txt = fopen(_STR_TXT, "wb+");

    if (NULL == txt) {

        fprintf(stderr, "fopen " _STR_TXT " error!\n");

        return -;

    }

    // 这里写入数据

    struct student stu = { , , , "鸣人", 172.23, 64.05 };

    _student_print(&stu);

    // 这里序列化并写入数据到文件

    _student_serialize(&stu, txt);

    // 我们读取这个文件, 先设置文件指针到文件开头

    fseek(txt, , SEEK_SET);

    // 开始读取数据

    struct student ts;

    _student_deserialize(&ts, txt);

    _student_print(&ts);

    fclose(txt);

    system("pause");

    return ;

}
本质在 自定义编码解码,并利用 scanf和printf 对映关系
// struct student 结构体序列化到文件的方法

static void _student_serialize(struct student* stu, FILE* txt) {

    fprintf(txt, "%d %c %d %s %lf %lf ", stu->id, stu->sex,

        stu->age, stu->name, stu->high, stu->weight);

}

// struct student 结构体反序列化

static void _student_deserialize(struct student* stu, FILE* txt) {

    fscanf(txt, "%d %c %d %s %lf %lf ", &stu->id, &stu->sex,

        &stu->age, stu->name, &stu->high, &stu->weight);

}
运行结果 如下:
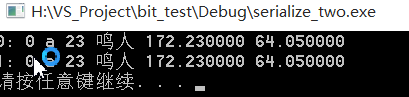
通过这种实现, 是跨平台的. 因为C实现标准和自己定义协议支持
"%d %c %d %s %lf %lf "
最后我们还会讨论这种情况.
正文
1. 一次失败扩展 fscanf -> fread ; fprintf -> fwrite
测试如下, 在window上测试代码 main.c
#include <stdio.h>

#include <stdlib.h>

#define _INT_NAME        (64)

#define _STR_TXT        "student.struct"

struct student {

    int id;

    char sex;

    int age;

    char name[_INT_NAME + ];

    double high;

    double weight;

};

// struct student 结构体序列化到文件的方法

static void _student_serialize(struct student* stu, FILE* txt) {

    fwrite(stu, sizeof(*stu), , txt);

}

// struct student 结构体反序列化

static void _student_deserialize(struct student* stu, FILE* txt) {

    fread(stu, sizeof(*stu), , txt);

}

// 简单打印数据

static void _student_print(struct student* stu) {

    static int _idx;

    printf("%d: %d %c %d %s %lf %lf \n", _idx++, stu->id,

        stu->sex, stu->age, stu->name, stu->high, stu->weight);

}

/*

* 一种最简单的通用序列化方法

*/

int main(int argc, char* argv[]) {

    FILE* txt = fopen(_STR_TXT, "wb+");

    if (NULL == txt) {

        fprintf(stderr, "fopen " _STR_TXT " error!\n");

        return -;

    }

    // 这里写入数据

    struct student stu = { , , , "鸣人", 172.23, 64.05 };

    _student_print(&stu);

    // 这里序列化并写入数据到文件

    _student_serialize(&stu, txt);

    // 我们读取这个文件, 先设置文件指针到文件开头

    fseek(txt, , SEEK_SET);

    // 开始读取数据

    struct student ts;

    _student_deserialize(&ts, txt);

    _student_print(&ts);

    fclose(txt);

    system("pause");

    return ;

}
核心是
// struct student 结构体序列化到文件的方法

static void _student_serialize(struct student* stu, FILE* txt) {

    fwrite(stu, sizeof(*stu), , txt);

}

// struct student 结构体反序列化

static void _student_deserialize(struct student* stu, FILE* txt) {

    fread(stu, sizeof(*stu), , txt);

}
在 linux 上处理的代码 是 serialize.c
#include <stdio.h>

#include <stdlib.h>

#define _INT_NAME       (64)

#define _STR_TXT        "student.struct"

struct student {

    int id;

    char sex;

    int age;

    char name[_INT_NAME + ];

    double high;

    double weight;

};

// struct student 结构体反序列化

static void _student_deserialize(struct student* stu, FILE* txt) {

    fread(stu, sizeof(*stu), , txt);

}

// 简单打印数据

static void _student_print(struct student* stu) {

    static int _idx;

    printf("%d: %d %c %d %s %lf %lf \n", _idx++, stu->id,

        stu->sex, stu->age, stu->name, stu->high, stu->weight);

}

/*

 * 处理 window 上生成的内存文件, 看是否跨平台

 */

int main(int argc, char* argv[]) {

    // 这里就简单读取 _STR_TXT

    FILE* txt = fopen(_STR_TXT, "rt");

    if (NULL == txt) {

        fprintf(stderr, "fopen " _STR_TXT " error!\n");

        return -;

    }

    // 开始读取数据

    struct student ts;

    _student_deserialize(&ts, txt);

    // 打印读取数据测试

    _student_print(&ts);

    fclose(txt);

    return ;

}
编译 命令的是
gcc -g -Wall -o serialize.out serialize.c
将 window生成的 student.struct 文件传输到linux测试机上, 运行结果 如下:

期间进行了各种折腾
a. 考虑转码
b. 考虑 fopen 创建utf8 文件
c. 考虑代码转码
.......
还是以失败告终, 估计fread, fwrite是不同平台的直接内存文件. 差异大, 不适合跨平台, 但是同样平台是比较快的考虑方式.
扩展一下, 怎么得到文件字符长度
linux得到文件长度扩展 http://blog.csdn.net/yutianzuijin/article/details/27205121
2. 采用 protobuf - c google一种协议.
pbc 传输协议, 很多公司都在采用, 我看了一下, 网上实现版本比较多, 现在可能有官方版本了. 推荐一个
cloudwn pbc https://github.com/cloudwu/pbc
可能是最精简的一种实现, 源码写的很好, 但是觉得有点复杂了. 为了这么功能这么搞, 没意思.
最关键的是 pbc 需要生成中间协议文件, 占用内存也不少.
这也是一种解决方案.
3. 采用json协议
这个意思很明了, 大家都通过json来处理问题 这里推荐自己写的一个json引擎
源码在1000行左右,欢迎使用. 这也是一种解决方案. 最近和朋友在讨论问题, 越发觉得, 计算机软件开发无非
围绕 空间和时间来回搞, 通用还是针对.
真实生产环境中可能会更直白些, 快些, 没bug就行, 怎么爽怎么随便, 怎么快怎么来. 哈哈.
但是对于C, 还是有一套自己的哲学, 用最简单完成一场意外. C/C++ 老了, 但却是美的.
这种解决方案讲到这里了.
4. 开始就是结束. 还是从最简单的开始. 实现一个C 序列换流程
后面继续讲解通过 fscanf 和 fprintf 构建 C的序列化. 先看一种实现体, serialize_student.h
#ifndef _H_SERIALIZE_THREE_SERIALIZE_STUDENT

#define _H_SERIALIZE_THREE_SERIALIZE_STUDENT

#include <assert.h>

#include <stdio.h>

#include <limits.h>

// 1.0 定义序列换结构体

#define _INT_NAME        (64)

struct student {

    int id;

    char sex;

    int age;

    char name[_INT_NAME + ];

    double high;

    double weight;

};

// 2.0 定义保存文件交换文件名 当前文件名去掉 .h

#define    _STR_SERIALIZE_TXT_student    "serialize_student"

//3.0 定义转换读取协议, printf协议后面跟' ', printf后面跟的, scanf跟的

#define    _STR_SERIALIZE_PBC_student    "%d %c %d %s %lf %lf "

#define _F_SERIALIZE_PRINTF_student(p) \

    p->id, p->sex, p->age, p->name, p->high, p->weight

#define _F_SERIALIZE_SCANF_student(p) \

    &p->id, &p->sex, &p->age, p->name, &p->high, &p->weight

// 3.0 定义序列换数据写入方法

static int serialize_student_printfs(void* data, int len) {

    assert(data && len > );

    FILE* txt = fopen(_STR_SERIALIZE_TXT_student, "wb");

    if (!txt) return -;

    struct student* p = data;

    for (int i = ; i < len; ++i) {

        fprintf(txt, _STR_SERIALIZE_PBC_student, _F_SERIALIZE_PRINTF_student(p));

        ++p;

    }

    fclose(txt);

    return ;

}

// 4.0 定义序列化数据读取方法

static int serialize_student_scanfs(void* data, int len) {

    assert(data);

    FILE* txt = fopen(_STR_SERIALIZE_TXT_student, "rb");

    if (!txt) return -;

    int ns = ;

    struct student* p = data;

    int nz = ;

    const char* s = _STR_SERIALIZE_PBC_student;

    while (*s) {

        if (*s == '%')

            ++nz;

        ++s;

    }

    while (ns < len && fscanf(txt, _STR_SERIALIZE_PBC_student, _F_SERIALIZE_SCANF_student(p)) == nz) {

        ++ns;

        ++p;

    }

    fclose(txt);

    return ns;

}

#endif // !_H_SERIALIZE_THREE_SERIALIZE_STUDENT
这里看看注释容易明白, 这里讲解一下 头文件导入宏规则.
_H 开头 + _项目名 + _文件名(去掉后缀) 主要为了解决项目特别多的时候联编造成宏碰撞.
测试代码 main.c
#include <stdlib.h>

#include "serialize_student.h"

/*

 * 实现C的序列流程操作

 */

int main(int argc, char* argv[]) {

    struct student stu[] = {

        { , , , "鸣人", 172.23, 64.05 },

        { , , , "杀生丸", 178.23, 74.00 }

    };

    // 先序列化到文件

    serialize_student_printfs(stu, sizeof(stu) / sizeof(*stu));

    // 开始读取序列化内容

    struct student sts[];

    serialize_student_scanfs(sts, );

    for (int i = ; i < ; ++i) {

        printf("%d => %s\n", i, sts[i].name);

    }

    puts("你喜欢吗, ... ");

    system("pause");

    return ;

}
运行结果是
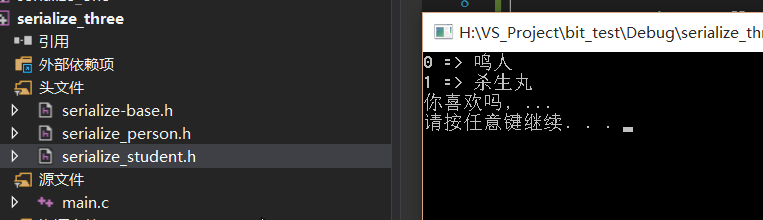
最后可能来点 封装, 减少以后的工作量. 可能有点复杂, 直接看代码, 能懂得就呵呵一笑而过.
再表述后面封装之前讲一个小知识, linux 上宏调试有个小技巧 通过 gcc -E 导出 *.i 文件, 查看宏命令.
同样 window 上 vs 需要这么 设置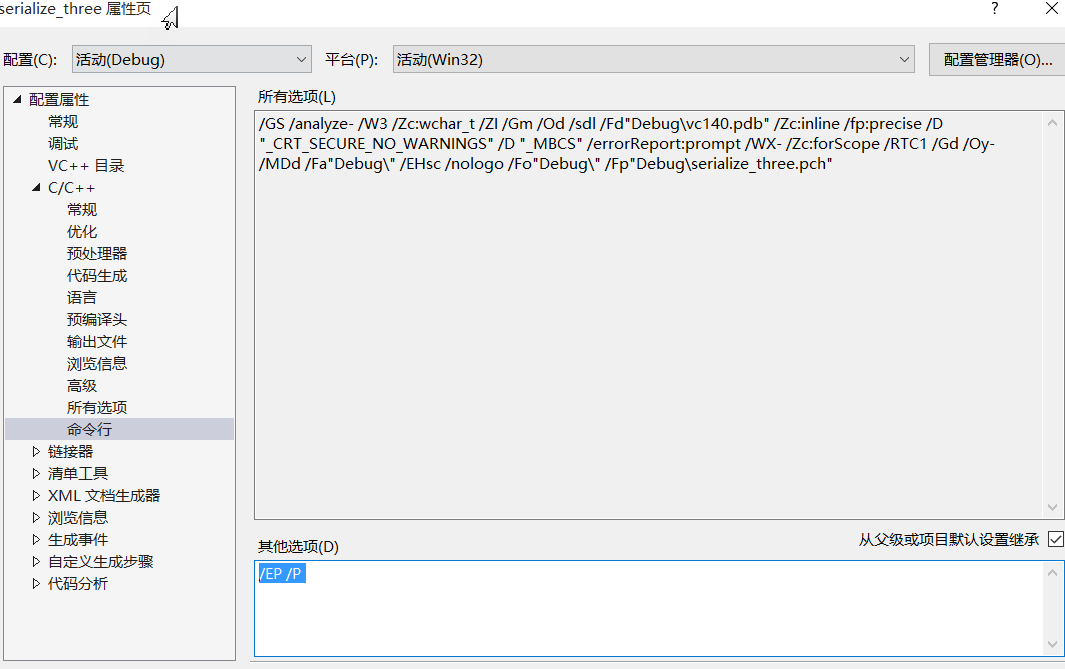
加上 /EP /P 运行时候会生成 main.i

找到问题后再将其去掉. 编译运行.
我们先看一个 C宏模板 序列化注册头文件 serialize-base.h
#ifndef _H_SERIALIZE_THREE_SERIALIZE_BASE

#define _H_SERIALIZE_THREE_SERIALIZE_BASE

#include <assert.h>

#include <stdio.h>

#include <limits.h>

/*

 * 宏模板, 为想实现序列化的结构注册函数

 * name    : 结构名称,                例如 student

 * pbc    : 定义的协议,                例如 "%d %c %d %s %lf %lf "

 * ptf    : printf 打印数据参数集,    例如 _->id, _->sex, _->age, _->name, _->high, _->weight | SERIALIZE_PTF

 * scf    : scanf 得到数据的参数集,    例如 &_->id, &_->sex, &_->age, _->name, &_->high, &_->weight | SERIALIZE_SCF

 */

#define SERIALIZE_BASE_REGISTER(name, pbc, ptf, scf)                                \

static int serialize_printfs_##name(void* data, int len) {                            \

    assert(data && len > );                                                        \

                                                                                    \

    FILE* txt = fopen("serialize_"#name, "wb");                                        \

    if (!txt) return -;                                                            \

                                                                                    \

    struct name* _ = (struct name*)data;                                            \

    for (int i = ; i < len; ++i) {                                                    \

        fprintf(txt, pbc, ptf);                                                    \

        ++_;                                                                        \

    }                                                                                \

                                                                                    \

    fclose(txt);                                                                    \

    return ;                                                                        \

}                                                                                    \

                                                                                    \

static int serialize_scanfs_##name(void* data, int len) {                            \

    assert(data);                                                                    \

                                                                                    \

    FILE* txt = fopen("serialize_"#name, "rb");                                        \

    if (!txt) return -;                                                            \

                                                                                    \

    int ns = , nz = ;                                                                \

    struct name* _ = (struct name*)data;                                            \

    const char* s = pbc;                                                            \

    while (*s) {                                                                    \

        if (*s == '%')                                                                \

            ++nz;                                                                    \

        ++s;                                                                        \

    }                                                                                \

                                                                                    \

    while (ns < len && fscanf(txt, pbc, scf) == nz) {                            \

        ++ns;                                                                        \

        ++_;                                                                        \

    }                                                                                \

                                                                                    \

    fclose(txt);                                                                    \

    return ns;                                                                        \

}                                                                                    \

#endif // !_H_SERIALIZE_THREE_SERIALIZE_BASE
后面写一个结构 来实现序列化 serialize_person.h
#ifndef _H_SERIALIZE_THREE_SERIALIZE_PERSON

#define _H_SERIALIZE_THREE_SERIALIZE_PERSON

// 必须导入(继承) 序列化基础实现模板

#include "serialize-base.h"

// 1.0 定义序列换结构体

struct person {

    int id;

    char sex;

    int age;

    char name[];

    double high;

    double weight;

};

// 2.0 注册得到 ptf 结构

#undef    SERIALIZE_PTF

#define SERIALIZE_PBC(id, sex, age, name, high, weight) \

    _->id, _->sex, _->age, _->name, _->high, _->weight

// 3.0 注册得到 sct 结构

#undef    SERIALIZE_SCF

#define SERIALIZE_SCF(id, sex, age, name, high, weight) \

    &_->id, &_->sex, &_->age, _->name, &_->high, &_->weight

// 4.0 最后开始注册实现体

SERIALIZE_BASE_REGISTER(

    person,

    "%d %c %d %s %lf %lf ",

    SERIALIZE_PBC(id, sex, age, name, high, weight),

    SERIALIZE_SCF(id, sex, age, name, high, weight)

)

#endif // !_H_SERIALIZE_THREE_SERIALIZE_PERSON
是不是很酷炫, 好测试一下 main.c
#include <stdlib.h>

#include "serialize_student.h"

#include "serialize_person.h"

/*

 * 实现C的序列流程操作

 */

int main(int argc, char* argv[]) {

    struct student stu[] = {

        { , , , "鸣人", 172.23, 64.05 },

        { , , , "杀生丸", 178.23, 74.00 }

    };

    // 先序列化到文件

    serialize_student_printfs(stu, sizeof(stu) / sizeof(*stu));

    // 开始读取序列化内容

    struct student sts[];

    serialize_student_scanfs(sts, );

    for (int i = ; i < ; ++i) {

        printf("%d => %s\n", i, sts[i].name);

    }

    puts("你喜欢吗, ... ");

    struct person ps[] = {

        { , , , "日向雏田", 162.23, 51.05 },

        { , , , "玲", 158.23, 45.00 }

    };

    // 序列化数据

    serialize_printfs_person(ps, sizeof(ps) / sizeof(*ps));

    // 得到序列化数据

    struct person tps[];

    serialize_scanfs_person(tps, );

    for (int i = ; i < ; ++i) {

        printf("%d => %s\n", i, sts[i].name);

    }

    system("pause");

    return ;

}
测试结果如下, 一切正常
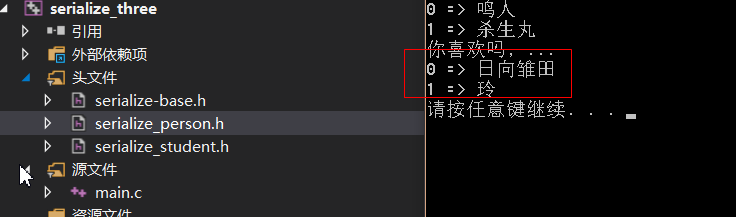
到这里基本都结束了. 主要核心就是上面注册的函数模板.
后记
这次后记我们在linux上测试一下 将刚生成的 serialize_person 上传到 linux平台
测试文件 main.c
#include <stdlib.h>

#include "serialize_person.h"

/*

 * 实现C的序列流程操作

 */

int main(int argc, char* argv[]) {

    puts("Play time game, writing code");

    struct person tps[];

    serialize_scanfs_person(tps, );

    for (int i = ; i < ; ++i) {

        printf("%d => %s\n", i, tps[i].name);

    }

    return ;

}
最终测试结果

源码成功, 到这里基本上可以离开了.
关于C数据序列化的简单操作就到这里了. 错误是难免的, 拜~~~
C基础 数据序列化简单使用和讨论的更多相关文章
- C中级 数据序列化简单使用和讨论 (二)
引言 - 一种更好的方式 其实不管什么语言, 开发框架都会遇到序列化问题. 序列化可以理解为A 和 B 交互的一种协议. 很久以前利用 printf 和 scanf 的协议实现过一套序列化问题. C ...
- Python基础4 迭代器,生成器,装饰器,Json和pickle 数据序列化
本节内容 迭代器&生成器 装饰器 Json & pickle 数据序列化 软件目录结构规范 作业:ATM项目开发 1.列表生成式,迭代器&生成器 列表生成式 孩子,我现在有个需 ...
- Python-Day4 Python基础进阶之生成器/迭代器/装饰器/Json & pickle 数据序列化
一.生成器 通过列表生成式,我们可以直接创建一个列表.但是,受到内存限制,列表容量肯定是有限的.而且,创建一个包含100万个元素的列表,不仅占用很大的存储空间,如果我们仅仅需要访问前面几个元素,那后面 ...
- python基础6之迭代器&生成器、json&pickle数据序列化
内容概要: 一.生成器 二.迭代器 三.json&pickle数据序列化 一.生成器generator 在学习生成器之前我们先了解下列表生成式,现在生产一个这样的列表[0,2,4,6,8,10 ...
- 【原创】Hadoop的IO模型(数据序列化,文件压缩)
数据序列化 我们知道,数据在分布式系统上运行程序数据是需要在机器之间通过网络传输的,这些数据必须被编码成一个个的字节才可以进行传输,这个其实就是我们所谓的数据序列化.数据中心中,最稀缺的资源就是网络带 ...
- ORM取数据很简单!是吗?
简介 几乎任何系统都以某种方式与外部数据存储一起运行.大多数情况下,外部数据存储是一个关系数据库,并且在实现时通常将数据提取任务委托给某些 ORM. 尽管 ORM 包含很多 routine 代码,但是 ...
- python第四周:装饰器、迭代器、内置方法、数据序列化
1.装饰器 定义:本质是一个函数,(装饰其他函数)就是为其他函数添加附加功能 原则:不能修改被装饰函数的源代码,不能修改被装饰函数的调用方式 实现装饰器的知识储备: 函数即“变量”.每当定义一个函数时 ...
- 迭代器/生成器/装饰器 /Json & pickle 数据序列化
本节内容 迭代器&生成器 装饰器 Json & pickle 数据序列化 软件目录结构规范 作业:ATM项目开发 1.列表生成式,迭代器&生成器 列表生成式 孩子,我现在有个需 ...
- 转载 ASP.NET SignalR 与LayIM配合,轻松实现网站客服聊天室(一) 整理基础数据
ASP.NET SignalR 与LayIM配合,轻松实现网站客服聊天室(一) 整理基础数据 最近碰巧发现一款比较好的Web即时通讯前端组件,layim,百度关键字即可,我下面要做的就是基于这个前 ...
随机推荐
- SDUT 3340 数据结构实验之二叉树一:树的同构
数据结构实验之二叉树一:树的同构 Time Limit: 1000MS Memory Limit: 65536KB Submit Statistic Problem Description 给定两棵树 ...
- Spring Boot 内嵌Tomcat的端口号的修改
操作非常的简单,不过如果从来没有操作过,也是需要查找一下资料的,所以,在此我简单的记录一下自己的操作步骤以备后用! 1:我的Eclipse版本,不同的开发工具可能有所差异,不过大同小异 2:如何进入对 ...
- SQL:每年每月最高的两个温度
SET QUOTED_IDENTIFIER ONGO CREATE TABLE [dbo].[Temperature]( [ID] [int] IDENTITY(1,1) NOT NULL, [Mon ...
- 洛谷P1204 [USACO1.2]挤牛奶Milking Cows
P1204 [USACO1.2]挤牛奶Milking Cows 474通过 1.4K提交 题目提供者该用户不存在 标签USACO 难度普及- 提交 讨论 题解 最新讨论 请各位帮忙看下程序 错误 ...
- sqlserver on linux
学习SQL Server从在Linux上安装开始 原创 2016-11-18 衡子 衡子hengzi 微软已经发布了SQL Server on Linux,目前支持Redhat和Ubuntu两种发行版 ...
- ubuntu多网卡绑定
这是最近碰到这个问题,需要将两张网卡绑定,共用一个IP,实现冗余效果.实际上linux双网卡的绑定模式有7中,而在这里常用的是 active-backup linux有七种网卡绑定模式:0. roun ...
- 【linux】Ubuntu 14.04 smba服务器的配置
SMB(Server Messages Block,信息服务块)是为了在ubuntu虚拟机与windows之间共享文件. 具体配置过程如下: (1)安装SMB应用 sudo apt-get in ...
- 在vs2005中使用SVN进行版本管理
1.软件准备 VisualSVN-Server-2.5.10.msi SVN服务端 WindowsXP-KB942288-v3-x86.exe XP中安装TortoiseSVNSVN1.8必须 Tor ...
- 设计模式-适配器模式(Adapter)
简介: 适配器模式在我看来是最无聊的一种模式,因为他根本不是一种新的创意模式,而是一种不得已而为之的模式.就算不学适配器模式,在具体应用场景中也会自然而然的想到这种解决方案. 张三在英国留学时买了个笔 ...
- 怎样在Android中ListView与ArrayAdapter配合使用
[代码]main.xml <?xml version="1.0" encoding="utf-8"?> <LinearLayout xml ...