
RabbitMQ基本配置
1.用户角色配置
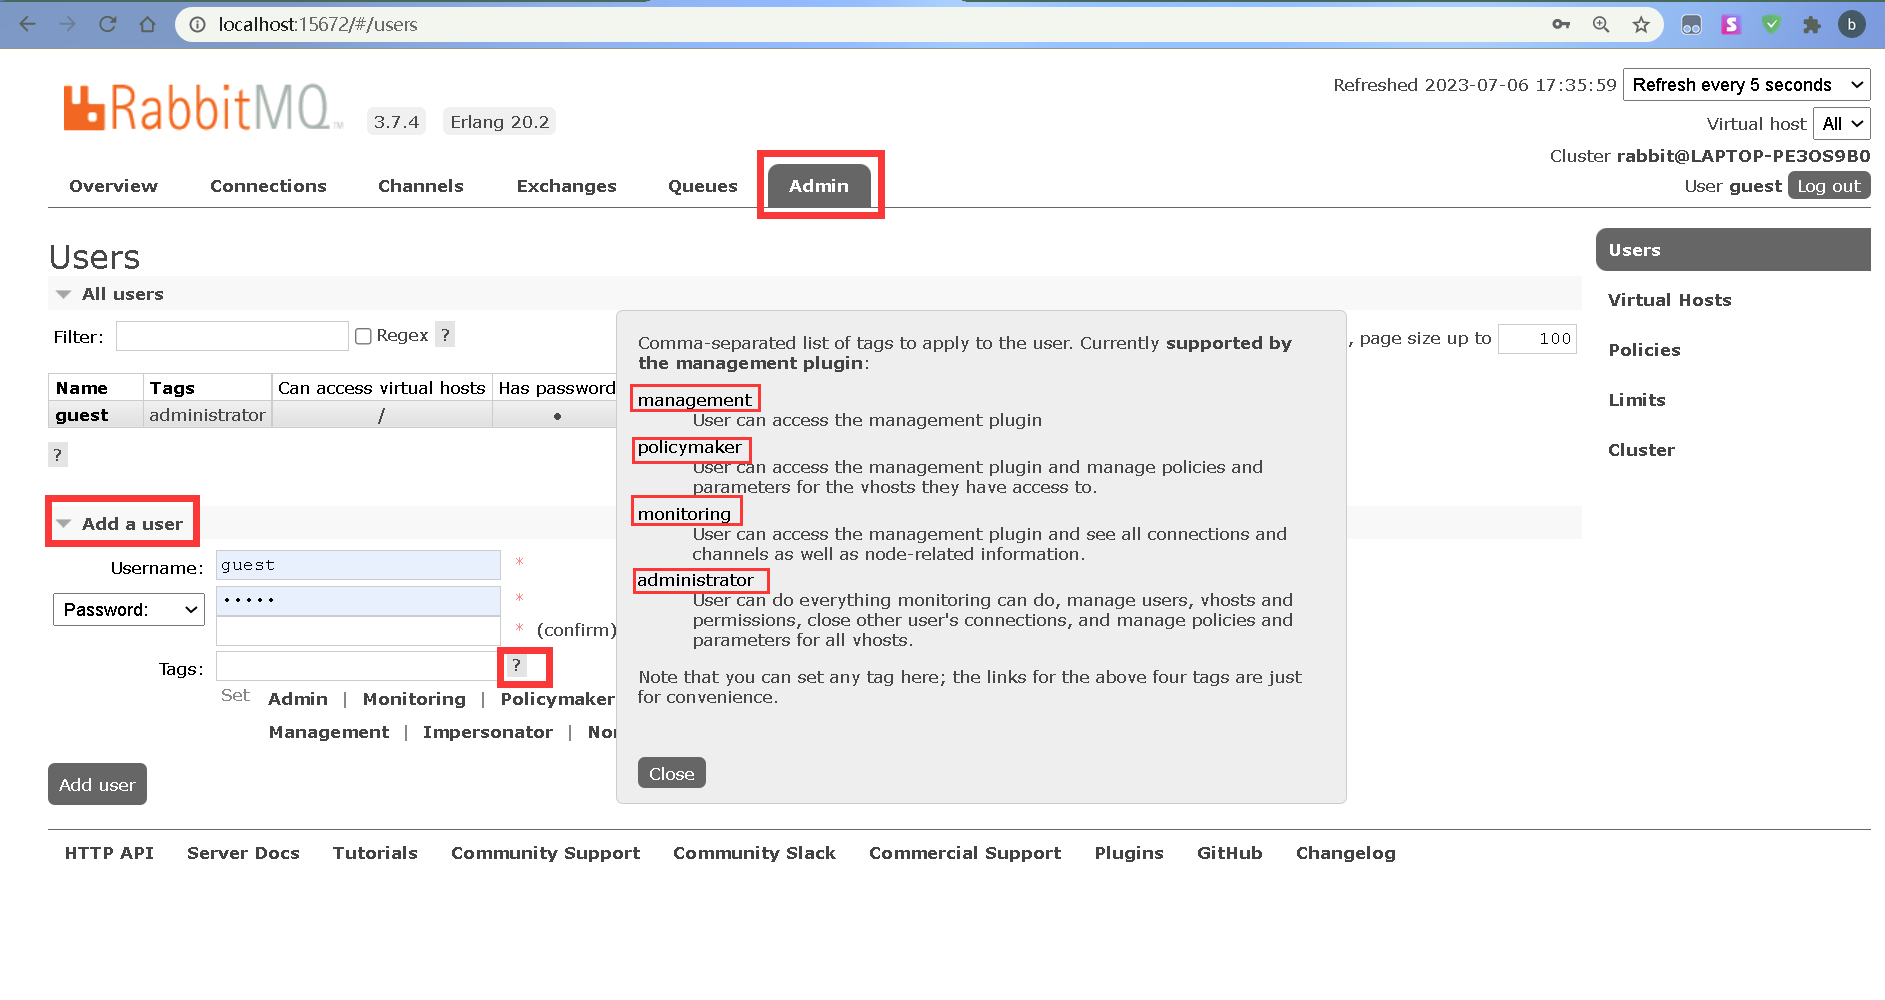
自带的guest/guest 超级管理员
五中不同角色配置:
- 普通管理者(management):仅可登陆管理控制台,无法看到节点信息,也无法对策略进行管理。
- 策略制定者(policymaker):可登陆管理控制台, 同时可以对policy进行管理。但无法查看节点的相关信息。
- 监控者 (monitoring):登录管理控制台 查看所有的信息(Rabbit的相关节点的信息,内存使用信息,磁盘的情况)
- 超级管理员 administrator:登录管理控制台 查看所有的信息 对所有用户的策略进行操作
- 其他:无法登陆管理控制台,通常就是普通的生产者和消费者(仅仅接收信息或者发送消息)。
2.Virtual Hosts配置
每一个 Virtual Hosts相互隔离, 就相当于一个相对独立的RabbitMQ,===> exchange queue message不是互通
可以理解为:一个Mysql又很多数据库,每一个数据库就相当于一个Virtual Hosts
2.1创建Virtual Hosts
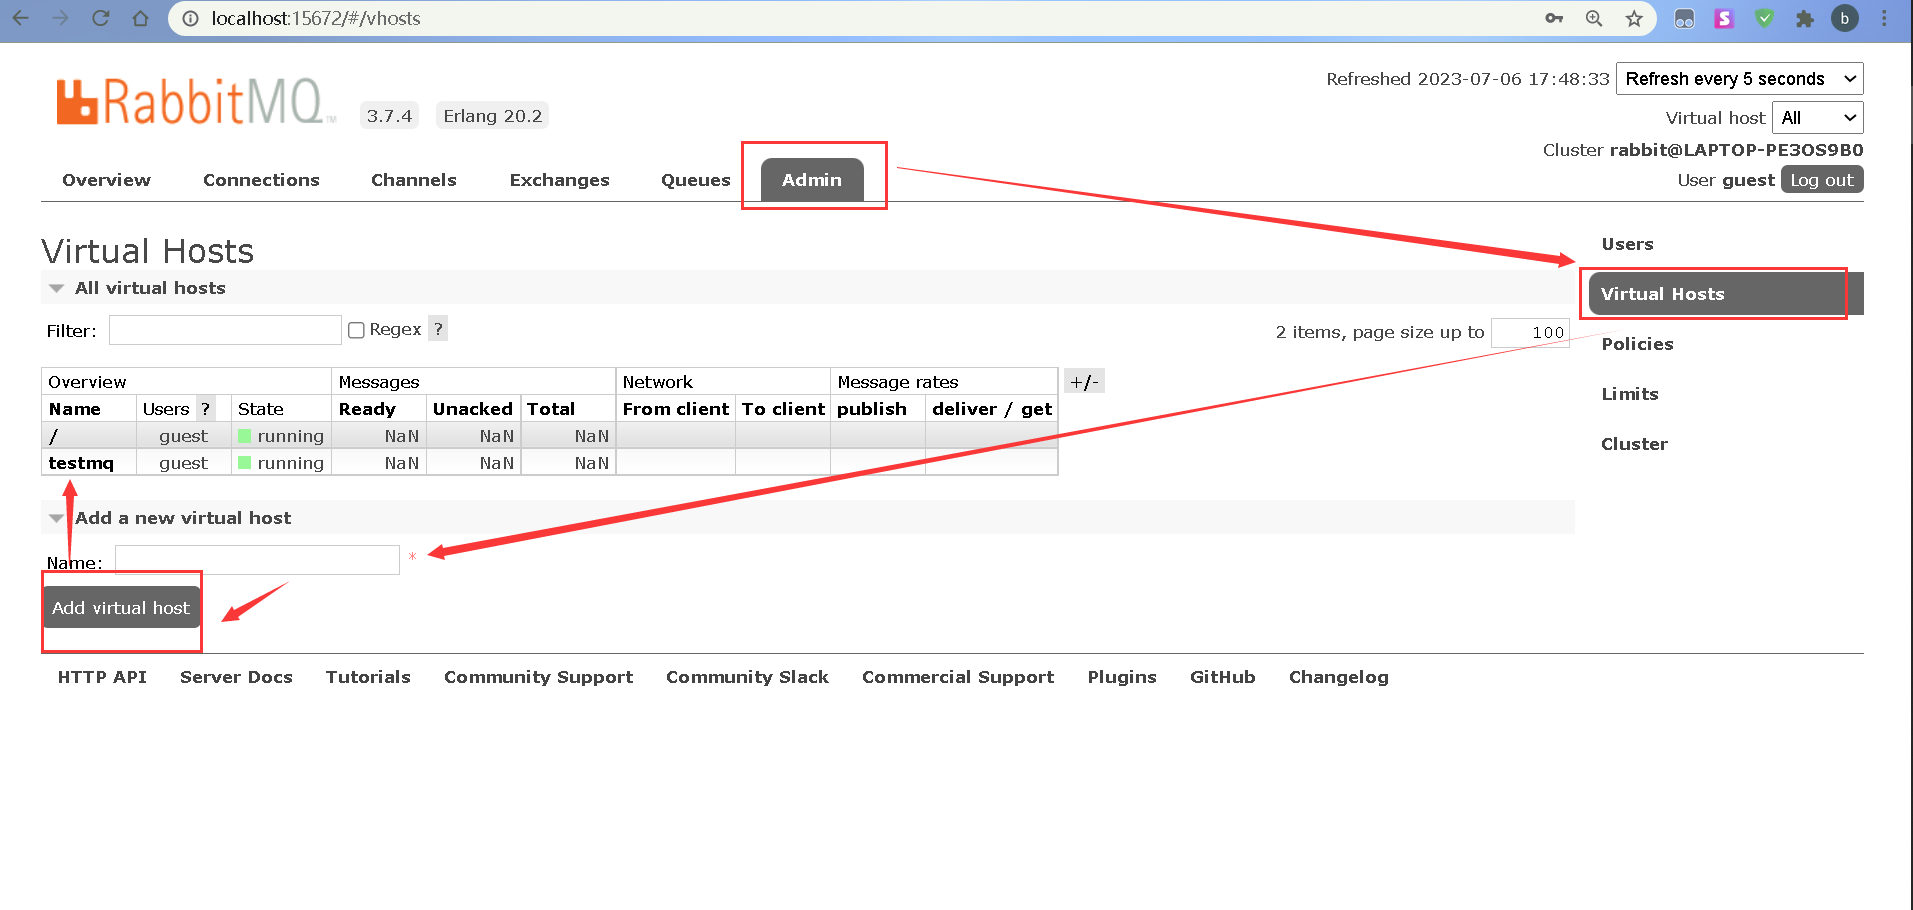
2.2权限的分配
点击对应Virtual Hostsv 名字,进入配置页面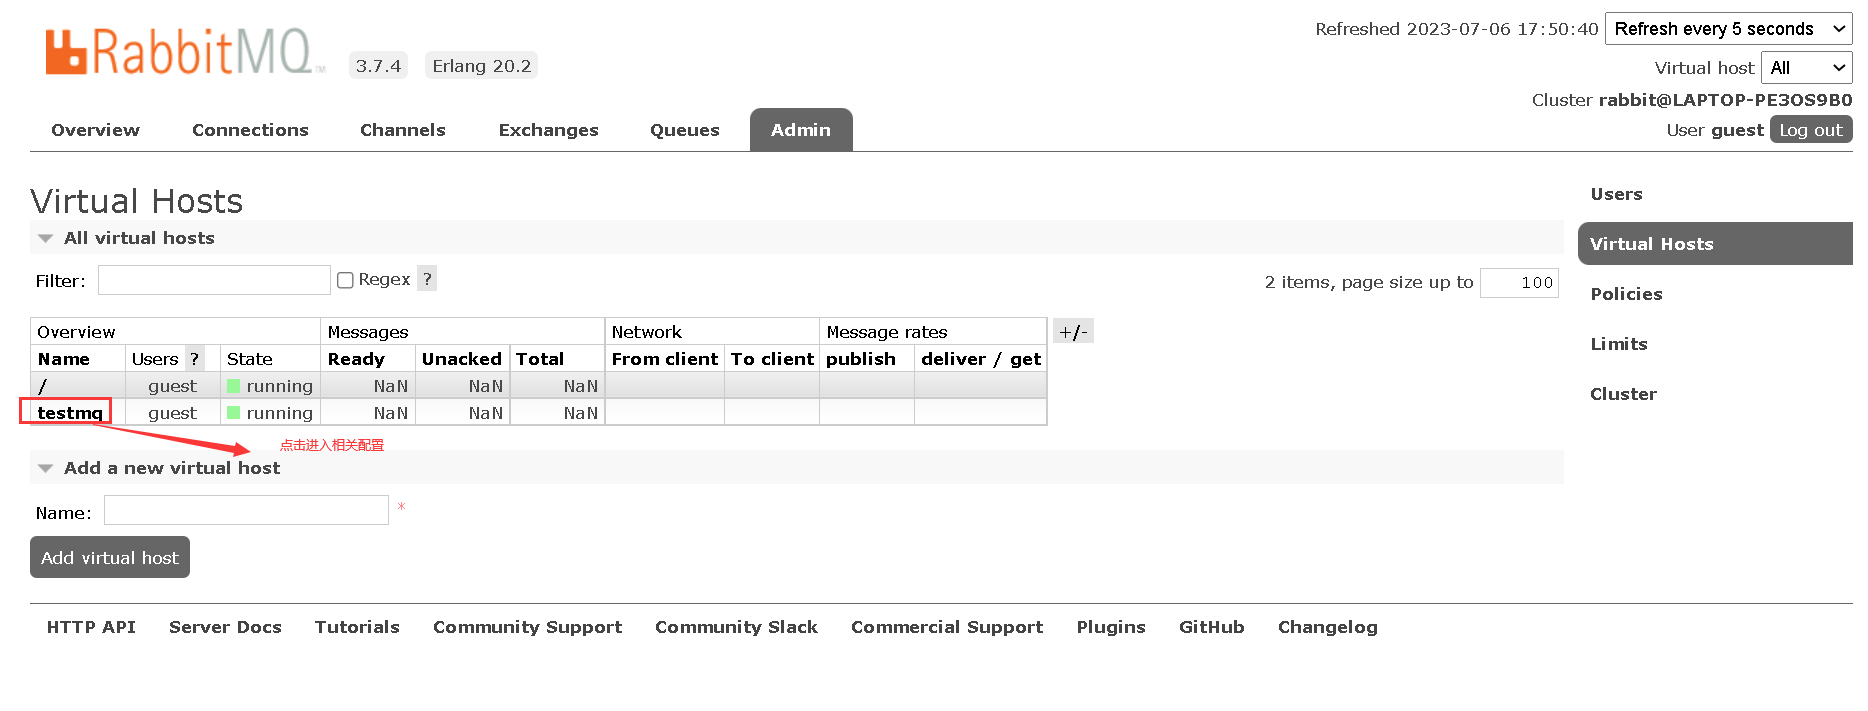
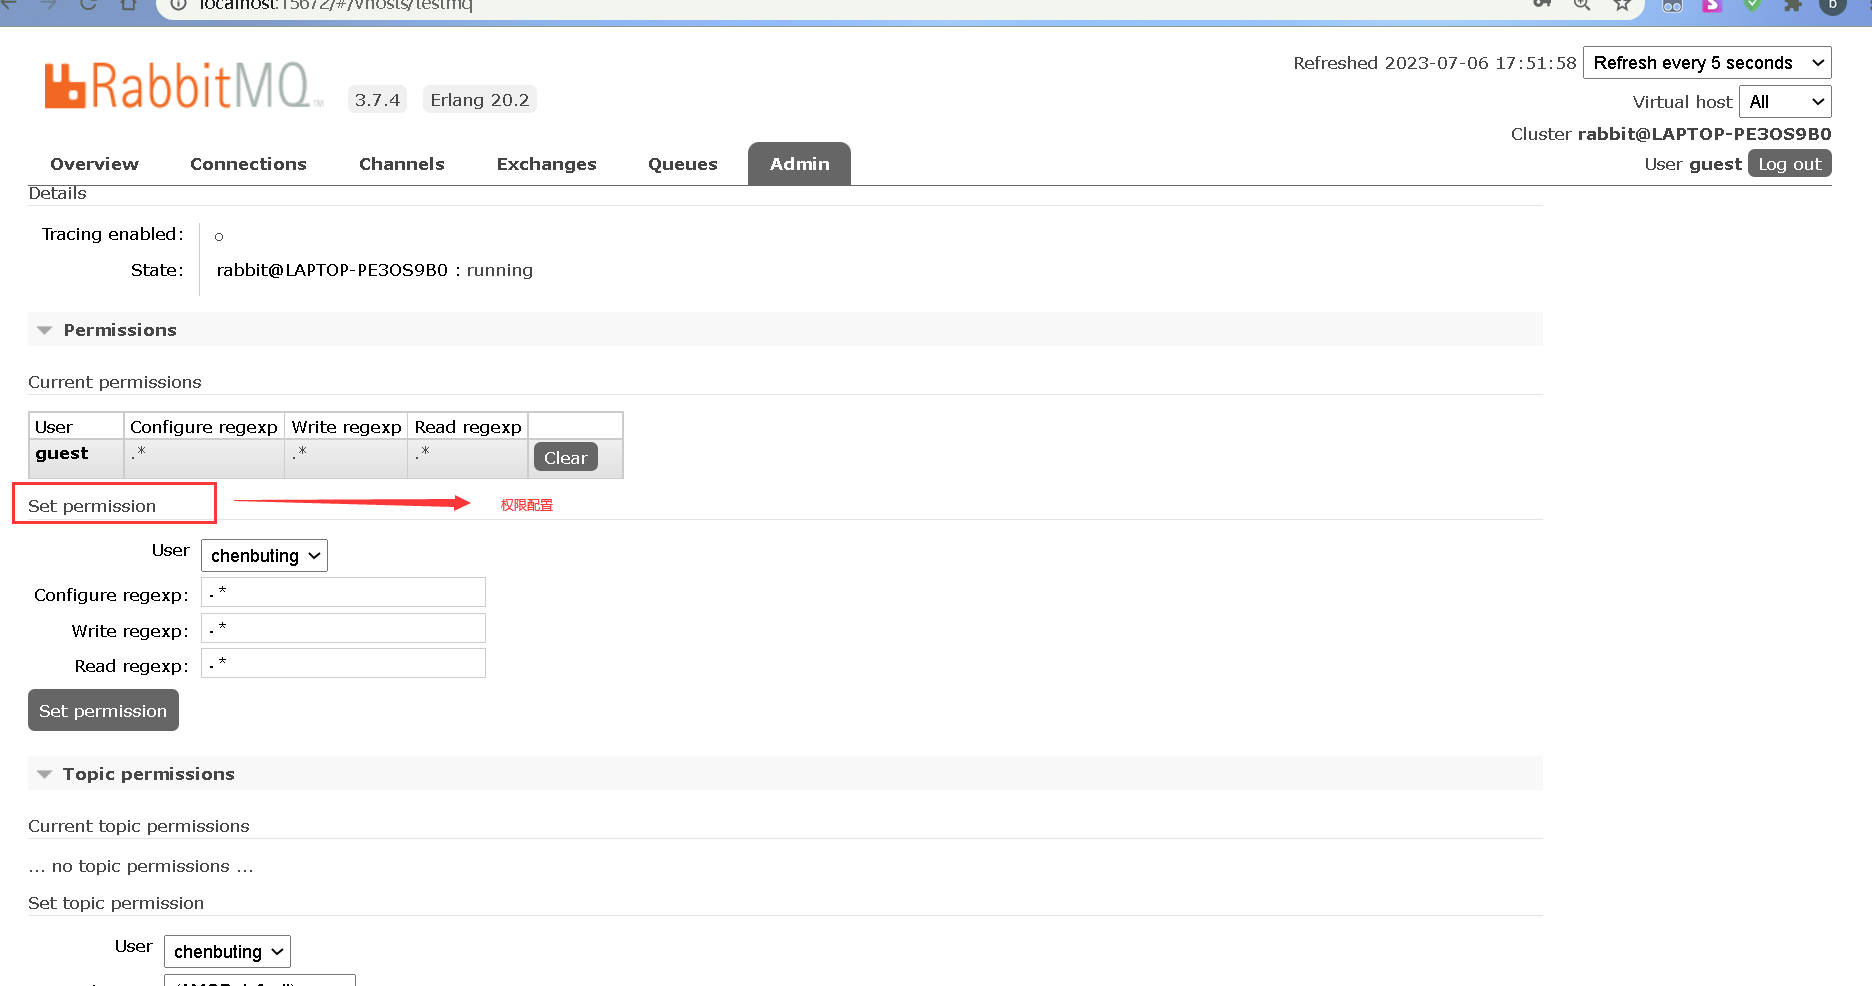
该权限配置参数说明:
- user:用户名
- configure :一个正则表达式,用户对符合该正则表达式的所有资源拥有 configure 操作的权限
- write:一个正则表达式,用户对符合该正则表达式的所有资源拥有 write 操作的权限
- read:一个正则表达式,用户对符合该正则表达式的所有资源拥有 read 操作的权限
3.入门案例
使用思路
生产者: --->按照JDBC思路
1. 创建连接工厂
2. 设置的rabbitMq的服务的主机 默认localhost
3. 设置的rabbitMq的服务的端口 默认5672
4. 设置的rabbitMq的服务的虚拟主机
5. 设置用户和密码
6. 创建连接
7. 创建频道
8. 声明队列
9. 创建消息
10. 发送消息
11.关闭资源
(观察者模式)
RabbitMQ 使用的是发布订阅模式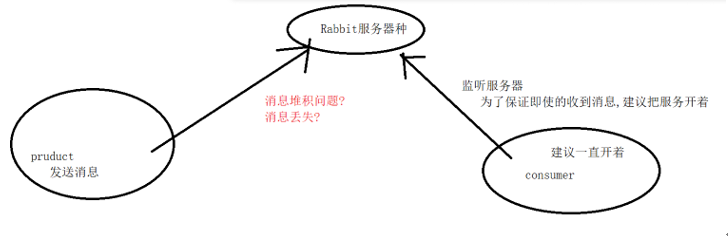
所需依赖
<dependency>

  <groupId>com.rabbitmq</groupId>

  <artifactId>amqp-client</artifactId>

  <version>5.6.0</version>

</dependency>
对Rabbit的连接进行封装
public class RabbitMQConnectionUtils {

    /**

     * 获得Rabbit的连接

     * 类比JDBC

     */

    public static Connection getConection() throws IOException, TimeoutException {

        //1.创建连接工厂

        ConnectionFactory connectionFactory=new ConnectionFactory();

        //2.设置的rabbitMq的服务的主机,默认localhost

        connectionFactory.setHost("localhost");

        //3.设置的rabbitMq的服务的端口,默认为5672

        connectionFactory.setPort(5672);

        //4.设置的rabbitMq的服务的虚拟主机

        connectionFactory.setVirtualHost("testmq");

        //5.设置用户和密码

        connectionFactory.setUsername("chenbuting");

        connectionFactory.setPassword("123");

        //6.创建连接

        Connection connection=connectionFactory.newConnection();

        return connection;

    }

}
基本消息队列
生产者Product相关代码
public class Product {

    public static void main(String[] args) throws IOException, TimeoutException {

        Connection connection=RabbitMQConnectionUtils.getConection();

        //7.创建频道

        Channel channel= connection.createChannel();

        //8.声明队列(创建队列)

        /*

         * 参数1:指定队列的名称

         * 参数2:指定消息是否持久化,一般设置为true,是否保存到磁盘当中去

         * 参数3:指定是否独占通道

         * 参数4:是否自动删除

         * 参数5:指定额外参数

         */

        channel.queueDeclare("simple_01",true,false,false,null);

        //9.创建消息

        String message="hello ,my name is chenbuting";

        //10.发送消息

        /*

         * 参数1:指定交换机  简单模式中使用默认交换机  指定空字符串

         * 参数2: 指定routingkey  简单模式  只需要指定队列名称即可

         * 参数3: 指定携带的额外的参数  null

         * 参数4:要发送的消息本身(字节数组)

         */

        channel.basicPublish("","simple_01",null,message.getBytes());

        //11.关闭资源

        channel.close();

        connection.close();

    }

}
消费者Consumer相关代码
public class Consumer {

    public static void main(String[] args) throws IOException, TimeoutException {

        //获取连接

        Connection connection= RabbitMQConnectionUtils.getConection();

        //7.创建频道

        Channel channel=connection.createChannel();

        //8.声明队列

        channel.queueDeclare("simple_01",true,false,false,null);

        //9.接受消息

        //处理消息

        DefaultConsumer consumer = new DefaultConsumer(channel){

            /*

             *consumerTag: 消费者标签,用于标识特定的消费者。每个消费者都有一个唯一的标签,它可以用于取消订阅或标识消息是由哪个消费者处理的。

             * envelope: 信封对象,包含与消息传递相关的元数据,如交换机、路由键、传递标签等。

             * properties: AMQP 的基本属性,包含附加的消息属性,如消息持久性、优先级、时间戳等。

             * body: 消息的正文,以字节数组的形式提供。

             */

            @Override

            public void handleDelivery(String consumerTag, Envelope envelope, AMQP.BasicProperties properties, byte[] body) throws IOException {

                System.out.println("消息本身"+new String(body,"utf-8"));

                System.out.println("exchange"+envelope.getExchange());

                System.out.println("RoutingKey"+envelope.getRoutingKey());

                System.out.println("消息的序号"+envelope.getDeliveryTag());

            }

        };

        //监听器----->观察者设计模式

        channel.basicConsume("simple_01",true,consumer);

        //10.建议不要关闭资源     建议一直监听消息

    }

}
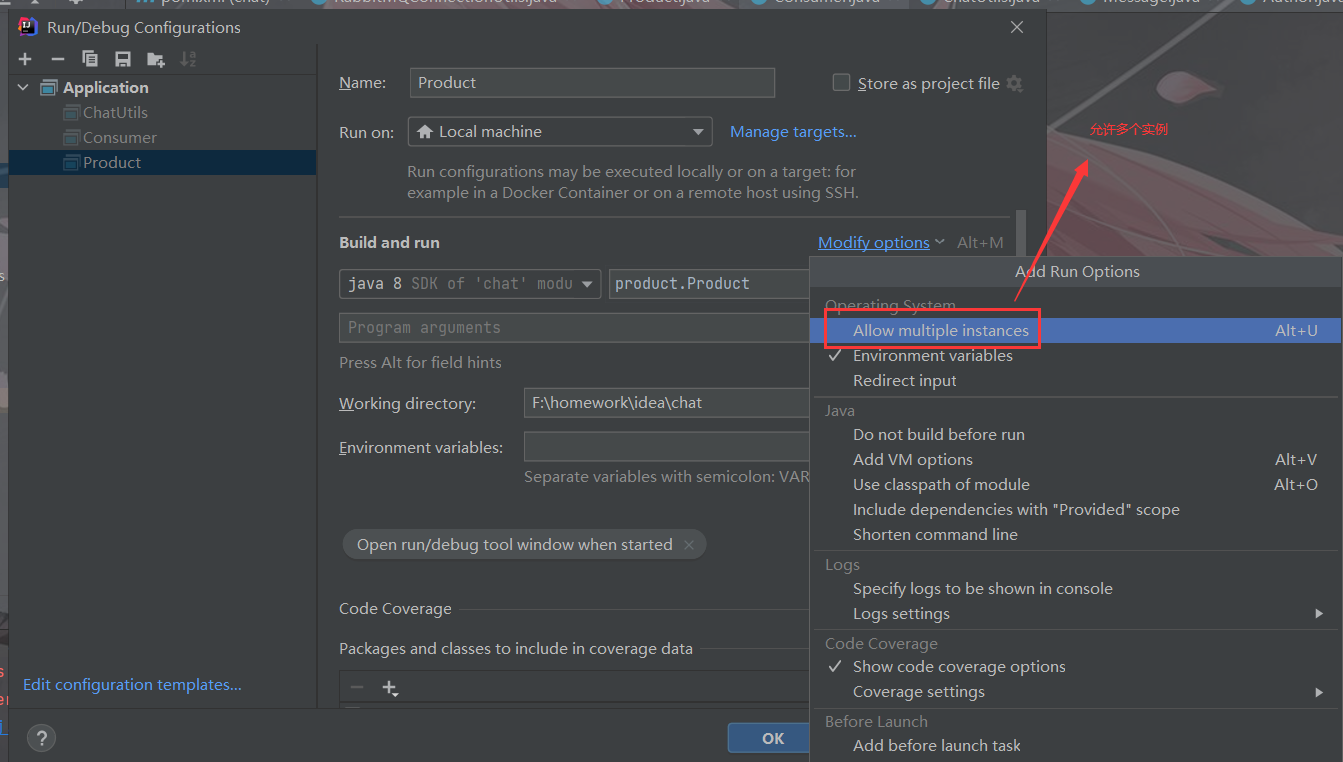
idea允许开启多个实例的方式
工作消息队列
生产者相关代码
public class WorkProduct {

    public static void main(String[] args) throws IOException, TimeoutException {

        Connection connection=RabbitMQConnectionUtils.getConection();

        //7.创建频道

        Channel channel= connection.createChannel();

        //8.声明队列(创建队列)

        /*

         * 参数1:指定队列的名称

         * 参数2:指定消息是否持久化,一般设置为true,是否保存到磁盘当中去

         * 参数3:指定是否独占通道

         * 参数4:是否自动删除

         * 参数5:指定额外参数

         */

        channel.queueDeclare("working_02",true,false,false,null);

        for (int i=0;i<30;i++) {

            //9.创建消息

            String message = "hello ,my name is CHENBUTING"+i;

            //10.发送消息

            /*

             * 参数1:指定交换机  简单模式中使用默认交换机  指定空字符串

             * 参数2: 指定routingkey  简单模式  只需要指定队列名称即可

             * 参数3: 指定携带的额外的参数  null

             * 参数4:要发送的消息本身(字节数组)

             */

            channel.basicPublish("", "working_02", null, message.getBytes());

        }

        //11.关闭资源

        channel.close();

        connection.close();

    }

}
消费者相关代码
WorkConsumer_1和WorkConsumer_2代码内容
public class WorkConsumer_1 {

    public static void main(String[] args) throws IOException, TimeoutException {

        //获取连接

        Connection connection= RabbitMQConnectionUtils.getConection();

        //7.创建频道

        Channel channel=connection.createChannel();

        //8.声明队列

        channel.queueDeclare("working_02",true,false,false,null);

        //9.接受消息

        //处理消息

        DefaultConsumer consumer = new DefaultConsumer(channel){

            /*

             *consumerTag: 消费者标签,用于标识特定的消费者。每个消费者都有一个唯一的标签,它可以用于取消订阅或标识消息是由哪个消费者处理的。

             * envelope: 信封对象,包含与消息传递相关的元数据,如交换机、路由键、传递标签等。

             * properties: AMQP 的基本属性,包含附加的消息属性,如消息持久性、优先级、时间戳等。

             * body: 消息的正文,以字节数组的形式提供。

             */

            @Override

            public void handleDelivery(String consumerTag, Envelope envelope, AMQP.BasicProperties properties, byte[] body) throws IOException {

                System.out.println("消息本身"+new String(body,"utf-8"));

                System.out.println("exchange"+envelope.getExchange());

                System.out.println("RoutingKey"+envelope.getRoutingKey());

                System.out.println("消息的序号"+envelope.getDeliveryTag());

            }

        };

        //监听器----->观察者设计模式

        channel.basicConsume("working_02",true,consumer);

        //10.建议不要关闭资源     建议一直监听消息

    }

}
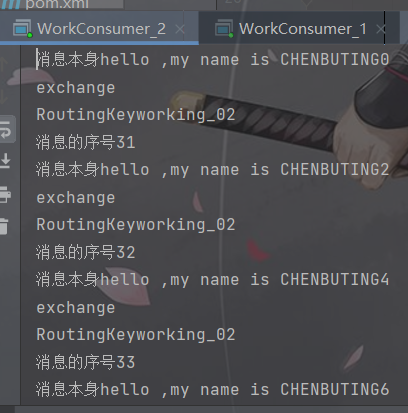
结果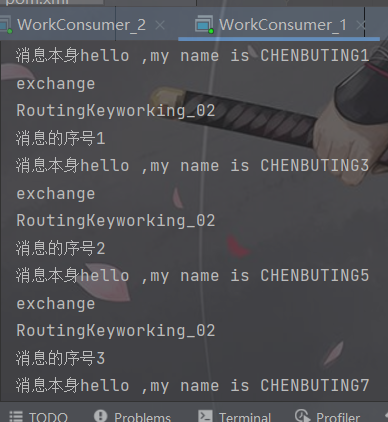
订阅模式
Fanout模式
Fanout生产者的相关代码
public class FanoutProduct {

    public static void main(String[] args) throws IOException, TimeoutException {

        Connection connection=RabbitMQConnectionUtils.getConection();

        //7.创建频道

        Channel channel= connection.createChannel();

        //创建交换机

        channel.exchangeDeclare("exchange_fanout", BuiltinExchangeType.FANOUT);

        //8.声明队列(创建队列)

        /*

         * 参数1:指定队列的名称

         * 参数2:指定消息是否持久化,一般设置为true,是否保存到磁盘当中去

         * 参数3:指定是否独占通道

         * 参数4:是否自动删除

         * 参数5:指定额外参数

         */

        channel.queueDeclare("fanout_queue1",true,false,false,null);

        channel.queueDeclare("fanout_queue2",true,false,false,null);

        //9.创建消息

        String message = "my name is Fanout";

        //10.发送消息

        /*

         *这段代码使用 RabbitMQ 的 Java 客户端库中的 `queueBind` 方法来将一个队列绑定到一个 fanout 类型的交换机上。下面是各个参数的介绍:

                1. `fanout_queue1`: 队列名称,表示要绑定的队列的名称。

                2. `exchange_fanout`: 交换机名称,表示要进行绑定的交换机的名称。

                3. `""`: 路由键,表示要使用的路由键。

         */

        channel.queueBind("fanout_queue1","exchange_fanout","");

        channel.queueBind("fanout_queue2","exchange_fanout","");

        /*

         * 参数1:指定交换机  简单模式中使用默认交换机  指定空字符串

         * 参数2: 指定routingkey  简单模式  只需要指定队列名称即可

         * 参数3: 指定携带的额外的参数  null

         * 参数4:要发送的消息本身(字节数组)

         */

        channel.basicPublish("exchange_fanout", "", null, message.getBytes());

        //11.关闭资源

        channel.close();

        connection.close();

    }

}
Fanout消费者的相关代码
public class FanoutConsumer_1 {

    public static void main(String[] args) throws IOException, TimeoutException {

        //获取连接

        Connection connection= RabbitMQConnectionUtils.getConection();

        //7.创建频道

        Channel channel=connection.createChannel();

        //8.声明队列

        channel.queueDeclare("fanout_queue1",true,false,false,null);

        //9.接受消息

        //处理消息

        DefaultConsumer consumer = new DefaultConsumer(channel){

            /*

             *consumerTag: 消费者标签,用于标识特定的消费者。每个消费者都有一个唯一的标签,它可以用于取消订阅或标识消息是由哪个消费者处理的。

             * envelope: 信封对象,包含与消息传递相关的元数据,如交换机、路由键、传递标签等。

             * properties: AMQP 的基本属性,包含附加的消息属性,如消息持久性、优先级、时间戳等。

             * body: 消息的正文,以字节数组的形式提供。

             */

            @Override

            public void handleDelivery(String consumerTag, Envelope envelope, AMQP.BasicProperties properties, byte[] body) throws IOException {

                System.out.println("消息本身"+new String(body,"utf-8"));

                System.out.println("exchange"+envelope.getExchange());

                System.out.println("RoutingKey"+envelope.getRoutingKey());

                System.out.println("消息的序号"+envelope.getDeliveryTag());

            }

        };

        //监听器----->观察者设计模式

        channel.basicConsume("fanout_queue1",true,consumer);

        //10.建议不要关闭资源     建议一直监听消息

    }

}
direct模式
direct生产者模式
public class DirectProduct {

    public static void main(String[] args) throws IOException, TimeoutException {

        Connection connection=RabbitMQConnectionUtils.getConection();

        //7.创建频道

        Channel channel= connection.createChannel();

        //创建交换机

        channel.exchangeDeclare("exchange_direct", BuiltinExchangeType.DIRECT);

        //8.声明队列(创建队列)

        /*

         * 参数1:指定队列的名称

         * 参数2:指定消息是否持久化,一般设置为true,是否保存到磁盘当中去

         * 参数3:指定是否独占通道

         * 参数4:是否自动删除

         * 参数5:指定额外参数

         */

        channel.queueDeclare("direct_queue1",true,false,false,null);

        channel.queueDeclare("direct_queue2",true,false,false,null);

        //9.创建消息

        String message1 = "this is add";

        String message2 = "this is select";

        //10.发送消息

        /*

         *这段代码使用 RabbitMQ 的 Java 客户端库中的 `queueBind` 方法来将一个队列绑定到一个 fanout 类型的交换机上。下面是各个参数的介绍:

                1. `fanout_queue1`: 队列名称,表示要绑定的队列的名称。

                2. `exchange_fanout`: 交换机名称,表示要进行绑定的交换机的名称。

                3. `""`: 路由键,表示要使用的路由键。

         */

        channel.queueBind("direct_queue1","exchange_direct","user.add");

        channel.queueBind("direct_queue2","exchange_direct","user.select");

        /*

         * 参数1:指定交换机  简单模式中使用默认交换机  指定空字符串

         * 参数2: 指定routingkey  简单模式  只需要指定队列名称即可

         * 参数3: 指定携带的额外的参数  null

         * 参数4:要发送的消息本身(字节数组)

         */

        channel.basicPublish("exchange_direct", "user.add", null, message1.getBytes());

        channel.basicPublish("exchange_direct", "user.select", null, message2.getBytes());

        //11.关闭资源

        channel.close();

        connection.close();

    }

}
direct消费者模式
public class DirectConsumer_1 {

    public static void main(String[] args) throws IOException, TimeoutException {

        //获取连接

        Connection connection= RabbitMQConnectionUtils.getConection();

        //7.创建频道

        Channel channel=connection.createChannel();

        //8.声明队列

        channel.queueDeclare("direct_queue1",true,false,false,null);

        //9.接受消息

        //处理消息

        DefaultConsumer consumer = new DefaultConsumer(channel){

            /*

             *consumerTag: 消费者标签,用于标识特定的消费者。每个消费者都有一个唯一的标签,它可以用于取消订阅或标识消息是由哪个消费者处理的。

             * envelope: 信封对象,包含与消息传递相关的元数据,如交换机、路由键、传递标签等。

             * properties: AMQP 的基本属性,包含附加的消息属性,如消息持久性、优先级、时间戳等。

             * body: 消息的正文,以字节数组的形式提供。

             */

            @Override

            public void handleDelivery(String consumerTag, Envelope envelope, AMQP.BasicProperties properties, byte[] body) throws IOException {

                System.out.println("消息本身"+new String(body,"utf-8"));

                System.out.println("exchange"+envelope.getExchange());

                System.out.println("RoutingKey"+envelope.getRoutingKey());

                System.out.println("消息的序号"+envelope.getDeliveryTag());

            }

        };

        //监听器----->观察者设计模式

        channel.basicConsume("direct_queue1",true,consumer);

        //10.建议不要关闭资源     建议一直监听消息

    }

}
Topic模式
生产模式相关代码
public class TopicProduct {

    public static void main(String[] args) throws IOException, TimeoutException {

        Connection connection=RabbitMQConnectionUtils.getConection();

        //7.创建频道

        Channel channel= connection.createChannel();

        //创建交换机

        channel.exchangeDeclare("exchange_topic", BuiltinExchangeType.TOPIC);

        //8.声明队列(创建队列)

        /*

         * 参数1:指定队列的名称

         * 参数2:指定消息是否持久化,一般设置为true,是否保存到磁盘当中去

         * 参数3:指定是否独占通道

         * 参数4:是否自动删除

         * 参数5:指定额外参数

         */

        channel.queueDeclare("topic_queue1",true,false,false,null);

        channel.queueDeclare("topic_queue2",true,false,false,null);

        //9.创建消息

        String message1 = "this is add";

        String message2 = "this is select";

        String message3 = "this is update";

        String message4 = "this is delete";

        //10.发送消息

        /*

         *这段代码使用 RabbitMQ 的 Java 客户端库中的 `queueBind` 方法来将一个队列绑定到一个 fanout 类型的交换机上。下面是各个参数的介绍:

                1. `fanout_queue1`: 队列名称,表示要绑定的队列的名称。

                2. `exchange_fanout`: 交换机名称,表示要进行绑定的交换机的名称。

                3. `""`: 路由键,表示要使用的路由键。

         */

        channel.queueBind("topic_queue1","exchange_topic","user.*");

        channel.queueBind("topic_queue2","exchange_topic","item.*");

        /*

         * 参数1:指定交换机  简单模式中使用默认交换机  指定空字符串

         * 参数2: 指定routingkey  简单模式  只需要指定队列名称即可

         * 参数3: 指定携带的额外的参数  null

         * 参数4:要发送的消息本身(字节数组)

         */

        channel.basicPublish("exchange_topic", "user.add", null, message1.getBytes());

        channel.basicPublish("exchange_topic", "user.select", null, message2.getBytes());

        channel.basicPublish("exchange_topic", "item.update", null, message3.getBytes());

        channel.basicPublish("exchange_topic", "item.delete", null, message4.getBytes());

        //11.关闭资源

        channel.close();

        connection.close();

    }

}
消费者相关代码
public class TopicConsumer_1 {

    public static void main(String[] args) throws IOException, TimeoutException {

        //获取连接

        Connection connection= RabbitMQConnectionUtils.getConection();

        //7.创建频道

        Channel channel=connection.createChannel();

        //8.声明队列

        channel.queueDeclare("topic_queue1",true,false,false,null);

        //9.接受消息

        //处理消息

        DefaultConsumer consumer = new DefaultConsumer(channel){

            /*

             *consumerTag: 消费者标签,用于标识特定的消费者。每个消费者都有一个唯一的标签,它可以用于取消订阅或标识消息是由哪个消费者处理的。

             * envelope: 信封对象,包含与消息传递相关的元数据,如交换机、路由键、传递标签等。

             * properties: AMQP 的基本属性,包含附加的消息属性,如消息持久性、优先级、时间戳等。

             * body: 消息的正文,以字节数组的形式提供。

             */

            @Override

            public void handleDelivery(String consumerTag, Envelope envelope, AMQP.BasicProperties properties, byte[] body) throws IOException {

                System.out.println("消息本身"+new String(body,"utf-8"));

                System.out.println("exchange"+envelope.getExchange());

                System.out.println("RoutingKey"+envelope.getRoutingKey());

                System.out.println("消息的序号"+envelope.getDeliveryTag());

            }

        };

        //监听器----->观察者设计模式

        channel.basicConsume("topic_queue1",true,consumer);

        //10.建议不要关闭资源     建议一直监听消息

    }

}
主意:
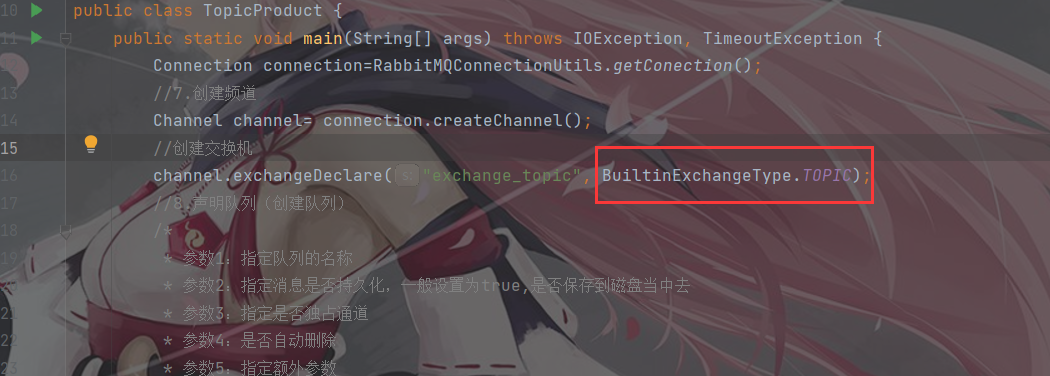
不要忘记在使用订阅模式时修改该处的交换机分发策略
4. springboot整合RabbitMQ
本次整合需要创建2个springboot项目,一个为生产者,一个为消费者。
direct exchange(直连型交换机)
生产者相关的整合
相关依赖
<!--rabbitmq-->

<dependency>

  <groupId>org.springframework.boot</groupId>

  <artifactId>spring-boot-starter-amqp</artifactId>

</dependency>

<dependency>

  <groupId>org.springframework.boot</groupId>

  <artifactId>spring-boot-starter-web</artifactId>

</dependency>
application相关配置
spring:

  #给项目来个名字

  application:

    name: rabbitmq-provider

  #配置rabbitMq 服务器

  rabbitmq:

    host: localhost

    port: 5672

    username: chenbuting

    password: root

    #虚拟host 可以不设置,使用server默认host

    #virtual-host: JCcccHost
配置类
@Configuration

public class DirectRabbitConfig {

    //队列 起名:TestDirectQueue

    @Bean

    public Queue TestDirectQueue() {

        // durable:是否持久化,默认是false,持久化队列:会被存储在磁盘上,当消息代理重启时仍然存在,暂存队列:当前连接有效

        // exclusive:默认也是false,只能被当前创建的连接使用,而且当连接关闭后队列即被删除。此参考优先级高于durable

        // autoDelete:是否自动删除,当没有生产者或者消费者使用此队列,该队列会自动删除。

        //   return new Queue("TestDirectQueue",true,true,false);

        //一般设置一下队列的持久化就好,其余两个就是默认false

        return new Queue("TestDirectQueue",true);

    }

    //Direct交换机 起名:TestDirectExchange

    @Bean

    DirectExchange TestDirectExchange() {

        //  return new DirectExchange("TestDirectExchange",true,true);

        return new DirectExchange("TestDirectExchange",true,false);

    }

    //绑定  将队列和交换机绑定, 并设置用于匹配键:TestDirectRouting

    @Bean

    Binding bindingDirect() {

        return BindingBuilder.bind(TestDirectQueue()).to(TestDirectExchange()).with("TestDirectRouting");

    }

    //单独的 Direct 类型的交换机

    @Bean

    DirectExchange lonelyDirectExchange() {

        return new DirectExchange("lonelyDirectExchange");

    }

}
controller层
@RestController

public class SendMessageController {

    @Autowired

    RabbitTemplate rabbitTemplate;  //使用RabbitTemplate,这提供了接收/发送等等方法

    @GetMapping("/sendDirectMessage")

    public String sendDirectMessage() {

        String messageId = String.valueOf(UUID.randomUUID());

        String messageData = "test message, hello!";

        String createTime = LocalDateTime.now().format(DateTimeFormatter.ofPattern("yyyy-MM-dd HH:mm:ss"));

        Map<String,Object> map=new HashMap<>();

        map.put("messageId",messageId);

        map.put("messageData",messageData);

        map.put("createTime",createTime);

        //将消息携带绑定键值:TestDirectRouting 发送到交换机TestDirectExchange

        rabbitTemplate.convertAndSend("TestDirectExchange", "TestDirectRouting", map);

        return "ok";

    }

}

消费者相关的整合
所需pom依赖
<!--rabbitmq-->

<dependency>

  <groupId>org.springframework.boot</groupId>

  <artifactId>spring-boot-starter-amqp</artifactId>

</dependency>

<dependency>

  <groupId>org.springframework.boot</groupId>

  <artifactId>spring-boot-starter-web</artifactId>

</dependency>
application相关配置
spring:

  #给项目来个名字

  application:

    name: rabbitmq-provider

  #配置rabbitMq 服务器

  rabbitmq:

    host: localhost

    port: 5672

    username: chenbuting

    password: root

    #虚拟host 可以不设置,使用server默认host

    #virtual-host: JCcccHost
相关配置类(消费者单独使用,可以不用添加配置,直接监听就行,直接使用注释监听器监听对应的队列即可,配置的话,则消费者也可当做生产者的身份,这样也就可以推送消息了)
@Configuration

public class DirectRabbitConfig {

    //队列 起名:TestDirectQueue

    @Bean

    public Queue TestDirectQueue() {

        return new Queue("TestDirectQueue",true);

    }

    //Direct交换机 起名:TestDirectExchange

    @Bean

    DirectExchange TestDirectExchange() {

        return new DirectExchange("TestDirectExchange");

    }

    //绑定  将队列和交换机绑定, 并设置用于匹配键:TestDirectRouting

    @Bean

    Binding bindingDirect() {

        return BindingBuilder.bind(TestDirectQueue()).to(TestDirectExchange()).with("TestDirectRouting");

    }

}
创建消息监听
@Component

@RabbitListener(queues = "TestDirectQueue")//监听的队列名称 TestDirectQueue

public class DirectReceiver {

    @RabbitHandler

    public void process(Map testMessage) {

        System.out.println("DirectReceiver消费者收到消息  : " + testMessage.toString());

    }

}
Topic Exchange主题交换机
生产者相关整合
相关配置类
 @Configuration

public class TopicRabbitConfig {

    //绑定键

    public final static String man = "topic.man";

    public final static String woman = "topic.woman";

    @Bean

    public Queue firstQueue() {

        return new Queue(TopicRabbitConfig.man);

    }

    @Bean

    public Queue secondQueue() {

        return new Queue(TopicRabbitConfig.woman);

    }

    @Bean

    TopicExchange exchange() {

        return new TopicExchange("topicExchange");

    }

    //将firstQueue和topicExchange绑定,而且绑定的键值为topic.man

    //这样只要是消息携带的路由键是topic.man,才会分发到该队列

    @Bean

    Binding bindingExchangeMessage() {

        return BindingBuilder.bind(firstQueue()).to(exchange()).with(man);

    }

    //将secondQueue和topicExchange绑定,而且绑定的键值为用上通配路由键规则topic.#

    // 这样只要是消息携带的路由键是以topic.开头,都会分发到该队列

    @Bean

    Binding bindingExchangeMessage2() {

        return BindingBuilder.bind(secondQueue()).to(exchange()).with("topic.#");

    }

}
添加两个接口,用于将消息推送到交换机上
    @GetMapping("/sendTopicMessage1")

    public String sendTopicMessage1() {

        String messageId = String.valueOf(UUID.randomUUID());

        String messageData = "message: M A N ";

        String createTime = LocalDateTime.now().format(DateTimeFormatter.ofPattern("yyyy-MM-dd HH:mm:ss"));

        Map<String, Object> manMap = new HashMap<>();

        manMap.put("messageId", messageId);

        manMap.put("messageData", messageData);

        manMap.put("createTime", createTime);

        rabbitTemplate.convertAndSend("topicExchange", "topic.man", manMap);

        return "ok";

    }

    @GetMapping("/sendTopicMessage2")

    public String sendTopicMessage2() {

        String messageId = String.valueOf(UUID.randomUUID());

        String messageData = "message: woman is all ";

        String createTime = LocalDateTime.now().format(DateTimeFormatter.ofPattern("yyyy-MM-dd HH:mm:ss"));

        Map<String, Object> womanMap = new HashMap<>();

        womanMap.put("messageId", messageId);

        womanMap.put("messageData", messageData);

        womanMap.put("createTime", createTime);

        rabbitTemplate.convertAndSend("topicExchange", "topic.woman", womanMap);

        return "ok";

    }

}
消费者相关整合
创建TopicManReceiver
@Component

@RabbitListener(queues = "topic.man")

public class TopicManReceiver {

    @RabbitHandler

    public void process(Map testMessage) {

        System.out.println("TopicManReceiver消费者收到消息  : " + testMessage.toString());

    }

}
创建TopicTotalReceiver
@Component

@RabbitListener(queues = "topic.woman")

public class TopicTotalReceiver {

    @RabbitHandler

    public void process(Map testMessage) {

        System.out.println("TopicTotalReceiver消费者收到消息  : " + testMessage.toString());

    }

}
其他类似
RabbitMQ基本配置的更多相关文章
- spring amqp rabbitmq fanout配置
基于spring amqp rabbitmq fanout配置如下: 发布端 <rabbit:connection-factory id="rabbitConnectionFactor ...
- OpenStack中的rabbitmq的配置方法
OpenStack中的rabbitmq的配置方法 author:headsen chen 2017-10-11 17:24:58 个人原创,允许转载,转载请注明作者,出处,否则依法追究法律责任 ...
- RabbitMQ vhost 配置
RabbitMQ vhost 配置 rabbitmqctl set_vhost_limits是用来定义虚拟主机限制的命令 配置最大连接限制 要限制vhost vhost_name中并发客户端连接的 总 ...
- centos7 rabbitmq安装/配置
原文:centos7 rabbitmq安装/配置 因为RabbitMQ是由erlang实现的,所以要先安装erlang再安装rabbitMQ 1.先配置yum软件源地址EPEL(EPEL是 ...
- Centos7使用yum安装RabbitMq以及配置
RabbitMQ是基于AMQP的一款消息管理系统,是基于erlang语言开发的! 消息队列,即MQ,Message Queue:消息队列是典型的:生产者.消费者模型.生产者不断向消息队列中生产消息,消 ...
- RabbitMq安装配置启动
RabbitMq安装配置启动 一:安装材料 请前往官方地址下载 Erlang: https://www.erlang.org/downloads rabbitmq: https://www.rabbi ...
- RabbitMQ安装配置
安装RabbitMQ windows下的安装是非常简单的,我们需要准备两个东西 erlang的环境 下载windows和与之对象的操作系统位数安装包 http://www.erlang.org/do ...
- 安装 RabbitMQ C#使用-摘自网络(包括RabbitMQ的配置)
1.什么是RabbitMQ.详见 http://www.rabbitmq.com/ . 作用就是提高系统的并发性,将一些不需要及时响应客户端且占用较多资源的操作,放入队列,再由另外一个线程,去异步处理 ...
- NET下RabbitMQ实践[配置篇]
这个系列目前计划写四篇,分别是配置,示例,WCF发布,实战.当然不排除加餐情况. 介绍: rabbitMQ是一个在AMQP协议标准基础上完整的,可服用的企业消息系统.他遵循Mozilla Publi ...
- rabbitmq.config配置参数详解
rabbitmq.config详细配置参数 详细使用方法请点击:http://www.cnblogs.com/wyt007/p/9073316.html Key Documentation tcp_l ...
随机推荐
- Nvidia GPU热迁移-Singularity
1 背景 在GPU虚拟化和池化的加持下,可以显著提高集群的GPU利用率,同时也可以较好地实现弹性伸缩.但有时会遇到需要GPU资源再分配的场景,此时亟需集群拥有GPU任务热迁移的能力.举个简单的例子,比 ...
- 22-source-map
const { resolve } = require('path') const htmlWebpackPlugins = require('html-webpack-plugin') module ...
- react中refs详解
https://zh-hans.reactjs.org/docs/refs-and-the-dom.html 字符串形式ref 1 <input ref="myinput" ...
- 用tk.mybaits实现指定字段更新
去年年底的因为业务需要需要在使用tk.mybaits框架的系统中实现指定字段的更新,可是tk.mybaits框架本身并不支持这个功能,我翻遍了CSDN和其他相关的技术相关的网站都没有找到相关的解决 ...
- 数据治理之关键环节元数据管理开源项目datahub探索
@ 目录 概述 定义 核心功能 概念 元数据应用 其他开源 架构 概览 组件 元数据摄取架构 服务体系结构 本地部署 环境要求 安装 摄取样例 摄取入门 介绍 核心概念 命令行MySQL摄取示例 配置 ...
- 2023-02-14:魔物了占领若干据点,这些据点被若干条道路相连接, roads[i] = [x, y] 表示编号 x、y 的两个据点通过一条道路连接。 现在勇者要将按照以下原则将这些据点逐一夺回:
2023-02-14:魔物了占领若干据点,这些据点被若干条道路相连接, roads[i] = [x, y] 表示编号 x.y 的两个据点通过一条道路连接. 现在勇者要将按照以下原则将这些据点逐一夺回: ...
- 2021-04-07:给定一个非负数组arr,长度为N,那么有N-1种方案可以把arr切成左右两部分,每一种方案都有,min{左部分累加和,右部分累加和},求这么多方案中,min{左部分累加和,右部分累加和}的最大值是多少? 整个过程要求时间复杂度O(N)。
2021-04-07:给定一个非负数组arr,长度为N,那么有N-1种方案可以把arr切成左右两部分,每一种方案都有,min{左部分累加和,右部分累加和},求这么多方案中,min{左部分累加和,右部分 ...
- 2021-12-27:给定一个字符串str,和一个正数k, str子序列的字符种数必须是k种,返回有多少子序列满足这个条件。 已知str中都是小写字母, 原始是取mod, 本节在尝试上,最难的, 搞出
2021-12-27:给定一个字符串str,和一个正数k, str子序列的字符种数必须是k种,返回有多少子序列满足这个条件. 已知str中都是小写字母, 原始是取mod, 本节在尝试上,最难的, 搞出 ...
- css预编译sass和stylus简单使用
目前css 流行的三大预编译有stylus.less . sass 说白了这些东西就是为了提高编码效率,更好的规整和简化 css代码的,相信大家less 就不用多说了用得都比较多了,在这里简单记录下s ...
- Netty实战(三)
目录 一.Channel.EventLoop 和 ChannelFuture 1.1 Channel 接口 1.2 EventLoop 接口 1.3 ChannelFuture 接口 二.Channe ...