Directx11教程(64) tessellation学习(6)-PN Triangles
原文:Directx11教程(64) tessellation学习(6)-PN Triangles
前面我们用tessellation细分三角形或者四边形,产生的细分点都是在三角形或四边形平面内。本教程我们学习一下PN triangles(point normal triangles)的方法,把一个三角形细分为一个曲面。PN triangles的详细介绍请参考:2001 paper by Vlachos et al ,下面我们简单介绍一下PN triangles:
大家都知道,通常我们用贝塞尔函数表示光滑的曲面,贝塞尔函数是多项式函数,它表示的曲面通常也称作贝塞尔曲面,贝塞尔曲面的详细介绍,可以到wiki上看看Bezier Surface。
PN triangle是一个特殊的贝塞尔曲面,它的表示形式为:

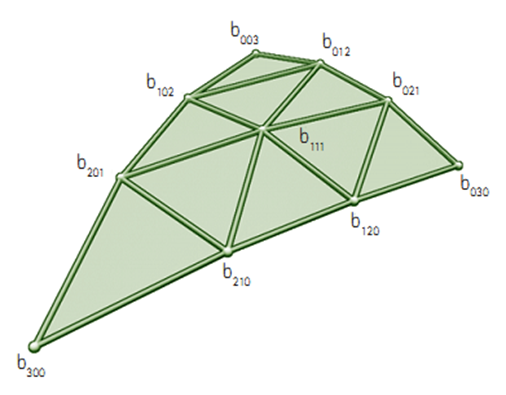
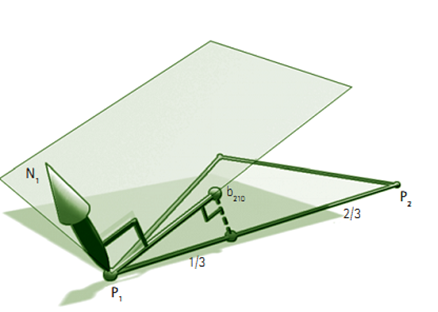
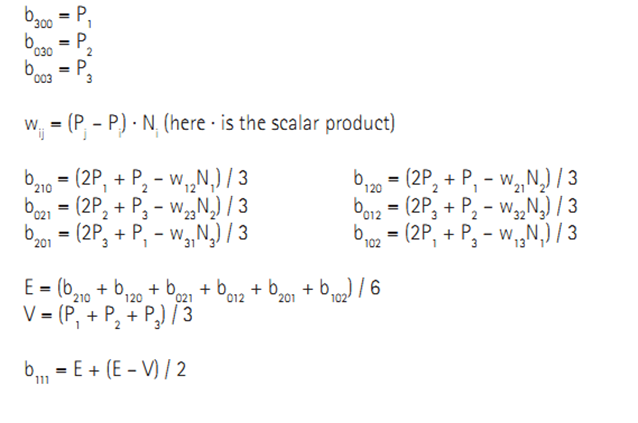
u,v, w是重心坐标,bxyz就是控制点,其中u+v+w=1,控制点的位置如下,看以看出来,b003, b030,b300就是三角形的三个顶点控制点,根据这三个控制点位置和法向,我们就可以计算出其它控制点的位置。
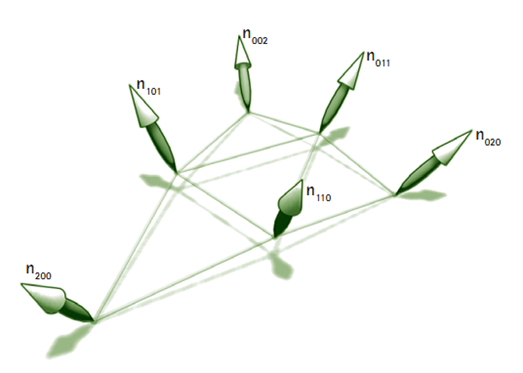
PN triangles的法向通过下面的方法计算得到:

下面我们在myTutorialD3D_54的基础上,增加PN triangle支持,用三角形生成曲面。首先修改MeshClass类,为三角形patch顶点结构增加normal属性,因为计算控制点时候需要它。
struct VertexType
{
D3DXVECTOR3 position;
D3DXVECTOR3 normal;
D3DXVECTOR4 color;
};
…
//创建顺时针方向的三角形,左手规则
// 设置顶点数据
vertices[0].position = D3DXVECTOR3(4.0f, 0.0f, -2.0f); // 左下
vertices[0].normal = D3DXVECTOR3(-1.0f, 1.0f, 0.0f);
vertices[0].color = D3DXVECTOR4(1.0f, 1.0f, 0.0f, 1.0f);
vertices[1].position = D3DXVECTOR3(6.0f, 0.0f, 4.0f); // 中上.
vertices[1].normal = D3DXVECTOR3(0.0f, 1.0f, 1.0f);
vertices[1].color = D3DXVECTOR4(0.0f, 1.0f, 0.0f, 1.0f);
vertices[2].position = D3DXVECTOR3(8.0f, 0.0f, -2.0f); // 底右
vertices[2].normal = D3DXVECTOR3(1.0f, 1.0f, 0.0f);
vertices[2].color = D3DXVECTOR4(0.0f, 1.0f, 1.0f, 1.0f);
接下来,修改TessShaderClass类,修改顶点布局,增加normal支持:
polygonLayout[1].SemanticName = "NORMAL";
polygonLayout[1].SemanticIndex = 0;
polygonLayout[1].Format = DXGI_FORMAT_R32G32B32_FLOAT;
polygonLayout[1].InputSlot = 0;
polygonLayout[1].AlignedByteOffset = 12;
polygonLayout[1].InputSlotClass = D3D11_INPUT_PER_VERTEX_DATA;
polygonLayout[1].InstanceDataStepRate = 0;
接着就是shader 文件的修改,这也是最关键的部分,下面看看各个shader文件,vs中基本就是pass through,把顶点属性传到hs,和以前比没有太多的变化,hs中增加了生成新控制点的代码:
ConstantOutputType ColorPatchConstantFunction(InputPatch<HullInputType, 3> inputPatch, uint patchId : SV_PrimitiveID)
{
ConstantOutputType output;
//设置三条边的细分因子.
output.edges[0] = tessellationAmount;
output.edges[1] = tessellationAmount;
output.edges[2] = tessellationAmount;
//设置三角形内的细分因子
output.inside = tessellationAmount;
// PN triangle三个控制顶点的位置,和三角形patch的原始控制点是一样的
float3 f3B003 = inputPatch[0].position;
float3 f3B030 = inputPatch[1].position;
float3 f3B300 = inputPatch[2].position;
// 法向
float3 f3N002 = inputPatch[0].normal;
float3 f3N020 = inputPatch[1].normal;
float3 f3N200 = inputPatch[2].normal;
// 根据公式计算边控制点和中心控制点
output.f3B210 = ( ( 2.0f * f3B003 ) + f3B030 - ( dot( ( f3B030 - f3B003 ), f3N002 ) * f3N002 ) ) / 3.0f;
output.f3B120 = ( ( 2.0f * f3B030 ) + f3B003 - ( dot( ( f3B003 - f3B030 ), f3N020 ) * f3N020 ) ) / 3.0f;
output.f3B021 = ( ( 2.0f * f3B030 ) + f3B300 - ( dot( ( f3B300 - f3B030 ), f3N020 ) * f3N020 ) ) / 3.0f;
output.f3B012 = ( ( 2.0f * f3B300 ) + f3B030 - ( dot( ( f3B030 - f3B300 ), f3N200 ) * f3N200 ) ) / 3.0f;
output.f3B102 = ( ( 2.0f * f3B300 ) + f3B003 - ( dot( ( f3B003 - f3B300 ), f3N200 ) * f3N200 ) ) / 3.0f;
output.f3B201 = ( ( 2.0f * f3B003 ) + f3B300 - ( dot( ( f3B300 - f3B003 ), f3N002 ) * f3N002 ) ) / 3.0f;
float3 f3E = ( output.f3B210 + output.f3B120 + output.f3B021 + output.f3B012 + output.f3B102 + output.f3B201 ) / 6.0f;
float3 f3V = ( f3B003 + f3B030 + f3B300 ) / 3.0f;
output.f3B111 = f3E + ( ( f3E - f3V ) / 2.0f );
// 计算法向控制点
float fV12 = 2.0f * dot( f3B030 - f3B003, f3N002 + f3N020 ) / dot( f3B030 - f3B003, f3B030 - f3B003 );
output.f3N110 = normalize( f3N002 + f3N020 - fV12 * ( f3B030 - f3B003 ) );
float fV23 = 2.0f * dot( f3B300 - f3B030, f3N020 + f3N200 ) / dot( f3B300 - f3B030, f3B300 - f3B030 );
output.f3N011 = normalize( f3N020 + f3N200 - fV23 * ( f3B300 - f3B030 ) );
float fV31 = 2.0f * dot( f3B003 - f3B300, f3N200 + f3N002 ) / dot( f3B003 - f3B300, f3B003 - f3B300 );
output.f3N101 = normalize( f3N200 + f3N002 - fV31 * ( f3B003 - f3B300 ) );
return output;
}
在ds中,我们根据PN triangle公式生成新的控制点:
//重心坐标
float fU = uvwCoord.x;
float fV = uvwCoord.y;
float fW = uvwCoord.z;
// 预计算一些需要的值
float fUU = fU * fU;
float fVV = fV * fV;
float fWW = fW * fW;
float fUU3 = fUU * 3.0f;
float fVV3 = fVV * 3.0f;
float fWW3 = fWW * 3.0f;
//根据公式和重心坐标计算细分后顶点的位置
float3 f3Position = patch[0].position * fWW * fW +
patch[1].position * fUU * fU +
patch[2].position * fVV * fV +
input.f3B210 * fWW3 * fU +
input.f3B120 * fW * fUU3 +
input.f3B201 * fWW3 * fV +
input.f3B021 * fUU3 * fV +
input.f3B102 * fW * fVV3 +
input.f3B012 * fU * fVV3 +
input.f3B111 * 6.0f * fW * fU * fV;
//计算新的顶点在世界坐标系中的位置
output.position = mul(float4(f3Position, 1.0f), worldMatrix);
output.position = mul(output.position, viewMatrix);
output.position = mul(output.position, projectionMatrix);
// 计算法向
float3 f3Normal = patch[0].normal * fWW +
patch[1].normal * fUU +
patch[2].normal * fVV +
input.f3N110 * fW * fU +
input.f3N011 * fU * fV +
input.f3N101 * fW * fV;
// 归一化
f3Normal = normalize( f3Normal );
output.normal = f3Normal;
//新生成顶点颜色也为各个控制点颜色组合
output.color = uvwCoord.x * patch[0].color + uvwCoord.y * patch[1].color + uvwCoord.z * patch[2].color;
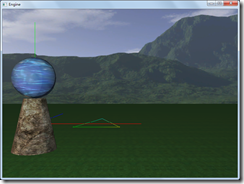
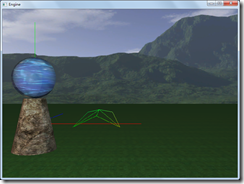
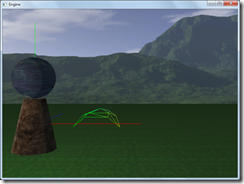
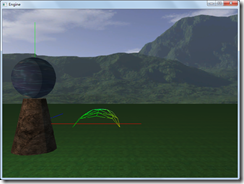
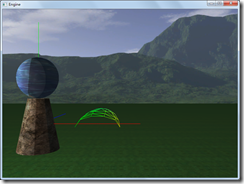
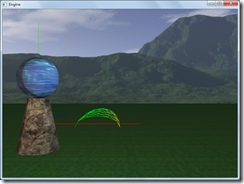
程序执行后界面如下,其中tess factor 从1到6,可以看出来,随着细分因子的增大,三角形越接近曲面。
完整的代码请参考:
工程文件myTutorialD3D11_59
代码下载:
稍后提供
Directx11教程(64) tessellation学习(6)-PN Triangles的更多相关文章
- Directx11教程(60) tessellation学习(2)
原文:Directx11教程(60) tessellation学习(2) 本教程中,我们开始tessellation编程,共实现了2个程序,第一个tessellation程序,是对一个三 ...
- Directx11教程(59) tessellation学习(1)
原文:Directx11教程(59) tessellation学习(1) 在D3D11管线中,新增加了3个stage, Hull shader, Tessellator, Domain s ...
- Directx11教程(63) tessellation学习(5)
原文:Directx11教程(63) tessellation学习(5) TS中生成细分后顶点的u,v,{w}坐标,我们根据控制点和u,w,{w}坐标生成新的顶点位置,在前面四边形的细分 ...
- Directx11教程(62) tessellation学习(4)
原文:Directx11教程(62) tessellation学习(4) 现在看看四边形在不同tess factor时,四边形细分的细节,下图是tess factor1-8时候的细分.te ...
- Directx11教程(61) tessellation学习(3)
原文:Directx11教程(61) tessellation学习(3) 现在我们看看在不同tess factor的情况下,三角形是如何细分的?(这儿三条边和内部tess factor值是 ...
- Directx11教程(15) D3D11管线(4)
原文:Directx11教程(15) D3D11管线(4) 本章我们首先了解一下D3D11中的逻辑管线,认识一下管线中每个stage的含义. 参考资料:http://fgiesen.wordpress ...
- Directx11教程(16) D3D11管线(5)
原文:Directx11教程(16) D3D11管线(5) 本章我们学习VS中具体做些什么事情? 首先再看看我们的VS shader代码: Clolor.vs - PixelInputType Col ...
- Directx11教程(66) D3D11屏幕文本输出(1)
原文:Directx11教程(66) D3D11屏幕文本输出(1) 在D3D10中,通过ID3DX10Font接口对象,我们可以方便的在屏幕上输出文字信息,一个DrawText函数就能解决所 ...
- Directx11教程(56) 建立一个skydome
原文:Directx11教程(56) 建立一个skydome 本章建立一个skydome(天空穹),主要学习如何使用cube mapping. cube map就是把六张纹理当作 ...
随机推荐
- ajax发送验证码
$.ajax({ url:url, type:"POST", data:data, dataType:"JSON", s ...
- VS2012与windos版本不兼容问题
昨天晚上加完班,想着把windows更新下.今天上午就发现再运行VS报错了,提示VS2012与windows版本不兼容,打开.sln文件后,VS自动关闭.错误如下: 查看后网上提示安装VS2012的一 ...
- c#日期时间截取
时间格式化CodeDateTime dt = DateTime.Now;Label11.Text = dt.ToString();2005-11-5 13:21:25Label12.Text = dt ...
- win10上的vs2015项目到win7的2015无法使用
- Docker(二)安装及常用命令
1.安装 1.安装虚拟机VMWare 链接:https://pan.baidu.com/s/1Xl7ENUm2gapPOFs-iXHpRQ 提取码:eubm 2.下载centos,我下的是这个版本的 ...
- UVA11916 Emoogle Grid
Emoogle Grid You have to color an M × N (1 ≤ M, N ≤ 108 ) two dimensional grid. You will be provided ...
- js中的观察者模式与发布者/订阅者模式的区别?
- spring源码学习之AOP(一)
继续源码学习,看了spring中基础的容器和AOP感觉自己也没有什么长进,哈哈,我也不知道到底有用没有,这可能是培养自己的一种精神吧,不管那么多,继续学习!AOP中 AOP中几个重要的概念:(1)Ad ...
- css背景图自适应
在开发时,修改了d2admin的登录页面.使用了背景图片,但是ui给的图过于大(可能是我电脑屏幕小哈)无法完整的显示到页面上,所以修改了代码,可以完整显示背景图. 代码如下:background: u ...
- 直接在安装了redis的Linux机器上操作redis数据存储类型--set类型
一.概述: 在Redis中,我们可以将Set类型看作为没有排序的字符集合,和List类型一样,我们也可以在该类型的数据值上执行添加.删除或判断某一元素是否存在等操作.需要说明的是,这些操作的时间复 ...