TensorFlow—多层感知器—MNIST手写数字识别
1 import tensorflow as tf
import tensorflow.examples.tutorials.mnist.input_data as input_data
import matplotlib.pyplot as plt
import numpy as np
mnist=input_data.read_data_sets("MNIST_data/",one_hot=True) #下载据数
print('train images:',mnist.train.images.shape, #查看数据
'labels:',mnist.train.labels.shape)
print('validation images:',mnist.validation.images.shape,
'labels:',mnist.validation.labels.shape)
print('test images:',mnist.test.images.shape,
'labels:',mnist.test.labels.shape
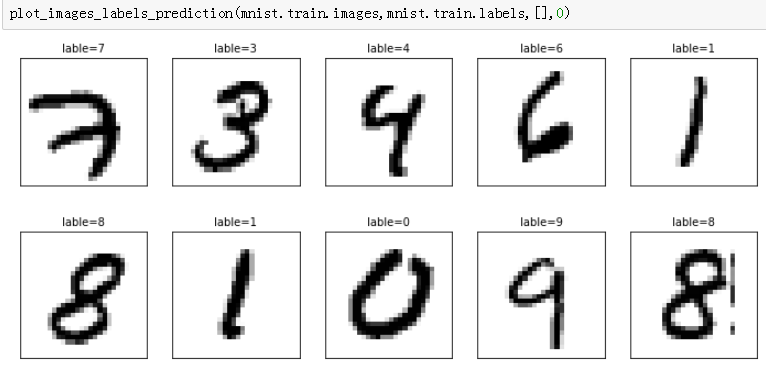
#定义显示多项图像的函数
def plot_images_labels_prediction_3(images,labels,prediction,idx,num=):
fig=plt.gcf()
fig.set_size_inches(,)
if num>:num=
for i in range(,num):
ax=plt.subplot(,,i+)
ax.imshow(np.reshape(images[idx],(,)),cmap='binary')
title='lable='+str(np.argmax(labels[idx]))
if len(prediction)>:
title+=",prediction="+str(prediction[idx])
ax.set_title(title,fontsize=)
ax.set_xticks([]);ax.set_yticks([])
idx+=
plt.show() plot_images_labels_prediction_3(mnist.train.images,mnist.train.labels,[],)
#定义layer函数,构建多层感知器模型
def layer(output_dim,input_dim,inputs,activation=None):
W=tf.Variable(tf.random_normal([input_dim,output_dim]))
b=tf.Variable(tf.random_normal([,output_dim]))
XWb=tf.matmul(inputs,W)+b
if activation is None:
outputs=XWb
else:
outputs=activation(XWb)
return outputs
#建立输入层
x=tf.placeholder("float",[None,])
#建立隐藏层
h1=layer(output_dim=,input_dim=,inputs=x,
activation=tf.nn.relu)
#建立输出层
y_predict=layer(output_dim=,input_dim=,inputs=h1,
activation=None)
y_label=tf.placeholder("float",[None,])
#定义损失函数
loss_function=tf.reduce_mean(tf.nn.softmax_cross_entropy_with_logits
(logits=y_predict,
labels=y_label))
#定义优化器
optimizer=tf.train.AdamOptimizer(learning_rate=0.001).minimize(loss_function)
#计算每一项数据是否预测正确
correct_prediction=tf.equal(tf.argmax(y_label,),
tf.argmax(y_predict,))
#计算预测正确结果的平均值
accuracy=tf.reduce_mean(tf.cast(correct_prediction,"float"))
#、定义训练参数
trainEpochs= #设置执行15个训练周期
batchSize= #每一批次项数为100
totalBatchs=int(mnist.train.num_examples/batchSize) #计算每个训练周期
loss_list=[];epoch_list=[];accuracy_list=[] #初始化训练周期、误差、准确率
from time import time #导入时间模块
startTime=time() #开始计算时间
sess=tf.Session() #建立Session
sess.run(tf.global_variables_initializer()) #初始化TensorFlow global 变量
#、进行训练
for epoch in range(trainEpochs):
for i in range(totalBatchs):
batch_x,batch_y=mnist.train.next_batch(batchSize) #使用mnist.train.next_batch方法读取批次数据,传入参数batchSize是100
sess.run(optimizer,feed_dict={x:batch_x,
y_label:batch_y}) #执行批次训练
loss,acc=sess.run([loss_function,accuracy], #使用验证数据计算准确率
feed_dict={x:mnist.validation.images,
y_label:mnist.validation.labels})
epoch_list.append(epoch); #加入训练周期列表
loss_list.append(loss) #加入误差列表
accuracy_list.append(acc) #加入准确率列表
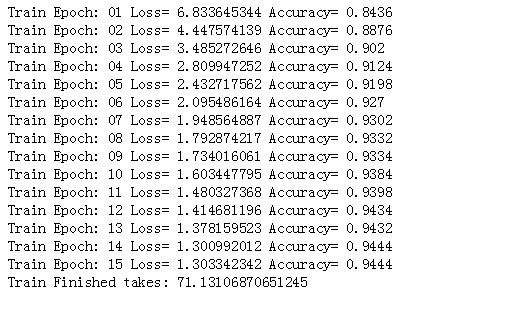
print("Train Epoch:",'%02d' % (epoch+),"Loss=",\
"{:.9f}".format(loss),"Accuracy=",acc)
duration=time()-startTime
print("Train Finished takes:",duration) #计算并显示全部训练所需时间
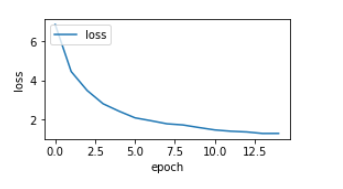
#画出误差执行结果 fig=plt.gcf()
fig.set_size_inches(,)
plt.plot(epoch_list,loss_list,label='loss')
plt.ylabel('loss')
plt.xlabel('epoch')
plt.legend(['loss'],loc='upper left')
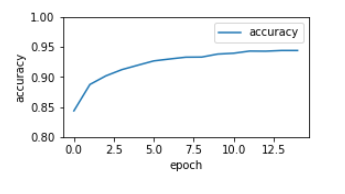
#画出准确率执行结果
plt.plot(epoch_list,accuracy_list,label="accuracy")
fig=plt.gcf()
fig.set_size_inches(,)
plt.ylim(0.8,)
plt.ylabel('accuracy')
plt.xlabel('epoch')
plt.legend()
plt.show()
#评估模型准确率
print("accuracy:",sess.run(accuracy,
feed_dict={x:mnist.test.images,
y_label:mnist.test.labels}))
#进行预测
#.执行预测
prediction_result=sess.run(tf.argmax(y_predict,),
feed_dict={x:mnist.test.images})
#.预测结果
print(prediction_result[:])
#.显示前10项预测结果
plot_images_labels_prediction_3(mnist.test.images,
mnist.test.labels,
prediction_result,)
运行结果:

TensorFlow—多层感知器—MNIST手写数字识别的更多相关文章
- 【TensorFlow-windows】(三) 多层感知器进行手写数字识别(mnist)
主要内容: 1.基于多层感知器的mnist手写数字识别(代码注释) 2.该实现中的函数总结 平台: 1.windows 10 64位 2.Anaconda3-4.2.0-Windows-x86_64. ...
- 基于tensorflow的MNIST手写数字识别(二)--入门篇
http://www.jianshu.com/p/4195577585e6 基于tensorflow的MNIST手写字识别(一)--白话卷积神经网络模型 基于tensorflow的MNIST手写数字识 ...
- Tensorflow实现MNIST手写数字识别
之前我们讲了神经网络的起源.单层神经网络.多层神经网络的搭建过程.搭建时要注意到的具体问题.以及解决这些问题的具体方法.本文将通过一个经典的案例:MNIST手写数字识别,以代码的形式来为大家梳理一遍神 ...
- TensorFlow——MNIST手写数字识别
MNIST手写数字识别 MNIST数据集介绍和下载:http://yann.lecun.com/exdb/mnist/ 一.数据集介绍: MNIST是一个入门级的计算机视觉数据集 下载下来的数据集 ...
- mnist手写数字识别——深度学习入门项目(tensorflow+keras+Sequential模型)
前言 今天记录一下深度学习的另外一个入门项目——<mnist数据集手写数字识别>,这是一个入门必备的学习案例,主要使用了tensorflow下的keras网络结构的Sequential模型 ...
- Android+TensorFlow+CNN+MNIST 手写数字识别实现
Android+TensorFlow+CNN+MNIST 手写数字识别实现 SkySeraph 2018 Email:skyseraph00#163.com 更多精彩请直接访问SkySeraph个人站 ...
- Tensorflow之MNIST手写数字识别:分类问题(1)
一.MNIST数据集读取 one hot 独热编码独热编码是一种稀疏向量,其中:一个向量设为1,其他元素均设为0.独热编码常用于表示拥有有限个可能值的字符串或标识符优点: 1.将离散特征的取值扩展 ...
- 基于TensorFlow的MNIST手写数字识别-初级
一:MNIST数据集 下载地址 MNIST是一个包含很多手写数字图片的数据集,一共4个二进制压缩文件 分别是test set images,test set labels,training se ...
- 持久化的基于L2正则化和平均滑动模型的MNIST手写数字识别模型
持久化的基于L2正则化和平均滑动模型的MNIST手写数字识别模型 觉得有用的话,欢迎一起讨论相互学习~Follow Me 参考文献Tensorflow实战Google深度学习框架 实验平台: Tens ...
随机推荐
- jenkins 使用的python 不是指定的python 的解决方法
构建的时候加上要使用python的解析器路径 终端 which python 可以找到 python编辑器里面 import os os.system("which python" ...
- RDD之三:RDD创建方式
RDD创建方式 1)从Hadoop文件系统(如HDFS.Hive.HBase)输入创建.2)从父RDD转换得到新RDD.3)通过parallelize或makeRDD将单机数据创建为分布式RDD. 4 ...
- CentOS下安装robot-framework
http://www.cnblogs.com/hengwei/p/5464678.html http://www.2cto.com/kf/201405/305383.html https://pypi ...
- OpenGL chapter5 基础纹理
Chapter5 基础纹理 Contents: ==================================================== | 任务 | 使用的函数 ========== ...
- crs_stop 错误一列
http://www.forzw.com/archives/703 grid 与 oracle 版本为11.2.0.4,为两节点RAC,在通过crs_stop -all命令关闭oracle服务时出 ...
- System Error:/usr/lib64/libstdc++.so.6: version `GLIBCXX_3.4.15' not found
System Error:/usr/lib64/libstdc++.so.6: version `GLIBCXX_3.4.15' not found 1.运行程序是,系统报错库文件libstdc++. ...
- Java读取文件方法大全
1.按字节读取文件内容2.按字符读取文件内容3.按行读取文件内容 4.随机读取文件内容 public class ReadFromFile { /** * 以字节为单位读取文件,常用于读 ...
- Python自定义状态码枚举类
在Java里很容易做到自定义有状态码和状态说明的枚举类例如: public enum MyStatus { NOT_FOUND(404, "Required resource is not ...
- python+selenium+requests爬取我的博客粉丝的名称
爬取目标 1.本次代码是在python2上运行通过的,python3的最需改2行代码,用到其它python模块 selenium 2.53.6 +firefox 44 BeautifulSoup re ...
- PHP Token(令牌)设计 避免重复提交
设计目标: 避免重复提交数据. 检查来路,是否是外部提交 匹配要执行的动作(如果有多个逻辑在同一个页面实现,比如新增,删除,修改放到一个PHP文件里操作) 这里所说的token是在页面显示的时候,写到 ...