Linux下架构高可用性网络----HA+LB+lvs
实验总拓扑:
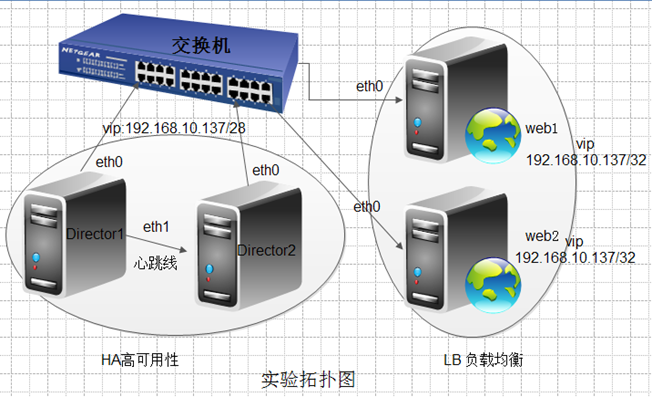
IP规划:
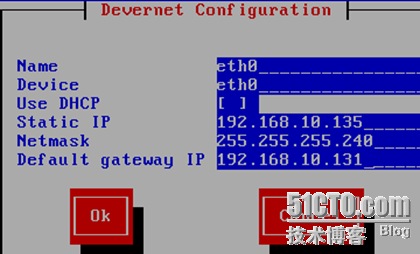
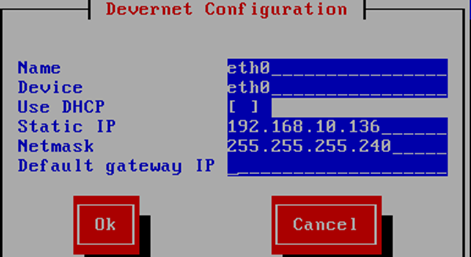
Director1: eth0 192.168.10.136/28
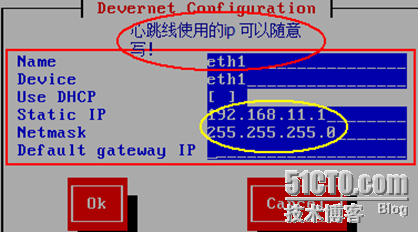
eth1 192.168.11.2/24
Director2: eth0 192.168.10.135/28
eth1 192.168.11.1/24
web1 eth0 192.168.10.133/28
web2 eth0 192.168.10.134/28
注意:ip地址为:192.168.10.136/28的为主Director
案例1:web的HA群集:
拓扑图1:

eth0网卡用Host-Only ,eth1 用vmware 2
[root@gjp99 ~]# vim /etc/sysconfig/network
[root@gjp99 ~]# cat /etc/sysconfig/network
NETWORKING=yes
NETWORKING_IPV6=yes
HOSTNAME=xc.bj.com
[root@gjp99 ~]# cat /etc/hosts
# Do not remove the following line, or various programs
# that require network functionality will fail.
127.0.0.1 localhost.localdomain localhost
::1 localhost6.localdomain6 localhost6
192.168.10.135 xc.bj.com
192.168.10.136 zz.bj.com
[root@gjp99 ~]# hostname xc.bj.com
[root@gjp99 ~]# hostname
xc.bj.com
exit 退出之后,重新ssh即可修改名字,否则,必须重启
[root@xc ~]# 名称已经修改


[root@mail ~]# cat /etc/sysconfig/network
NETWORKING=yes
NETWORKING_IPV6=yes
HOSTNAME=zz.bj.com
同一个网段可以用scp来拷贝!
[root@mail ~]# scp 192.168.10.135:/etc/hosts /etc/
The authenticity of host '192.168.10.135 (192.168.10.135)' can't be established.
RSA key fingerprint is 87:be:8b:a4:bd:11:11:10:c2:ec:2d:ef:02:68:f6:0e.
Are you sure you want to continue connecting (yes/no)? yes
Warning: Permanently added '192.168.10.135' (RSA) to the list of known hosts.
root@192.168.10.135's password:
hosts 100% 242 0.2KB/s 00:00
[root@mail ~]# cat /etc/hosts
# Do not remove the following line, or various programs
# that require network functionality will fail.
127.0.0.1 localhost.localdomain localhost
::1 localhost6.localdomain6 localhost6
192.168.10.135 xc.bj.com
192.168.10.136 zz.bj.com
[root@mail ~]# hostname zz.bj.com
logout登出,再登陆即可
[root@zz ~]# ping xc.bj.com
PING xc.bj.com (192.168.10.135) 56(84) bytes of data.
64 bytes from xc.bj.com (192.168.10.135): icmp_seq=1 ttl=64 time=1.06 ms
64 bytes from xc.bj.com (192.168.10.135): icmp_seq=2 ttl=64 time=0.481 ms
[root@xc ~]# ping zz.bj.com
PING zz.bj.com (192.168.10.136) 56(84) bytes of data.
64 bytes from zz.bj.com (192.168.10.136): icmp_seq=1 ttl=64 time=0.668 ms
64 bytes from zz.bj.com (192.168.10.136): icmp_seq=2 ttl=64 time=0.350 ms
配置本地yum服务器:
[root@xc ~]# vim /etc/yum.repos.d/rhel-debuginfo.repo
[root@xc ~]# cat /etc/yum.repos.d/rhel-debuginfo.repo
[rhel-server]
name=Red Hat Enterprise Linux server
baseurl=file:///mnt/cdrom/Server
enabled=1
gpgcheck=1
gpgkey=file:///mnt/cdrom/RPM-GPG-KEY-redhat-release
把本地yum服务器上的配置拷贝到zz.bj.com 的机器上:
[root@xc ~]# scp /etc/yum.repos.d/rhel-debuginfo.repo zz.bj.com:/etc/yum.repos.d/The authenticity of host 'zz.bj.com (192.168.10.136)' can't be established.
RSA key fingerprint is 87:be:8b:a4:bd:11:11:10:c2:ec:2d:ef:02:68:f6:0e.
Are you sure you want to continue connecting (yes/no)? yes
Warning: Permanently added 'zz.bj.com' (RSA) to the list of known hosts.
root@zz.bj.com's password:
rhel-debuginfo.repo 100% 157 0.2KB/s 00:00
[root@xc ~]# mkdir /mnt/cdrom
[root@xc ~]# mount /dev/cdrom /mnt/cdrom
mount: block device /dev/cdrom is write-protected, mounting read-only
[root@xc ~]# yum install httpd –y
[root@xc ~]# cd /var/www/html/
[root@xc html]# echo "www.xcu.com">index.html
[root@xc html]# service httpd start 服务的启动是靠hearbeat调用的,这里仅供测试开启
Starting httpd:
[root@xc html]# yum install lynx –y
[root@xc html]# lynx http://192.168.10.135 能够访问的到!
[root@xc html]# service httpd stop
Stopping httpd: [ OK ]
[root@xc html]# chkconfig --list |grep httpd 要保证其为off状态
httpd 0:off 1:off 2:on 3:on 4:on 5:on 6:off
[root@xc html]# chkconfig httpd off 默认把2345 off了!
[root@xc html]# chkconfig --list |grep httpd
httpd 0:off 1:off 2:off 3:off 4:off 5:off 6:off
没省之前为: chkconfig --level 2345 httpd on
[root@xc html]# service httpd status
httpd is stopped
另一台Director上操作如下:
[root@zz ~]# mkdir /mnt/cdrom
[root@zz ~]# mount /dev/cdrom /mnt/cdrom
mount: block device /dev/cdrom is write-protected, mounting read-only
[root@zz ~]# yum install httpd –y
[root@zz ~]# cd /var/www/html/
[root@zz html]# echo "www.zhengzhou.com">index.html
[root@zz html]# service httpd start
Starting httpd: [ OK ]
[root@zz html]# yum install lynx –y
[root@zz html]# lynx http://192.168.10.136
[root@zz html]# service httpd stop
Stopping httpd: [ OK ]
[root@zz html]# chkconfig --list |grep httpd
httpd 0:off 1:off 2:off 3:off 4:off 5:off 6:off
[root@zz html]# service httpd status
httpd is stopped
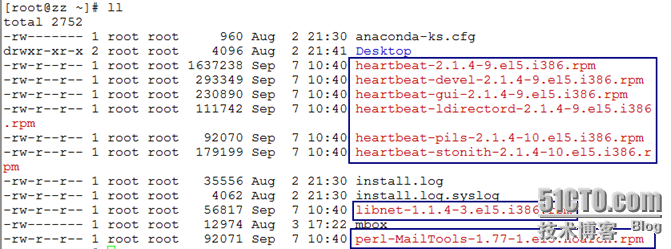
[root@zz ~]# yum localinstall -y heartbeat-2.1.4-9.el5.i386.rpm heartbeat-pils-2.1.4-10.el5.i386.rpm heartbeat-stonith-2.1.4-10.el5.i386.rpm libnet-1.1.4-3.el5.i386.rpm perl-MailTools-1.77-1.el5.noarch.rpm --nogpgcheck
需要用本地yum来解决依赖,所以,用localinstall 不检测数字证书nogpgcheck
[root@zz ~]# cd /etc/ha.d
[root@zz ha.d]# ll
total 24
-rwxr-xr-x 1 root root 745 Jul 25 2009 harc
drwxr-xr-x 2 root root 4096 Sep 7 10:48 rc.d
-rw-r--r-- 1 root root 692 Jul 25 2009 README.config
drwxr-xr-x 2 root root 4096 Sep 7 10:48 resource.d
-rw-r--r-- 1 root root 7862 Jul 25 2009 shellfuncs
[root@zz ha.d]# cd /usr/share/doc/heartbeat-2.1.4/
[root@zz heartbeat-2.1.4]# ls
apphbd.cf faqntips.html haresources Requirements.html
authkeys faqntips.txt hb_report.html Requirements.txt
AUTHORS GettingStarted.html hb_report.txt rsync.html
ChangeLog GettingStarted.txt heartbeat_api.html rsync.txt
COPYING ha.cf heartbeat_api.txt startstop
COPYING.LGPL HardwareGuide.html logd.cf
DirectoryMap.txt HardwareGuide.txt README
[root@zz heartbeat-2.1.4]# cp ha.cf /etc/ha.d/
[root@zz heartbeat-2.1.4]# cp haresources /etc/ha.d/ 资源定义
[root@zz heartbeat-2.1.4]# cp authkeys /etc/ha.d/ 双方身份验证
[root@zz heartbeat-2.1.4]# cd /etc/ha.d/
[root@zz ha.d]# ll
total 48
-rw-r--r-- 1 root root 645 Sep 7 10:55 authkeys
-rw-r--r-- 1 root root 10539 Sep 7 10:55 ha.cf
-rwxr-xr-x 1 root root 745 Jul 25 2009 harc
-rw-r--r-- 1 root root 5905 Sep 7 10:55 haresources
drwxr-xr-x 2 root root 4096 Sep 7 10:48 rc.d
-rw-r--r-- 1 root root 692 Jul 25 2009 README.config
drwxr-xr-x 2 root root 4096 Sep 7 10:48 resource.d
-rw-r--r-- 1 root root 7862 Jul 25 2009 shellfuncs
[root@zz ha.d]# vim ha.cf
95 bcast eth1
214 node xc.bj.com
215 node zz.bj.com
[root@zz ha.d]# vim authkeys 通过md5
auth 3
3 md5 889ace63c4d4dd2234a149eb187e3f4f
[root@zz ha.d]# dd if=/dev/random bs=512 count=1
产生的随机文件:没有of表示输入到屏幕上!
+>c.\.Y?Be?}1_v.K苌.E.躐Q?.. Pi.?吏" V?*?
??使???...$m? ~vm雌.$.侥]bX c.?0+1 records in
0+1 records out
128 bytes (128 B) copied, 0.00155976 seconds, 82.1 kB/s
[root@zz ha.d]# dd if=/dev/random bs=512 count=1 |openssl md5
把随机产生的文件用md5加密!
0+1 records in
0+1 records out
128 bytes (128 B) copied, 0.000253127 seconds, 506 kB/s
889ace63c4d4dd2234a149eb187e3f4f
[root@zz ha.d]# chmod 600 authkeys
[root@zz ha.d]# vim haresources 资源管理器
45 zz.bj.com 192.168.10.137/28/eth0/192.168.10.143 httpd
[root@zz ha.d]# cp /etc/init.d/httpd resource.d/
[root@zz ha.d]# scp ha.cf xc.bj.com:/etc/ha.d/
The authenticity of host 'xc.bj.com (192.168.10.135)' can't be established.
RSA key fingerprint is 87:be:8b:a4:bd:11:11:10:c2:ec:2d:ef:02:68:f6:0e.
Are you sure you want to continue connecting (yes/no)? yes
Warning: Permanently added 'xc.bj.com' (RSA) to the list of known hosts.
root@xc.bj.com's password:
ha.cf 100% 10KB 10.3KB/s 00:00
把刚才在zz.bj.com上的配置拷贝到xc.bj.com
[root@xc html]# scp zz.bj.com:/root/*.rpm ./
root@zz.bj.com's password:
heartbeat-2.1.4-9.el5.i386.rpm 100% 1599KB 1.6MB/s 00:00
heartbeat-devel-2.1.4-9.el5.i386.rpm 100% 286KB 286.5KB/s 00:00
heartbeat-gui-2.1.4-9.el5.i386.rpm 100% 225KB 225.5KB/s 00:01
heartbeat-ldirectord-2.1.4-9.el5.i386.rpm 100% 109KB 109.1KB/s 00:00
heartbeat-pils-2.1.4-10.el5.i386.rpm 100% 90KB 89.9KB/s 00:00
heartbeat-stonith-2.1.4-10.el5.i386.rpm 100% 175KB 175.0KB/s 00:00
libnet-1.1.4-3.el5.i386.rpm 100% 55KB 55.5KB/s 00:00
perl-MailTools-1.77-1.el5.noarch.rpm 100% 90KB 89.9KB/s 00:00
[root@xc html]# yum localinstall -y heartbeat-2.1.4-9.el5.i386.rpm heartbeat-pils-2.1.4-10.el5.i386.rpm heartbeat-stonith-2.1.4-10.el5.i386.rpm libnet-1.1.4-3.el5.i386.rpm perl-MailTools-1.77-1.el5.noarch.rpm --nogpgcheck
root@zz ha.d]# chkconfig --list |grep heartbeat
heartbeat 0:off 1:off 2:on 3:on 4:on 5:on 6:off
[root@zz ha.d]# chkconfig heartbeat on
[root@zz ha.d]# service heartbeat start
Starting High-Availability services:
2012/09/07_11:30:10 INFO: Resource is stopped [ OK ]

[root@zz ha.d]# netstat -tupln |grep http
tcp 0 0 :::80 :::* LISTEN 7134/httpd
本来http服务在两台机器上都是关闭状态,但是,由于这些服务都是资源,由heartbeat自动调用,所以,启动heartbeat后,它会自动调用这些资源!
[root@zz ha.d]# tail -f /var/log/messages
Sep 7 11:32:39 mail ResourceManager[6883]: info: Acquiring resource group: zz.bj.com 192.168.10.137/28/eth0/192.168.10.143 httpd
Sep 7 11:32:39 mail IPaddr[6910]: INFO: Resource is stopped
Sep 7 11:32:39 mail ResourceManager[6883]: info: Running /etc/ha.d/resource.d/IPaddr 192.168.10.137/28/eth0/192.168.10.143 start
访问资源测试:


发现另一台设备则:
[root@xc ha.d]# ifconfig |less 没有虚拟ip
这台设备处于备份状态!
[root@xc ha.d]# service httpd status 服务关闭状态
httpd is stopped
[root@xc ha.d]# watch -n 1 "service httpd status"
隔一秒查看一下http的状态:
模拟一个接口失效了!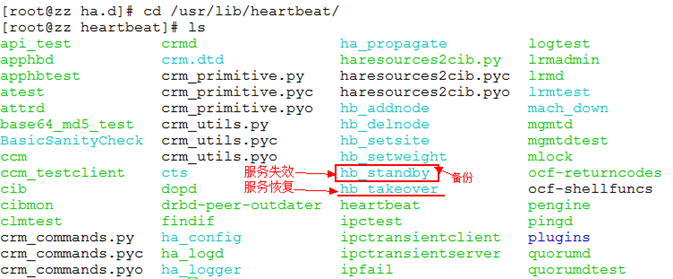
[root@zz heartbeat]# ./hb_standby
2012/09/07_12:01:22 Going standby [all].

发现没有丢一个包,比较完美!
发现xc.bj.com 机器上的http已开始启动!

网页一刷新,便呈现出来!

如果两台机器上放置的是同一个网页时,不会影响正常访问
权利再夺过来!
[root@zz heartbeat]# ./hb_takeover
另一台机器的http服务立即就停止掉了!

主服务的heartbeat一旦停掉,另一台自动启用,即资源也开始使用!
[root@zz heartbeat]# service heartbeat stop
Stopping High-Availability services:
[ OK ]
[root@xc ha.d]# service httpd status
httpd (pid 12275) is running...
[root@xc ha.d]# service heartbeat stop
Stopping High-Availability services:
[ OK ]
案例2:HA+LB+lvs
拓扑图2:
LVS的HA群集:
两台的heartbeat都停止掉了,即服务也停了!
[root@xc ha.d]# yum remove httpd
两台机器上都卸掉http
[root@zz heartbeat]# cat /etc/yum.repos.d/rhel-debuginfo.repo
[rhel-server]
name=Red Hat Enterprise Linux server
baseurl=file:///mnt/cdrom/Server
enabled=1
gpgcheck=1
gpgkey=file:///mnt/cdrom/RPM-GPG-KEY-redhat-release
[rhel-cluster]
name=Red Hat Enterprise Linux cluster
baseurl=file:///mnt/cdrom/Cluster
enabled=1
gpgcheck=1
gpgkey=file:///mnt/cdrom/RPM-GPG-KEY-redhat-release
[root@zz heartbeat]# scp /etc/yum.repos.d/rhel-debuginfo.repo xc.bj.com:/etc/yum.repos.d/
两台机器都用:
[root@xc ha.d]# yum install ipvsadm –y
[root@xc ha.d]# chkconfig --list |grep ipvs
ipvsadm 0:off 1:off 2:off 3:off 4:off 5:off 6:off
[root@xc ha.d]# service ipvsadm status
ipvsadm is stopped
[root@xc ha.d]# ipvsadm -A -t 192.168.10.137:80 -s rr
[root@xc ha.d]# ipvsadm -a -t 192.168.10.137:80 -r 192.168.10.133 -g
[root@xc ha.d]# ipvsadm -a -t 192.168.10.137:80 -r 192.168.10.134 -g
[root@xc ha.d]# service ipvsadm save
Saving IPVS table to /etc/sysconfig/ipvsadm: [ OK ]
[root@xc ha.d]# ipvsadm -ln
IP Virtual Server version 1.2.1 (size=4096)
Prot LocalAddress:Port Scheduler Flags
-> RemoteAddress:Port Forward Weight ActiveConn InActConn
TCP 192.168.10.137:80 rr
-> 192.168.10.134:80 Route 1 0 0
-> 192.168.10.133:80 Route 1 0 0
[root@xc ha.d]# service ipvsadm stop
Clearing the current IPVS table: [ OK ]
[root@xc ha.d]# service ipvsadm start
Clearing the current IPVS table: [ OK ]
Applying IPVS configuration: [ OK ]
[root@xc ha.d]# ipvsadm -ln
IP Virtual Server version 1.2.1 (size=4096)
Prot LocalAddress:Port Scheduler Flags
-> RemoteAddress:Port Forward Weight ActiveConn InActConn
TCP 192.168.10.137:80 rr
-> 192.168.10.133:80 Route 1 0 0
-> 192.168.10.134:80 Route 1 0 0
[root@xc ha.d]# service ipvsadm stop
Clearing the current IPVS table: [ OK ]
把刚才的配置拷贝到192.168.10.136/28的机器 上!
[root@xc ha.d]# scp /etc/sysconfig/ipvsadm zz.bj.com:/etc/sysconfig/
root@zz.bj.com's password:
ipvsadm 100% 136 0.1KB/s 00:00
[root@zz ha.d]# vim haresources
45 zz.bj.com 192.168.10.137/28/eth0/192.168.10.143 ipvsadm
[root@zz ha.d]# cp /etc/init.d/ipvsadm resource.d/ 控制脚本也拷贝过去
[root@zz ha.d]# scp haresources zz.bj.com:/etc/ha.d/ 刚修改的东西拷到另一台机器上
[root@xc ha.d]# service ipvsadm status
ipvsadm is stopped
[root@xc ha.d]# service heartbeat start
logd is already running
Starting High-Availability services:
2012/10/15_17:04:49 INFO: Resource is stopped
[ OK ]
[root@xc ha.d]# tail -f /var/log/messages
在其机器上查看:
[root@zz heartbeat]# service ipvsadm start
Clearing the current IPVS table: [ OK ]
Applying IPVS configuration: [ OK ]
[root@zz heartbeat]# ipvsadm -ln
IP Virtual Server version 1.2.1 (size=4096)
Prot LocalAddress:Port Scheduler Flags
-> RemoteAddress:Port Forward Weight ActiveConn InActConn
TCP 192.168.10.137:80 rr
-> 192.168.10.133:80 Route 1 0 0
-> 192.168.10.134:80 Route 1 0 0
[root@zz heartbeat]# service ipvsadm stop
Clearing the current IPVS table: [ OK ]
[root@xc ha.d]# service ipvsadm status
ipvsadm is stopped
[root@xc ha.d]# service heartbeat start
Starting High-Availability services:
2012/10/15_16:44:39 INFO: Resource is stopped
[ OK ]
[root@zz ha.d]# cp /etc/init.d/ipvsadm resource.d/
cp: overwrite `resource.d/ipvsadm'? y
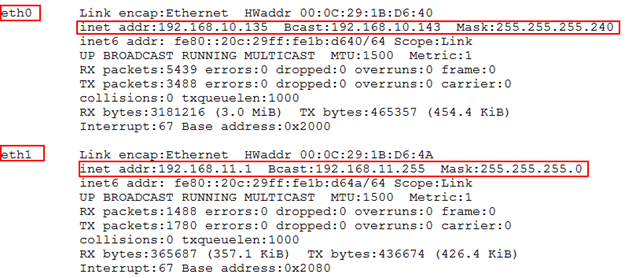
[root@zz ha.d]# ifconfig |less
发现已经有虚拟ip
eth0 Link encap:Ethernet HWaddr 00:0C:29:5B:98:33
inet addr:192.168.10.136 Bcast:192.168.10.143 Mask:255.255.255.240
inet6 addr: fe80::20c:29ff:fe5b:9833/64 Scope:Link
UP BROADCAST RUNNING MULTICAST MTU:1500 Metric:1
RX packets:11573 errors:0 dropped:0 overruns:0 frame:0
TX packets:10445 errors:0 dropped:0 overruns:0 carrier:0
collisions:0 txqueuelen:1000
RX bytes:3679371 (3.5 MiB) TX bytes:4107158 (3.9 MiB)
Interrupt:67 Base address:0x2000
eth0:0 Link encap:Ethernet HWaddr 00:0C:29:5B:98:33
inet addr:192.168.10.137 Bcast:192.168.10.143 Mask:255.255.255.240
UP BROADCAST RUNNING MULTICAST MTU:1500 Metric:1
Interrupt:67 Base address:0x2000
eth1 Link encap:Ethernet HWaddr 00:0C:29:5B:98:3D
inet addr:192.168.11.2 Bcast:192.168.11.255 Mask:255.255.255.0
inet6 addr: fe80::20c:29ff:fe5b:983d/64 Scope:Link
UP BROADCAST RUNNING MULTICAST MTU:1500 Metric:1
RX packets:5849 errors:0 dropped:0 overruns:0 frame:0
TX packets:4255 errors:0 dropped:0 overruns:0 carrier:0
collisions:0 txqueuelen:1000
RX bytes:1451433 (1.3 MiB) TX bytes:1043240 (1018.7 KiB)
Interrupt:67 Base address:0x2080
[root@zz ha.d]# tail -f /var/log/messages
[root@zz ha.d]# ipvsadm –ln 已启动起来了!
IP Virtual Server version 1.2.1 (size=4096)
Prot LocalAddress:Port Scheduler Flags
-> RemoteAddress:Port Forward Weight ActiveConn InActConn
TCP 192.168.10.137:80 rr
-> 192.168.10.133:80 Route 1 0 0
-> 192.168.10.134:80 Route 1 0 0
备份机上查看状态:
[root@xc ha.d]# watch -n 1 "ipvsadm -ln"

主机上模拟接口失效状态:
[root@zz ha.d]# cd /usr/lib/heartbeat/
[root@zz heartbeat]# ./hb_standby
2012/09/07_14:19:11 Going standby [all].
备份机上watch -n 1 "ipvsadm -ln" 立即转变

ifconfig |less 多了vip
eth0 Link encap:Ethernet HWaddr 00:0C:29:1B:D6:40
inet addr:192.168.10.135 Bcast:192.168.10.143 Mask:255.255.255.240
inet6 addr: fe80::20c:29ff:fe1b:d640/64 Scope:Link
UP BROADCAST RUNNING MULTICAST MTU:1500 Metric:1
RX packets:10387 errors:0 dropped:0 overruns:0 frame:0
TX packets:7743 errors:0 dropped:0 overruns:0 carrier:0
collisions:0 txqueuelen:1000
RX bytes:3557930 (3.3 MiB) TX bytes:945775 (923.6 KiB)
Interrupt:67 Base address:0x2000
eth0:0 Link encap:Ethernet HWaddr 00:0C:29:1B:D6:40
inet addr:192.168.10.137 Bcast:192.168.10.143 Mask:255.255.255.240
UP BROADCAST RUNNING MULTICAST MTU:1500 Metric:1
Interrupt:67 Base address:0x2000
eth1 Link encap:Ethernet HWaddr 00:0C:29:1B:D6:4A
inet addr:192.168.11.1 Bcast:192.168.11.255 Mask:255.255.255.0
inet6 addr: fe80::20c:29ff:fe1b:d64a/64 Scope:Link
UP BROADCAST RUNNING MULTICAST MTU:1500 Metric:1
RX packets:6909 errors:0 dropped:0 overruns:0 frame:0
TX packets:8599 errors:0 dropped:0 overruns:0 carrier:0
collisions:0 txqueuelen:1000
RX bytes:1697015 (1.6 MiB) TX bytes:2118388 (2.0 MiB)
[root@zz heartbeat]# ./hb_takeover 权利夺回!
备份服务器上已看不到vip
备份机上watch -n 1 "ipvsadm -ln" 立即看不到列表

后台服务器realserver1:
[root@gjp99 ~]# sysctl -a |grep arp
dev.parport.parport0.devices.lp.timeslice = 200
dev.parport.parport0.devices.active = none
dev.parport.parport0.modes = PCSPP,TRISTATE
dev.parport.parport0.dma = -1
dev.parport.parport0.irq = 7
dev.parport.parport0.base-addr = 888 0
dev.parport.parport0.spintime = 500
dev.parport.default.spintime = 500
dev.parport.default.timeslice = 200
net.ipv4.conf.eth0.arp_accept = 0
net.ipv4.conf.eth0.arp_ignore = 0
net.ipv4.conf.eth0.arp_announce = 0
net.ipv4.conf.eth0.arp_filter = 0
net.ipv4.conf.eth0.proxy_arp = 0
net.ipv4.conf.lo.arp_accept = 0
net.ipv4.conf.lo.arp_ignore = 0
net.ipv4.conf.lo.arp_announce = 0
net.ipv4.conf.lo.arp_filter = 0
net.ipv4.conf.lo.proxy_arp = 0
net.ipv4.conf.default.arp_accept = 0
net.ipv4.conf.default.arp_ignore = 0
net.ipv4.conf.default.arp_announce = 0
net.ipv4.conf.default.arp_filter = 0
net.ipv4.conf.default.proxy_arp = 0
net.ipv4.conf.all.arp_accept = 0
net.ipv4.conf.all.arp_ignore = 0
net.ipv4.conf.all.arp_announce = 0
net.ipv4.conf.all.arp_filter = 0
net.ipv4.conf.all.proxy_arp = 0
[root@gjp99 ~]# echo "net.ipv4.conf.eth0.arp_announce=2">>/etc/sysctl.conf
[root@gjp99 ~]# echo "net.ipv4.conf.all.arp_announce=2">>/etc/sysctl.conf
[root@gjp99 ~]# echo "net.ipv4.conf.lo.arp_ignore=1">>/etc/sysctl.conf
[root@gjp99 ~]# echo "net.ipv4.conf.all.arp_ignore=1">>/etc/sysctl.conf
[root@gjp99 ~]# sysctl –p
net.ipv4.ip_forward = 0
net.ipv4.conf.default.rp_filter = 1
net.ipv4.conf.default.accept_source_route = 0
kernel.sysrq = 0
kernel.core_uses_pid = 1
net.ipv4.tcp_syncookies = 1
kernel.msgmnb = 65536
kernel.msgmax = 65536
kernel.shmmax = 4294967295
kernel.shmall = 268435456
net.ipv4.conf.eth0.arp_announce = 2
net.ipv4.conf.all.arp_announce = 2
net.ipv4.conf.lo.arp_ignore = 1
net.ipv4.conf.all.arp_ignore = 1

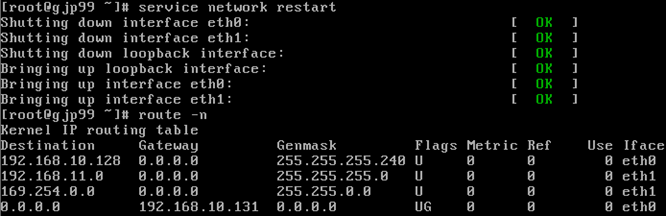
[root@gjp99 ~]# service network restart
Shutting down interface eth0: [ OK ]
Shutting down loopback interface: [ OK ]
Bringing up loopback interface: [ OK ]
Bringing up interface eth0: [ OK ]
[root@gjp99 ~]# ifconfig
eth0 Link encap:Ethernet HWaddr 00:0C:29:10:D7:4F
inet addr:192.168.10.133 Bcast:192.168.10.143 Mask:255.255.255.240
inet6 addr: fe80::20c:29ff:fe10:d74f/64 Scope:Link
UP BROADCAST RUNNING MULTICAST MTU:1500 Metric:1
RX packets:1177 errors:0 dropped:0 overruns:0 frame:0
TX packets:764 errors:0 dropped:0 overruns:0 carrier:0
collisions:0 txqueuelen:1000
RX bytes:130489 (127.4 KiB) TX bytes:126400 (123.4 KiB)
Interrupt:67 Base address:0x2000
lo Link encap:Local Loopback
inet addr:127.0.0.1 Mask:255.0.0.0
inet6 addr: ::1/128 Scope:Host
UP LOOPBACK RUNNING MTU:16436 Metric:1
RX packets:8 errors:0 dropped:0 overruns:0 frame:0
TX packets:8 errors:0 dropped:0 overruns:0 carrier:0
collisions:0 txqueuelen:0
RX bytes:560 (560.0 b) TX bytes:560 (560.0 b)
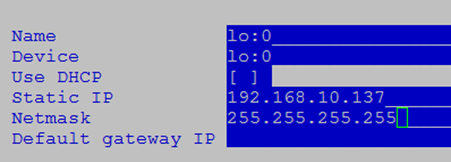
lo:0 Link encap:Local Loopback
inet addr:192.168.10.137 Mask:255.255.255.255
UP LOOPBACK RUNNING MTU:16436 Metric:1
临时创建路由:
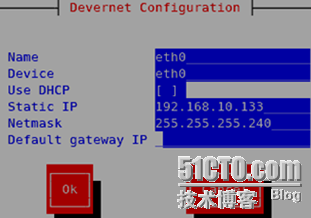
[root@gjp99 ~]# route add -host 192.168.10.137 dev lo:0
[root@gjp99 ~]# route -n
Kernel IP routing table
Destination Gateway Genmask Flags Metric Ref Use Iface
192.168.10.137 0.0.0.0 255.255.255.255 UH 0 0 0 lo
192.168.10.128 0.0.0.0 255.255.255.240 U 0 0 0 eth0
169.254.0.0 0.0.0.0 255.255.0.0 U 0 0 0 eth0
realserver2同理:
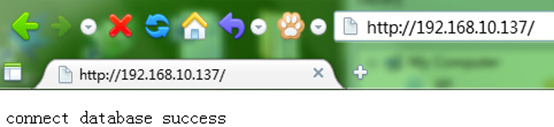
测试:
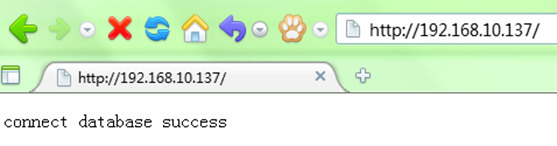
由lamp搭建的连接mysql 数据库的php页面!
主director
web窗口如果关闭ActiveConn为0

由于是轮询方式,所以:
后台服务器:一个mysql服务启动 (realserver1) 一个关闭(realserver2)


[root@zz heartbeat]# pwd
/usr/lib/heartbeat
[root@zz heartbeat]# ./hb_standby
2012/09/08_14:52:33 Going standby [all].
另一台director立即启动ipvsadm,测试正常!
ipvsadm动态列表(让前方的director主动去探测后台的服务器,如果后台服务器停止了服务,自己向外部提供服务)
heartbeat-ldirectord-2.1.4-9.el5.i386 该包能够实现heartbeat与lvs完美结合,用来探测后台服务器!
在director上安装此包!
[root@zz ~]# service heartbeat stop
Stopping High-Availability services:
[ OK ]
[root@zz ~]# ipvsadm -ln
IP Virtual Server version 1.2.1 (size=4096)
Prot LocalAddress:Port Scheduler Flags
-> RemoteAddress:Port Forward Weight ActiveConn InActConn
先上传该安装包:
[root@zz ~]# rpm -ivh heartbeat-ldirectord-2.1.4-9.el5.i386.rpm
warning: heartbeat-ldirectord-2.1.4-9.el5.i386.rpm: Header V3 DSA signature: NOKEY, key ID 217521f6
Preparing... ########################################### [100%]
1:heartbeat-ldirectord ########################################### [100%]
[root@zz ~]# rpm -ql heartbeat-ldirectord-2.1.4-9.el5.i386.rpm
package heartbeat-ldirectord-2.1.4-9.el5.i386.rpm is not installed
[root@zz ~]# rpm -ql heartbeat-ldirectord
/etc/ha.d/resource.d/ldirectord
/etc/init.d/ldirectord 控制脚本
/etc/logrotate.d/ldirectord
/usr/sbin/ldirectord
/usr/share/doc/heartbeat-ldirectord-2.1.4
/usr/share/doc/heartbeat-ldirectord-2.1.4/COPYING
/usr/share/doc/heartbeat-ldirectord-2.1.4/README
/usr/share/doc/heartbeat-ldirectord-2.1.4/ldirectord.cf
/usr/share/man/man8/ldirectord.8.gz
[root@zz ~]# cp /usr/share/doc/heartbeat-ldirectord-2.1.4/ldirectord.cf /etc/ha.d/
[root@zz ~]# cp /etc/init.d/ldirectord /etc/ha.d/resource.d/
cp: overwrite `/etc/ha.d/resource.d/ldirectord'? n
安装时,自动拷贝过去了!
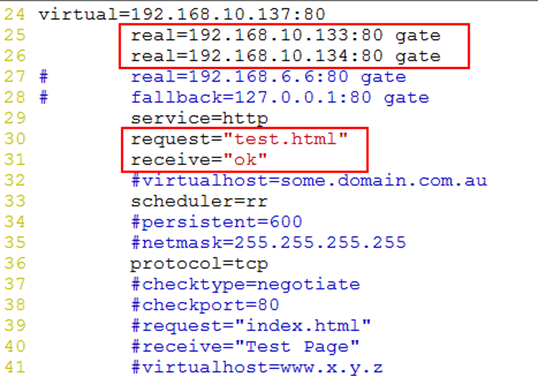
[root@zz ~]# vim /etc/ha.d/ldirectord.cf
11 # Global Directives
12 checktimeout=3 检测超时时间3秒
13 checkinterval=1 检测间隔
14 #fallback=127.0.0.1:80 后方服务器都探测不到,自己提供服务
15 autoreload=yes 无需启动,自动加载
16 #logfile="/var/log/ldirectord.log" 日志文件
17 #logfile="local0"
18 #emailalert="admin@x.y.z"
19 #emailalertfreq=3600
20 #emailalertstatus=all
21 quiescent=yes 静默模式:如果后台服务器失效,ipvsadm表现不删除,只把失效服务器的权重值调小
[root@zz ha.d]# pwd
/etc/ha.d
[root@zz ha.d]# vim haresources
45 zz.bj.com 192.168.10.137 ldirectord::ldirectord.cf
现在可以把ipvsadm删除掉或者如下备份:
[root@zz ha.d]# mv /etc/sysconfig/ipvsadm /etc/sysconfig/ipvsadm.old
在另一台机器上安装heartbeat-ldirectord-2.1.4-9.el5.i386 包
[root@zz ~]# scp ./heartbeat-ldirectord-2.1.4-9.el5.i386.rpm xc.bj.com:/root
root@xc.bj.com's password:
heartbeat-ldirectord-2.1.4-9.el5.i386.rpm 100% 109KB 109.1KB/s 00:00
[root@xc ~]# rpm -ivh heartbeat-ldirectord-2.1.4-9.el5.i386.rpm
warning: heartbeat-ldirectord-2.1.4-9.el5.i386.rpm: Header V3 DSA signature: NOKEY, key ID 217521f6
Preparing... ########################################### [100%]
1:heartbeat-ldirectord ########################################### [100%]
把刚修改的文件拷贝到另一台director上!
[root@zz ha.d]# scp ldirectord.cf xc.bj.com:/etc/ha.d/
root@xc.bj.com's password:
ldirectord.cf 100% 7690 7.5KB/s 00:00
[root@xc ~]# mv /etc/sysconfig/ipvsadm /etc/sysconfig/ipvsadm.old
两台director服务都启动:
[root@xc ~]# service heartbeat start
Starting High-Availability services:
2012/10/16_20:04:42 INFO: Resource is stopped
[ OK ]
[root@xc ~]# tail -f /var/log/messages
Oct 16 20:04:43 xc heartbeat: [5853]: info: Link xc.bj.com:eth1 up.
Oct 16 20:04:43 xc harc[5860]: info: Running /etc/ha.d/rc.d/status status
Oct 16 20:04:43 xc heartbeat: [5853]: info: Comm_now_up(): updating status to active
Oct 16 20:04:43 xc heartbeat: [5853]: info: Local status now set to: 'active'
Oct 16 20:04:44 xc heartbeat: [5853]: info: Status update for node zz.bj.com: status active
Oct 16 20:04:44 xc harc[5879]: info: Running /etc/ha.d/rc.d/status status
Oct 16 20:04:55 xc heartbeat: [5853]: info: remote resource transition completed.
Oct 16 20:04:55 xc heartbeat: [5853]: info: remote resource transition completed.
Oct 16 20:04:55 xc heartbeat: [5853]: info: Initial resource acquisition complete (T_RESOURCES(us))
Oct 16 20:04:55 xc heartbeat: [5895]: info: No local resources [/usr/share/heartbeat/ResourceManager listkeys xc.bj.com] to acquire.
[root@zz ha.d]# ifconfig |less
eth0 Link encap:Ethernet HWaddr 00:0C:29:5B:98:33
inet addr:192.168.10.136 Bcast:192.168.10.143 Mask:255.255.255.240
inet6 addr: fe80::20c:29ff:fe5b:9833/64 Scope:Link
UP BROADCAST RUNNING MULTICAST MTU:1500 Metric:1
RX packets:5767 errors:0 dropped:0 overruns:0 frame:0
TX packets:4833 errors:0 dropped:0 overruns:0 carrier:0
collisions:0 txqueuelen:1000
RX bytes:646738 (631.5 KiB) TX bytes:754427 (736.7 KiB)
Interrupt:67 Base address:0x2000
eth0:0 Link encap:Ethernet HWaddr 00:0C:29:5B:98:33
inet addr:192.168.10.137 Bcast:192.168.10.143 Mask:255.255.255.240
UP BROADCAST RUNNING MULTICAST MTU:1500 Metric:1
Interrupt:67 Base address:0x2000
eth1 Link encap:Ethernet HWaddr 00:0C:29:5B:98:3D
inet addr:192.168.11.2 Bcast:192.168.11.255 Mask:255.255.255.0
inet6 addr: fe80::20c:29ff:fe5b:983d/64 Scope:Link
UP BROADCAST RUNNING MULTICAST MTU:1500 Metric:1
[root@zz ha.d]# ipvsadm -ln
IP Virtual Server version 1.2.1 (size=4096)
Prot LocalAddress:Port Scheduler Flags
-> RemoteAddress:Port Forward Weight ActiveConn InActConn
TCP 192.168.10.137:80 rr
-> 192.168.10.134:80 Route 0 0 0
-> 192.168.10.133:80 Route 0 0 0
因为ldirector.cf里用的是默认静默模式,只把Weight减少了,列表还在,没做任何处理!
另一台director没有vip,也没用ipvsadm –ln 列表!
后台服务器进行测试:
[root@gjp99 ~]# cd /usr/local/apache/bin/
[root@gjp99 bin]# ./apachectl stop
httpd: apr_sockaddr_info_get() failed for gjp99.baidu.com
httpd: Could not reliably determine the server's fully qualified domain name, using 127.0.0.1 for ServerName
[root@gjp99 bin]# netstat -tupln |grep http
[root@gjp99 htdocs]# pwd
/usr/local/apache/htdocs
[root@gjp99 htdocs]# ll
total 8
-rw-r--r-- 1 root root 6 Oct 16 11:38 index.html
-rw-r--r-- 1 root root 137 Oct 16 12:16 index.php
[root@gjp99 htdocs]# echo "ok">test.html
[root@gjp99 htdocs]# cd ../bin/
[root@gjp99 bin]# ./apachectl start
httpd: apr_sockaddr_info_get() failed for gjp99.baidu.com
httpd: Could not reliably determine the server's fully qualified domain name, using 127.0.0.1 for ServerName
[root@zz ha.d]# ipvsadm -ln
IP Virtual Server version 1.2.1 (size=4096)
Prot LocalAddress:Port Scheduler Flags
-> RemoteAddress:Port Forward Weight ActiveConn InActConn
TCP 192.168.10.137:80 rr
-> 192.168.10.134:80 Route 0 0 0
-> 192.168.10.133:80 Route 1 0 0
发现权重值已发生改变!
另一台机器:
[root@gjp99 apache]# pwd
/usr/local/apache
[root@gjp99 apache]# cd htdocs/
[root@gjp99 htdocs]# ll
total 8
-rw-r--r-- 1 root root 6 Oct 16 11:38 index.html
-rw-r--r-- 1 root root 137 Oct 16 12:16 index.php
[root@gjp99 htdocs]# echo "ok">test.html
[root@gjp99 htdocs]# cd ../bin/
[root@gjp99 bin]# ./apachectl stop
httpd: apr_sockaddr_info_get() failed for gjp99.baidu.com
httpd: Could not reliably determine the server's fully qualified domain name, using 127.0.0.1 for ServerName
[root@gjp99 bin]# ./apachectl start
httpd: apr_sockaddr_info_get() failed for gjp99.baidu.com
httpd: Could not reliably determine the server's fully qualified domain name, using 127.0.0.1 for ServerName
[root@zz ha.d]# ipvsadm -ln
IP Virtual Server version 1.2.1 (size=4096)
Prot LocalAddress:Port Scheduler Flags
-> RemoteAddress:Port Forward Weight ActiveConn InActConn
TCP 192.168.10.137:80 rr
-> 192.168.10.134:80 Route 1 0 0
-> 192.168.10.133:80 Route 1 0 0
由于静默模式打开了饿,所以后台服务器即使失效,列表也不消失
现在将静默模式关闭,测试:
两台director上都进行修改:
[root@zz ha.d]# vim ldirectord.cf
quiescent=no
模拟:停掉后台服务器192.168.10.133:
[root@gjp99 bin]# ./apachectl stop
httpd: apr_sockaddr_info_get() failed for gjp99.baidu.com
httpd: Could not reliably determine the server's fully qualified domain name, using 127.0.0.1 for ServerName
[root@zz ha.d]# ipvsadm -ln
IP Virtual Server version 1.2.1 (size=4096)
Prot LocalAddress:Port Scheduler Flags
-> RemoteAddress:Port Forward Weight ActiveConn InActConn
TCP 192.168.10.137:80 rr
-> 192.168.10.134:80 Route 1 0 0
发现已动态呈现,列表中仅显示正在活动的服务器!
[root@gjp99 bin]# ./apachectl start
httpd: apr_sockaddr_info_get() failed for gjp99.baidu.com
httpd: Could not reliably determine the server's fully qualified domain name, using 127.0.0.1 for ServerName
服务再重启:
[root@zz ha.d]# ipvsadm -ln
IP Virtual Server version 1.2.1 (size=4096)
Prot LocalAddress:Port Scheduler Flags
-> RemoteAddress:Port Forward Weight ActiveConn InActConn
TCP 192.168.10.137:80 rr
-> 192.168.10.133:80 Route 1 0 0
-> 192.168.10.134:80 Route 1 0 0
停掉后台服务器192.168.10.134:
[root@gjp99 bin]# ./apachectl stop
httpd: apr_sockaddr_info_get() failed for gjp99.baidu.com
httpd: Could not reliably determine the server's fully qualified domain name, using 127.0.0.1 for ServerName
[root@zz ha.d]# ipvsadm -ln
IP Virtual Server version 1.2.1 (size=4096)
Prot LocalAddress:Port Scheduler Flags
-> RemoteAddress:Port Forward Weight ActiveConn InActConn
TCP 192.168.10.137:80 rr
-> 192.168.10.133:80 Route 1 0 0
[root@gjp99 bin]# ./apachectl start
httpd: apr_sockaddr_info_get() failed for gjp99.baidu.com
httpd: Could not reliably determine the server's fully qualified domain name, using 127.0.0.1 for ServerName
[root@zz ha.d]# ipvsadm -ln
IP Virtual Server version 1.2.1 (size=4096)
Prot LocalAddress:Port Scheduler Flags
-> RemoteAddress:Port Forward Weight ActiveConn InActConn
TCP 192.168.10.137:80 rr
-> 192.168.10.134:80 Route 1 0 0
-> 192.168.10.133:80 Route 1 0 0
原文:http://guojiping.blog.51cto.com/5635432/1028761/
Linux下架构高可用性网络----HA+LB+lvs的更多相关文章
- RHAS Linux下架构Lotus Domino详解(附视频)
此处下载操作视频:RHAS Linux下架构Lotus Domino 6.5视频教程 在rhas下架构Lotus Domino 汉化 650) this.width=650;" o ...
- Linux下高并发网络编程
Linux下高并发网络编程 1.修改用户进程可打开文件数限制 在Linux平台上,无论编写客户端程序还是服务端程序,在进行高并发TCP连接处理时, 最高的并发数量都要受到系统对用户单一进程同时可打 ...
- 在Linux下,在网络没有配置好前,怎样查看网卡的MAC地址?
在Linux下,在网络没有配置好前,怎样查看网卡的MAC地址? 使用 dmesg 与 grep 命令来实际,例如以下: [root@localhost ~]# dmesg | grep eth e10 ...
- linux下重要的网络配置文件
linux下重要的网络配置文件:一; /etc/sysconfig/network 文件内容: NETWORKING=yes <= ...
- Linux下IP等网络配置
Linux下IP等网络配置: 我所知道一共三种方式,下面简单介绍(注意:网络配置必须”root管理员“登录才能进行配置). 一 1.首先在命令行输入[ifconfig]命令,可看到相关网络信息,其中” ...
- linux下脚本监控网络流量
linux下脚本监控网络流量 学习了:https://blog.csdn.net/chenghuikai/article/details/48437479 学习了:http://www.jb51.ne ...
- linux 下链接无线网络
无线网卡配置此页由Linux Wiki用户Chenxing于2008年11月27日 (星期四) 09:28的最后更改. 在1233456的工作基础上.本文介绍在Linux命令行界面中手动配置无线网卡的 ...
- linux下开发板网络速度测试记录
由于做的项目对于网络和USB的读写速度有很高的要求,因此新拿回来的板子要测试网络和usb的最佳传输速度.要考虑不少因素,先把我能想到的记录下来. 测试的环境是开发板和ubuntu虚拟机 ...
- Linux下Wireshark的网络抓包使用方法
Wireshark是世界上最流行的网络分析工具.这个强大的工具可以捕捉网络中的数据,并为用户提供关于网络和上层协议的各种信息.与很多其他网络工具一样,Wireshark也使用pcap network ...
随机推荐
- linux中chkconfig 启动程序顺序介绍
1)redhat的启动方式和执行次序是: 加载内核 执行init程序 /etc/rc.d/rc.sysinit # 由init执行的第一个脚本 /etc/rc.d/rc $RUNLE ...
- 缓存机制和Hibernate的缓存机制介绍
缓存是介于应用程序和物理数据源之间,其作用是为了降低应用程序对物理数据源访问的频次,从而提高了应用的运行性能.缓存内的数据是对物理数据源中的数据的复制,应用程序在运行时从缓存读写数据,在特定的时刻或事 ...
- Android数据库安全解决方案,使用SQLCipher
源码:http://files.cnblogs.com/android100/SQLCipherTest.rar 我们都知道,Android系统内置了SQLite数据库,并且提供了一整套的API用于对 ...
- python执行selenium报错
python + unittest + HTMLTestRunner 执行suite用例报错 Traceback (most recent call last): File "C:/ws/S ...
- win7重命名文件时 提示 “指定的设备名无效”的解决办法
同事从mac上传一个文件夹到win7上,但是少了一张图片con.jpg.查了半天发现将备份文件改名为con.jpg时提示 “指定的设备名无效”. 谷歌了下,发现了问题所在.坑爹的win7. 从不同的系 ...
- unity, 2d rope
https://www.youtube.com/watch?v=l6awvCT29yU
- logstash 中multiline插件的用法
input { stdin { codec =>multiline { charset=>... #可选 字符编码 max_bytes=>... #可选 bytes类型 设置最大的字 ...
- WPF 控件事件的一个小坑…
最近想判断一下 Slider 是由鼠标点击而改变值,还是由程序内部代码改变的值,发现鼠标的各种事件比如 MouseDown.MouseUp.MouseLeftButtonDown 什么的,都没有任何反 ...
- CodeBlocks 17.12 工程如何引用其他文件夹的头文件和源程序
假设你的工程名为project,目录为F:\test.但是你想在project中使用文件夹F:\library下面的一些头文件和源程序.由于这些头文件和源程序与工程project不在同一目录下面,所以 ...
- 分布式缓存Memcache和Redis
引言 针对于如今计算机的CPU和网络设施,相应用程序来说,运行效率的瓶颈.已经不是代码的长度(实现同一个功能)和带宽了,而是,代码訪问资源的过程.即:让我们的程序慢下来的罪魁祸首就是IO操作. 程序从 ...