
VS2013创建Node.js C++ Addons的过程
首先看我的Node.js版本。
|
node –v v6.11.4 |
然后参照这篇文章来做:
https://nodejs.org/api/addons.html#addons_hello_world
- 安装node-gyp
|
npm install -g node-gyp |
- 创建一个文件夹,在里面创建hello.cc文件
|
// hello.cc #include <node.h> namespace demo { using v8::FunctionCallbackInfo; using v8::Isolate; using v8::Local; using v8::Object; using v8::String; using v8::Value; void Method(const FunctionCallbackInfo<Value>& args){ Isolate* isolate = args.GetIsolate(); args.GetReturnValue().Set(String::NewFromUtf8(isolate,"world")); } void init(Local<Object> exports){ NODE_SET_METHOD(exports,"hello", Method); } NODE_MODULE(NODE_GYP_MODULE_NAME, init) }// namespace demo |
原文的说明如下:
|
Note that all Node.js Addons must export an initialization function following the pattern: |
- 创建binding.gyp文件
|
- 将cmd定位到当前的文件夹,然后运行命令:
|
node-gyp configure |
结果报如下的错误:
|
gyp info it worked if it ends with ok gyp info using node-gyp@3.6.2 gyp info using node@6.11.4 | win32 | x64 gyp ERR! configure error gyp ERR! stack Error: Can't find Python executable "python", you can set the PYTHON env variable. gyp ERR! stack at Object.failNoPython (C:\Users\Administrator\AppData\Roaming\npm\node_modules\node-gyp\lib\configur e.js:483:19) gyp ERR! stack at Object.<anonymous> (C:\Users\Administrator\AppData\Roaming\npm\node_modules\node-gyp\lib\configure .js:508:16) gyp ERR! stack at C:\Users\Administrator\AppData\Roaming\npm\node_modules\node-gyp\node_modules\graceful-fs\polyfill s.js:284:29 gyp ERR! stack at FSReqWrap.oncomplete (fs.js:123:15) gyp ERR! System Windows_NT 6.1.7601 gyp ERR! command "C:\\Program Files\\nodejs\\node.exe" "C:\\Users\\Administrator\\AppData\\Roaming\\npm\\node_modules\\n ode-gyp\\bin\\node-gyp.js" "configure" gyp ERR! cwd C:\SourceCode\HenryProjects\HenryNodeTest\CppAddons\demo gyp ERR! node -v v6.11.4 gyp ERR! node-gyp -v v3.6.2 gyp ERR! not ok |
由于我的机器没有装python, 所以这里报错。
我是从这个网站下载的python:
https://www.python.org/downloads/windows/
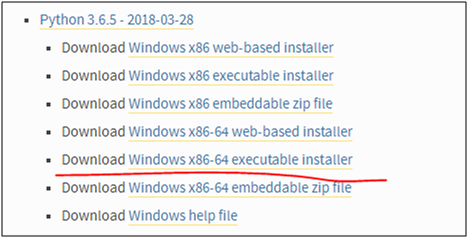
下载后点击安装即可,默认的安装路径是AppData的目录,我觉得不太好,就自定义选择了C:\Python目录。
安装完成后将python.exe所在的路径加入到环境变量中去(我只加了用户的环境变量,没有加系统的环境变量)。

然后重新运行命令:
|
node-gyp configure |
运行后还是报错:
|
gyp info it worked if it ends with ok gyp info using node-gyp@3.6.2 gyp info using node@6.11.4 | win32 | x64 gyp ERR! configure error gyp ERR! stack Error: Can't find Python executable "C:\Python\Python36", you can set the PYTHON env variable. gyp ERR! stack at Object.failNoPython (C:\Users\Administrator\AppData\Roaming\npm\node_modules\node-gyp\lib\configur e.js:483:19) gyp ERR! stack at Object.<anonymous> (C:\Users\Administrator\AppData\Roaming\npm\node_modules\node-gyp\lib\configure .js:508:16) gyp ERR! stack at C:\Users\Administrator\AppData\Roaming\npm\node_modules\node-gyp\node_modules\graceful-fs\polyfill s.js:284:29 gyp ERR! stack at FSReqWrap.oncomplete (fs.js:123:15) gyp ERR! System Windows_NT 6.1.7601 gyp ERR! command "C:\\Program Files\\nodejs\\node.exe" "C:\\Users\\Administrator\\AppData\\Roaming\\npm\\node_modules\\n ode-gyp\\bin\\node-gyp.js" "configure" gyp ERR! cwd C:\SourceCode\HenryProjects\HenryNodeTest\CppAddons\demo gyp ERR! node -v v6.11.4 gyp ERR! node-gyp -v v3.6.2 gyp ERR! not ok |
只是错误不同了。于是又加了系统的环境变量,还是不行。
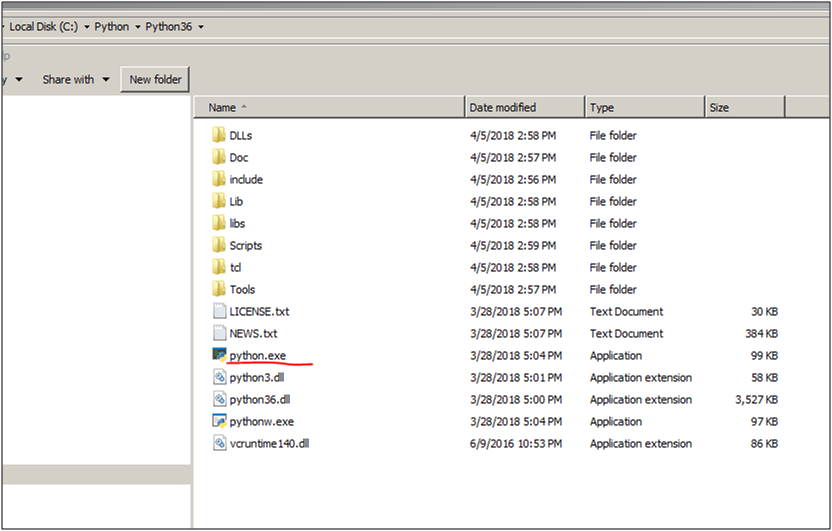
看错误提示是在C:\Python\Python36目录下找不到Phthon的执行文件,可是明明在那里啊。
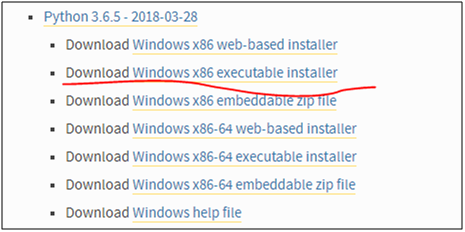
那就下载个32位的python试试吧。
装完后修改PYTHON环境变量到32位的目录下:
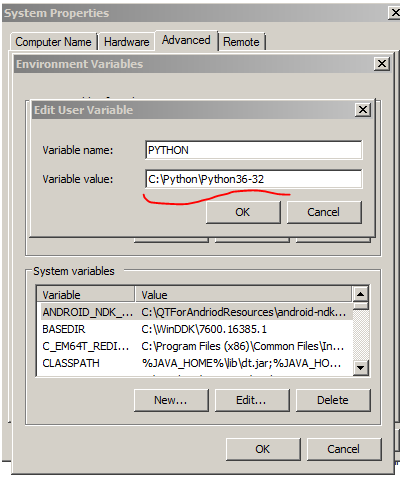
结果还是报同样的错误,服了!
网上搜了一下,发现需要把Python的路径加到PATH环境变量中去才可以,于是照做了一下:
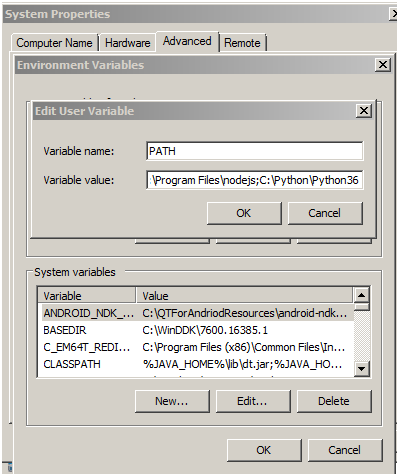
同时需要将以前加的PYTHON环境变量移除(这个很重要,否则还是会报一样的错误),并且要重新启动cmd.
这次报了另一个错误:
|
gyp info it worked if it ends with ok gyp info using node-gyp@3.6.2 gyp info using node@6.11.4 | win32 | x64 gyp ERR! configure error gyp ERR! stack Error: Can't find Python executable "C:\Python\Python36\python.EXE", you can set the PYTHON env variable. gyp ERR! stack at Object.failNoPython (C:\Users\Administrator\AppData\Roaming\npm\node_modules\node-gyp\lib\configur e.js:483:19) gyp ERR! stack at Object.<anonymous> (C:\Users\Administrator\AppData\Roaming\npm\node_modules\node-gyp\lib\configure .js:508:16) gyp ERR! stack at C:\Users\Administrator\AppData\Roaming\npm\node_modules\node-gyp\node_modules\graceful-fs\polyfill s.js:284:29 gyp ERR! stack at FSReqWrap.oncomplete (fs.js:123:15) gyp ERR! System Windows_NT 6.1.7601 gyp ERR! command "C:\\Program Files\\nodejs\\node.exe" "C:\\Users\\Administrator\\AppData\\Roaming\\npm\\node_modules\\n ode-gyp\\bin\\node-gyp.js" "configure" gyp ERR! cwd C:\SourceCode\HenryProjects\HenryNodeTest\CppAddons\demo gyp ERR! node -v v6.11.4 gyp ERR! node-gyp -v v3.6.2 gyp ERR! not ok |
难道是大小写有关系?把目录下的python.exe改成大写试试?
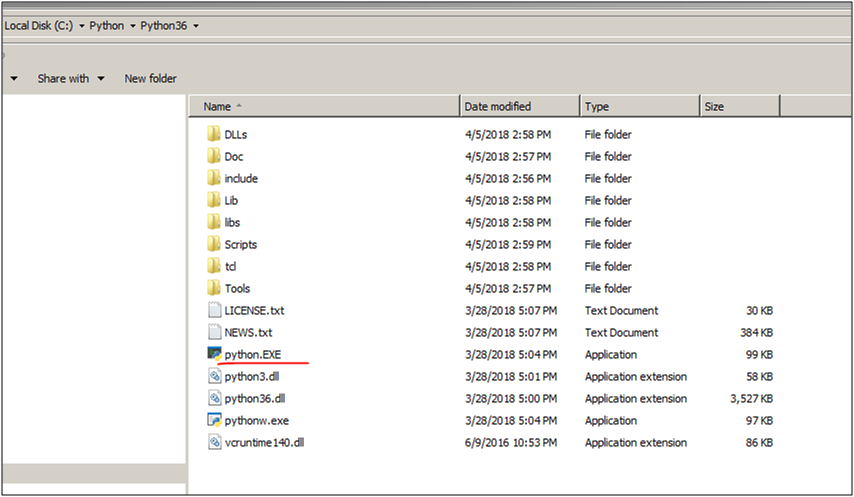
还是一样的错误,服了!
又搜了一下,有的说要设置单独的PYTHON环境变量,然后把%PYTHON%加到PATH的末尾。试了一下,还是报如下的错误:
|
gyp info it worked if it ends with ok gyp info using node-gyp@3.6.2 gyp info using node@6.11.4 | win32 | x64 gyp ERR! configure error gyp ERR! stack Error: Can't find Python executable "C:\Python\Python36", you can set the PYTHON env variable. gyp ERR! stack at Object.failNoPython (C:\Users\Administrator\AppData\Roaming\npm\node_modules\node-gyp\lib\configur e.js:483:19) gyp ERR! stack at Object.<anonymous> (C:\Users\Administrator\AppData\Roaming\npm\node_modules\node-gyp\lib\configure .js:508:16) gyp ERR! stack at C:\Users\Administrator\AppData\Roaming\npm\node_modules\node-gyp\node_modules\graceful-fs\polyfill s.js:284:29 gyp ERR! stack at FSReqWrap.oncomplete (fs.js:123:15) gyp ERR! System Windows_NT 6.1.7601 gyp ERR! command "C:\\Program Files\\nodejs\\node.exe" "C:\\Users\\Administrator\\AppData\\Roaming\\npm\\node_modules\\n ode-gyp\\bin\\node-gyp.js" "configure" gyp ERR! cwd C:\SourceCode\HenryProjects\HenryNodeTest\CppAddons\demo gyp ERR! node -v v6.11.4 gyp ERR! node-gyp -v v3.6.2 gyp ERR! not ok |
又搜了一下,有的说是需要用管理员权限来运行命令行,检查了一下,我当前就是用管理员身份运行的命令行,所以这个对我没有帮助。
有搜到这段描述:
|
I first had Python version 3.6 for Windows installed on a Windows Server 2016 machine. I used the windows executable installation. This was required in order to install the web3 package. But no matter how I set path and environment variables, during the npm install of web3 it kept complaining it couldn't find the python executable. Typing python in the command prompt worked fine. I suspect it has to do with version/compatibility issues between web3 and python. After uninstalling the 3.6 version of python and installing 2.7 using the npm command ArminMa suggested it all works! I did update my environment variables (PYTHON and PATH) to the 2.7 executable. |
说的是可能安装了两个版本的PYTHON, 导致了互相冲突,卸载掉一个就好了。于是试着把32位的卸载掉看看。
结果还是同样的错误。于是把64位的PYTHON卸载掉,装上32位的,同时PYTHON环境变量也改一下。
还是一样的错误。
难道必须是PYTHON2? 好吧,卸载掉PYTHON3, 装PYTHON2试试吧。
先下载64位的试试。

安装完后环境变量也改一下。
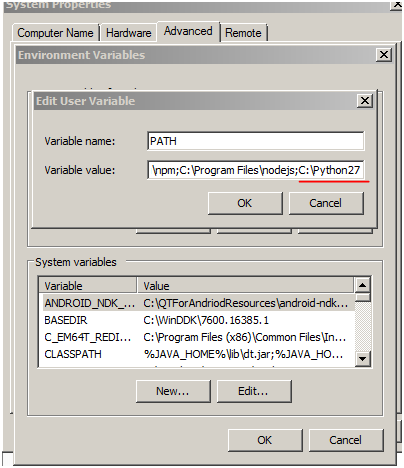
再次运行,这次多走了几步,Python的问题解决了。是另外的错误:
|
gyp info it worked if it ends with ok gyp info using node-gyp@3.6.2 gyp info using node@6.11.4 | win32 | x64 gyp http GET https://nodejs.org/download/release/v6.11.4/node-v6.11.4-headers.tar.gz gyp http 200 https://nodejs.org/download/release/v6.11.4/node-v6.11.4-headers.tar.gz gyp http GET https://nodejs.org/download/release/v6.11.4/SHASUMS256.txt gyp http GET https://nodejs.org/download/release/v6.11.4/win-x86/node.lib gyp http GET https://nodejs.org/download/release/v6.11.4/win-x64/node.lib gyp http 200 https://nodejs.org/download/release/v6.11.4/win-x64/node.lib gyp http 200 https://nodejs.org/download/release/v6.11.4/SHASUMS256.txt gyp http 200 https://nodejs.org/download/release/v6.11.4/win-x86/node.lib gyp info spawn C:\Python27\python.EXE gyp info spawn args [ 'C:\\Users\\Administrator\\AppData\\Roaming\\npm\\node_modules\\node-gyp\\gyp\\gyp_main.py', gyp info spawn args 'binding.gyp', gyp info spawn args '-f', gyp info spawn args 'msvs', gyp info spawn args '-G', gyp info spawn args 'msvs_version=2015', gyp info spawn args '-I', gyp info spawn args 'C:\\SourceCode\\HenryProjects\\HenryNodeTest\\CppAddons\\demo\\build\\config.gypi', gyp info spawn args '-I', gyp info spawn args 'C:\\Users\\Administrator\\AppData\\Roaming\\npm\\node_modules\\node-gyp\\addon.gypi', gyp info spawn args '-I', gyp info spawn args 'C:\\Users\\Administrator\\.node-gyp\\6.11.4\\include\\node\\common.gypi', gyp info spawn args '-Dlibrary=shared_library', gyp info spawn args '-Dvisibility=default', gyp info spawn args '-Dnode_root_dir=C:\\Users\\Administrator\\.node-gyp\\6.11.4', gyp info spawn args '-Dnode_gyp_dir=C:\\Users\\Administrator\\AppData\\Roaming\\npm\\node_modules\\node-gyp', gyp info spawn args '-Dnode_lib_file=C:\\Users\\Administrator\\.node-gyp\\6.11.4\\<(target_arch)\\node.lib', gyp info spawn args '-Dmodule_root_dir=C:\\SourceCode\\HenryProjects\\HenryNodeTest\\CppAddons\\demo', gyp info spawn args '-Dnode_engine=v8', gyp info spawn args '--depth=.', gyp info spawn args '--no-parallel', gyp info spawn args '--generator-output', gyp info spawn args 'C:\\SourceCode\\HenryProjects\\HenryNodeTest\\CppAddons\\demo\\build', gyp info spawn args '-Goutput_dir=.' ] Traceback (most recent call last): File "C:\Users\Administrator\AppData\Roaming\npm\node_modules\node-gyp\gyp\gyp_main.py", line 16, in <module> sys.exit(gyp.script_main()) File "C:\Users\Administrator\AppData\Roaming\npm\node_modules\node-gyp\gyp\pylib\gyp\__init__.py", line 545, in script _main return main(sys.argv[1:]) File "C:\Users\Administrator\AppData\Roaming\npm\node_modules\node-gyp\gyp\pylib\gyp\__init__.py", line 538, in main return gyp_main(args) File "C:\Users\Administrator\AppData\Roaming\npm\node_modules\node-gyp\gyp\pylib\gyp\__init__.py", line 514, in gyp_ma in options.duplicate_basename_check) File "C:\Users\Administrator\AppData\Roaming\npm\node_modules\node-gyp\gyp\pylib\gyp\__init__.py", line 130, in Load params['parallel'], params['root_targets']) File "C:\Users\Administrator\AppData\Roaming\npm\node_modules\node-gyp\gyp\pylib\gyp\input.py", line 2778, in Load variables, includes, depth, check, True) File "C:\Users\Administrator\AppData\Roaming\npm\node_modules\node-gyp\gyp\pylib\gyp\input.py", line 394, in LoadTarge tBuildFile includes, True, check) File "C:\Users\Administrator\AppData\Roaming\npm\node_modules\node-gyp\gyp\pylib\gyp\input.py", line 246, in LoadOneBu ildFile None) File "binding.gyp", line 4 target_name addon, ^ SyntaxError: invalid syntax gyp ERR! configure error gyp ERR! stack Error: `gyp` failed with exit code: 1 gyp ERR! stack at ChildProcess.onCpExit (C:\Users\Administrator\AppData\Roaming\npm\node_modules\node-gyp\lib\config ure.js:336:16) gyp ERR! stack at emitTwo (events.js:106:13) gyp ERR! stack at ChildProcess.emit (events.js:191:7) gyp ERR! stack at Process.ChildProcess._handle.onexit (internal/child_process.js:219:12) gyp ERR! System Windows_NT 6.1.7601 gyp ERR! command "C:\\Program Files\\nodejs\\node.exe" "C:\\Users\\Administrator\\AppData\\Roaming\\npm\\node_modules\\n ode-gyp\\bin\\node-gyp.js" "configure" gyp ERR! cwd C:\SourceCode\HenryProjects\HenryNodeTest\CppAddons\demo gyp ERR! node -v v6.11.4 gyp ERR! node-gyp -v v3.6.2 gyp ERR! not ok |
错误说的是binding.gyp的语法不对。
仔细看了一下,这个文件缺失有问题,怎么标点符号都没有了!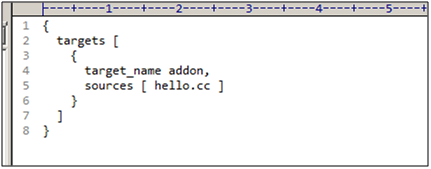
于是重新从官网的例子里面拷贝一份内容。
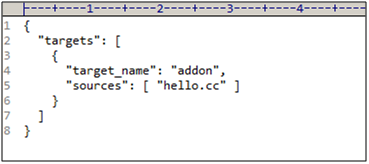
再次运行,这次成功了!真不容易啊。
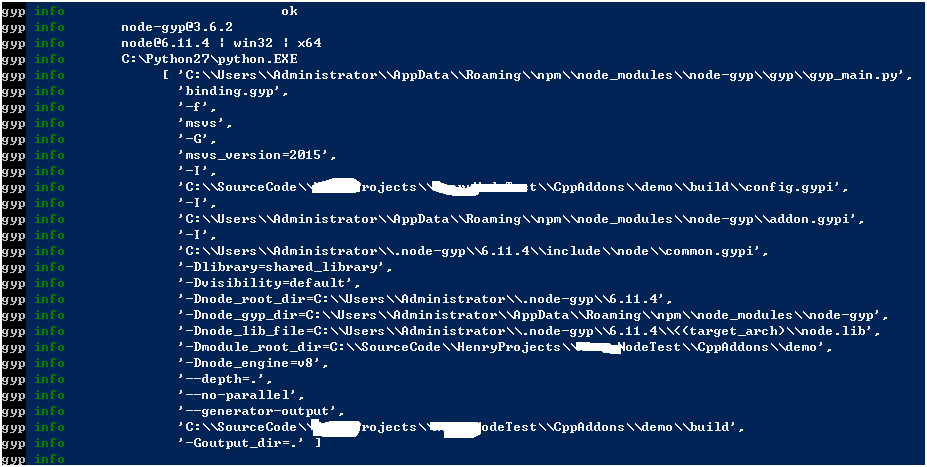
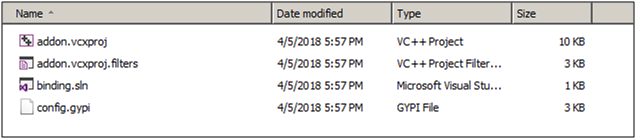
查看物理路径,发现生成了一个build文件夹。

打开文件夹,里面是个c++的解决方案。
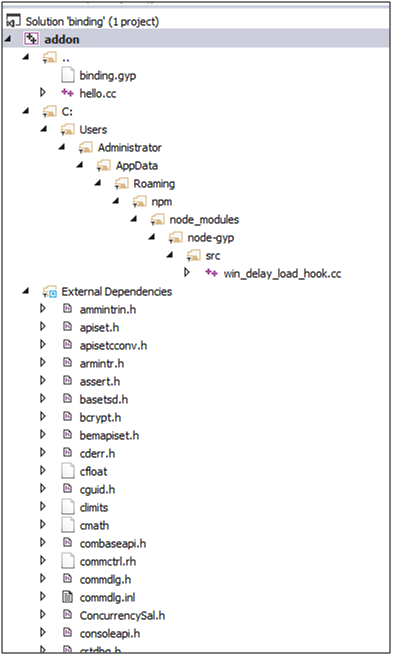
- 用VS2013打开这个解决方案。是这样的一个结构:
编译一下,报这个错误:

查了一下,build tool v141是VS2015. 这个麻烦了,我只有VS2013.
查了一下,解决方法是改一下项目的配置。
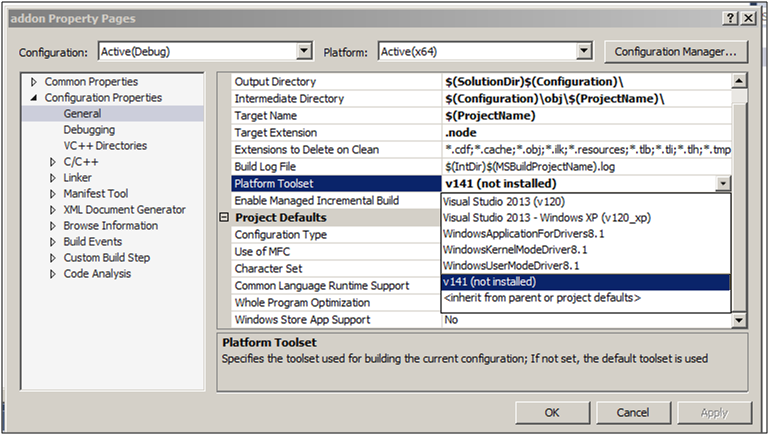
在上面的选择框中选择Visual Studio 2013(v120),也就是第一个。
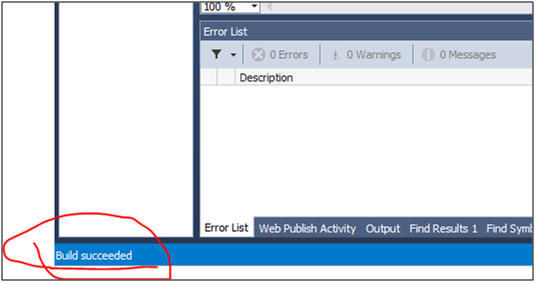
然后再次编译,成功了!
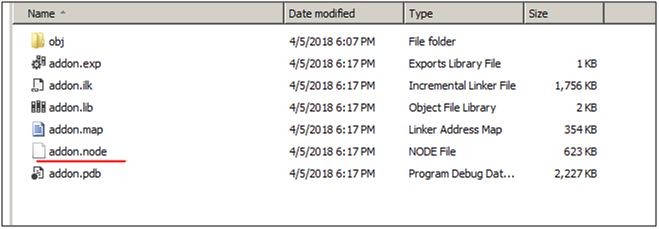
打开bin/Debug目录,addon.node赫然在目。
- 现在来测试这个c++ addon.
创建一个testdemoaddon.js文件。里面按照官方的例子写如下的代码:
|
这里的引用路径需要改成你自己机器上的相对路径。比如Release可能需要改成Debug.
然后命令行定位到测试文件所在的路径。然后运行:
|
node testdemoaddon.js |
结果如下:

至此为止,用VS2013创建的第一个Node.js的Addon成功运行。
如果想继续写更复杂的Addon, 就需要继续按照这个文章来学习了:
https://nodejs.org/api/addons.html#addons_hello_world
VS2013创建Node.js C++ Addons的过程的更多相关文章
- 用http-server 创建node.js 静态服务器
今天做一本书上的例子,结果代码不能正常运行,查询了一下,是语法过时了,书其实是新买的,出版不久. 过时代码如下 var connect=require('connect'); connect.crea ...
- 创建Node.js TypeScript后端项目
1.安装Node.js扩展,支持TypeScript语法 npm install -g typescript npm install -g typings 2.创建项目目录project_fold ...
- npm学习(六)之如何创建 Node.js 模块
如何创建 Node.js 模块 Node.js 模块是一种可以发布到 npm 的包.当你创建一个新模块时,创建 package.json 文件是第一步. 你可以使用 npm init 命令创建 pac ...
- 用vs2013开发node.js的addon.
下载node.js的源代码. https://github.com/joyent/node 如果用svn下载,后面加上/trunk,以免把用不着的branches也下载下来,浪费时间. 安装V ...
- 总结在Visual Studio Code创建Node.js+Express+handlebars项目
一.安装node.js环境. Node.js安装包及源码下载地址为:https://nodejs.org/en/download/ 32 位安装包下载地址 : https://nodejs.org/d ...
- 在 Web 应用中创建 Node.js 应用程序
本分步指南将通过 Azure Web 应用帮助您启动并运行示例 Node.JS 应用程序.除 Node.JS 外,Azure Web 应用还支持其他语言,如 PHP..NET.Node.JS.Pyth ...
- 创建node.js一个简单的应用实例
在node.exe所在目录下,创建一个叫 server.js 的文件,并写入以下代码: //使用 require 指令来载入 http 模块 var http = require("http ...
- 在vs2017中创建Node.js项目
https://github.com/Microsoft/nodejstools/wiki/Projects 1. 安装vs2017的时候,需要勾选Node.js 2.新建项目的时候,选择其他语言,然 ...
- 【每天学一点-02】创建Node.js的第一个应用
1.引入require模块,使用createServer()创建服务器 [server.js]文件 var http = require('http'); http.createServer(func ...
随机推荐
- CoreSight™ Technology
ARM Cortex-M processor-based devices use the ARM CoreSight technology which introduces powerful new ...
- Windows 2008 R2防火墙设置运行被ping通
参考文献: http://huobumingbai.blog.51cto.com/1196746/323896/
- 报错:Validation failed for one or more entities. See 'EntityValidationErrors' property for more details.
在保存数据的时候报这个错误,知道是验证错误,但到底是哪个属性验证错误呢? →打断点,运行,观察程序出错的地方→在出错的部分添加try...catch语句块→添加监视,输入((System.Data.E ...
- springboot之异步调用@Async
原文:http://www.cnblogs.com/xuwenjin/p/8858050.html 引言: 在Java应用中,绝大多数情况下都是通过同步的方式来实现交互处理的:但是在处理与第三方系统交 ...
- C#编程(五十八)----------并行集合
并行集合 对于并行任务,与其相关紧密的就是对一些共享资源,数据结构的并行访问.经常要做的就是对一些队列进行加锁-解锁,然后执行类似插入,删除等等互斥操作. .NET4提供了一些封装好的支持并行操作数据 ...
- oracle表复制
1. 复制表结构及其数据: create table table_name_new as select * from table_name_old 2. 只复制表结构: crea ...
- C语言之基本算法24—黄金切割法求方程近似根
//黄金切割法! /* ================================================================ 题目:用黄金切割法求解3*x*x*x-2*x* ...
- .NET:自定义配置节
背景 对于编译型应用程序来说,参数化程序行为是非常有必要的,.NET有其标准的配置方法,我们可以可以扩展. 示例 代码 using System; using System.Collections; ...
- Linux学习15-CentOS安装mysql5.6环境
前言 在linux上安装mysql5.6版本,并远程连接mysql数据库操作 安装mysql mysql的安装可以用yum安装更方便 [root@yoyo ~]# cd /usr/local/ [ro ...
- 通用的Bitmap压缩算法,进一步节约内存(推荐)
前几天我写了一篇通过压缩Bitmap,减少OOM的文章,那篇文章的目的是按照imageview的大小来压缩bitmap,让bitmap的大小正好是imageview.但是那种算法的通用性比较差,仅仅能 ...