
Android 沉浸式顶部
研究了下这个,记录下代码。
主页面代码:activity_main.xml
<?xml version="1.0" encoding="utf-8"?>

<android.support.constraint.ConstraintLayout xmlns:android="http://schemas.android.com/apk/res/android"

    xmlns:app="http://schemas.android.com/apk/res-auto"

    xmlns:tools="http://schemas.android.com/tools"

    android:layout_width="match_parent"

    android:layout_height="match_parent"

    tools:context=".MainActivity">

    <TextView

        android:layout_width="match_parent"

        android:layout_height="70dp"

        android:text="Hello World!"

        android:gravity="center"

        android:background="@color/colorAccent"

        app:layout_constraintLeft_toLeftOf="parent"

        app:layout_constraintRight_toRightOf="parent"

        app:layout_constraintTop_toTopOf="parent" />

   <!-- android:fitsSystemWindows="true" android:clipToPadding="true"-->

</android.support.constraint.ConstraintLayout>
添加三个文件:三份 style 文件,即默认的values(不设置状态栏透明)、values-v19、values-v21(解决半透明遮罩问题)。
values 下 style.xml
  <style name="TranslucentTheme" parent="AppTheme">

        <!--在Android 4.4之前的版本上运行,直接跟随系统主题-->

    </style>
values-v19 下 style.xml
<?xml version="1.0" encoding="utf-8"?>

<resources>

    <style name="TranslucentTheme" parent="Theme.AppCompat.Light.NoActionBar">

        <item name="android:windowTranslucentStatus">true</item>

        <item name="android:windowTranslucentNavigation">true</item>

    </style>

</resources>
values-v21 下 style.xml
<?xml version="1.0" encoding="utf-8"?>

<resources>

    <style name="TranslucentTheme" parent="Theme.AppCompat.Light.NoActionBar">

        <item name="android:windowTranslucentStatus">false</item>

        <item name="android:windowTranslucentNavigation">true</item>

        <item name="android:statusBarColor">@android:color/transparent</item>

    </style>

</resources>
这里需要在:AndroidMainfest.xml 里添加样式。
<?xml version="1.0" encoding="utf-8"?>

<manifest xmlns:android="http://schemas.android.com/apk/res/android"

    package="controller.hzl.com.dingbu2">

    <application

        android:allowBackup="true"

        android:icon="@mipmap/ic_launcher"

        android:label="@string/app_name"

        android:roundIcon="@mipmap/ic_launcher_round"

        android:supportsRtl="true"

        android:theme="@style/AppTheme">

        <activity android:name=".MainActivity"

            android:theme="@style/TranslucentTheme"

            >

            <intent-filter>

                <action android:name="android.intent.action.MAIN" />

                <category android:name="android.intent.category.LAUNCHER" />

            </intent-filter>

        </activity>

    </application>

</manifest>
主Acitivity没有修改。
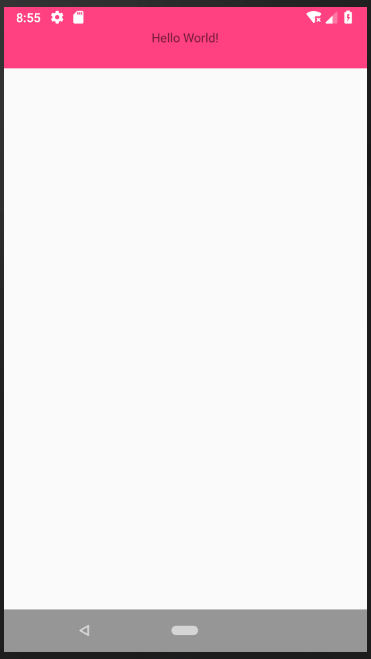
效果图:
Android 沉浸式顶部的更多相关文章
- Android沉浸式(侵入式)标题栏(状态栏)Status(一)
Android沉浸式(侵入式)标题栏(状态栏)Status(一) 现在越来越多的APP设计采用这种称之为沉浸式状态栏(Status)的设计,这种沉浸式状态栏又称之"侵入式"状 ...
- android 沉浸式状态栏的实现
本文介绍一种简单的实现沉浸式状态栏的方法,要高于或等于api19才可以. 实现android沉浸式状态栏很简单,添加代码两步就可以搞定. 一.在activity中添加 getWindow().addF ...
- Android沉浸式状态栏(透明状态栏)最佳实现
Android沉浸式状态栏(透明状态栏)最佳实现 在Android4.4之前,我们的应用没法改变手机的状态栏颜色,当我们打开应用时,会出现上图中左侧的画面,在屏幕的顶部有一条黑色的状态栏,和应用的风格 ...
- Android 沉浸式状态栏 实现方式二 ( 更简单 )
以前写过一个沉浸式状态栏 的实现方式 Android 沉浸式状态栏 实现方式一 现在有个更为简单的实现方式 . 相关链接 http://www.apkbus.com/forum.php?mod=vie ...
- Android沉浸式(侵入式)标题栏(状态栏)Status(三)
Android沉浸式(侵入式)标题栏(状态栏)Status(三) 从附录文章1,2可以看到,依靠Android系统提供的标准方案,状态栏即便在透明状态下,仍然有些半透明而不是全透明.本文是And ...
- Android沉浸式(侵入式)标题栏(状态栏)Status(二)
Android沉浸式(侵入式)标题栏(状态栏)Status(二) 附录1以xml写style实现了Android沉浸式(侵入式)状态栏(标题栏),同样以上层Java代码实现.在附录文章1的基础上 ...
- [置顶]
Xamarin android沉浸式状态栏
虽然关于android "沉浸式"状态栏有很多博客介绍过,从小菜到大神无一例外.我第一次看到这种"沉浸"式的效果我也以为真的是这么叫,然而根本不是这么回事,完全 ...
- Android 沉浸式状态栏完美解决方案
现在搜索Android 沉浸式状态栏,真的是一堆一堆,写的特别多,但是真正用的舒服的真没有,在这里自己整理一下开发记录 注意,在使用这个步骤过程之前,请把之前设置的代码注释一下 把布局带有androi ...
- flutter android沉浸式状态栏
import 'package:flutter/services.dart'; import 'dart:io'; class _MyAppState extends State<MyApp&g ...
随机推荐
- Git 打标签(分布式版本控制系统)
前言 像其他版本控制系统(VCS)一样,Git 可以给历史中的某一个提交打上标签,以示重要.比较有代表性的是人们会使用这个功能来标记发布结点(v1.0 等等). 1.列出标签 在 Git 中列出已有的 ...
- linux中WDCP的日志彻底删除技巧
apache或nginx都有开关默认日志,一个是正常访问日志,一个是错误的日志,目录在 /www/wdlinux/nginx-1.0.15/logs /www/wdlinux/httpd-2.2.22 ...
- Jedis工具类(含分布式锁的调用和释放)
个人把工具类分为两部分: 一.连接池部分 import org.slf4j.Logger; import org.slf4j.LoggerFactory; import redis.clients.j ...
- RGB 常用颜色对照表
http://blog.csdn.net/xiaoting451292510/article/details/8226325
- js 万恶之源 是否滚动到底部?
let scrollHandle = (el) => { // 如果已经滚到底部了 if (el.scrollHeight - el.scrollTop === el.clientHeight) ...
- css 温故而知新 字体方向 将文字竖着显示
writing-mode: vertical-rl;
- spring中InitializingBean接口使用理解(转)
InitializingBean接口为bean提供了初始化方法的方式,它只包括afterPropertiesSet方法,凡是继承该接口的类,在初始化bean的时候会执行该方法. 测试程序如下: imp ...
- CentOS 7 host-only 设置上网
CentOS 7 ifcfg-enp0s3: HWADDR=::::F6: TYPE=Ethernet BOOTPROTO=static #dhcp DEFROUTE=yes PEERDNS=yes ...
- 转 kafka 清理数据
由于项目原因,最近经常碰到Kafka消息队列拥堵的情况.碰到这种情况为了不影响在线系统的正常使用,需要大家手动的清理Kafka Log.但是清理Kafka Log又不能单纯的去删除中间环节产生的日志, ...
- nginx静态资源缓存与压缩
一.静态资源缓存 参考文章 (1)apache设置max-age或expires 这里需要修改.htaccess文件. <IfModule mod_headers.c> <Files ...