
关于Fragment里面嵌套fragment
今天看到一篇好文章
https://www.2cto.com/kf/201609/545979.html
转载过来记录一下,往后需要的时候可以随时查看;
接下来进入正题:
动态fragment的使用
对于动态的使用fragment,就是简单的底部多个按钮,然后多个fragment进行切换,这个应该很简单,平时都在用。
MainActivity:
/**

 * 主布局

 * @author Rine

 * @version 1.0, 2015-12-1

 */

public class MainActivity extends FragmentActivity{

    MainDB mdata = new MainDB();

    /**

     * 定义结束时间

     */

    private long exitTime = 0;

    /**

     * 定义FragmentTabHost对象

     */

    private FragmentTabHost mTabHost;

    /**

     * 定义一个布局

     */

    private LayoutInflater layoutInflater;

    /**

     * 定义数组来存放Fragment界面

     */

    private Class fragmentArray[] = mdata.fragmentArray;

    /**

     * 定义数组来存放按钮图片

     */

    private int mImageViewArray[] = mdata.ImageViewArray;

    /**

     * Tab选项卡的文字

     */

    private String mTextviewArray[] = mdata.TextviewArray;

 @Override

    public void onCreate(Bundle savedInstanceState) {

        super.onCreate(savedInstanceState);

        setContentView(R.layout.activity_main);

//        CloudOnlyDB dbHelper;

//        dbHelper = new CloudOnlyDB(MainActivity.this);

//        HomeData home = new HomeData(MainActivity.this);

        initView( );

    }

    /**

     * 初始化组件

     */

    private void initView (){

        /**

         * 实例化布局对象

         */

        layoutInflater = LayoutInflater.from(this);

        /**

         * 实例化TabHost对象,得到TabHost

         */

        mTabHost = (FragmentTabHost)findViewById(android.R.id.tabhost);

        mTabHost.setup(this, getSupportFragmentManager(), R.id.container);     //加载内容

        /**

         * 得到fragment的个数

         */

        int count = fragmentArray.length;

        for(int i = 0; i < count; i++){

            TabSpec tabSpec = mTabHost.newTabSpec(mTextviewArray[i]).setIndicator(getTabItemView(i));  //为每一个Tab按钮设置图标、文字和内容

            mTabHost.addTab(tabSpec, fragmentArray[i], null);    //将Tab按钮添加进Tab选项卡中

        }

    }

    /**

     * 给Tab按钮设置图标和文字

     */

    private View getTabItemView(int index){

        View view = layoutInflater.inflate(R.layout.main_tab_view, null);

        ImageView imageView = (ImageView) view.findViewById(R.id.imageview);

        imageView.setImageResource(mImageViewArray[index]);

        TextView textView = (TextView) view.findViewById(R.id.textview);

        textView.setText(mTextviewArray[index]);

        return view;

    }

    /**

     * 2次退出效果

     */

    @Override

    public boolean onKeyDown(int keyCode, KeyEvent event) {

        if (keyCode == KeyEvent.KEYCODE_BACK) {

            exit();                                        //按返回键,true则退出

            return false;

        }

        return super.onKeyDown(keyCode, event);

    }

    public void exit() {                                         //按返回退出

        if ((System.currentTimeMillis() - exitTime) > 2000) {

            Toast.makeText(getApplicationContext(), "再按一次退出程序",

                    Toast.LENGTH_SHORT).show();

            exitTime = System.currentTimeMillis();

        } else {                                           //退出

            finish();

            System.exit(0);

        }

    }

}
MainAcitivity 中的MainDB
/**

 * 存放主布局数据

 * @author Rine

 * @version 1.0, 2015-12-1

 */

public class MainDB {

    /**

     * 定义数组来存放Fragment界面

     */

    public  Class fragmentArray[] = {one.class,two.class,three.class};

     /**

      * 定义数组来存放按钮图片

      */

    public int ImageViewArray[] = {R.drawable.home,R.drawable.ccarticle,

            R.drawable.ccone};

    /**

     * Tab选项卡的文字

     */

    public String TextviewArray[] = {"one","twom","three"};

 }
MainActivity 相应的布局:
<!--?xml version="1.0" encoding="utf-8"?-->

<!-- Rine -->

<!-- 功能:主布局 -->

<linearlayout android:layout_height="fill_parent" android:layout_width="fill_parent" android:orientation="vertical" xmlns:android="https://schemas.android.com/apk/res/android">

  <framelayout android:id="@+id/container" android:layout_height="0dp" android:layout_weight="1" android:layout_width="fill_parent">

    <framelayout android:id="@android:id/tabcontent" android:layout_height="0dp" android:layout_weight="0" android:layout_width="0dp">

  </framelayout></android.support.v4.app.fragmenttabhost>

</framelayout></linearlayout>
相应的style:
<style name="homework_tab_item" type="text/css"><item name="android:layout_width">0dp</item>

        <item name="android:layout_height">wrap_content</item>

        <item name="android:layout_weight">1</item>

        <item name="android:button">@null</item>

        <item name="android:gravity">center</item>

        <item name="android:textColor">@color/homework_tab_item_text_color</item></style>
相应的 color:
<!--?xml version="1.0" encoding="utf-8"?-->

<selector xmlns:android="https://schemas.android.com/apk/res/android">

    <item android:color="#000000" android:state_checked="true">

    <item android:color="#757575">

</item></item></selector>
fragment嵌套fragment
这就是简单动态fragment的应该。这也是其中的一种方法。
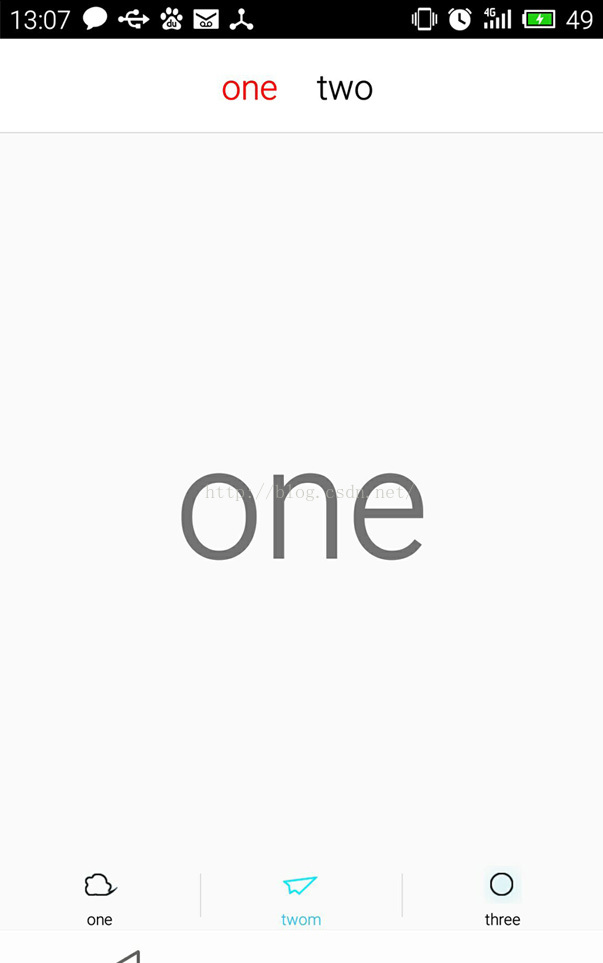
然后就是在其fragment中再嵌套多个fragment,我采用的是利用单选按钮来实现,当然单选按钮外面还要包一层RadioGroup。
Activity:
/**

 * fragment嵌套fragment

 * @author Rine

 * @version 1.0, 2015-12-1

 */

public class two extends  Fragment  implements OnClickListener

{

    /**

     * 定义一个布局

     */

    private LayoutInflater inflater;

//  private View rootView;// 缓存Fragment view

    private Context mainActivity;

    private TwoToOne twoToOne;

    private TwoToTwo twoToTwo;

    /**

     * one、two RadioGroup 控件

     */

    private RadioGroup twoGroup;

    protected RadioButton twoOne, twoTwo;

    /**

     * 加载页面

     */

    @Override

    public void onActivityCreated(Bundle savedInstanceState) {

        super.onActivityCreated(savedInstanceState);

        mainActivity = getActivity();

        inflater = LayoutInflater.from(getActivity());

//      初始化控件和声明事件

//        rootView = inflater.inflate(R.layout.two, null);

        twoGroup = (RadioGroup) getActivity().findViewById(R.id.two_group);

        twoOne = (RadioButton) getActivity().findViewById(R.id.two_one);

        twoTwo = (RadioButton) getActivity().findViewById(R.id.two_two);

        //控件颜色

        twoOne.setTextColor(getResources().getColor(R.color.red));

        twoTwo.setTextColor(getResources().getColor(R.color.black));

        twoOne.setOnClickListener(this);

        twoTwo.setOnClickListener(this);

        setDefaultFragment();

    }

    /**

     * 设置默认的Fragment

     */

     private void setDefaultFragment()

        {

            FragmentManager fm = getFragmentManager();

            FragmentTransaction transaction = fm.beginTransaction();

            twoToOne = new TwoToOne();

            transaction.add(R.id.framelayout, twoToOne).commit();

        }

    @Override

    public void onClick(View v) {

        FragmentManager fm = getFragmentManager();

        // 开启Fragment事务

        FragmentTransaction transaction = fm.beginTransaction();

        switch (v.getId())

        {

        case R.id.two_one:

            if (twoToOne == null)

            {

                twoToOne = new TwoToOne();

            }

            // 使用当前Fragment的布局替代id_content的控件

            transaction.replace(R.id.framelayout, twoToOne);

          //控件颜色

            twoOne.setTextColor(getResources().getColor(R.color.red));

            twoTwo.setTextColor(getResources().getColor(R.color.black));

            break;

        case R.id.two_two:

            if (twoToTwo == null)

            {

                twoToTwo = new TwoToTwo();

            }

            transaction.replace(R.id.framelayout, twoToTwo);

          //控件颜色

            twoOne.setTextColor(getResources().getColor(R.color.black));

            twoTwo.setTextColor(getResources().getColor(R.color.red));

            break;

        }

        // transaction.addToBackStack();

        // 事务提交

        transaction.commit();

    }

    @Override

    public View onCreateView(LayoutInflater inflater, ViewGroup container, Bundle savedInstanceState)

    {

        return inflater.inflate(R.layout.two, null);

    }

}
其对应的布局:
<!--?xml version="1.0" encoding="utf-8"?-->

<linearlayout android:layout_height="match_parent" android:layout_width="match_parent" android:orientation="vertical" xmlns:android="https://schemas.android.com/apk/res/android">

    <relativelayout android:background="@color/white" android:layout_height="@dimen/height_title" android:layout_width="match_parent">

       <linearlayout android:id="@+id/layout_brck" android:layout_height="match_parent" android:layout_marginleft="@dimen/margin_15dp" android:layout_width="wrap_content" android:orientation="horizontal">

        </linearlayout>

        <radiogroup android:gravity="center" android:id="@+id/two_group" android:layout_centerinparent="true" android:layout_height="wrap_content" android:layout_width="wrap_content" android:orientation="horizontal">

            <radiobutton android:background="@null" android:checked="true" android:id="@+id/two_one" android:layout_marginright="@dimen/margin_20dp" android:text="one" android:textcolor="@color/black" android:textsize="@dimen/title_textsize_22sp" style="@style/homework_tab_item">

            <radiobutton android:background="@null" android:id="@+id/two_two" android:layout_margin="5dp" android:layout_marginleft="@dimen/margin_20dp" android:text="two" android:textcolor="@color/black" android:textsize="@dimen/title_textsize_22sp" style="@style/homework_tab_item">

        </radiobutton></radiobutton></radiogroup>

        <view android:background="@color/br_title_color" android:layout_alignparentbottom="true" android:layout_height="0.1dp" android:layout_width="match_parent">

    </view></relativelayout>

    <framelayout android:id="@+id/framelayout" android:layout_height="0dp" android:layout_weight="1" android:layout_width="match_parent">

    </framelayout>

</linearlayout>
OK。大体就是这样了。示例图如下:
关于Fragment里面嵌套fragment的更多相关文章
- Fragment里面嵌套Fragment的问题
最近两天做项目时,要在fragment里面嵌套Fragment,最开始使用Fragment的hide,show等方法一直失败,,如图,message是一个fragment,在里面又有两个子fragme ...
- 关于TabLayout与ViewPager在Fragment中嵌套Fragment使用或配合使用的思考
注意: 因为继承的是Fragment,所以getSupportFragmentManager()与getFragmentManager()方法无法使用,这里需要用到getChildFragmentMa ...
- Android 中关于Fragment嵌套Fragment的问题
转载请注明出处:http://www.cnblogs.com/Joanna-Yan/p/5802146.html 问题描述: 在项目中Activity A中嵌套Fragment B,Fragment ...
- android fragment嵌套fragment出现的问题:no activity
package com.example.fragmentNavigation2.fragment; import android.content.Context; import android.os. ...
- 嵌套fragment时必须要重写 onDetach()
/** * 嵌套fragment时必须要重写 onDetach()如下 */ @Override public void onDetach() { super.onDetach(); ...
- fragment中嵌套viewpager,vierpager中有多个fragment,不显示 .
fragment中嵌套viewpager,vierpager中有多个fragment,不显示 ... 现在好多应用流行一种布局.底部几个工具栏选项,上面也有类似tab的选项. 底部用RadioGrou ...
- Fragment嵌套Fragment时候。子类fragment调用父容器Fragment方法
业务场景:有的时候我们的页面可能是Activity 嵌套多个Fragment ..其中某个Fragment 又嵌套多个Fragment. 其中某个子Fragment 定义为 NewsFragmen ...
- Android FragmentActivity 嵌套 Fragment 调用startActivityForResult返回的requestCode错误
Android FragmentActivity 嵌套 Fragment 调用startActivityForResult返回的requestCode错误 此时,要在调用startActivityFo ...
- Android流行界面结构——Fragment通过ViewPager(带指示器)嵌套Fragment结构的创建方法详解
原创文章,转载请注明出处http://www.cnblogs.com/baipengzhan/p/6287213.html 当前Android流行界面结构的一种——Fragment通过ViewPage ...
随机推荐
- .NET Core Dapper操作mysql数据库
前言 现在ORM盛行,市面上已经出现了N款不同的ORM套餐了.今天,我们不谈EF,也不聊神马黑马,就说说 Dapper.如何在.NET Core中使用Dapper操作Mysql数据库呢,让我们跟随镜头 ...
- Spring Boot入门(五):使用JDBC访问MySql数据库
本系列博客记录自己学习Spring Boot的历程,如帮助到你,不胜荣幸,如有错误,欢迎指正! 在程序开发的过程中,操作数据库是必不可少的部分,前面几篇博客中,也一直未涉及到数据库的操作,本篇博客 就 ...
- RazorPage 小测试,作下记录
@page@inject Microsoft.AspNetCore.Antiforgery.IAntiforgery Xsrf@{}@functions{ public AppInfo item { ...
- .Net Core ORM选择之路,哪个才适合你
因为老板的一句话公司项目需要迁移到.Net Core ,但是以前同事用的ORM不支持.Net Core 开发过程也遇到了各种坑,插入条数多了也特别的慢,导致系统体验比较差好多都改写Sql实现. 所以我 ...
- [PHP]实体类基类和序列化__sleep问题
1.构造函数传参2.__get和__set实现,当调用不存在的属性的时候,可以取值和赋值到data属性数组3.__sleep实现,当序列化对象的时候,只序列化data属性数组和类内初始化定义的字段4. ...
- 接口以及 LeetCode 每日一题
1 接口 1.1 接口的概念 接口定义了某一批类所需要遵守的规范,接口不关心这些类的内部状态数据,也不关心类内方法的实现细节,只是规定这批类里面必须提供某些方法.所以接口体现的是规范和实现分离的设计哲 ...
- vue 中使用sass实现主体换肤
有如下代码要实现换肤功能 <template> <div class="app-root" :class="themeClass"> & ...
- Flutter 即学即用系列博客——04 Flutter UI 初窥
前面三篇可以算是一个小小的里程碑. 主要是介绍了 Flutter 环境的搭建.如何创建 Flutter 项目以及如何在旧有 Android 项目引入 Flutter. 这一篇我们来学习下 Flutte ...
- 【BZOJ5505】[GXOI/GZOI2019]逼死强迫症(矩阵快速幂)
[BZOJ5505][GXOI/GZOI2019]逼死强迫症(矩阵快速幂) 题面 BZOJ 洛谷 题解 如果没有那两个\(1*1\)的东西,答案就是斐波那契数,可以简单的用\(dp\)得到. 大概是设 ...
- 从0到1打造自己的VOIP网络电话系统(基于FreePBX)
从0到1打造自己的网络电话系统 最近流量卡越来越便宜了,看看自己手里的"坑不死老用户"的联通卡,顿时感觉到深深的恶意,但是iPhone没有双卡功能,所以只好自己动手打造一个网络电话 ...