
maven插件mybatis-generator生成代码配置
鸣谢:http://my.oschina.net/u/1763011/blog/324106?fromerr=nJakGh4P (也可参看此博客进行配置)
http://www.cnblogs.com/zcy_soft/p/3358132.html(补充1)
http://blog.csdn.net/sunny243788557/article/details/45166397 (补充2)
http://www.cnblogs.com/yjmyzz/p/4210554.html (补充3)
http://www.myexception.cn/software-architecture-design/621662.html (补充4)
http://mbg.cndocs.tk (MyBatis Generator介绍)
http://blog.csdn.net/isea533/article/details/42102297 (MyBatis Generator详解)
http://www.cnblogs.com/daxin/p/3545040.html (Mybatis MapperScannerConfigurer 自动扫描 将Mapper接口生成代理注入到Spring)
---------------------------------------------------------------------------------------------------------------------------
测试项目:Test
1.新建maven项目
2.pom.xml文件中添加插件,如:
<build>

        <finalName>org.zsl.hnust</finalName>

        <plugins>

          <plugin>

              <groupId>org.mybatis.generator</groupId>

              <artifactId>mybatis-generator-maven-plugin</artifactId>

              <version>1.3.2</version>

              <configuration>

                  <verbose>true</verbose>

                  <overwrite>true</overwrite>

              </configuration>

          </plugin>

      </plugins>

</build>
3.在项目的/src/main/resources(默认目录)的文件目录下加入generateConfig.xml
如:
<?xml version="1.0" encoding="UTF-8" ?>

<!DOCTYPE generatorConfiguration PUBLIC "-//mybatis.org//DTD MyBatis Generator Configuration 1.0//EN" "http://mybatis.org/dtd/mybatis-generator-config_1_0.dtd" >

<generatorConfiguration>

    <classPathEntry

            location="D:\repo\mysql-connector-java-5.1.26.jar" />

    <context id="context1" targetRuntime="MyBatis3">

        <commentGenerator>

            <!-- 是否去除自动生成的注释 true:是 : false:否 -->

            <property name="suppressAllComments" value="true" />

        </commentGenerator>

        <jdbcConnection driverClass="com.mysql.jdbc.Driver"

                        connectionURL="jdbc:mysql://localhost:3306/test"

                        userId="root" password="" />

        <javaModelGenerator targetPackage="com.cn.hnust.pojo"

                            targetProject="D:\Eclipse_Workspace\HNUST\org.zsl.hnust Maven Webapp\src\main\java" />

        <sqlMapGenerator targetPackage="com.cn.hnust.mapping"

                         targetProject="D:\Eclipse_Workspace\HNUST\org.zsl.hnust Maven Webapp\src\main\java" />

        <javaClientGenerator type="XMLMAPPER" targetPackage="com.cn.hnust.dao"

                          targetProject="D:\Eclipse_Workspace\HNUST\org.zsl.hnust Maven Webapp\src\main\java">

        </javaClientGenerator>

        <table tableName="t_student" domainObjectName="Address"

            enableCountByExample="false" enableUpdateByExample="false" enableDeleteByExample="false"

            enableSelectByExample="false" selectByExampleQueryId="false" >

            <property name="useActualColumnNames" value="true"/>

        </table>

    </context>

</generatorConfiguration>
注:
javaModelGenerator :指定生成pojo的包和此包在项目中的地址;
sqlMapGenerator :指定生成pojo的映射xml文件的所在包和此包在项目中的地址;
javaClientGenerator :指定生成访问映射xml文件的接口所在包和此包在项目中的地址;
table属性:
enableCountByExample="false"
enableUpdateByExample="false"
enableDeleteByExample="false"
enableSelectByExample="false"
selectByExampleQueryId="false"
schema为数据库名, tableName为对应的数据库表, domainObjectName是要生成的实体类,
如果想要mapper配置文件加入sql的where条件查询, 可以将enableCountByExample等设为true,
这样就会生成一个对应domainObjectName的Example类, enableCountByExample等设为false时,
就不会生成对应的Example类了.
如果table里边不配置property,默认字段都生成为类属性。
<ignoreColumn column="FRED" />//忽略字段
<columnOverride column="LONG_VARCHAR_FIELD" jdbcType="VARCHAR" />//无论字段是什么类型,生成的类属性都是varchar。
4.项目 右键--》run as --》 maven bulid --》弹出对话框 --》在goals中输入mybatis-generator:generate (或者 点击select --》选择你的mybatis插件 --》apply --》run)
5:选择项目 按 F5 刷新项目 出现生成的代码。
说明:上面示例的generateConfig.xml 可简化成以下写法:即把targetProject的决定路径改为项目中的相对路径。以后要用可直接复制下面的。
<?xml version="1.0" encoding="UTF-8" ?>

<!DOCTYPE generatorConfiguration PUBLIC "-//mybatis.org//DTD MyBatis Generator Configuration 1.0//EN" "http://mybatis.org/dtd/mybatis-generator-config_1_0.dtd" >

<generatorConfiguration>

    <classPathEntry

            location="D:\repo\mysql-connector-java-5.1.26.jar" />

    <context id="context1" targetRuntime="MyBatis3">

        <commentGenerator>

            <!-- 是否去除自动生成的注释 true:是 : false:否 -->

            <property name="suppressAllComments" value="true" />

        </commentGenerator>

        <jdbcConnection driverClass="com.mysql.jdbc.Driver"

                        connectionURL="jdbc:mysql://localhost:3306/test"

                        userId="root" password="" />

        <javaModelGenerator targetPackage="com.cn.hnust.pojo"

                            targetProject="src/main/java" />

        <sqlMapGenerator targetPackage="sqlMap"

                         targetProject="src/main/resources" />

        <javaClientGenerator type="XMLMAPPER" targetPackage="com.cn.hnust.dao"

                          targetProject="src/main/java">

        </javaClientGenerator>

        <table tableName="t_student" domainObjectName="Student"

            enableCountByExample="false" enableUpdateByExample="false" enableDeleteByExample="false"

            enableSelectByExample="false" selectByExampleQueryId="false" >

            <property name="useActualColumnNames" value="true"/>

        </table>

    </context>

</generatorConfiguration>
值得注意的是pojo映射文件的存放地址在项目中要记得配对哦,如:
spring-mybatis.xml中下面的配置:这里sql映射文件存放在src/main/resources目录
<!-- spring和MyBatis完美整合,不需要mybatis的配置映射文件 -->

    <bean id="sqlSessionFactory" class="org.mybatis.spring.SqlSessionFactoryBean">

        <property name="dataSource" ref="dataSource" />

        <!-- 自动扫描mapping.xml文件 原:value="classpath:com/cn/hnust/mapping/*.xml"-->

        <property name="mapperLocations" value="classpath:sqlMap/*.xml"/>

    </bean>
sql映射文件存放地址:
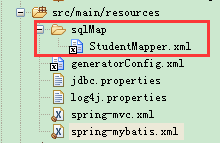
实践:
1.建表 t_student
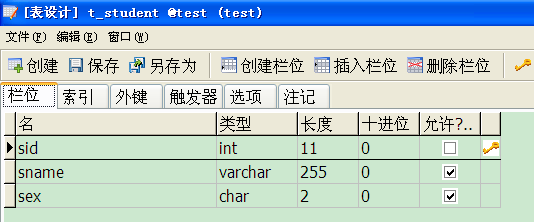
2.项目 右键--》run as --》 maven bulid 生成代码(按上面简化的generateConfig.xml)
3.查看生成的代码
a.Student.java 略
b.StudentMapper 注意:1.访问pojo的映射文件可直接通过此接口访问,不需要建立实现类。2.在spring-mybatis.xml中MapperScannerConfigurer会把sqlSessionFactory注入此类,所以也不需要注入sqlSessionFactory、SqlSessionTemplate 。具体参见:http://www.cnblogs.com/daxin/p/3545040.html
package com.cn.hnust.dao;

import com.cn.hnust.pojo.Student;

public interface StudentMapper {

    int deleteByPrimaryKey(Integer sid);

    int insert(Student record);

    int insertSelective(Student record);

    Student selectByPrimaryKey(Integer sid);

    int updateByPrimaryKeySelective(Student record);

    int updateByPrimaryKey(Student record);

}
c.StudentMapper.xml
<?xml version="1.0" encoding="UTF-8" ?>

<!DOCTYPE mapper PUBLIC "-//mybatis.org//DTD Mapper 3.0//EN" "http://mybatis.org/dtd/mybatis-3-mapper.dtd" >

<mapper namespace="com.cn.hnust.dao.StudentMapper" >

  <resultMap id="BaseResultMap" type="com.cn.hnust.pojo.Student" >

    <id column="sid" property="sid" jdbcType="INTEGER" />

    <result column="sname" property="sname" jdbcType="VARCHAR" />

    <result column="sex" property="sex" jdbcType="CHAR" />

  </resultMap>

  <sql id="Base_Column_List" >

    sid, sname, sex

  </sql>

  <select id="selectByPrimaryKey" resultMap="BaseResultMap" parameterType="java.lang.Integer" >

    select

    <include refid="Base_Column_List" />

    from t_student

    where sid = #{sid,jdbcType=INTEGER}

  </select>

  <delete id="deleteByPrimaryKey" parameterType="java.lang.Integer" >

    delete from t_student

    where sid = #{sid,jdbcType=INTEGER}

  </delete>

  <insert id="insert" parameterType="com.cn.hnust.pojo.Student" >

    insert into t_student (sid, sname, sex)

    values (#{sid,jdbcType=INTEGER}, #{sname,jdbcType=VARCHAR}, #{sex,jdbcType=CHAR})

  </insert>

  <insert id="insertSelective" parameterType="com.cn.hnust.pojo.Student" >

    insert into t_student

    <trim prefix="(" suffix=")" suffixOverrides="," >

      <if test="sid != null" >

        sid,

      </if>

      <if test="sname != null" >

        sname,

      </if>

      <if test="sex != null" >

        sex,

      </if>

    </trim>

    <trim prefix="values (" suffix=")" suffixOverrides="," >

      <if test="sid != null" >

        #{sid,jdbcType=INTEGER},

      </if>

      <if test="sname != null" >

        #{sname,jdbcType=VARCHAR},

      </if>

      <if test="sex != null" >

        #{sex,jdbcType=CHAR},

      </if>

    </trim>

  </insert>

  <update id="updateByPrimaryKeySelective" parameterType="com.cn.hnust.pojo.Student" >

    update t_student

    <set >

      <if test="sname != null" >

        sname = #{sname,jdbcType=VARCHAR},

      </if>

      <if test="sex != null" >

        sex = #{sex,jdbcType=CHAR},

      </if>

    </set>

    where sid = #{sid,jdbcType=INTEGER}

  </update>

  <update id="updateByPrimaryKey" parameterType="com.cn.hnust.pojo.Student" >

    update t_student

    set sname = #{sname,jdbcType=VARCHAR},

      sex = #{sex,jdbcType=CHAR}

    where sid = #{sid,jdbcType=INTEGER}

  </update>

</mapper>
4.测试
package org.zsl.testmybatis;

import javax.annotation.Resource;

import org.junit.Test;

import org.junit.runner.RunWith;

import org.springframework.test.context.ContextConfiguration;

import org.springframework.test.context.junit4.SpringJUnit4ClassRunner;

import com.cn.hnust.dao.StudentMapper;

import com.cn.hnust.pojo.Address;

import com.cn.hnust.pojo.Student;

@RunWith(SpringJUnit4ClassRunner.class)        //表示继承了SpringJUnit4ClassRunner类

@ContextConfiguration(locations = {"classpath:spring-mybatis.xml"})

public class StudentTest {

    @Resource

    private StudentMapper studentMapper;

    @Test

    public void insert(){

        Student s = new Student();

        s.setSex("女");

        s.setSname("李浩");

        studentMapper.insert(s);

    }

    @Test

    public void deleteByPrimaryKey(){

        studentMapper.deleteByPrimaryKey(1);

    }

    @Test

    public void insertSelective(){

        Student s = new Student();

        s.setSname("李浩");

        studentMapper.insertSelective(s);

    }

    @Test

    public void selectByPrimaryKey(){

        Student s = studentMapper.selectByPrimaryKey(2);

        System.out.println(s);

    }

    @Test

    public void updateByPrimaryKeySelective(){

        Student s = studentMapper.selectByPrimaryKey(2);

        s.setSname("张三");

        studentMapper.updateByPrimaryKeySelective(s);

    }

    @Test

    public void updateByPrimaryKey(){

        Student s = studentMapper.selectByPrimaryKey(2);

        s.setSname("王五");

        s.setSex("男");

        studentMapper.updateByPrimaryKeySelective(s);

    }

}
附:
spring-mybatis.xml
<?xml version="1.0" encoding="UTF-8"?>

<beans xmlns="http://www.springframework.org/schema/beans"

    xmlns:xsi="http://www.w3.org/2001/XMLSchema-instance" xmlns:p="http://www.springframework.org/schema/p"

    xmlns:context="http://www.springframework.org/schema/context"

    xmlns:mvc="http://www.springframework.org/schema/mvc"

    xsi:schemaLocation="http://www.springframework.org/schema/beans

                        http://www.springframework.org/schema/beans/spring-beans-3.1.xsd

                        http://www.springframework.org/schema/context

                        http://www.springframework.org/schema/context/spring-context-3.1.xsd

                        http://www.springframework.org/schema/mvc

                        http://www.springframework.org/schema/mvc/spring-mvc-4.0.xsd">

    <!-- 自动扫描 -->

    <context:component-scan base-package="com.cn.hnust" />

    <!-- 引入配置文件 -->

    <bean id="propertyConfigurer"

        class="org.springframework.beans.factory.config.PropertyPlaceholderConfigurer">

        <property name="location" value="classpath:jdbc.properties" />

    </bean>

    <bean id="dataSource" class="org.apache.commons.dbcp.BasicDataSource"

        destroy-method="close">

        <property name="driverClassName" value="${driver}" />

        <property name="url" value="${url}" />

        <property name="username" value="${username}" />

        <property name="password" value="${password}" />

        <!-- 初始化连接大小 -->

        <property name="initialSize" value="${initialSize}"></property>

        <!-- 连接池最大数量 -->

        <property name="maxActive" value="${maxActive}"></property>

        <!-- 连接池最大空闲 -->

        <property name="maxIdle" value="${maxIdle}"></property>

        <!-- 连接池最小空闲 -->

        <property name="minIdle" value="${minIdle}"></property>

        <!-- 获取连接最大等待时间 -->

        <property name="maxWait" value="${maxWait}"></property>

    </bean>

    <!-- spring和MyBatis完美整合,不需要mybatis的配置映射文件 -->

    <bean id="sqlSessionFactory" class="org.mybatis.spring.SqlSessionFactoryBean">

        <property name="dataSource" ref="dataSource" />

        <!-- 自动扫描mapping.xml文件 原:value="classpath:com/cn/hnust/mapping/*.xml"-->

        <property name="mapperLocations" value="classpath:sqlMap/*.xml"/>

    </bean>

    <!-- DAO接口所在包名,Spring会自动查找其下的类 -->

    <bean class="org.mybatis.spring.mapper.MapperScannerConfigurer">

        <property name="basePackage" value="com.cn.hnust.dao" />

        <property name="sqlSessionFactoryBeanName" value="sqlSessionFactory"></property>

    </bean>

    <!-- (事务管理)transaction manager, use JtaTransactionManager for global tx -->

    <bean id="transactionManager"

        class="org.springframework.jdbc.datasource.DataSourceTransactionManager">

        <property name="dataSource" ref="dataSource" />

    </bean>

</beans>
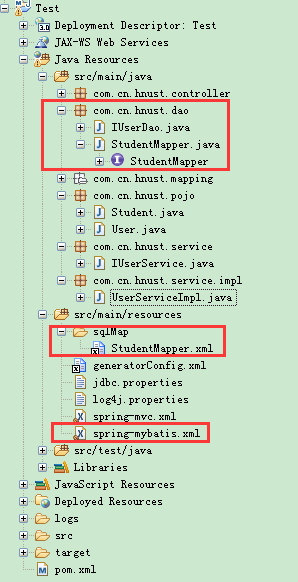
项目结构:
maven插件mybatis-generator生成代码配置的更多相关文章
- mybatis Generator生成代码及使用方式
本文原创,转载请注明:http://www.cnblogs.com/fengzheng/p/5889312.html 为什么要有mybatis mybatis 是一个 Java 的 ORM 框架,OR ...
- 用org.mybatis.generator 生成代码
1:引入pom 2:增加生成配置xml: <?xml version="1.0" encoding="UTF-8" ?> <!DOCTYPE ...
- 2016.7.12 eclispe使用mybatis generator生成代码时提示project E is not exist
运行mybatis-generator之后,出现错误:project E is not exist 错误原因:使用了项目的绝对路径. http://bbs.csdn.net/topics/3914 ...
- mybatis Generator生成代码及使用方式(转载)
转载自:http://www.cnblogs.com/fengzheng/p/5889312.html 文章很棒,很不错,转了.
- MyBatis Generator 超详细配置
想快速开始,请直接拉到最后,看整体配置. MyBatis Generator 是 MyBatis 提供的一个代码生成工具.可以帮我们生成 表对应的持久化对象(po).操作数据库的接口(dao).CRU ...
- mybatis自动生成代码插件mybatis-generator使用流程(亲测可用)
mybatis-generator是一款在使用mybatis框架时,自动生成model,dao和mapper的工具,很大程度上减少了业务开发人员的手动编码时间 坐着在idea上用maven构建spri ...
- mybatis generator配置,Mybatis自动生成文件配置,Mybatis自动生成实体Bean配置
mybatis generator配置,Mybatis自动生成文件配置,Mybatis自动生成实体Bean配置 ============================== 蕃薯耀 2018年3月14 ...
- springboot mybatis 自动生成代码(maven+IntelliJ IDEA)
1.在pom文件中加入需要的依赖(mybatis-generator-core) 和 插件(mybatis-generator-maven-plugin) <dependency> < ...
- Maven下用MyBatis Generator生成文件
使用Maven命令用MyBatis Generator生成MyBatis的文件步骤如下: 1.在mop文件内添加plugin <build> <finalName>KenShr ...
- mybatis-generator:generate 生成代码配置踩坑详解
mybatis-generator:generate 生成代码配置踩坑不少,在此留下笔记以便后续填坑 一.mysql返回时间问题 错误信息: [ERROR] Failed to execute goa ...
随机推荐
- Ehcache(2.9.x) - API Developer Guide, Searching a Cache
About Searching The Search API allows you to execute arbitrarily complex queries against caches. The ...
- 第八章 jQuery与Ajax应用
Ajax(Asynchronous JavaScript and XML),异步JavaScript和XML,它实现的无刷新更新页面,能够进行异步提交. jQuery对Ajax进行了封装,最底层的是$ ...
- 【转】Github入门教程
原文 http://www.eoeandroid.com/thread-274556-1-1.html [初识Github] 首先让我们大家一起喊一句“Hello Github”.YEAH!就是这样. ...
- mssql 查询效率
(1)临时表.表变量 据说:当数据量<100行数据时使用表变量,数据量较大时使用临时表(可创建索引提高查询效率). 表变量只能创建主键或唯一索引,准确讲是约束不是索引. (2)存储过程直接在查询 ...
- MDAC 在WINDOWS XP SP3 不能安装 的解决方法
MDAC 在WINDOWS XP SP3 不能安装 的解决方法 解决步骤如下: c:/windows/inf 下找出mdac.inf 然后点右键->安装.在弹出提示路径选取c:/windows/ ...
- 第六十三篇、runtime实现归解档
#import <objc/runtime.h> #import <objc/message.h> @implementation HDFArchiveModel - (voi ...
- 简单快速的伪Fractional Cascading
Fractional Cascading算法是用于将零散的多个数组(亦可理解成比较高维的空间)中的数据的二分查找速度增加,用的是空间换时间的方法.然而这种方法并不是很好懂,而且中文文献很少.在这里介绍 ...
- (转)理解SQL SERVER中的分区表
简介 分区表是在SQL SERVER2005之后的版本引入的特性.这个特性允许把逻辑上的一个表在物理上分为很多部分.而对于SQL SERVER2005之前版本,所谓的分区表仅仅是分布式视图,也就是多个 ...
- struts2的知识
result的类型 转向 <result type="dispatcher"> <param name="location" > ... ...
- [GeekBand] 探讨C++新标准之新语法——C++ 11~14
一. 可变参数模板(Variadic Templates) 在C++11中,出现了参数数目可变的模板,这部分在之前C++高级编程的时候就有学习到. 其实,在C中就有类似的设定.最常用的printf() ...