
Dao模型设计(基于Dao与Hebernate框架)
以前没有Dao设计模型之前,一般都是这样的流程:
①先设计实体对象
学生对象:
package com.itheima.domain;

import java.io.Serializable;

import java.util.Date;

public class Student implements Serializable {

	private Integer id;//可以为null

	private String name;

	private Date birthday;

	public Integer getId() {

		return id;

	}

	public void setId(Integer id) {

		this.id = id;

	}

	public String getName() {

		return name;

	}

	public void setName(String name) {

		this.name = name;

	}

	public Date getBirthday() {

		return birthday;

	}

	public void setBirthday(Date birthday) {

		this.birthday = birthday;

	}

	@Override

	public String toString() {

		return "Student [id=" + id + ", name=" + name + ", birthday="

				+ birthday + "]";

	}

}
客户对象:
package com.itheima.domain;

import java.io.Serializable;

public class Customer implements Serializable {

	private Integer id;

	private String name;

	private String gender;

	public Integer getId() {

		return id;

	}

	public void setId(Integer id) {

		this.id = id;

	}

	public String getName() {

		return name;

	}

	public void setName(String name) {

		this.name = name;

	}

	public String getGender() {

		return gender;

	}

	public void setGender(String gender) {

		this.gender = gender;

	}

	@Override

	public String toString() {

		return "Customer [id=" + id + ", name=" + name + ", gender=" + gender

				+ "]";

	}

}
②设计Dao层
学生Dao
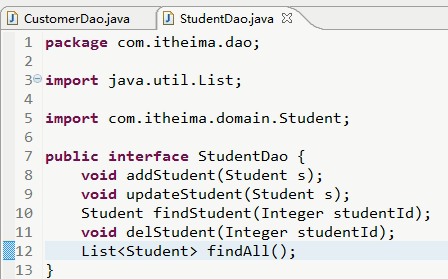
客户Dao
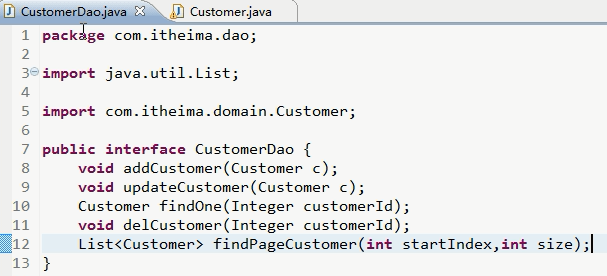
③Dao实现
学生Dao实现

客户Dao实现类似
可以发现,这样Dao多起来后,有很多的重复代码,主要集中在增删改查4个方法上面.
改进
一.在Dao包中,添加一个Dao接口
package com.itheima.dao;

import java.io.Serializable;

public interface Dao<T> {

	void add(T t);

	void update(T t);

	/**

	 * 根据主键查询一个对象

	 * @param id

	 * @return

	 */

	T findOne(Serializable id);

	/**

	 * 根据主键删除一个对象

	 * @param id

	 */

	void del(Serializable id);

}
二.在DaoImpl包下新建一个简单的BaseDao类(这里是重点),实现Dao接口
package com.itheima.dao.impl;

import java.io.Serializable;

import org.hibernate.Session;

import org.hibernate.Transaction;

import com.itheima.dao.Dao;

import com.itheima.util.SessionFactoryUtil;

public abstract class BaseDao<T> implements Dao<T> {

	private Class clazz;//记住外面传递过来的实体类型

	public BaseDao(Class clazz){

		this.clazz = clazz;

	}

	public void add(T t) {

		Session session = null;

		try{

			session = SessionFactoryUtil.getSession();

			Transaction tx = session.beginTransaction();

			session.save(t);

			tx.commit();

		}catch(Exception e){

			throw new RuntimeException(e);

		}finally{

			session.close();

		}

	}

	public T findOne(Serializable id) {

		Session session = null;

		try{

			session = SessionFactoryUtil.getSession();

			return (T)session.get(clazz, id);

		}catch(Exception e){

			throw new RuntimeException(e);

		}finally{

			session.close();

		}

	}

	public void update(T t) {

		Session session = null;

		try{

			session = SessionFactoryUtil.getSession();

			Transaction tx = session.beginTransaction();

			session.update(t);

			tx.commit();

		}catch(Exception e){

			throw new RuntimeException(e);

		}finally{

			session.close();

		}

	}

	public void del(Serializable id) {

		Session session = null;

		try{

			session = SessionFactoryUtil.getSession();

			Transaction tx = session.beginTransaction();

			T bean = (T)session.get(clazz, id);

			session.delete(bean);

			tx.commit();

		}catch(Exception e){

			throw new RuntimeException(e);

		}finally{

			session.close();

		}

	}

}
三.修改具体的实现类
修改客户dao实现类
package com.itheima.dao.impl;

import java.util.List;

import com.itheima.dao.CustomerDao;

import com.itheima.domain.Customer;

public class CustomerDaoImpl extends BaseDao<Customer> implements CustomerDao {


	public CustomerDaoImpl(Class clazz) {

		super(Customer.class);

	}

	public List<Customer> findPageCustomer(int startIndex, int size) {

		return null;

	}

}
修改学生dao实现类
package com.itheima.dao.impl;

import java.util.List;

import com.itheima.dao.StudentDao;

import com.itheima.domain.Student;

public class StudentDaoImpl extends BaseDao<Student> implements StudentDao {

    //继承BaseDao,没有构造方法,需要构造方法,告诉父类,查的是那个类,上面的customer一样

	public StudentDaoImpl(Class clazz) {

		super(Student.class);

	}

	public List<Student> findAll() {

		return null;

	}

}
四.service测试
Student.cfg.xml
<?xml version="1.0" encoding="UTF-8"?>

<!DOCTYPE hibernate-mapping PUBLIC

	"-//Hibernate/Hibernate Mapping DTD 3.0//EN"

	"http://www.hibernate.org/dtd/hibernate-mapping-3.0.dtd">

<hibernate-mapping package="com.itheima.domain">

	<class name="Student" table="STUDENTS">

		<id name="id" column="ID">

			<!-- 根据数据库的能力管理主键 -->

			<generator class="native"></generator>

		</id>

		<property name="name" column="NAME"></property>

		<property name="birthday" column="BIRTHDAY"></property>

	</class>

</hibernate-mapping>
Cusstomer.cfg.xml
<?xml version="1.0" encoding="UTF-8"?>

<!DOCTYPE hibernate-mapping PUBLIC

	"-//Hibernate/Hibernate Mapping DTD 3.0//EN"

	"http://www.hibernate.org/dtd/hibernate-mapping-3.0.dtd">

<hibernate-mapping package="com.itheima.domain">

	<class name="Customer" table="CUSTOMERS">

		<id name="id" column="ID">

			<!-- 根据数据库的能力管理主键 -->

			<generator class="native"></generator>

		</id>

		<property name="name" column="NAME"></property>

		<property name="gender" column="GENDER"></property>

	</class>

</hibernate-mapping>
把配置文件交给hibernate管理
hibernate文件hibernate.cfg.xml
<?xml version="1.0" encoding="UTF-8"?>

<!DOCTYPE hibernate-configuration PUBLIC

	"-//Hibernate/Hibernate Configuration DTD 3.0//EN"

	"http://www.hibernate.org/dtd/hibernate-configuration-3.0.dtd">

<hibernate-configuration>

	<session-factory>

		<!-- 配置Hibernate:属性配置参考  Hibernate发型包\project\etc\hibernate.properties -->

		<!-- JDBC的基本链接 -->

		<property name="hibernate.connection.driver_class">com.mysql.jdbc.Driver</property>

		<property name="connection.username">root</property>

		<property name="connection.password">sorry</property>

		<property name="connection.url">jdbc:mysql://localhost:3306/day22</property>

		<!-- 配置数据库方言 -->

		<property name="dialect">org.hibernate.dialect.MySQLDialect</property>

		<!-- 根据映射产生表结构的类型:

			create-drop:木有表结构创建,下次启动时删除重新创建。适合学习阶段

			create:只做创建

			update:探测表结构够的变化,对于数据库没有的,进行更新操作。适合学习阶段

			validate:对比与数据库的结构

		 -->

		<property name="hibernate.hbm2ddl.auto">update</property>

		<!-- 显示sql语句及格式:开发调试阶段非常有用 -->

		<property name="hibernate.show_sql">true</property>

		<property name="hibernate.format_sql">true</property>

          <--最主要的就是这个-->

		<!-- 告知映射文件 -->

		<mapping resource="com/itheima/domain/Student.hbm.xml"/>

		<mapping resource="com/itheima/domain/Customer.hbm.xml"/>

	</session-factory>

</hibernate-configuration>
Dao测试
package com.itheima.test;

import java.util.Date;

import com.itheima.dao.CustomerDao;

import com.itheima.dao.StudentDao;

import com.itheima.dao.impl.CustomerDaoImpl;

import com.itheima.dao.impl.StudentDaoImpl;

import com.itheima.domain.Customer;

import com.itheima.domain.Student;

public class DaoTest {

	public static void main(String[] args) {

		CustomerDao cDao = new CustomerDaoImpl(Customer.class);

		StudentDao sDao = new StudentDaoImpl(Student.class);

		Customer c = new Customer();

		c.setName("刘亚雄");

		c.setGender("待定");

		cDao.add(c);

		Student s = new Student();

		s.setName("吕云雪");

		s.setBirthday(new Date());

		sDao.add(s);

	}

}
结果:
 customer表
 student表
这就是Dao设计模型

虚线是实现接口,实线是继承类
BaseDao上有个abstract,注意:
为什么一个类里面没有抽象方法,还要定义声明为抽象类?
原因很简单:就是不让直接使用,干嘛不让?
BaseDao不让直接使用,是用来继承使用的.其实HTTPServlet就是典型,HTTPServlet是抽象类,里面有一个非抽象的方法doXXX(忘记叫什么名了)
继承后,满意的方法直接使用,不满意的方法直接覆盖掉就好了.
以上写法还不够优雅!下面来修改:
一.修改StudentDaoImpl实现类,其实就是去掉构造方法
package com.itheima.dao.impl;

import java.util.List;

import com.itheima.dao.StudentDao;

import com.itheima.domain.Student;

public class StudentDaoImpl extends BaseDao<Student> implements StudentDao {

//	public StudentDaoImpl(Class clazz) {

//		super(Student.class);

//	}

	public List<Student> findAll() {

		return null;

	}

}
二.修改CustomerDaoImpl实现类,其实就是去掉构造方法
package com.itheima.dao.impl;

import java.util.List;

import com.itheima.dao.CustomerDao;

import com.itheima.domain.Customer;

public class CustomerDaoImpl extends BaseDao<Customer> implements CustomerDao {

//	public CustomerDaoImpl() {

//		super();

//	}

	public List<Customer> findPageCustomer(int startIndex, int size) {

		return null;

	}

}
三.修改BaseDao类
package com.itheima.dao.impl;

import java.io.Serializable;

import java.lang.reflect.ParameterizedType;

import java.lang.reflect.Type;

import org.hibernate.Session;

import org.hibernate.Transaction;

import com.itheima.dao.Dao;

import com.itheima.util.SessionFactoryUtil;

public abstract class BaseDao<T> implements Dao<T> {

	private Class clazz;//实体类型

	public BaseDao(){

		//给clazz赋值:需要知道操作的是哪个实体类,从而知道操作那张表

		Type type = this.getClass().getGenericSuperclass();//得到当前实例的带有泛型类型的父类

		ParameterizedType ptype = (ParameterizedType)type;//因为父类型带有泛型信息,就可以转为ParameterizedType(参数化的泛型类型)

		clazz = (Class)ptype.getActualTypeArguments()[0];// Customer|Student.class

	}

	public void add(T t) {

		Session session = null;

		try{

			session = SessionFactoryUtil.getSession();

			Transaction tx = session.beginTransaction();

			session.save(t);

			tx.commit();

		}catch(Exception e){

			throw new RuntimeException(e);

		}finally{

			session.close();

		}

	}

	public T findOne(Serializable id) {

		Session session = null;

		try{

			session = SessionFactoryUtil.getSession();

			return (T)session.get(clazz, id);

		}catch(Exception e){

			throw new RuntimeException(e);

		}finally{

			session.close();

		}

	}

	public void update(T t) {

		Session session = null;

		try{

			session = SessionFactoryUtil.getSession();

			Transaction tx = session.beginTransaction();

			session.update(t);

			tx.commit();

		}catch(Exception e){

			throw new RuntimeException(e);

		}finally{

			session.close();

		}

	}

	public void del(Serializable id) {

		Session session = null;

		try{

			session = SessionFactoryUtil.getSession();

			Transaction tx = session.beginTransaction();

			T bean = (T)session.get(clazz, id);

			session.delete(bean);

			tx.commit();

		}catch(Exception e){

			throw new RuntimeException(e);

		}finally{

			session.close();

		}

	}

}
说明:
this代表当前对象,this有句话可以这么理解(对象永远都是这个对象,但是指向有可能向上转型)
其实上面主要就是添加以下几句代码:
Type type = this.getClass().getGenericSuperclass();//得到当前实例的带有泛型类型的父类----->CustomerDaoImpl的父类BaseDao<Customer>就是带有泛型类型的类
ParameterizedType ptype = (ParameterizedType)type;//因为父类型带有泛型信息,就可以转为ParameterizedType(参数化的泛型类型)
clazz = (Class)ptype.getActualTypeArguments()[0];// Customer|Student.class
以上几句其实就是泛型的反射应用
修改之后,优雅多了
Dao模型设计(基于Dao与Hebernate框架)的更多相关文章
- 基于maven的ssm框架整合
基于maven的ssm框架整合 第一步:通过maven建立一个web项目. 第二步:pom文件导入jar包 (1 ...
- 基于springboot的SSM框架实现返回easyui-tree所需要数据
1.easyui-tree easui-tree目所需要的数据结构类型如下: [ { "children": [ { "children": [], " ...
- MyBatis开发Dao的原始Dao开发和Mapper动态代理开发
目录 咳咳...初学者看文字(Mapper接口开发四个规范)属实有点费劲,博主我就废了点劲做了如下图,方便理解: 原始Dao开发方式 1. 编写映射文件 3.编写Dao实现类 4.编写Dao测试 Ma ...
- 基于LoadRunner构建接口测试框架
基于LoadRunner构建接口测试框架 http://www.docin.com/p-775544153.html
- 8个强大的基于Bootstrap的CSS框架
做过前端开发的小伙伴们应该对Bootstrap不会陌生,它是由Twitter推出的开源CSS框架,其中包含了很多Web前端开发的工具包和应用组件.当然,和jQuery一样,Bootstrap同时也是一 ...
- 基于cocos2d-x的游戏框架设计——李成
视频:http://v.youku.com/v_show/id_XMzc5ODUyMTI4.html?f=17330006 网易科技讯 3月31日,第四届CocoaChina开发者大会暨Cocos2d ...
- 基于MEF的插件框架之总体设计
基于MEF的插件框架之总体设计 1.MEF框架简介 MEF的全称是Managed Extensibility Framework(MEF),其是.net4.0的组成部分,在3.5上也可以使用.熟悉ja ...
- 【百度地图开发之二】基于Fragment的地图框架的使用
写在前面的话: [百度地图开发之二]基于Fragment的地图框架的使用(博客地址:http://blog.csdn.net/developer_jiangqq),转载请注明. Author:hmji ...
- 基于NetMQ的TLS框架NetMQ.Security的实现分析
基于NetMQ的TLS框架NetMQ.Security的实现分析 前言 介绍 交互过程 支持的协议 TLS协议 支持的算法 实现 握手 第一次握手 Client Hello 第二次握手 Server ...
随机推荐
- cocos2d-x 从onEnter、onExit、 引用计数 谈内存泄露问题
/////////////////////////////////// //author : zhxfl //date : 2013.8.29 //email : 291221622@qq.co ...
- HW5.15
public class Solution { public static void main(String[] args) { System.out.printf("%10s\t%10s\ ...
- linux select 与 阻塞( blocking ) 及非阻塞 (non blocking)实现io多路复用的示例
除了自己实现之外,还有个c语言写的基于事件的开源网络库:libevent http://www.cnblogs.com/Anker/p/3265058.html 最简单的select示例: #incl ...
- Native code - how to get function call stack (backtrace) programatically 附带源代码
自己根据 https://github.com/zhuowei/libcorkscrew-ndk 上的库做了一个包装库并附带使用的例子(executable 分支),具体代码在自己的代码仓库里,名字叫 ...
- 问题.NETSystem.Data.OleDb.OleDbException 操作必须使用一个可更新的查询
问题:System.Data.OleDb.OleDbException 操作必须使用一个可更新的查询 问题现象:用asp.net连access数据库,查询可以,插入数据报错.在.NET中F5可以使用方 ...
- redis缓存技术
初学redis缓存技术,如果文章写得不好还请谅解 应用环境:win7 实现环境:cmd,eclipse redis缓存技术的特点就在于高效,因为目前涉及的数据量逐渐增多,在对于数据的存储上面和sql以 ...
- 算法基础:最大递减数问题(Golang实现)
给出一个非负整数,找到这个非负整数中包括的最大递减数.一个数字的递减数是指相邻的数位从大到小排列的数字. 如: 95345323,递减数有:953,95,53,53,532,32, 那么最大的递减数为 ...
- cocos2dx 3.1创建工 mac
1.下载cocos2dx 3.1版本号 2.打开终端,cd 进入 cocos2d-x-3.1.1/tools/cocos2d-console/bin 3.cocos new game -p com.t ...
- linux系统禁止root用户通过ssh登录及ssh的访问控制
Linux系统默认情况下,是可以通过ssh以root权限登录的.但出于安全考虑,这样的权限是不合适的,因为黑客可能通过暴力破解你的root密码,然后进入你的系统,oh,damn it..... 同样是 ...
- [Javascript] Chaining the Array map and filter methods
Both map and filter do not modify the array. Instead they return a new array of the results. Because ...