[转载]VIM 教程:Learn Vim Progressively

TL;DR: You want to teach yourself vim (the best text editor known to human kind) in the fastest way possible. This is my way of doing it. You start by learning the minimal to survive, then you integrate all the tricks slowly.
Vim the Six Billion Dollar editor
Better, Stronger, Faster.
Learn vim and it will be your last text editor. There isn’t any better text editor that I know of. It is hard to learn, but incredible to use.
I suggest you teach yourself Vim in 4 steps:
- Survive
- Feel comfortable
- Feel Better, Stronger, Faster
- Use superpowers of vim
By the end of this journey, you’ll become a vim superstar.
But before we start, just a warning. Learning vim will be painful at first. It will take time. It will be a lot like playing a musical instrument. Don’t expect to be more efficient with vim than with another editor in less than 3 days. In fact it will certainly take 2 weeks instead of 3 days.
1st Level – Survive
- Install vim
- Launch vim
- DO NOTHING! Read.
In a standard editor, typing on the keyboard is enough to write something and see it on the screen. Not this time. Vim is in Normalmode. Let’s go to Insert mode. Type the letter i.
You should feel a bit better. You can type letters like in a standard editor. To get back to Normal mode just press the ESC key.
You now know how to switch between Insert and Normal mode. And now, here are the commands that you need in order to survive in Normal mode:
i→ Insert mode. TypeESCto return to Normal mode.x→ Delete the char under the cursor:wq→ Save and Quit (:wsave,:qquit)dd→ Delete (and copy) the current linep→ PasteRecommended:
hjkl(highly recommended but not mandatory) → basic cursor move (←↓↑→). Hint:jlooks like a down arrow.:help <command>→ Show help about<command>. You can use:helpwithout a<command>to get general help.
Only 5 commands. That is all you need to get started. Once these command start to become natural (maybe after a day or so), you should move on to level 2.
But first, just a little remark about Normal mode. In standard editors, to copy you have to use the Ctrl key (Ctrl-c generally). In fact, when you press Ctrl, it is as if all of your keys change meaning. Using vim in normal mode is a bit like having the editor automatically press the Ctrl key for you.
A last word about notations:
- instead of writing
Ctrl-λ, I’ll write<C-λ>. - commands starting with
:end with<enter>. For example, when I write:q, I mean:q<enter>.
2nd Level – Feel comfortable
You know the commands required for survival. It’s time to learn a few more commands. These are my suggestions:
Insert mode variations:
a→ insert after the cursoro→ insert a new line after the current oneO→ insert a new line before the current onecw→ replace from the cursor to the end of the word
Basic moves
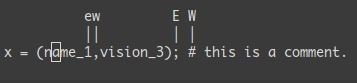
0→ go to the first column^→ go to the first non-blank character of the line$→ go to the end of lineg_→ go to the last non-blank character of line/pattern→ search forpattern
Copy/Paste
P→ paste before, rememberpis paste after current position.yy→ copy the current line, easier but equivalent toddP
Undo/Redo
u→ undo<C-r>→ redo
Load/Save/Quit/Change File (Buffer)
:e <path/to/file>→ open:w→ save:saveas <path/to/file>→ save to<path/to/file>:x,ZZor:wq→ save and quit (:xonly save if necessary):q!→ quit without saving, also::qa!to quit even if there are modified hidden buffers.:bn(resp.:bp) → show next (resp. previous) file (buffer)
Take the time to learn all of these command. Once done, you should be able to do every thing you are able to do in other editors. You may still feel a bit awkward. But follow me to the next level and you’ll see why vim is worth the extra work.
3rd Level – Better. Stronger. Faster.
Congratulation for reaching this far! Now we can start with the interesting stuff. At level 3, we’ll only talk about commands which are compatible with the old vi editor.
Better
Let’s look at how vim could help you to repeat yourself:
.→ (dot) will repeat the last command,- N<command> → will repeat the command N times.
Some examples, open a file and type:
2dd→ will delete 2 lines3p→ will paste the text 3 times100idesu [ESC]→ will write “desu desu desu desu desu desu desu desu desu desu desu desu desu desu desu desu desu desu desu desu desu desu desu desu desu desu desu desu desu desu desu desu desu desu desu desu desu desu desu desu desu desu desu desu desu desu desu desu desu desu desu desu desu desu desu desu desu desu desu desu desu desu desu desu desu desu desu desu desu desu desu desu desu desu desu desu desu desu desu desu desu desu desu desu desu desu desu desu desu desu desu desu desu desu desu desu desu desu desu desu”.→ Just after the last command will write again the 100 “desu”.3.→ Will write 3 “desu” (and not 300, how clever).
Stronger
Knowing how to move efficiently with vim is very important. Don’t skip this section.
- N
G→ Go to line N gg→ shortcut for1G- go to the start of the fileG→ Go to last lineWord moves:
w→ go to the start of the following word,e→ go to the end of this word.
By default, words are composed of letters and the underscore character. Let’s call a WORD a group of letter separated by blank characters. If you want to consider WORDS, then just use uppercase characters:
W→ go to the start of the following WORD,E→ go to the end of this WORD.
Now let’s talk about very efficient moves:
%: Go to the corresponding(,{,[.*(resp.#) : go to next (resp. previous) occurrence of the word under the cursor
Believe me, the last three commands are gold.
Faster
Remember about the importance of vi moves? Here is the reason. Most commands can be used using the following general format:
<start position><command><end position>
For example : 0y$ means
0→ go to the beginning of this liney→ yank from here$→ up to the end of this line
We also can do things like ye, yank from here to the end of the word. But also y2/foo yank up to the second occurrence of “foo”.
But what was true for y (yank), is also true for d (delete), v (visual select), gU (uppercase), gu (lowercase), etc…
4th Level – Vim Superpowers
With all preceding commands you should be comfortable using vim. But now, here are the killer features. Some of these features were the reason I started to use vim.
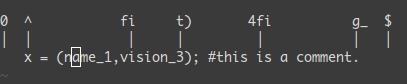
Move on current line: 0 ^ $ g_ f F t T , ;
0→ go to column 0^→ go to first character on the line$→ go to the last columng_→ go to the last character on the linefa→ go to next occurrence of the letteraon the line.,(resp.;) will find the next (resp. previous) occurrence.t,→ go to just before the character,.3fa→ find the 3rd occurrence ofaon this line.FandT→ likefandtbut backward.
A useful tip is: dt" → remove everything until the ".
Zone selection <action>a<object> or <action>i<object>
These command can only be used after an operator in visual mode. But they are very powerful. Their main pattern is:
<action>a<object> and <action>i<object>
Where action can be any action, for example, d (delete), y (yank), v(select in visual mode). The object can be: w a word, W a WORD (extended word), s a sentence, p a paragraph. But also, natural character such as ", ', ), }, ].
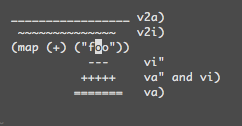
Suppose the cursor is on the first o of (map (+) ("foo")).
vi"→ will selectfoo.va"→ will select"foo".vi)→ will select"foo".va)→ will select("foo").v2i)→ will selectmap (+) ("foo")v2a)→ will select(map (+) ("foo"))
Select rectangular blocks: <C-v>.
Rectangular blocks are very useful for commenting many lines of code. Typically: 0<C-v><C-d>I-- [ESC]
^→ go to the first non-blank character of the line<C-v>→ Start block selection<C-d>→ move down (could also bejjjor%, etc…)I-- [ESC]→ write--to comment each line

Note: in Windows you might have to use <C-q> instead of <C-v> if your clipboard is not empty.
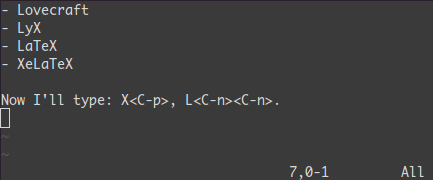
Completion: <C-n> and <C-p>.
In Insert mode, just type the start of a word, then type <C-p>, magic…
Macros : qa do something q, @a, @@
qa record your actions in the register a. Then @a will replay the macro saved into the register a as if you typed it. @@ is a shortcut to replay the last executed macro.
Example
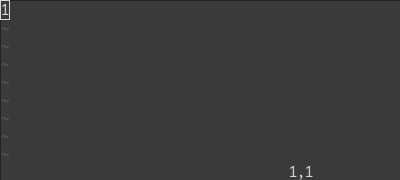
On a line containing only the number 1, type this:
qaYp<C-a>q→
qastart recording.Ypduplicate this line.<C-a>increment the number.qstop recording.@a→ write 2 under the 1@@→ write 3 under the 2- Now do
100@@will create a list of increasing numbers until 103.
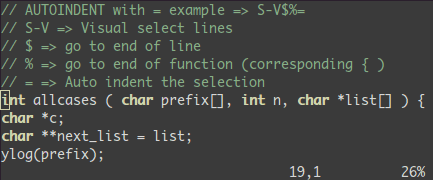
Visual selection: v,V,<C-v>
We saw an example with <C-v>. There is also v and V. Once the selection has been made, you can:
J→ join all the lines together.<(resp.>) → indent to the left (resp. to the right).=→ auto indent
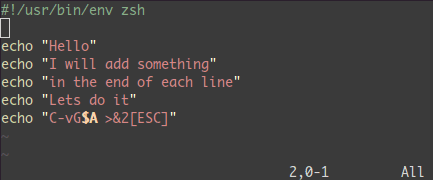
Add something at the end of all visually selected lines:
<C-v>- go to desired line (
jjjor<C-d>or/patternor%etc…) $go to the end of the lineA, write text,ESC.
Splits: :split and vsplit.
These are the most important commands, but you should look at :help split.
:split→ create a split (:vsplitcreate a vertical split)<C-w><dir>: where dir is any ofhjklor ←↓↑→ to change the split.<C-w>_(resp.<C-w>|) : maximise the size of the split (resp. vertical split)<C-w>+(resp.<C-w>-) : Grow (resp. shrink) split
Conclusion
That was 90% of the commands I use every day. I suggest that you learn no more than one or two new commands per day. After two to three weeks you’ll start to feel the power of vim in your hands.
Learning Vim is more a matter of training than plain memorization. Fortunately vim comes with some very good tools and excellent documentation. Run vimtutor until you are familiar with most basic commands. Also, you should read this page carefully: :help usr_02.txt.
Then, you will learn about !, folds, registers, plugins and many other features. Learn vim like you’d learn piano and all should be fine.
If you liked this article, there is a follow up: Vim as IDE
[转载]VIM 教程:Learn Vim Progressively的更多相关文章
- 【最简单的vim教程】vim学习笔记-基础操作
说明 C-字母 = Ctrl + 字母 char = 任意字符 开始编辑 insert 按键 功能 说明 i(I) insert 当前位置插入(当前行前) a(A) append 当前字符后面插入(当 ...
- VIMTUTOR《VIM教程》
=============================================================================== = 欢 迎 阅 ...
- 7张图片学习VIM教程
7张图片学习VIM教程 张图片设置为桌面背景,时不时的能看上一眼.慢慢就学会VIM了. VIM lesson 1 VIM lesson 2 VIM lesson 3 VIM lesson 4 VIM ...
- 最好的vim教程莫过于vimtutor
最好的vim教程莫过于vimtutor 直接运行vimtutor即可
- 转载:Linux的vim三种模式
一般模式:在Linux终端中输入“vim 文件名”就进入了一般模式,但不能输入文字. 编辑模式:在一般模式下按i就会进入编辑模式,此时就可以写程式,按Esc可回到一般模式. 命令模式:在一般模式下按: ...
- Emmet.vim 教程
Emmet.vim 教程 May 5, 2012 目录 1 下载 Emmet.vim 2 安装 Emmet.vim 3 使用 Emmet.vim 4 余话 Emmet 项目原先叫 Zen Coding ...
- vimtutor - Vim 教程
总览 (SYNOPSIS) vimtutor 描述 (DESCRIPTION) Vimtutor 打开 Vim 教程. 它首先 考备 文件, 这样 就可以 在 不改变 原文件 的情况下 修改 当前文件 ...
- 《VIM教程》笔记
一:vi ,vim, gvim简介 vi的功能是最弱的,它是*nix操作系统下最基本的文本编辑器. vim一开始的功能还不如vi,那个时候它的全称是"Vi IMitation",即 ...
- [转载] ubuntu下定制Vim/Gvim及使用技巧
vim是linux下的编辑器之神,是玩linux的必备工具,同样emacs是神的编辑器,两个编辑器是各有千秋,看个人的喜好,青菜萝卜各有所爱.我是比较喜欢vim,用vim编写bash,perl,pyt ...
随机推荐
- 传入的表格格式数据流(TDS)远程过程调用(RPC)协议流不正确。此 RPC 请求中提供了过多的参数。最多应为 2100
出现这个问题的背景是,判断一批激活码在系统中是否已经存在,很傻的一个作法是,把这一批激活码,以in(in (‘ddd‘,‘aaa‘))的形式来处理,导致问题的出现. 后来,查找资料,http://bb ...
- 《JavaScript_DOM编程艺术第二版(中文)》整书笔记
目录 第3章:DOM 第4章:案例研究 第5章:最佳实践 第6章:案例改进 第7章:动态创建标记 第8章:充实文档的内容 第9章:CSS-DOM 第3章:DOM 文档:DOM中的"D&quo ...
- javascript在html中的加载顺序
参考:[1]http://coolshell.cn/articles/9749.html(酷壳) [2]http://shaozhuqing.com/?p=2756 [3]http://www.cnb ...
- linux下如何安装webbench
1.上传webbench,解压 2.make&&make install进行安装 如果报没有man1目录,则要用 mkdir -p /usr/local/man/man1 然后 mak ...
- 1.Counting DNA Nucleotides
Problem A string is simply an ordered collection of symbols selected from some alphabet and formed i ...
- 遥感影像滤波处理软件 — timesat3.2
最近因为要做遥感影像的滤波处理,经过女神推荐,决定用Timesat,可是该软件3.1版本只适合xp系统以及2011的matlab,后来在官网上找到了最新的3.2版本.支持64位操作系统以及2014的m ...
- 浏览器功能记住账号和密码解决方法(HTML解决方式)
1.在input标签里应用html5的新特性autocomplete="off" 注:对chrome不管用.其他浏览器没试. 2.如果是一个输入框那就在当前input标签后面(一 ...
- 初步认知java的方法
1.正确区分函数和方法: 面向对象的语言叫做方法,面向过程的语言叫做函数,两者的意义是一样的,只是叫法不同.java是面向对象的语言,所以用方法. 2.方法的定义: 就是有名字的代码段 3.方法的目的 ...
- Linux中的入口函数main
main()函数,想必大家都不陌生了,从刚开始写程序的时候,大家便开始写main(),我们都知道main是程序的入口.那main作为一个函数,又是谁调用的它,它是怎么被调用的,返回给谁,返回的又是什么 ...
- Linux下高cpu解决方案(转载)
昨天搞定了一个十万火急的issue,客户抱怨产品升级后系统会变慢和CPU使用率相当高,客户脾气很大,声称不尽快解决这个问题就退货,弄得我们 R&D压力很大,解决这个issue的任务分给了我,客 ...