
mac上eclipse用gdb调试(转)
With its new OS release, Apple has discontinued the use of GDB in OS X. Since 2005 Apple has steadily been moving away from the GNU toolchain in favor of LLVM. This means that Xcode now uses LLDB instead.
LLDB looks to be a very nice replacement for GDB, and I hope to use it in the future, but currently Xcode is the only graphical front-end that supports its use; pretty much every other debugging GUI uses GDB under the hood, including Eclipse. So, if you want to debug C/C++ code in Eclipse CDT on the Mac, you must install GDB.1
Here is the procedure that worked for me.2 Others have reported issues with this, so please do let me know in the comments if it doesn't work for you.
Known Issues
GDB will not be able to breakpoint inside any template function, though it should be able to step into it. This problem may be resolved if you use the MacPorts installation procedure (below) but it may only work if you also compile with Apple's GCC.
It was also reported in the comments that it cannot breakpoint into a shared library function. I have not confirmed this issue myself.
Installing GDB
You can install via MacPorts or Homebrew. MacPorts has Apple's official GDB distribution, which is modified for OS X. This is probably the best option (thanks to CC's comment for this tip). However, on my machine this only seems to work if the program is compiled using Apple's GCC, which is no longer supported by Apple. All things being equal, I vastly prefer to avoid MacPorts altogether. So I installed with Homebrew, despite recommending MacPorts. If you have no preference either way, go with MacPorts.
Install with MacPorts
- Install Xcode and MacPorts, if not already installed.
- Now install the Apple GCC and GDB from MacPorts:
$ sudo port install gdb-apple
$ sudo port install apple-gcc42 - For the remainder of the tutorial, use /opt/local/bin/gdb-apple as the GDB executable
- Remember if you want breakpoints in template functions to work, you'll need to change your compiler to g++-apple-4.2 instead of g++! This can be done in your Makefiles or in your IDE settings.
Install with Homebrew
- Install Xcode and Homebrew, if not already installed.
- Now install GDB from Homebrew:
$ brew tap homebrew/dupes
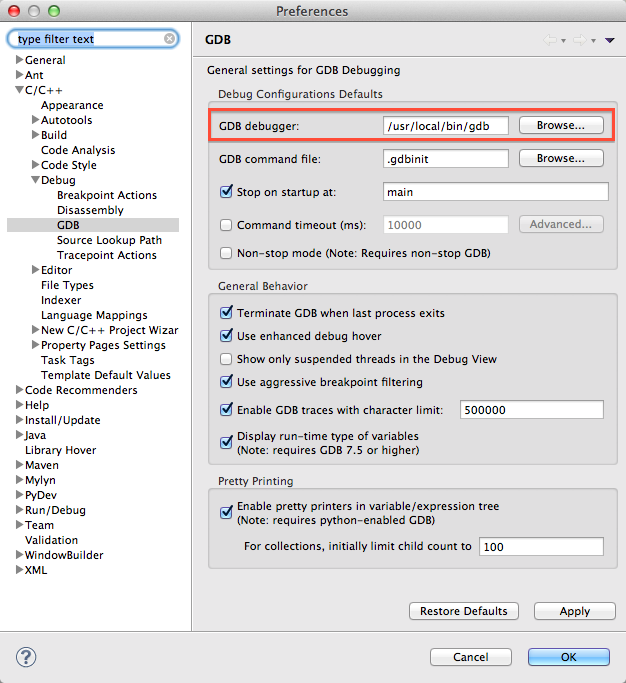
$ brew install gdb - For the remainder of the tutorial, use /usr/local/bin/gdb as the GDB executable
If that worked, then lucky you! Getting it compiled is where many people seem to have trouble. Now you just need to sign it to give it permission to control OS X processes.
Certifying GDB
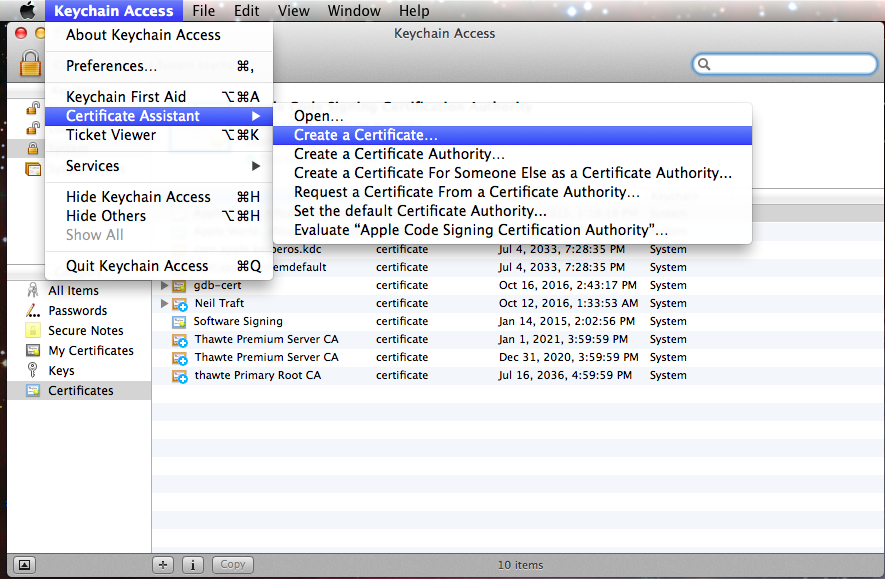
Open up the Keychain Access application (/Applications/Utilities/Keychain Access.app). Navigate via the menu to Keychain Access > Certificate Assistant > Create Certificate...
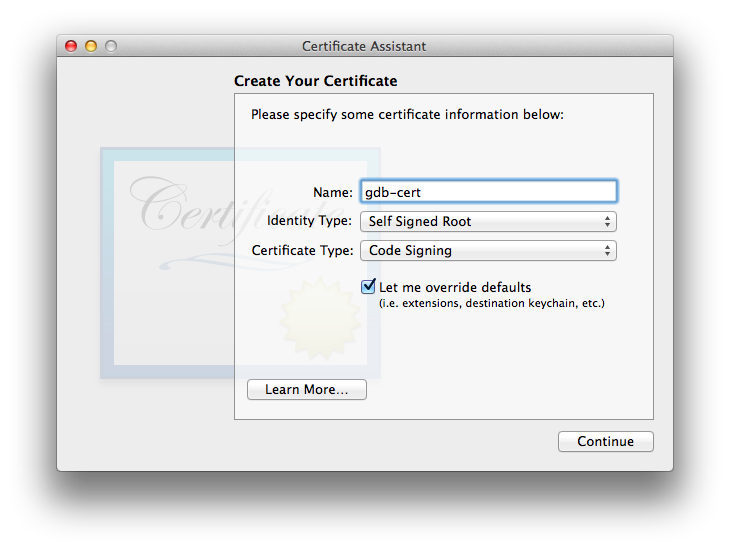
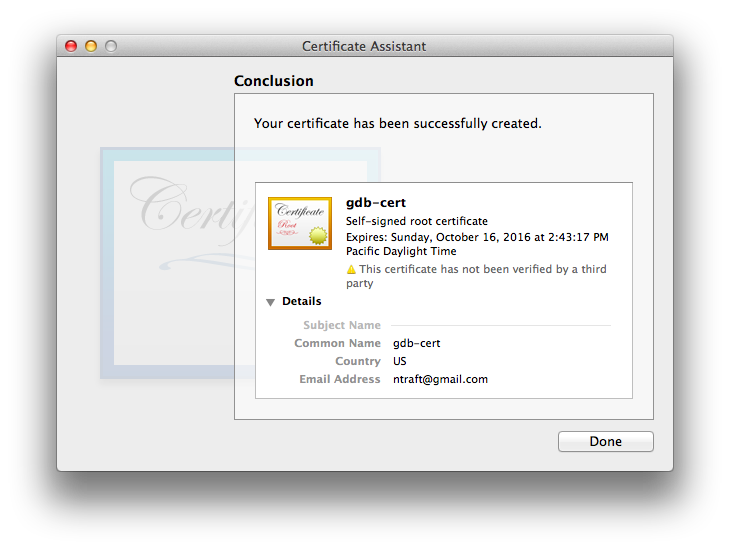
Enter a name for the certificate. For this how-to, I'll call it "gdb-cert". Set the fields exactly as shown below.
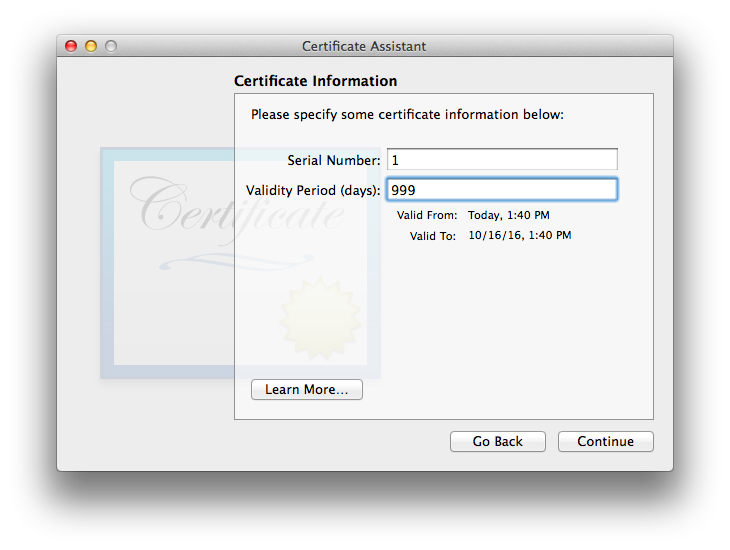
The maximum validity period is 999 days. I don't really want to deal with this again, so I'm going to max it out.
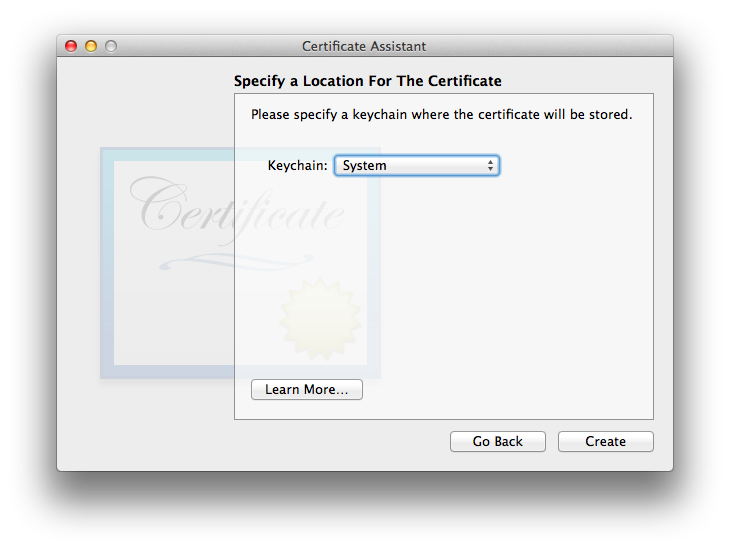
Keep clicking the "Continue" button until you are asked for a location. Set it to "System".3
Success!
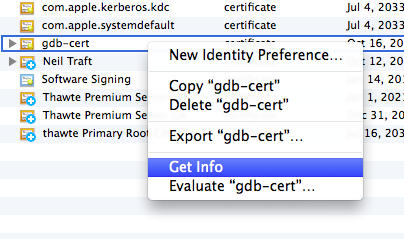
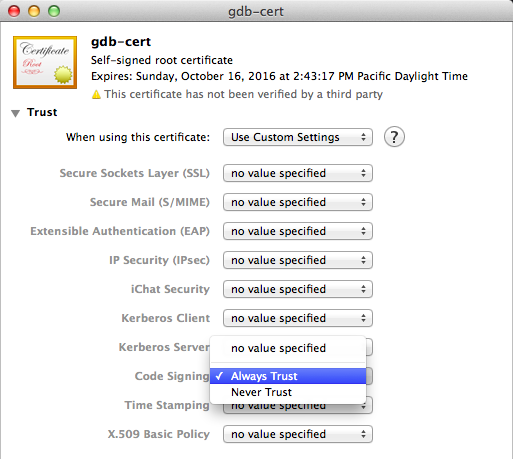
Now make sure the cert is always trusted. Right-click the new certificate and select Get Info. Under the Trust section, set Code Signing to Always Trust.
Now that we have a certificate, we need to use it to sign GDB. First, we'll restart the taskgatedprocess to make sure it picks up the new certificate. Quit Keychain Access (you must quit Keychain Access!) and return to the Terminal for these final commands.
Find the taskgated process.
56822 ?? 0:03.11 /usr/libexec/taskgated -s
60944 ttys002 0:00.00 grep --color=auto taskgated
The first number in the above output is the PID. Use this to kill the process (it will immediately restart itself).
Now you can finally code sign GDB.
$ codesign -s gdb-cert $(which gdb-apple)
# Homebrew version
$ codesign -s gdb-cert $(which gdb)
Now you should be all set! The OS X Keychain may ask for your password the first time you attempt to debug a program, but it should work!
Getting it to Work with Eclipse
There's one more step for Eclipse users. You need to specify where Eclipse can find the new GDB. Specify the path to GDB in Preferences > C/C++ > Debug > GDB:
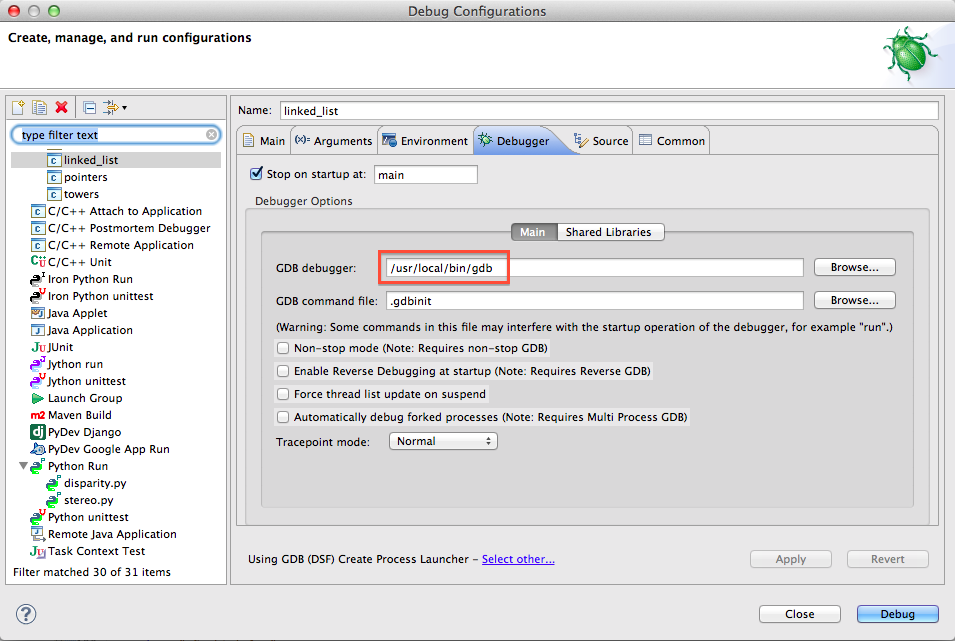
If you already have some debug configurations, you may need to edit them individually to point to the correct place (under Run > Debug Configurations...):
- The CDT developers are planning to support LLDB, but they will have to write a whole new interface, and I think most of them only work on Eclipse in their spare time, so it will likely be at least some months before LLDB support is there.
- The procedure is derived from this StackOverflow post and this GDB Wiki page.
- If you are unable to save it to the System keychain, then save it to the login keychain. You can later export the cert, and then import it into the System keychain. I didn't have to do this, so comment if you have any problem.
mac上eclipse用gdb调试(转)的更多相关文章
- Eclipse+CDT+GDB调试android NDK程序(转)
Eclipse+CDT+gdb调试android ndk程序 先介绍一下开发环境,在这个环境下,up主保证是没有问题的. ubuntu 11.10 eclipse 3.7(indego) for ja ...
- mac上eclipse上配置hadoop
在mac上安装了eclipse之后,配置hadoop其实跟在linux上配置差不多,只是mac上得eclipse和界面和linux上得有点不同. 一:安装eclipse eclipse得安装比较简单, ...
- 在mac上如何用safari调试ios手机的移动端页面
第一步:打开iphone手机的开发者模式,流程是:[设置]->[Safari]->[高级]->开启[Web检查器] ,如图1.图2 图1 图2第二步:打开Mac上Safari的开发者 ...
- 对“线上问题 不能gdb调试怎么处理??“”的思考
Q1:线上问题的process 都为release版本!不带调试信息怎么查?(目前有时需要查线上问题, 不得不解决这个问题) 之前查问题都是编译环境编译一个带有debug信息的版本进行替换来调试,但是 ...
- 使用 VSCode 在 Mac 上配置 C/C++ 调试环境
Background VSCode是微软开发的一款开源代码编辑器,具有可拓展性强,多语言支持,跨平台等优点,在不同的个性化配置下几乎可以用作所有的轻量级开发.我在初学C的时候也使用的是类似于Xcode ...
- mac上eclipse上运行word count
1.打开eclipse之后,建立wordcount项目 package wordcount; import java.io.IOException; import java.util.StringTo ...
- Mac下Eclipse/adb无法调试MX5手机
前提是环境已经配置好,其他手机可以连接但MX系列不可以 解决方法:打开终端 echo 0x2a45 >> ~/.android/adb_usb.ini adb kill-server ad ...
- Mac配置Eclipse CDT的Debug出现的问题(转)
问题1:出现 Could not determine GDB version using command: gdb --version 原因: mac上没有安装gdb或者gdb位置配置有问题 解决 ...
- mac OSX上eclipse adb无法识别(调试)小米的解决方案
最近在Mac上开发安卓,用小米2a作为开发机,连上电脑后发现idea和eclipse真机调试的时候都提示USB device not found.经过一番google和百度,终于找到了解决方案,在这里 ...
随机推荐
- oracle查询某个时间点的数据
1. select * from emps as of timestamp to_Date('2015-12-11 14:00:00','yyyy-mm-dd hh24:mi:ss'),SQL语句是查 ...
- [转载]Ubuntu17.04(Zesty Zapus)路线图发布:2017年4月13日发布
Canonical今天公布了Ubuntu 17.04(Zesty Zapus)操作系统的发布路线图,该版本于今年10月24日上线启动,toolchain已经上传且首个daily ISO镜像已经生成.面 ...
- linux指定nologin用户执行命令
为了安全,使用nologin账号来运行程序, su -s /bin/bash -c "ls" www 这条命令到底做了什么呢?su -s 是指定shell,这里www用户是nolo ...
- hadoop_elk架构图
- git用.gitignore忽略指定文件
.gitignore 配置文件用于配置不需要加入版本管理的文件,配置好该文件可以为我们的版本管理带来很大的便利,以下是个人对于配置 .gitignore 的一些心得. 1.配置语法: 以斜杠“/”开头 ...
- 关于ssh_copy_id脚本解析
[oldgirl@module ~]$ more /usr/bin/ssh-copy-id #!/bin/sh # Shell script to install your public key on ...
- VMware 12 CentOS Minimal 安装VMwareTools 找不到头文件kernelheaders
输入命令: yum install kernel-headers 安装vmware-tools时提示需要kernel headers 输入命令: yum install kernel-devel
- 2.2 C#的注释
注释,是代码中的一些“说明文档”,注释注释本身不会参与程序代码的编译和运行,仅仅是为了方便程序员阅读. C#的注释分为:单行注释.多行注释.文档注释. 单行注释的符号是2条斜杠线(斜线的方向是左下到右 ...
- 算法第四版 用eclipse实现书中UnionFind例子
一 安装环境 直接下载algs4.exe 下载完成后C:\Users\zle 下面会有algs4 文件夹 原文: Our installer downloads, installs, and conf ...
- 关于在linux中使用图形界面的网络管理工具
有好几种自动设置的工具可以选择(既然说是自动设置的工具,那就说明有手动设置的工具,例如 使用 ip, iw, iwconfig 这些命令设置网络),例如:Connman, netctl, Networ ...