Vue父子组件间的通信

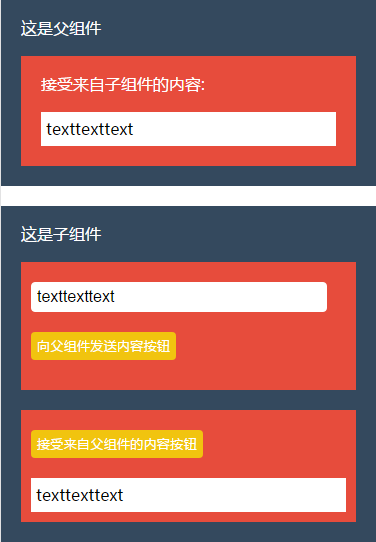
父组件通过 props 向下传递数据给子组件,子组件通过 events 向上给父组件发送消息。
父组件:

<div>

    <div style="background:#34495E;color: #fff; padding:20px">

      <p style="margin-bottom: 20px">这是父组件</p>

      <div style="background:#E74C3C;color: #fff; padding:20px; margin-top:20px">

        <p>接受来自子组件的内容: </p>

        <p style="margin-top:20px;background:#fff; color:#000; padding:5px; line-height:1.5;">{{hello}}</p>

      </div>

    </div>

    <div style="background:#34495E;color: #fff; padding:20px; margin-top:20px">

      <p style="margin-bottom: 20px">这是子组件</p>

      <musicsearch @trans="transContent" :pupu="hello" :info="info"></musicsearch>

    </div>

  </div>

export default {

  components: {

    musicsearch

  },

  data() {

    return {

      hello: '',

      info: ''

    }

  },

  methods: {

    transContent(msgs) {

      this.hello = msgs;

      this.info = msgs;

    }

  }

}
子组件:

<div>

    <div style="margin-top:20px; background:#E74C3C; padding:10px;">

      <input type="text" ref="ipt" style="border:none; margin-top:10px; margin-bottom: 20px; border-radius:4px; width:90%; height:18px; padding:5px; line-height:18px; border:1px solid #fff">

      <button @click="sendVal()" style="margin-bottom: 20px; border:none; outline:none; border-radius:4px; height:28px; line-height:28px; background:#F1C40F; color:#fff;">向父组件发送内容按钮</button>

    </div>

    <div style="margin-top:20px; background:#E74C3C; padding:10px;">

      <button @click="click()" style=" margin-top:10px; border:none; outline:none; border-radius:4px; height:28px; line-height:28px; background:#F1C40F; color:#fff;">接受来自父组件的内容按钮</button>

      <div style="margin-top:20px;background:#fff; color:#000; padding:5px; line-height:1.5;">{{msg}}</div>

    </div>

  </div>

export default {

  name: 'girl-group',

  props: {

    info: ''

  },

  data() {

    return {

      msg: ''

    }

  },

  methods: {

    sendVal() {

      this.$emit('trans', this.$refs.ipt.value);

    //这里在父组件使用v-on来监听子组件上的自定义事件($emit的变化),一旦发生变化click方法里的值就会跟着改变,调用click事件可看到信息

    },

    click() {

      this.msg = this.info;

    }

  }

}
Vue父子组件间的通信的更多相关文章
- Vue 父子组件间的通信
前言 在 Vue 项目中父子组件的通信是非常常见的,最近做项目的时候发现对这方面的知识还不怎么熟练,在这边做一下笔记,系统学习一下吧. 1 父组件传值给子组件 1.1 传值写法 父组件传值给子组件,这 ...
- 第四节:Vue表单标签和组件的基本用法,父子组件间的通信
vue表单标签和组件的基本用法,父子组件间的通信,直接看例子吧. <!DOCTYPE html> <html> <head> <meta charset=&q ...
- vue组件定义方式,vue父子组件间的传值
vue组件定义方式,vue父子组件间的传值 <!DOCTYPE html> <html lang="zh-cn"> <head> <met ...
- 【转】vue父子组件之间的通信
vue父子组件之间的通信 在vue组件通信中其中最常见通信方式就是父子组件之中的通性,而父子组件的设定方式在不同情况下又各有不同.最常见的就是父组件为控制组件子组件为视图组件.父组件传递数据给子组件使 ...
- React中父子组件间的通信问题
1.https://blog.csdn.net/sinat_17775997/article/details/59103173 (React中父子组件间的通信问题)
- vue:父子组件间通信,父组件调用子组件方法进行校验子组件的表单
参考: ElementUI多个子组件表单的校验管理:https://www.jianshu.com/p/541d8b18cf95 Vue 子组件调用父组件方法总结:https://juejin.im/ ...
- vue父子组件之间的通信
利用props在子组件接受父组件传过来的值1.父组件parentComp.vue <template> <childComp :fromParentToChild="fro ...
- vue -- 父子组件间的事件触发
1.父组件触发子组件事件 Parent.vue <child ref="child"></child> <div @click="fn&qu ...
- vue——父子组件间传值
(1)父组件给子组件传值(商品详情页): 根据订单类型,判断显示立即购买/立即拼单: 通过props来传递参数 父组件(商品详情页) 父组件调用子组件,在子组件的标签中,通过:数据名称=”数据”的形式 ...
随机推荐
- nodeJS一些事儿
node-webkit:开发桌面+WEB混合型应用的神器[大漠穷秋] 展望未来 其实这条路老早就有人在走 网上有很多人在争论,未来究竟是原生的应用会胜出,还是WEB APP会胜出,实际上这两者并不是你 ...
- Unity -- 入门教程三
进入这个页面,按编译器版本进行下载,我用的是2010,所以要下载这个. 安装就不用我教了,下面开始看我是如何导入Unity VS的. 点击Import之后我们会发现并没有发生什么,但是接下来我们按一下 ...
- linux下添加自动启动项,linux 开机自动启动脚本方法
#service servicename status是当前状态#chkconfig --list servicename是查看启动状态,也就是是否开机自动启动 首先写好脚本,如 mysql,把它放到 ...
- Java Unsafe类
参考了这篇文章:http://blog.csdn.net/aesop_wubo/article/details/7537278 <JAVA并发编程学习笔记之Unsafe类> Unsafe开 ...
- 高仿QQ6.0側滑菜单之滑动优化(二)
好了,昨天已经实现了高仿QQ6.0的側滑大致框架.如有兴趣.能够去看下仿QQ6.0側滑之ViewDragHelper的使用(一) 可是之前的实现.仅仅是简单的能够显示和隐藏左側的菜单,可是特别生硬,并 ...
- 使用纯CSS3实现一个日食动画
日食现象是月亮挡在了地球和太阳之间,也就是月亮遮挡住了太阳. 所以要构造日食,我们须要2个对象:一个代表月亮,一个代表太阳. <div class="eclipse sun" ...
- HDU 5304(Eastest Magical Day Seep Group's Summer-环加外向树生成树计数)[Template:Kirchhoff矩阵]
Eastest Magical Day Seep Group's Summer Time Limit: 10000/5000 MS (Java/Others) Memory Limit: 655 ...
- UVa11234 表达式
题意:题目意思是给出后缀表达式.能够通过栈来计算表达式的值,即转化为中缀表达式. 然后如果如今不用栈.而是用队列来操作.即每遇到一操作符时.进行两次pop和一次push.(这里注意,先pop出来的作为 ...
- jni集成第3方third party动态库libwebrtc_audio_preprocessing.so时android.mk的编写
现在要调用一个第3方库libwebrtc_audio_preprocessing.so 最终布局如下: 即创建2个文件夹,将第3方库放进去. include目录放第3方库的头文件 其中lib目录如下 ...
- Greenplum使用简明手册
GP服务启停 su - gpadmin gpstart #正常启动 gpstop #正常关闭 gpstop -M fast #快速关闭 gpstop –r #重启 gpstop –u #重新加载配置文 ...
