Spring MVC — @RequestMapping原理讲解-1
转载地址 :http://blog.csdn.net/j080624/article/details/56278461
为了降低文章篇幅,使得文章更目标化,简洁化,我们就不例举各种@RequestMapping的用法等内容了.
文章主要说明以下问题:
Spring怎样处理@RequestMapping(怎样将请求路径映射到控制器类或方法)
Spring怎样将请求分派给正确的控制器类或方法
Spring如何实现灵活的控制器方法的
在Spring MVC 3.1 之前的版本中,Spring默认使用 DefaultAnnotationHandlerMapping,AnnotationMethodHandlerAdapter来处理 @RequestMapping注解和请求方法调用,而从3.1开始提供了一组新的API完成这些工作。相比之下,新的API更加的合理完善,开放,易拓 展,面向对象。这篇文章便是基于3.1的新API进行剖析的。
一、概念解析
在开始之前我们先了解下新的API中引入的新接口或者类,这会有助于后面的处理过程的理解。不得不说新的API提供了更多漂亮的抽象,你能感受到面向对象的魅力。
RequestMappingInfo 这个类是对请求映射的一个抽象,它包含了请求路径,请求方法,请求头等信息。其实可以看做是@RequestMapping的一个对应类。
HandlerMethod这个类封装了处理器实例(Controller Bean)和 处理方法实例(Method)以及方法参数数组(MethodParameter[])
MethodParameter这个类从2.0就有了,它封装了方法某个参数的相关信息及行为,如该参数的索引,该参数所属方法实例或构造器实例,该参数的类型等。
HandlerMapping 该接口的实现类用来定义请求和处理器之前的映射关系,其中只定义了一个方法getHandler。
AbstractHandlerMethodMapping 这是HandlerMapping的一个基本实现类,该类定义了请求与HandlerMethod实例的映射关系。
RequestMappingInfoHandlerMapping这个是AbstractHandlerMethodMapping的实现类,他维护了一个RequestMappingInfo和HandlerMethod的Map属性。
RequestMappingHandlerMapping 这个是RequestMappingInfoHandlerMapping的子类,它将@RequestMapping注解转化为RequestMappingInfo实例,并为父类使用。也就是我们处理@RequestMapping的终点。
InitializingBean 这个接口定义了其实现Bean在容器完成属性设置后可以执行自定义初始化操作,我们的AbstractHandlerMethodMapping便实现了这个接口,并且定义了一组自定义操作,就是用来检测处理我们的@RequestMapping注解。
概念讲的太多总不是什么好事。但明白了上述概念基本上就成功一半了,其中的实现相对@Autowired那篇简单多了。
二、InitialiZingBean.afterPropertySet()
我们从头开始,看看到底Spring是怎样检测并处理我们@RequestMapping注解的。不知大家还记不记的这段代码:
- Object exposedObject = bean;
- try {
- populateBean(beanName, mbd, instanceWrapper);
- if (exposedObject != null) {
- exposedObject = initializeBean(beanName, exposedObject, mbd);
- }
- }
这是BeanFactory创建Bean过程中需要执行的一段代码,其中populateBean方法便是@Autowired注解的处理过程,执行的属性的自动注入等操作。因为initializeBean方法当时与主题无关没有讲,不过这时它便是我们关注的焦点了。
上面概念中我们讲到InitiaizingBean接口,它的实现Bean会在容器完成属性注入后执行一个自定义操作,这不就满足initializeBean方法的执行唤醒嘛,我们来看它的实现:
- protected Object initializeBean(final String beanName, final Object bean, RootBeanDefinition mbd) {
- if (System.getSecurityManager() != null) {
- AccessController.doPrivileged(new PrivilegedAction<Object>() {
- public Object run() {
- invokeAwareMethods(beanName, bean);
- return null;
- }
- }, getAccessControlContext());
- }
- else {//这里检测当前Bean是否实现一些列Aware接口,并调用相关方法,我们不关心。
- invokeAwareMethods(beanName, bean);
- }
- Object wrappedBean = bean;
- if (mbd == null || !mbd.isSynthetic()) {//BeanPostProcessor 的回调,不关心
- wrappedBean = applyBeanPostProcessorsBeforeInitialization(wrappedBean, beanName);
- }
- try {
- invokeInitMethods(beanName, wrappedBean, mbd);//这是我们需要关心的,下面看下它的实现
- }
- if (mbd == null || !mbd.isSynthetic()) {//BeanPostProcessor 的回调,不关心
- wrappedBean = applyBeanPostProcessorsAfterInitialization(wrappedBean, beanName);
- }
- return wrappedBean;
- }
我们接着来看下invokeInitMethods方法的实现:
- protected void invokeInitMethods(String beanName, final Object bean, RootBeanDefinition mbd)
- throws Throwable {
- //是否是InitializingBean的实例
- boolean isInitializingBean = (bean instanceof InitializingBean);
- if (isInitializingBean &&
- (mbd == null || !mbd.isExternallyManagedInitMethod("afterPropertiesSet"))) {
- if (System.getSecurityManager() != null) {
- try {
- AccessController.doPrivileged(new PrivilegedExceptionAction<Object>() {
- public Object run() throws Exception {//利用系统安全管理器调用
- ((InitializingBean) bean).afterPropertiesSet();
- return null;
- }
- }, getAccessControlContext());
- }
- }
- else {//调用InitializingBean的afterPropertiesSet方法。
- ((InitializingBean) bean).afterPropertiesSet();
- }
- }
- //调用自定义初始化方法。。。省略,不关心
- }
上一篇关于<mvc:annotation-driven/>的文章,我们说过了,当在配置文件中加上该标记后,Spring(3.1后)会默认为我们注册RequestMappingHandlerMapping等Bean定义。而RequestMappingHandlerMapping实现了InitializingBean接口,因此,在初始化并装配该Bean实例时,执行到上述代码是,便会执行他的afterPropertySet方法。我们接下来看看他的afterPropertySet方法:
- public void afterPropertiesSet() {
- initHandlerMethods();
- }
- //Scan beans in the ApplicationContext, detect and register handler methods.
- protected void initHandlerMethods() {
- //扫描所有注册的Bean
- String[] beanNames = (this.detectHandlerMethodsInAncestorContexts ?
- BeanFactoryUtils.beanNamesForTypeIncludingAncestors(getApplicationContext(),
- Object.class) : getApplicationContext().getBeanNamesForType(Object.class));
- //遍历这些Bean,依次判断是否是处理器,并检测其HandlerMethod
- for (String beanName : beanNames) {
- if (isHandler(getApplicationContext().getType(beanName))){
- detectHandlerMethods(beanName);
- }
- }
- //这个方法是个空实现,不管他
- handlerMethodsInitialized(getHandlerMethods());
- }
它直接调用了initHandlerMethods()方法,并且该方法被描述为:扫描ApplicationContext中的beans,检测并注册处理器方法。we are close。
三、检测@RequestMapping
我们再看它是怎样判断是否是处理器的,以及怎么detect Handler Methods 的:
- @Override
- protected boolean isHandler(Class<?> beanType) {
- return ((AnnotationUtils.findAnnotation(beanType, Controller.class) != null) ||
- (AnnotationUtils.findAnnotation(beanType, RequestMapping.class) != null));
- }
啊哈,很简单,就是看看有没有被@Controller或者@RequestMapping注解标记
- protected void detectHandlerMethods(final Object handler) {
- Class<?> handlerType = (handler instanceof String) ?
- getApplicationContext().getType((String) handler) : handler.getClass();
- final Class<?> userType = ClassUtils.getUserClass(handlerType);
- Set<Method> methods = HandlerMethodSelector.selectMethods(userType, new MethodFilter(){
- public boolean matches(Method method) {//只选择被@RequestMapping标记的方法
- return getMappingForMethod(method, userType) != null;
- }
- });
- for (Method method : methods) {
- //根据方法上的@RequestMapping来创建RequestMappingInfo实例。
- T mapping = getMappingForMethod(method, userType);
- //注册请求映射
- registerHandlerMethod(handler, method, mapping);
- }
- }
整个的检测过程大致清楚了:1)遍历Handler中的所有方法,找出其中被@RequestMapping注解标记的方法。2)然后遍历这些方法,生成RequestMappingInfo实例。3)将RequestMappingInfo实例以及处理器方法注册到缓存中。
下面我们看看细节:
- @Override
- protected RequestMappingInfo getMappingForMethod(Method method, Class<?> handlerType) {
- RequestMappingInfo info = null;
- //获取方法method上的@RequestMapping实例。
- RequestMapping methodAnnotation =
- AnnotationUtils.findAnnotation(method, RequestMapping.class);
- if (methodAnnotation != null) {//方法被注解了
- RequestCondition<?> methodCondition = getCustomMethodCondition(method);//始终返回null
- info = createRequestMappingInfo(methodAnnotation, methodCondition);//创建MappingInfo
- //检查方法所属的类有没有@RequestMapping注解
- RequestMapping typeAnnotation = AnnotationUtils.findAnnotation(handlerType,
- RequestMapping.class);
- if (typeAnnotation != null) {//有类层次的@RequestMapping注解
- RequestCondition<?> typeCondition = getCustomTypeCondition(handlerType);//null
- //将类层次的RequestMapping和方法级别的RequestMapping结合
- info = createRequestMappingInfo(typeAnnotation, typeCondition).combine(info);
- }
- }
- return info;
- }
很清晰吧,先获取方法上的@RequestMapping信息,然后获取类级别上的@RequestMapping 信息,然后将两者结合,这里我们有必要再了解下怎样创建RequestMappingInfo对象的(包括他的内部结构),以及怎样将类级别的request mapping信息和方法级别的进行结合的?
- private RequestMappingInfo createRequestMappingInfo(RequestMapping annotation,
- RequestCondition<?> customCondition) {
- return new RequestMappingInfo(
- new PatternsRequestCondition(annotation.value(), getUrlPathHelper(), getPathMatcher(),
- this.useSuffixPatternMatch, this.useTrailingSlashMatch, this.fileExtensions),
- new RequestMethodsRequestCondition(annotation.method()),
- new ParamsRequestCondition(annotation.params()),
- new HeadersRequestCondition(annotation.headers()),
- new ConsumesRequestCondition(annotation.consumes(), annotation.headers()),
- new ProducesRequestCondition(annotation.produces(), annotation.headers(),
- getContentNegotiationManager()),
- customCondition
- );
- }
其中涉及到了几个类,我们大致了解下含义:
PatternRequestCondition 它其实就是URL模式的封装,它包含了一个URL模式的Set集合。其实就是@RequestMapping注解中的value值得封装。
RequestMethodRequestCondition 它是@RequestMapping 注解中method属性的封装
ParamsRequestCondition 它是@RequestMapping注解中params属性的封装
等等,依次类推。因此RequestMappingInfo其实就是对@RquestMapping 的封装。
下面我们再看看怎样进行Combine的:
- public RequestMappingInfo combine(RequestMappingInfo other) {
- PatternsRequestCondition patterns = this.patternsCondition.combine(other.patternsCondition);
- RequestMethodsRequestCondition methods = this.methodsCondition.combine(other.methodsCondition);
- ParamsRequestCondition params = this.paramsCondition.combine(other.paramsCondition);
- HeadersRequestCondition headers = this.headersCondition.combine(other.headersCondition);
- ConsumesRequestCondition consumes = this.consumesCondition.combine(other.consumesCondition);
- ProducesRequestCondition produces = this.producesCondition.combine(other.producesCondition);
- RequestConditionHolder custom = this.customConditionHolder.combine(other.customConditionHolder);
- return new RequestMappingInfo(patterns, methods, params, headers, consumes,
- produces, custom.getCondition());
- }<span style="white-space:pre;"> </span>
很清晰,对每一个元素都进行combine操作,我们这里只看PatternRequestCondition是怎么结合的,就是看看怎样合并url的。其他没太大必要。
- public PatternsRequestCondition combine(PatternsRequestCondition other) {
- Set<String> result = new LinkedHashSet<String>();
- if (!this.patterns.isEmpty() && !other.patterns.isEmpty()) {
- for (String pattern1 : this.patterns) {
- for (String pattern2 : other.patterns) {
- result.add(this.pathMatcher.combine(pattern1, pattern2));
- }
- }
- }
- else if (!this.patterns.isEmpty()) {
- result.addAll(this.patterns);
- }
- else if (!other.patterns.isEmpty()) {
- result.addAll(other.patterns);
- }
- else {
- result.add("");
- }
- return new PatternsRequestCondition(result, this.urlPathHelper, this.pathMatcher,
- this.useSuffixPatternMatch,this.useTrailingSlashMatch, this.fileExtensions);
- }
1)两个pattern都存在是,调用PathMatcher的combine方法合并两个pattern。
2)只有一个有时,使用这个。
3)两个都没有时,为空“”。
现在真正的url拼接是由PathMatcher来完成的了。我们就不看他的代码了就是一串if else的组合,重点是考虑进各种情况,我们来看下方法的注释吧:
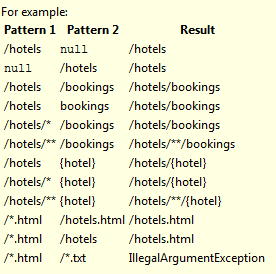
清晰,全面吧,有兴趣的可以看一下代码,这里不讲了。
四、注册请求映射
上面我们已经讲了@RequestMapping的检测和处理,并且根据@RequestMapping生成了RequestMappingInfo实例,那Spring必定需要将这些信息保存起来,以处理我们的请求。
第三节中我们提到一个方法还没有分析,就是registerHandlerMethod 方法:
- protected void registerHandlerMethod(Object handler, Method method, T mapping) {
- HandlerMethod handlerMethod;
- if (handler instanceof String) {
- String beanName = (String) handler;
- handlerMethod = new HandlerMethod(beanName, getApplicationContext(), method);
- }
- else {
- handlerMethod = new HandlerMethod(handler, method);
- }
- //上面几行是根据新的处理器实例,方法实例,RequestMappingInfo来生成新的HandlerMethod实例
- //下面是从缓存中查看是否有存在的HandlerMethod实例,如果有并且不相等则抛出异常
- HandlerMethod oldHandlerMethod = handlerMethods.get(mapping);
- if (oldHandlerMethod != null && !oldHandlerMethod.equals(handlerMethod)) {
- throw new IllegalStateException();
- }
- //handlerMethods 是一个Map键是RequestMappingInfo对象,值是HandlerMethod实例
- //因此一个HandlerMethod实例可能处理多个mapping,而一个mapping实例只能由一个method处理
- this.handlerMethods.put(mapping, handlerMethod);
- //这里获取mapping实例中的所有url。
- Set<String> patterns = getMappingPathPatterns(mapping);
- for (String pattern : patterns) {
- if (!getPathMatcher().isPattern(pattern)) {
- //urlMap也是Map,键是url 模式,值是RequestMappingInfo实例
- //因此一个mapping实例可能对应多个pattern,但是一个pattern只能对应一个mapping实例
- this.urlMap.add(pattern, mapping);
- }
- }
- }
这里可能稍微有点绕,其实道理很简单,当请求到达时,去urlMap中需找匹配的url,以及获取对应mapping实例,然后去handlerMethods中获取匹配HandlerMethod实例。
五、承上启下
篇幅有些长了,超出字数限制了,只能分成两篇了..........................
这章只分析了我们前面三个问题中的第一个,但是已经相当接近了。下一篇我们来讲,Spring怎样处理客户发来的请求,以及方法调用的。
Spring MVC — @RequestMapping原理讲解-1的更多相关文章
- Spring MVC简单原理
Spring MVC原理 针对有Java Web基础.Spring基础和Spring MVC使用经验者. 前言 目前基于Java的web后端,Spring生态应该是比较常见了.虽然现在流行前后端分离, ...
- spring Mvc 执行原理 及 xml注解配置说明 (六)
Spring MVC 执行原理 在 Spring Mvc 访问过程里,每个请求都首先经过 许多的过滤器,经 DispatcherServlet 处理; 一个Spring MVC工程里,可以配置多个的 ...
- (4.1)Spring MVC执行原理和基于Java的配置过程
一.Spring MVC执行原理和基于Java配置的配置过程 (一)Spring MVC执行过程,大致为7步. 所有的请求都会经过Spring的一个单例的DispacherServlet. Dispa ...
- Spring MVC执行原理和基于Java的配置过程
一.Spring MVC执行原理和基于Java配置的配置过程 (一)Spring MVC执行过程,大致为7步. 所有的请求都会经过Spring的一个单例的DispacherServlet. Dispa ...
- Spring MVC工作原理(好用版)
Spring MVC工作原理 参考: SpringMVC工作原理 - 平凡希 - 博客园https://www.cnblogs.com/xiaoxi/p/6164383.html SpringMVC的 ...
- Spring MVC工作原理及源码解析(三) HandlerMapping和HandlerAdapter实现原理及源码解析
1.HandlerMapping实现原理及源码解析 在前面讲解Spring MVC工作流程的时候我们说过,前端控制器收到请求后会调⽤处理器映射器(HandlerMapping),处理器映射器根据请求U ...
- Spring MVC工作原理 及注解说明
SpringMVC框架介绍 1) spring MVC属于SpringFrameWork的后续产品,已经融合在Spring Web Flow里面. Spring 框架提供了构建 Web 应用程序的全功 ...
- Spring入门(十三):Spring MVC常用注解讲解
在使用Spring MVC开发Web应用程序时,控制器Controller的开发非常重要,虽然说视图(JSP或者是Thymeleaf)也很重要,因为它才是直接呈现给用户的,不过由于现在前端越来越重要, ...
- Spring MVC 入门示例讲解
在本例中,我们将使用Spring MVC框架构建一个入门级web应用程序.Spring MVC 是Spring框架最重要的的模块之一.它以强大的Spring IoC容器为基础,并充分利用容器的特性来简 ...
随机推荐
- swf 上传
推荐这个博客:http://blog.csdn.net/hi_kevin/article/details/23430345 这个文章很不错,我推荐这个文章:http://leeon.me/upload ...
- Redis与memchache对比
Redis是NOSQL系统之一,它是一个key-value存储系统.和Memcache类似,但很大程度补偿了Memcache的不足,它支持存储的value类型相对更多,包括string.list.se ...
- vue购物车功能源码
<!DOCTYPE html><html lang="en"> <head> <meta charset="UTF-8" ...
- C++ 四种新式类型转换
static_cast ,dynamic_cast,const_cast,reinterpret_cast static_cast 定义:通俗的说就是静态显式转换,用于基本的数据类型转换,及指针之间的 ...
- 一步步构建iOS路由
什么是移动端路由层: 路由层的概念在服务端是指url请求的分层解析,将一个请求分发到对应的应用处理程序.移动端的路由层指的是将诸如App内页面访问.H5与App访问的访问请求和App间的访问请求,进行 ...
- Qt_自定义菜单
一.右键菜单 右键菜单实现:通过重写contextMenuEvent(QContextMenuEvent *event)事件,QMenu+QAction即可完美实现! 重写voidcontextMen ...
- samba共享文件夹设置
sudo apt-get install samba(4) mkdir /home/用户名/share (新建share文件夹) sudo cp /etc/samba/smb.conf /etc/sa ...
- 基于Quartz.NET 实现可中断的任务(转)
Quartz.NET 是一个开源的作业调度框架,非常适合在平时的工作中,定时轮询数据库同步,定时邮件通知,定时处理数据等. Quartz.NET 允许开发人员根据时间间隔(或天)来调度作业.它实现了作 ...
- pycharm(Tip of Day)
You can easily override the methos of the base class by press Ctrl + 0 ( code | override methods) Yo ...
- MAVEN ECLIPSE JAR工程
在eclipse 空白处点击鼠标右键选择新建 project 选择maven project: 选择Create a simple project Group ID: Artifact ID:创建项目 ...