快速搭建MQTT服务器(MQTTnet和Apache Apollo)
前言
MQTT协议是IBM开发的一个即时通讯协议,有可能成为物联网的重要组成部分,http://mqtt.org/。
MQTT is a machine-to-machine (M2M)/"Internet of Things" connectivity protocol. It was designed as an extremely lightweight publish/subscribe messaging transport. It is useful for connections with remote locations where a small code footprint is required and/or network bandwidth is at a premium. For example, it has been used in sensors communicating to a broker via satellite link, over occasional dial-up connections with healthcare providers, and in a range of home automation and small device scenarios. It is also ideal for mobile applications because of its small size, low power usage, minimised data packets, and efficient distribution of information to one or many receivers
通过https://github.com/mqtt/mqtt.github.io/wiki/servers 找到官方推荐的服务端软件,比如:Apache Apollo,
通过https://github.com/mqtt/mqtt.github.io/wiki/libraries可以找到推荐的客户端类库,比如:Eclipse Paho Java
MQTTnet
MQTTnet 是MQTT协议的.NET 开源类库。
MQTTnet is a .NET library for MQTT based communication. It provides a MQTT client and a MQTT server. The implementation is based on the documentation from http://mqtt.org/.
通过Nuget搜索MQTT找到了MQTTnet,它不是下载量最多的,也不在官方推荐列表中,主要是因为同时支持客户端和服务端,所以开始下载试用,结果证明有坑,源码在vs2015中不能打开,客户端示例接收不到消息。
开源地址:https://github.com/chkr1011/MQTTnet
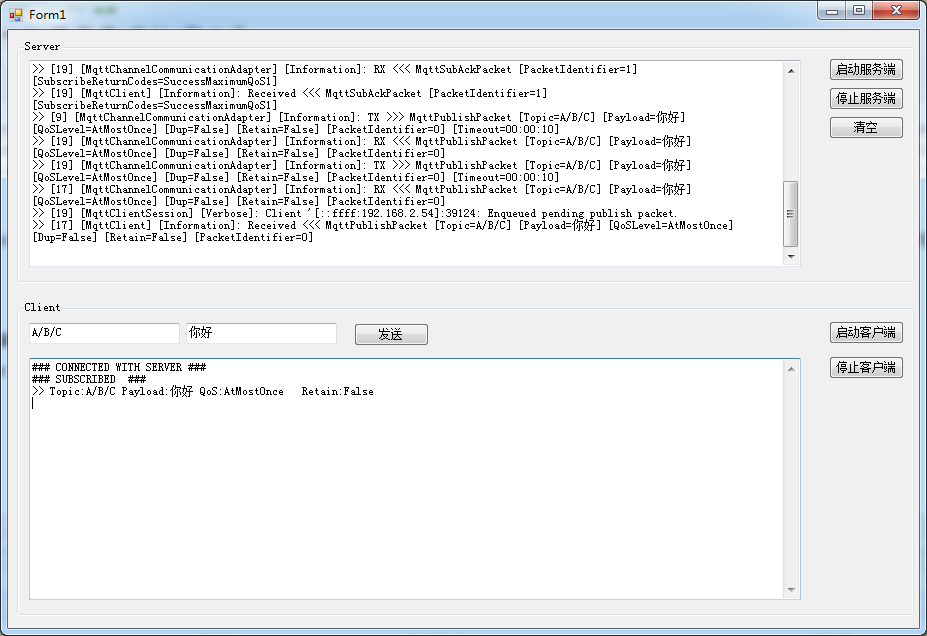
首先把官方的控制台程序改成winform的,界面如下:

 public partial class Form1 : Form

    {

        private MqttServer mqttServer = null;

        private MqttClient mqttClient = null;

        public Form1()

        {

            InitializeComponent();

        }

        private void button_启动服务端_Click(object sender, EventArgs e)

        {

            MqttTrace.TraceMessagePublished += MqttTrace_TraceMessagePublished;

            if (this.mqttServer == null)

            {

                try

                {

                    var options = new MqttServerOptions

                    {

                        ConnectionValidator = p =>

                        {

                            if (p.ClientId == "SpecialClient")

                            {

                                if (p.Username != "USER" || p.Password != "PASS")

                                {

                                    return MqttConnectReturnCode.ConnectionRefusedBadUsernameOrPassword;

                                }

                            }

                            return MqttConnectReturnCode.ConnectionAccepted;

                        }

                    };

                    mqttServer = new MqttServerFactory().CreateMqttServer(options);

                }

                catch (Exception ex)

                {

                    MessageBox.Show(ex.Message);

                    return;

                }

            }

            mqttServer.Start();

            this.txt_服务器.AppendText( $">> 启动成功..." + Environment.NewLine);

        }

        private void MqttTrace_TraceMessagePublished(object sender, MqttTraceMessagePublishedEventArgs e)

        {

            this.Invoke(new Action(() =>

            {

                this.txt_服务器.AppendText($">> [{e.ThreadId}] [{e.Source}] [{e.Level}]: {e.Message}" + Environment.NewLine);

                if (e.Exception != null)

                {

                    this.txt_服务器.AppendText( e.Exception + Environment.NewLine);

                }

            }));

        }

        private void button_停止服务端_Click(object sender, EventArgs e)

        {

            if (mqttServer != null)

            {

                mqttServer.Stop();

            }

            this.txt_服务器.AppendText( $">> 停止成功" + Environment.NewLine);

        }

        private async void button_启动客户端_Click(object sender, EventArgs e)

        {

            if (this.mqttClient == null)

            {

                var options = new MqttClientOptions

                {

                    Server = "192.168.2.54",

                    ClientId = "zbl",

                    CleanSession = true

                };

                this.mqttClient = new MqttClientFactory().CreateMqttClient(options);

                this.mqttClient.ApplicationMessageReceived += MqttClient_ApplicationMessageReceived;

                this.mqttClient.Connected += MqttClient_Connected;

                this.mqttClient.Disconnected += MqttClient_Disconnected;

            }

            try

            {

                await this.mqttClient.ConnectAsync();

            }

            catch(Exception ex)

            {

                this.txt_客户端.AppendText( $"### CONNECTING FAILED ###" + Environment.NewLine);

            }

        }

        private void MqttClient_Connected(object sender, EventArgs e)

        {

            this.Invoke(new Action( async () =>

            {

                this.txt_客户端.AppendText( $"### CONNECTED WITH SERVER ###" + Environment.NewLine);

                await this.mqttClient.SubscribeAsync(new List<TopicFilter>{

                        new TopicFilter("#", MqttQualityOfServiceLevel.AtMostOnce)

                    });

                this.txt_客户端.AppendText($"### SUBSCRIBED  ###" + Environment.NewLine);

            }));

        }

        private void MqttClient_Disconnected(object sender, EventArgs e)

        {

            this.Invoke(new Action(() =>

            {

                this.txt_客户端.AppendText( $"### DISCONNECTED FROM SERVER ###" + Environment.NewLine);

            }));

        }

        private void MqttClient_ApplicationMessageReceived(object sender, MQTTnet.Core.MqttApplicationMessageReceivedEventArgs e)

        {

            this.Invoke(new Action(() =>

            {

                this.txt_客户端.AppendText( $">> Topic:{e.ApplicationMessage.Topic} Payload:{Encoding.UTF8.GetString(e.ApplicationMessage.Payload)} QoS:{e.ApplicationMessage.QualityOfServiceLevel}   Retain:{e.ApplicationMessage.Retain}" + Environment.NewLine);

            }));

        }

        private async void button_停止客户端_Click(object sender, EventArgs e)

        {

            if (this.mqttClient != null)

            {

                await this.mqttClient.DisconnectAsync();

            }

            this.txt_客户端.AppendText( $">> 停止成功" + Environment.NewLine);

        }

        private async void button_发送_Click(object sender, EventArgs e)

        {

            //var options = new MqttClientOptions

            //{

            //    Server = "localhost"

            //};

            //var client = new MqttClientFactory().CreateMqttClient(options);

            //await client.ConnectAsync();

            var applicationMessage = new MqttApplicationMessage(this.txt_topic.Text,

                Encoding.UTF8.GetBytes(this.txt_message.Text), MqttQualityOfServiceLevel.AtMostOnce, false);

            await this.mqttClient.PublishAsync(applicationMessage);

        }

        private void button_清空服务端_Click(object sender, EventArgs e)

        {

            this.txt_服务器.Text = "";

        }

    }
需要注意的是按照作者说明是
|
1
2
3
4
5
6
7
8
9
10
11
12
13
|
while (true){ Console.ReadLine(); var applicationMessage = new MqttApplicationMessage( "A/B/C", Encoding.UTF8.GetBytes("Hello World"), MqttQualityOfServiceLevel.AtLeastOnce, false ); await client.PublishAsync(applicationMessage);} |
客户端死活都收不到消息,改成 MqttQualityOfServiceLevel.AtMostOnce 就可以了,找问题时尝试下载源码调试因为vs2015打不开项目也折腾了一会。这个问题提交了issues,期待作者回复。
Apache Apollo
1.下载Apollo服务器,我这里用的是Binaries for Windows。下载后解压到一个文件夹,注意路径不要包含中文,安装手册
2.创建Broker Instance,命令行cd到bin目录,执行/bin/apollo create mybroker,执行后就会在bin目录下创建mybroker文件夹。
3.运行Broker Instance,命令行cd到mybroker/bin目录,执行mybroker/bin/apollo-broker.cmd run
4.Web Administrator,地址 http://127.0.0.1:61680/ or https://127.0.0.1:61681/,默认账号 admin,密码 password

参考
搭建了MQTT服务端之后需要在Esp8266模块和手机App中分别实现客户端功能,稍后待续。。。。
快速搭建MQTT服务器(MQTTnet和Apache Apollo)的更多相关文章
- 快速搭建Web服务器软件PHP+Apache+MySQL
搭建网站或者博客,需要一个合适的 Web 服务器.除了如下能在购买的虚拟空间上进行操作外,我们也可以在自己的电脑上搞定,因为可以用来方便快捷地测试网站或者博客主题,无论是 Wordpress.Joom ...
- 转 【MQTT】在Windows下搭建MQTT服务器
MQTT简介 MQ 遥测传输 (MQTT) 是轻量级基于代理的发布/订阅的消息传输协议,设计思想是开放.简单.轻量.易于实现.这些特点使它适用于受限环境.该协议的特点有: 使用发布/订阅消息模式,提供 ...
- MQTT实战1 - 使用Apache Apollo代理服务器实现mqtt通信
MQTT实战1 - 使用Apache Apollo代理服务器实现mqtt通信 MQTT实战2 - 使用MQTTnet实现mqtt通信 源码下载 -> 提取码 QQ:505645074 MQTT ...
- MQTT再学习 -- 搭建MQTT服务器及测试
最近在搞 PM2.5 采集,需要用到 MQTT 传输协议.协议部分看了几天的,讲的七七八八.本身在 intel 上有 写好的MQTT 的源码,现在的工作其实也就是移植到单片机上或者DM368板卡上.不 ...
- [Windows Azure] 使用 Windows Azure 快速搭建 Redis 服务器
[Windows Azure] 使用 Windows Azure 快速搭建 Redis 服务器 Redis相信玩开源,大数据的朋友们并不陌生,大家最熟悉的使用者就是新浪微博,微博的整体数据缓存都是 ...
- 使用EMQ搭建MQTT服务器
前言寒假的时候开始搭建mqtt服务器,一开始使用的是RabbitMQ,基于Erlang语言.但是RabbitMQ的本职工作是AMQP,MQTT只是他的一个插件功能,似乎有些大材小用,很多MQTT的功能 ...
- CentOS 6.5下快速搭建ftp服务器[转]
CentOS 6.5下快速搭建ftp服务器 1.用root 进入系统 2.使用命令 rpm -qa|grep vsftpd 查看系统是否安装了ftp,若安装了vsftp,使用这个命令会在屏幕上显示vs ...
- Ubuntu 搭建Web服务器(MySQL+PHP+Apache)详细教程
Ubuntu 搭建Web服务器(MySQL+PHP+Apache)详细教程 看了好多人的博客,有的不全 or 有问题,整理了一下,适合小白 新手先整理几个小问题 1.为啥使用 Linux 搭建服务器? ...
- 搭建MQTT服务器
MQTT协议简介 MQTT 是一个基于发布/订阅模式的消息传输协议.它具有轻量级.开放.简单,易于实现,通信带宽要求低等特点.这些特点使得它对机器与机器的通信(M2M)以及物联网应用(IoT)来说是很 ...
随机推荐
- HDU 2571 命运(简单dp)
传送门 真是刷越多题,越容易满足.算是一道很简单的DP了.终于可以自己写出来了. 二维矩阵每个点都有一个幸运值,要求从左上走到右下最多能积累多少幸运值. 重点就是左上右下必须都踩到. dp[i][j] ...
- codeforces645B
Mischievous Mess Makers CodeForces - 645B It is a balmy spring afternoon, and Farmer John's n cows a ...
- 存储引擎和表的操作(mysql中的数据类型、完整性约束)
一.存储引擎 .概念 MySQL中的数据用各种不同的技术存储在文件(或者内存)中.这些技术中的每一种技术都使用不同的存储机制.索引技巧.锁定水平并且最终提供广泛的不同的功能和能力. 通过选择不同的技术 ...
- Python实现聚类算法AP
1.算法简介 AP(Affinity Propagation)通常被翻译为近邻传播算法或者亲和力传播算法,是在2007年的Science杂志上提出的一种新的聚类算法.AP算法的基本思想是将全部数据点都 ...
- 第一节:从面向对象思想(oo)开发、接口、抽象类以及二者比较
一. 面向对象思想 1. 面向过程(OP)和面向对象(OO)的区别: (1):面向过程就是排着用最简单的代码一步一步写下去,没有封装,当业务复杂的时候,改动就很麻烦了 (2):面向对象将复杂的业务分离 ...
- Beamer 跳到另外一页
\documentclass[english]{beamer}\usepackage{babel} \begin{document} \begin{frame}\frametitle{the refe ...
- React Router v4 页面传值的三种方法
传值方法 1.props.params 使用React router定义路由时,我们可以给指定一个path,然后指定通配符可以携带参数到指定的path: <Route path='/user/: ...
- Codeforces Round #527 (Div. 3) . F Tree with Maximum Cost
题目链接 题意:给你一棵树,让你找一个顶点iii,使得这个点的∑dis(i,j)∗a[j]\sum dis(i,j)*a[j]∑dis(i,j)∗a[j]最大.dis(i,j)dis(i,j)dis( ...
- cvc-complex-type.2.4.a: Invalid content was found starting with element 'asy
- EasyUI datagrid 的多条件查询
<script type="text/javascript"> $(function () { $("#dg" ...