MySQL多实例(二)
一、多实例MySQL数据库原理
1.1:原理图
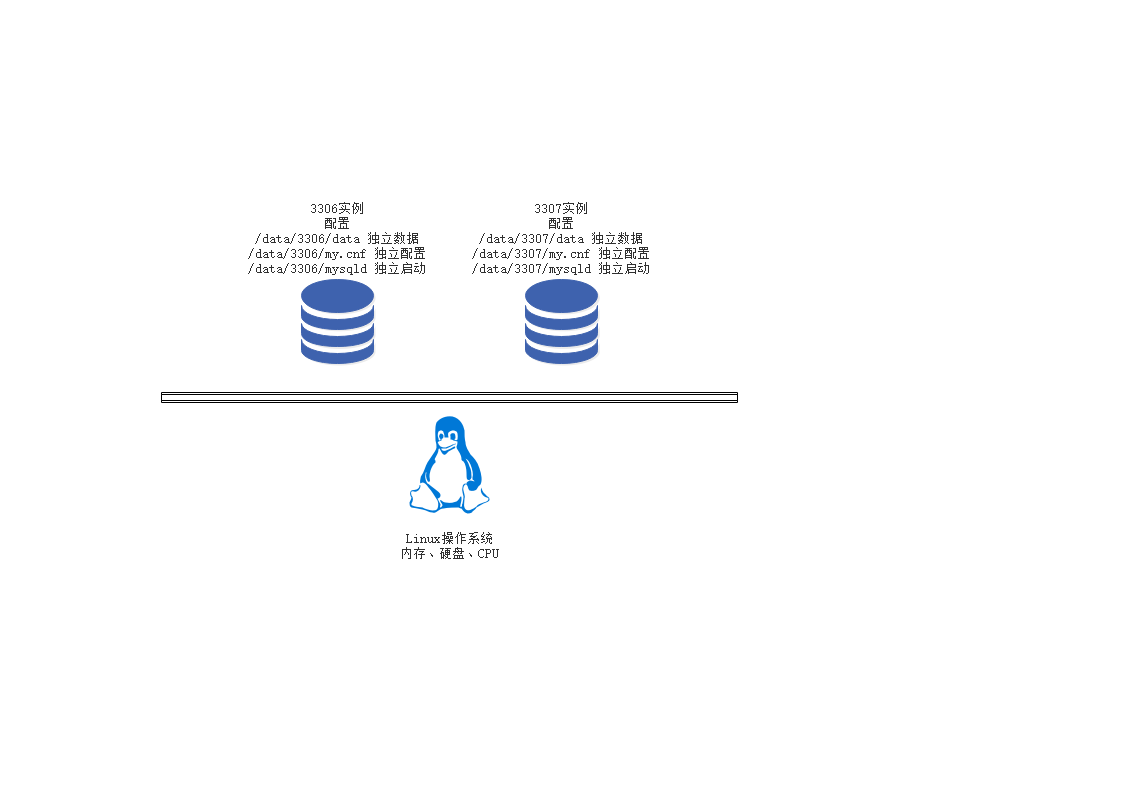
1.2:多实例原理(什么是多实例)
简单来说MySQL多实例就是在一台服务器上同时开启多个不用的服务端口(如:3306、3307),同时运行多个MySQL进程,这些服务进程通过不同的socket监听不同的服务端口来提供服务,这些MySQL多实例公用一套MySQL安装程序,使用不同的my.cnf配置文件、启动程序和数据文件。在提供服务时,多实例MySQL在逻辑上看来是各自独立的,它们根据配置文件的对应设定值,获取服务器的相应数量的硬件资源。
二、多实例MySQL数据库优缺点及应用场景
2.1:多实例的优点
① 有效的利用资源
② 节约服务器资源
2.2:多实例的缺点
① 会存在资源互相抢占的问题(当某个数据库并发很高或者sql慢查询的时候,整个实例会消耗大量的CPU、磁盘I/O 导致服务器的其他数据库实例提供服务的质量一起下降)
2.2:多实例的应用场景
① 资金紧张型公司(公司资金紧张,业务访问量不大,又希望数据库服务隔离,同时还需要主从复制提供备份或者读写分离)
② 并发访问不是特别大的业务
③ 门户网站应用(服务器配置好,可以节省IDC空间,同时又充分利用的服务器的资源)
三、多实例MySQL数据库实现方案
3.1:单一配置文件、单一启动程序多实例部署方案(耦合度很高,也是官网的推荐)
3.2:多配置文件、多启动启动文件、多数据文件(解决了耦合度高的问题)
四、多实例MySQL数据库安装
PS:和单实例安装的方式是基本上差不多的,我很久采用二进制的安装方式来进行多实例的安装,单实例安装地址:https://www.cnblogs.com/zhujingzhi/p/9609861.html
4.1:3306实例安装
① 下载MySQL卸载自带Mariadb
[root@web1 ~]# wget https://dev.mysql.com/get/Downloads/MySQL-5.7/mysql-5.7.23-linux-glibc2.12-x86_64.tar.gz

[root@web1 ~]# rpm -qa | grep mariadb

mariadb-libs-5.5.56-2.el7.x86_64

mariadb-devel-5.5.56-2.el7.x86_64

[root@web1 ~]# rpm -e --nodeps mariadb-libs-5.5.56-2.el7.x86_64 mariadb-devel-5.5.56-2.el7.x86_64
② 安装配置MySQL3306
[root@web1 ~]# tar xf mysql-5.7.23-linux-glibc2.12-x86_64.tar.gz -C /usr/local/                         # 解压MySQL

[root@web1 ~]# useradd -M -s /sbin/nologin mysql                                                        # 创建MySQL用户

[root@web1 usr]# cd /usr/local/

[root@web1 local]# mv mysql-5.7.23-linux-glibc2.12-x86_64/ mysql/

# 创建多实例的数据文件和日志文件

[root@web1 opt]# cd /home/

[root@web1 local]# mkdir -p /home/mysql/{3306,3307}/{data,log}

# 配置mysql3306的配置文件

[root@web1 3306]# vim my.cnf

[client]

port            = 3306

socket          = /home/mysql/3306/mysql.sock

[mysql]

no-auto-rehash

[mysqld]

user    = mysql

port    = 3306

socket  = /home/mysql/3306/mysql.sock

basedir = /usr/local/mysql

datadir = /home/mysql/3306/data

pid-file = /home/mysql/3306/mysql.pid

open_files_limit    = 1024

back_log = 600

max_connections = 800

max_connect_errors = 3000

external-locking = FALSE

max_allowed_packet =8M

sort_buffer_size = 1M

join_buffer_size = 1M

thread_cache_size = 100

query_cache_size = 2M

query_cache_limit = 1M

query_cache_min_res_unit = 2k

#default_table_type = InnoDB

thread_stack = 192K

#transaction_isolation = READ-COMMITTED

tmp_table_size = 2M

max_heap_table_size = 2M

long_query_time = 1

#log_long_format

log-error = /home/mysql/3306/log/error.log

#log-slow-queries = /home/mysql/3306/log/slow.log

pid-file = /home/mysql/3306/mysql.pid

#log-bin = /home/mysql/3306/mysql-bin

relay-log = /home/mysql/3306/relay-bin

relay-log-info-file = /home/mysql/3306/relay-log.info

binlog_cache_size = 1M

max_binlog_cache_size = 1M

max_binlog_size = 2M

expire_logs_days = 7

key_buffer_size = 16M

read_buffer_size = 1M

read_rnd_buffer_size = 1M

bulk_insert_buffer_size = 1M

lower_case_table_names = 1

skip-name-resolve

slave-skip-errors = 1032,1062

replicate-ignore-db=mysql

server-id = 1

sql_mode=NO_ENGINE_SUBSTITUTION,STRICT_TRANS_TABLES,NO_AUTO_CREATE_USER,NO_AUTO_VALUE_ON_ZERO,NO_ZERO_IN_DATE,NO_ZERO_DATE,ERROR_FOR_DIVISION_BY_ZERO,PIPES_AS_CONCAT,ANSI_QUOTES

innodb_buffer_pool_size = 32M

innodb_thread_concurrency = 8

innodb_flush_log_at_trx_commit = 2

innodb_log_buffer_size = 2M

innodb_log_file_size = 4M

innodb_log_files_in_group = 3

innodb_max_dirty_pages_pct = 90

innodb_lock_wait_timeout = 120

innodb_file_per_table = 0

[mysqldump]

quick

max_allowed_packet = 2M

# 这里说明一下为什么要先创建这个error文件,因为这个是数据库的一个bug在启动数据库的时候会出现

2018-09-10T06:29:10.161125Z mysqld_safe error: log-error set to '/home/mysql/3306/log/error.log', however file don't exists. Create writable for user 'mysql'.

[root@web1 mysql]# touch /home/mysql/3306/log/error.log
[root@web1 mysql]# touch /home/mysql/3307/log/error.log

[root@web1 mysql]# chown -R mysql.mysql /home/mysql/   # 设置MySQL权限

[root@web1 3306]# yum install -y libaio

#  必须安装不然会报下面的错误

./bin/mysqld: error while loading shared libraries: libaio.so.1: cannot open shared object file: No such file or directory

# 设置环境比变量

[root@web1 mysql]# echo "export PATH=/usr/local/mysql/bin:$PATH" >> /etc/profile
[root@web1 mysql]# source /etc/profile    # 是环境变量生效
③ 修改密码及启动MySQL3306
# 初始化数据库,要记住初始化的密码

[root@web1 3306]# cd /usr/local/mysql/

[root@web1 mysql]# ./bin/mysqld --initialize --user=mysql --basedir=/usr/local/mysql --datadir=/home/mysql/3306/data

2018-09-10T03:09:58.040768Z 0 [Warning] TIMESTAMP with implicit DEFAULT value is deprecated. Please use --explicit_defaults_for_timestamp server option (see documentation for more details).

2018-09-10T03:09:58.452316Z 0 [Warning] InnoDB: New log files created, LSN=45790

2018-09-10T03:09:58.515904Z 0 [Warning] InnoDB: Creating foreign key constraint system tables.

2018-09-10T03:09:58.582330Z 0 [Warning] No existing UUID has been found, so we assume that this is the first time that this server has been started. Generating a new UUID: ffe8e1c7-b4a6-11e8-91ba-000c296f1735.

2018-09-10T03:09:58.584298Z 0 [Warning] Gtid table is not ready to be used. Table 'mysql.gtid_executed' cannot be opened.

2018-09-10T03:09:58.585110Z 1 [Note] A temporary password is generated for root@localhost: (RKsr0Jv(H9v    # 初始化密码

# 因为5.7的安全机制必须要修改默认密码才能使用数据库,所以我们要先使用mysqld_safe启动数据库修改密码

[root@web1 3306]# cd /usr/local/mysql/

[root@web1 mysql]# ./bin/mysqld_safe  --defaults-file=/home/mysql/3306/my.cnf --user=mysql     # 启动3306数据库

[root@web1 mysql]# ./bin/mysql -u root -p -S /home/mysql/3306/mysql.sock

Enter password: (RKsr0Jv(H9v   # 初始化密码

Welcome to the MySQL monitor.  Commands end with ; or \g.

Your MySQL connection id is 2

Server version: 5.7.23

Copyright (c) 2000, 2018, Oracle and/or its affiliates. All rights reserved.

Oracle is a registered trademark of Oracle Corporation and/or its

affiliates. Other names may be trademarks of their respective

owners.

Type 'help;' or '\h' for help. Type '\c' to clear the current input statement.

mysql> SET PASSWORD FOR 'root'@'localhost' = PASSWORD('123456');   # 修改密码

Query OK, 0 rows affected, 1 warning (0.00 sec)

# 编写MySQL启动脚本

[root@web1 3306]# vim /etc/init.d/mysql3306

#!/bin/sh

#init

port=3306

mysql_user="root"

mysql_pwd=""

CmdPath="/usr/local/mysql/bin"

mysql_sock="/home/mysql/${port}/mysql.sock"

#startup function

function_start_mysql()

{

    if [ ! -e "$mysql_sock" ];then

      printf "Starting MySQL...\n"

      /bin/sh ${CmdPath}/mysqld_safe --defaults-file=/home/mysql/${port}/my.cnf --user=mysql 2>&1 > /dev/null &

    else

      printf "MySQL is running...\n"

      exit

    fi

}

#stop function

function_stop_mysql()

{

    if [ ! -e "$mysql_sock" ];then

       printf "MySQL is stopped...\n"

       exit

    else

       printf "Stoping MySQL...\n"

       ${CmdPath}/mysqladmin -u ${mysql_user} -p${mysql_pwd} -S /home/mysql/${port}/mysql.sock shutdown

   fi

}

#restart function

function_restart_mysql()

{

    printf "Restarting MySQL...\n"

    function_stop_mysql

    sleep 2

    function_start_mysql

}

case $1 in

start)

    function_start_mysql

;;

stop)

    function_stop_mysql

;;

restart)

    function_restart_mysql

;;

*)

    printf "Usage: /home/mysql/${port}/mysql {start|stop|restart}\n"

esac

# 启动

[root@web1 mysql]# /etc/init.d/mysql3306 start

# 停止,为了安全这里需要密码

[root@web1 mysql]# /etc/init.d/mysql3307 stop

Stoping MySQL...

Enter password: 123456  # 数据库密码
④ 设置远程数据库权限
# 设置远程主机登录权限

[root@web1 mysql]# mysql -uroot -p -S /home/mysql/3306/mysql.sock

Enter password:123456

Welcome to the MySQL monitor.  Commands end with ; or \g.

Your MySQL connection id is 2

Server version: 5.7.23 MySQL Community Server (GPL)

Copyright (c) 2000, 2018, Oracle and/or its affiliates. All rights reserved.

Oracle is a registered trademark of Oracle Corporation and/or its

affiliates. Other names may be trademarks of their respective

owners.

Type 'help;' or '\h' for help. Type '\c' to clear the current input statement.

mysql> grant all privileges on *.* to 'root' @'%' identified by '123456';   # 设置权限

Query OK, 0 rows affected, 1 warning (0.00 sec)

mysql> flush privileges;													# 刷新权限
4.2:3307实例安装
PS:和配置3306一样只是修改一下端口 把3306改成3307
① 修改配置文件
# 拷贝配置文件

[root@web1 ~]# cp /home/mysql/3306/my.cnf /home/mysql/3307/

# 修改配置文件

[root@web1 ~]# sed -i "s#3306#3307#g" /home/mysql/3307/my.cnf

# 查看配置文件

[root@web1 ~]# cat /home/mysql/3307/my.cnf
② 修改启动脚本
# 拷贝启动文件

[root@web1 mysql]# cp /etc/init.d/mysql3306 /etc/init.d/mysql3307

# 修改启动文件

[root@web1 mysql]# sed -i "s#3306#3307#g" /etc/init.d/mysql3307

# 查看启动文件

[root@web1 mysql]# cat /etc/init.d/mysql3307
③ 初始化3307数据库
# 设置mysql权限

[root@web1 3307]# chown mysql.mysql /home/mysql/

# 初始化数据库

[root@web1 3307]# cd /usr/local/mysql/

[root@web1 mysql]# ./bin/mysqld --initialize --user=mysql --basedir=/usr/local/mysql --datadir=/home/mysql/3307/data

2018-09-10T07:02:06.000207Z 0 [Warning] TIMESTAMP with implicit DEFAULT value is deprecated. Please use --explicit_defaults_for_timestamp server option (see documentation for more details).

2018-09-10T07:02:06.452043Z 0 [Warning] InnoDB: New log files created, LSN=45790

2018-09-10T07:02:06.498280Z 0 [Warning] InnoDB: Creating foreign key constraint system tables.

2018-09-10T07:02:06.556171Z 0 [Warning] No existing UUID has been found, so we assume that this is the first time that this server has been started. Generating a new UUID: 6da1081a-b4c7-11e8-be64-000c296f1735.

2018-09-10T07:02:06.557543Z 0 [Warning] Gtid table is not ready to be used. Table 'mysql.gtid_executed' cannot be opened.

2018-09-10T07:02:06.558513Z 1 [Note] A temporary password is generated for root@localhost: _ob9Hqq9:?kk
④ 启动3307数据库及修改密码
# 启动数据库

[root@web1 mysql]# cd /usr/local/mysql/

[root@web1 mysql]# ./bin/mysqld_safe  --defaults-file=/home/mysql/3307/my.cnf --user=mysql

[root@web1 mysql]# mysql -uroot -p_ob9Hqq9:?kk -S /home/mysql/3307/

mysql: [Warning] Using a password on the command line interface can be insecure.

Welcome to the MySQL monitor.  Commands end with ; or \g.

Your MySQL connection id is 2

Server version: 5.7.23

Copyright (c) 2000, 2018, Oracle and/or its affiliates. All rights reserved.

Oracle is a registered trademark of Oracle Corporation and/or its

affiliates. Other names may be trademarks of their respective

owners.

Type 'help;' or '\h' for help. Type '\c' to clear the current input statement.

mysql> SET PASSWORD FOR 'root'@'localhost' = PASSWORD('123456');    # 修改密码

Query OK, 0 rows affected, 1 warning (0.00 sec)

mysql> flush privileges;    # 刷新

Query OK, 0 rows affected (0.00 sec)
五、查看启动是否成功
[root@web1 ~]# netstat -lntup | grep mysql

tcp6       0      0 :::3306                 :::*                    LISTEN      20490/mysqld

tcp6       0      0 :::3307                 :::*                    LISTEN      55606/mysqld

[root@web1 ~]#
六、多实例MySQL数据库登录方式
# 登录3306数据库

[root@web1 ~]# mysql -uroot -p -S /home/mysql/3306/mysql.sock

Enter password:123456

Welcome to the MySQL monitor.  Commands end with ; or \g.

Your MySQL connection id is 3

Server version: 5.7.23 MySQL Community Server (GPL)

Copyright (c) 2000, 2018, Oracle and/or its affiliates. All rights reserved.

Oracle is a registered trademark of Oracle Corporation and/or its

affiliates. Other names may be trademarks of their respective

owners.

Type 'help;' or '\h' for help. Type '\c' to clear the current input statement.

mysql>

# 登录3307数据库

[root@web1 ~]# mysql -uroot -p -S /home/mysql/3307/mysql.sock

Enter password:123456

Welcome to the MySQL monitor.  Commands end with ; or \g.

Your MySQL connection id is 2

Server version: 5.7.23 MySQL Community Server (GPL)

Copyright (c) 2000, 2018, Oracle and/or its affiliates. All rights reserved.

Oracle is a registered trademark of Oracle Corporation and/or its

affiliates. Other names may be trademarks of their respective

owners.

Type 'help;' or '\h' for help. Type '\c' to clear the current input statement.

mysql>
MySQL多实例(二)的更多相关文章
- python3.4学习笔记(二十五) Python 调用mysql redis实例代码
python3.4学习笔记(二十五) Python 调用mysql redis实例代码 #coding: utf-8 __author__ = 'zdz8207' #python2.7 import ...
- MySQL优化实例
这周就要从泰笛离职了,在公司内部的wiki上,根据公司实际的项目,写了一些mysql的优化方法,供小组里的小伙伴参考下,没想到大家的热情很高,还专门搞了个ppt讲解了一下. 举了三个大家很容易犯错的地 ...
- PHP调用MYSQL存储过程实例
PHP调用MYSQL存储过程实例 标签: mysql存储phpsqlquerycmd 2010-09-26 11:10 11552人阅读 评论(3) 收藏 举报 实例一:无参的存储过程$conn = ...
- mysql多实例部署
mysql 多实例常规来讲,主要有二种方案可以实现,这二种方案各有利弊,如下:1.基于多配置文件 通过使用多个配置文件来启动不同的进程,以此来实现多实例. 优点:逻辑简单,配置简单 缺点:管理起来不方 ...
- PHP mysql 事务处理实例
事务是必须满足4个条件(ACID):原子性(Autmic).一致性(Consistency).隔离性(Isolation).持久性(Durability) 原子性(Autmic):事务在执行性,要做到 ...
- 调用MYSQL存储过程实例
PHP调用MYSQL存储过程实例 http://blog.csdn.net/ewing333/article/details/5906887 http://www.cnblogs.com/kkchen ...
- MySQL学习(二)复制
复制解决的问题是保持多个服务器之间的数据的一致性,就如同通过复制保持两个文件的一致性一样,只不过MySQL的复制要相对要复杂一些,其基本过程如下: 1)在主库上将数据更改记录到二进制日 ...
- 如何在同一台机器上安装多个MySQL的实例
转自:'http://www.cnblogs.com/shangzekai/p/4375271.html 最近由于工作的需要,需要在同一台机器上搭建两个MySQL的实例,(注:已经存在了一个3306的 ...
- Python MySQLdb模块连接操作mysql数据库实例_python
mysql是一个优秀的开源数据库,它现在的应用非常的广泛,因此很有必要简单的介绍一下用python操作mysql数据库的方法.python操作数据库需要安装一个第三方的模块,在http://mysql ...
随机推荐
- TF Boys (TensorFlow Boys ) 养成记(二): TensorFlow 数据读取
TensorFlow 的 How-Tos,讲解了这么几点: 1. 变量:创建,初始化,保存,加载,共享: 2. TensorFlow 的可视化学习,(r0.12版本后,加入了Embedding Vis ...
- 情感分析snownlp包部分核心代码理解
snownlps是用Python写的个中文情感分析的包,自带了中文正负情感的训练集,主要是评论的语料库.使用的是朴素贝叶斯原理来训练和预测数据.主要看了一下这个包的几个主要的核心代码,看的过程作了一些 ...
- 使用eclipse创建android项目的时候为什么会生成两个项目
使用eclipse创建android项目的时候为什么会生成两个项目 问题描述: 使用eclipse创建一个Android项目时,发现project列表中会多创建出一个appcompat_v7项目,再创 ...
- phalApi数据库操作
在很多时候,我们会遇到数据库表里面的某个值需要+1操作,我们不能简单地在update的时候写入array('key' => 'key+1'),因为在解析sql的时候,key+1 会带上引号作为一 ...
- [VC++入门]指针一
俗话说没有搞清楚指针就没有学会C/C++,所以指针是一个相当重要的东东,相当年在用 C#调用C++写的动态链接库时,以为C++中的指针就是C#中的引用类型(ref),但是看了一下却不是这样.指针当然和 ...
- win7-64bit下安装Scipy
一直用MAC写python,但京东给的本装的是win7系统,在安装scipy时各种报错,最后错误提示为: no lapack/blas resources found 开始一顿搜,爆栈给出的解决方案是 ...
- 1) Spring_HelloWorld
1. Spring Tool Suite™ 方式一:下载对应eclipse版本的文件,离线安装 4.4.2 springsource-tool-suite-3.6.4.RELEASE-e4.4.2-u ...
- MFC框架仿真<二>
- JAVA“动态”为类添加属性
部分参考:http://www.cnblogs.com/zy2009/p/6725843.html pom.xml中添加: <dependency> <groupId>comm ...
- linux信号量(转载)
本文转载自http://blog.csdn.net/qinxiongxu/article/details/7830537 信号量一.什么是信号量信号量的使用主要是用来保护共享资源,使得资源在一个时刻只 ...