亲测有效,解决Can 't connect to local MySQL server through socket '/tmp/mysql.sock '(2) ";
最近租了一个阿里云云翼服务器,趁着自己还是一个学生,享受一下优惠。我租的是阿里云Ubuntu16.04版本的服务器,在搭建mysql的时候,一开始是可以运行的,由于某次手抽,把mysql的套接字文件不小心删除了,然后无论怎么卸载重装,都出现了这个问题:
-
root@iZufkfljcZ:~# mysql -uroot -p
-
Enter password:
-
ERROR 2002 (HY000): Can't connect to local MySQL server through socket '/tmp/mysql.sock' (2)
-
网上找了好久,搜到的全部是重复的文章而且也没讲明为什么出现这个问题,找了一天才找到一篇讲解mysql.sock文件作用的文章,然后分析一下为什么出现这个问题,现在讲之总结一下,以备后人查阅。
我出现的问题是:找不到mysql.sock,如果你可以运行
find / -name mysql.sock
这条命令,并且能查到结果的话,只需将查到的结果做一个软连接到/tmp目录下即可解决(网上都是这么解决的)。
但是,我执行了这条语句之后,并没有任何反应,没有找到mysql.sock文件。
在这之前,需要明白mysql.sock这个文件有什么用?
连接localhost通常通过一个Unix域套接字文件进行,一般是/tmp/mysql.sock。如果套接字文件被删除了,本地客户就不能连接。这可能发生在你的系统运行一个cron任务删除了/tmp下的临时文件。
如果你因为丢失套接字文件而不能连接,你可以简单地通过重启服务器重新创建得到它。因为服务器在启动时重新创建它。
如果和我一样,重启服务器还是没有任何变化,你可以先执行下面的语句:
# mysql -uroot -h 127.0.0.1 -p
不出意外,这句话应该是可以执行的,你现在不能用套接字建立连接因为它不见了,所以可以建立一个TCP/IP连接
如果套接字文件被一个cron任务删除,问题将重复出现,除非你修改cron任务或使用一个或使用一个不同的套接字文件,我的解决办法是重新指定一个不同的套接字,或者说,我现在没有mysql.sock文件,所以我要想办法生成一个。
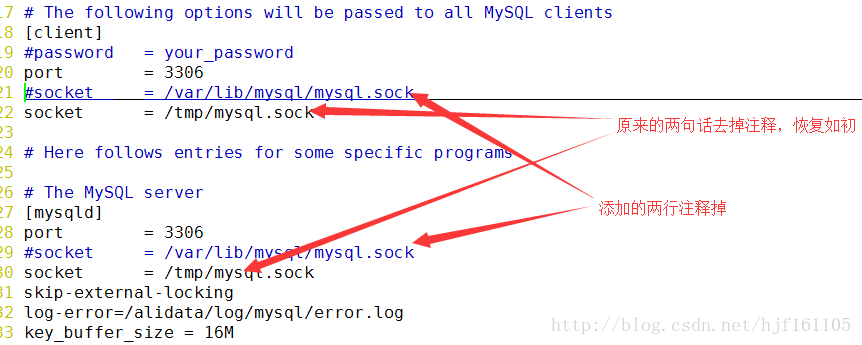
首先,更改my.cnf文件,我的服务器中的目录为/etc/my.cnf,如果没有的话可以用find去查找,

接下来就是保存退出,然后确保这个目录存在,并且将这个目录的权限修改一下
# chmod 777 /var/lib/mysql
准备步骤做好,然后就是mysql和mysqld服务重启
-
# service mysql restart
-
# service mysqld restart
我在重启mysqld服务的时候,重启失败了,显示如下:
-
root@iZufkfljcZ:~# service mysqld start
-
Job for mysqld.service failed because the control process exited with error code. See "systemctl status mysqld.service" and "journalc
-
tl -xe" for details.
这个时候,提示可以输入systemctl status mysqld.service去查看具体的失败原因,于是:
****************************************************************************************
root@iZufkfljcZ:~# systemctl status mysqld.service
● mysqld.service - LSB: start and stop MySQL
Loaded: loaded (/etc/init.d/mysqld; bad; vendor preset: enabled)
Active: failed(Result: exit-code) since 三 2017-12-20 10:38:30 CST; 45s ago
Docs: man:systemd-sysv-generator(8)
Process: 2154 ExecStart=/etc/init.d/mysqld start
(code=exited, status=1/FAILURE)
12月 20 10:38:29 iZufkfljcZ systemd[1]: Starting LSB: start and stop MySQL...
12月 20 10:38:29 iZufkfljcZ mysqld[2154]: Starting MySQL
12月 20 10:38:29 iZufkfljcZ mysqld_safe[2689]:Logging to '/var/log/mysql/error.log'.
12月 20 10:38:29 iZufkfljcZ mysqld_safe[2693]:Directory '/var/run/mysqld' for UNIX socket file don't exists.
12月 20 10:38:30 iZufkfljcZ mysqld[2154]: . * The server quit without updating PID file (/var/run/mysqld/mysqld.pid).
12月 20 10:38:30 iZufkfljcZ systemd[1]:
mysqld.service: Control process exited, code=exited status=1
12月 20 10:38:30 iZufkfljcZ systemd[1]:
Failed to start LSB: start and stop MySQL.
12月 20 10:38:30 iZufkfljcZ systemd[1]:
mysqld.service: Unit entered failed state.
12月 20 10:38:30 iZufkfljcZ systemd[1]:
mysqld.service: Failed with result 'exit-code'.
****************************************************************************************
根据提示可知,/var/run/mysqld目录不存在,也就是说mysqld服务重启需要这个目录,那就建一个吧:
-
root@iZufkfljcZ:~# mkdir /var/run/mysqld
-
root@iZufkfljcZ:~# chmod 777 /var/run/mysqld/
-
root@iZufkfljcZ:~# service mysqld start
-
root@iZufkfljcZ:~#
建完目录后,重新运行mysqld服务,发现重启成功了,那么我们再来看看为什么刚才要建这个目录呢?打开这个目录看看:
-
root@iZufkfljcZ# ls /var/run/mysqld
-
mysqld.pid mysqld.sock mysqld.sock.lock
发现了一个熟悉的东西,mysqld.sock,但是这个是不是我们需要的东西呢?不管他,先用这个sock文件登下mysql看看行不行:
-
root@iZufkfljcZ:/var/run/mysqld# mysql -uroot -p -S /var/run/mysqld/mysqld.sock
-
Enter password:
-
Welcome to the MySQL monitor. Commands end with ; or \g.
-
Your MySQL connection id is 4
-
Server version: 5.7.20-0ubuntu0.16.04.1 (Ubuntu)
-
-
Copyright (c) 2000, 2017, Oracle and/or its affiliates. All rights reserved.
-
-
Oracle is a registered trademark of Oracle Corporation and/or its
-
affiliates. Other names may be trademarks of their respective
-
owners.
-
-
Type 'help;' or '\h' for help. Type '\c' to clear the current input statement.
-
-
mysql>
这么一运行,发现好像可以了,那接下来好办了,我们把之前改的配置改回来就行了,之前的目录应该是/tmp/mysql.sock,我们可以建立一个软连接连上去就可以了,
-
root@iZufkfljcZ:~# ln -s /var/run/mysqld/mysqld.sock /tmp/mysql.sock
-
root@iZufkfljcZ:~# ls /tmp/
-
mysql.sock
这样,tmp目录下就有了my.cnf配置文件中需要的mysql.sock文件了,然后把my.cnf改回就行了,
到此为止,我们的mysql应该已经完全修复了,那么我们再测试一下吧:
-
root@iZufkfljcZ:/var/run/mysqld# mysql -uroot -p
-
Enter password:
-
Welcome to the MySQL monitor. Commands end with ; or \g.
-
Your MySQL connection id is 5
-
Server version: 5.7.20-0ubuntu0.16.04.1 (Ubuntu)
-
-
Copyright (c) 2000, 2017, Oracle and/or its affiliates. All rights reserved.
-
-
Oracle is a registered trademark of Oracle Corporation and/or its
-
affiliates. Other names may be trademarks of their respective
-
owners.
-
-
Type 'help;' or '\h' for help. Type '\c' to clear the current input statement.
-
-
mysql>
OK,搞定收工,用了快一天时间在解决这个问题上,感觉收获还是挺多的,Linux的学习任重而道远啊!
亲测有效,解决Can 't connect to local MySQL server through socket '/tmp/mysql.sock '(2) ";的更多相关文章
- mac 安装mysql 报错“ERROR 2002 (HY000): Can not connect to local MySQL server through socket '/tmp/mysql.sock' (2)” 解决办法
首先安装 homebrew 再 brew install mysql 之后连接 mysql 无论是登录还是修改初始密码都会报如下的错误 ERROR 2002 (HY000): Can not conn ...
- Mac mySql ERROR 2002 (HY000): Can't connect to local MySQL server through socket '/tmp/mysql.sock' (2)的解决办法
我的环境:Mac 10.11.6 ,mysql 5.7.14 . mac mySql 报错ERROR 2002 (HY000): Can't connect to local MySQL serv ...
- Mac端解决(含修改8.0.13版的密码):Can't connect to local MySQL server through socket '/tmp/mysql.sock' (2)
1. 安装mysql但是从来没启动过,今天一启动就报错: Can't connect to local MySQL server through socket '/tmp/mysql.sock' (2 ...
- 解决Can't connect to local MySQL server through socket '/tmp/mysql.sock'
0 Problem 电脑重启后用python的MySQLdb连接数据库报错 Can't connect to local MySQL server through socket '/tmp/mysql ...
- XtraBackup出现 Can't connect to local MySQL server through socket '/tmp/mysql.sock'
Xtrabackup做备份时遇到下面错误信息MySQL server: Can't connect to local MySQL server through socket '/tmp/mysql.s ...
- linux云服务器mysql ERROR 2002 (HY000): Can’t connect to local MySQL server through socket ‘/tmp/mysql.sock’
一早上过来发现网站打开报错,数据库连接不上.. 有人改密码? putty进去,mysql -uroot -p 输入密码后,报错 ERROR 2002 (HY000): Can't connect to ...
- ERROR 2002 (HY000): Can't connect to local MySQL server through socket '/tmp/mysql.sock' (2)
ERROR 2002 (HY000): Can't connect to local MySQL server through socket '/tmp/mysql.sock' (2) 背景: mys ...
- 关于Can't connect to local MySQL server through socket '/tmp/mysql.sock' (2)的问题
找不到mysql socket的问题,我最近碰到了好多次重装系统以前,我的mysql,apache,php都是自己编译安装的,当时并没有碰到这些问题,重装系统以后,我的mysql是通过yum安装的,a ...
- Mac下安装Mysql出现 Can’t connect to local MySQL server through socket '/tmp/mysql.sock'
在Mac下安装mysql出现 Can't connect to local MySQL server through socket '/tmp/mysql.sock' 错误,解决如下: $ unset ...
随机推荐
- tensorflow compile
bazel build --spawn_strategy=standalone tensorflow/examples/label_image/...
- Codeforces Beta Round #24 D. Broken robot (打表找规律)
题目链接: 点击我打开链接 题目大意: 给你 \(n,j\),再给出 \(m[0]\) 的坐标和\(a[0]-a[n-1]\) 的坐标. 让你输出 \(m[j]\) 的坐标,其中 \(m[i]\) 和 ...
- web服务器软件(Nginx,Apache,IIS,Lighttpd)介绍
Nginx是一款轻量级的Web 服务器/反向代理服务器及电子邮件(IMAP/POP3)代理服务器,并在一个BSD-like 协议下发行.其特点是占有内存少,并发能力强,事实上nginx的并发能力确实在 ...
- WPF学习笔记——概述
如果你选择WPF,多半原因是因为折服于它那震撼性的用户体验.纵观WPF整个知识体系,其内容并不复杂,但却比较细碎,不易理清.以下内容是对WPF部分内容的简单概括,希望读者能够对WPF框架有个大体认识. ...
- netty epoll调用示例
1.服务器端 import io.netty.bootstrap.ServerBootstrap; import io.netty.buffer.PooledByteBufAllocator; imp ...
- 设计模式--单例模式之Lock
1.为什么用Lock及关键知识 当我们使用线程的时候,效率最高的方式当然是异步,即个个线程同时运行,其间互不依赖和等待.当不同的线程都需要访问某个资源的时候,就需要同步机制了,也就是说当对同一个资源进 ...
- 清除浮动.md
清除浮动的三种方法 1 加空div层(.clear) 2 overflow属性设置(.clearo) 3 :after伪元素(.clearfix) <!DOCTYPE html> < ...
- Topological Spaces(拓扑空间)
拓扑空间的定义有多种形式,通过 open sets(开集)的形式定义是最为常见的拓扑空间定义形式. 1. 通过开集(open sets)定义 拓扑空间由一个有序对 (X,τ) 表示,X 表示非空集合, ...
- 7、基于嵌入式Linux的视频采集系统---UVC驱动模型介绍
UVC 即 usb video class.USB协议中,除了通用的软硬件电气接口规范等,还包含了各种各样的Class协议,用来为不同的功能定义各自的标准接口和具体的总线上的数据交互格式和内容.这些C ...
- 0、驱动及应用小技巧、uboot指令及环境变量配置、linux常用命令
(内核make menuconfig之后,通过insmod安装的驱动都应该重新make,可能会出现一些莫名的问题) (nor flash/SDRAM/DM9000都受内存控制器控制,需要配置内存控制器 ...