2.监控软件zabbix-服务端安装
环境准备
Zabbix服务端环境要求:
Red Hat Enterprise Linux
CentOS
Oracle Linux
Debian
Ubuntu
注意,要安装的Zabbix服务器需要联网,如果没有网络以下内容不适用.
软件准备
Zabbix服务端安装包
Zabbix官网镜像:http://repo.zabbix.com/zabbix/2.4/
阿里云镜像:http://mirrors.aliyun.com/zabbix/zabbix/2.4/
关联软件安装包
数据库
Zabbix-Server支持的数据库:
MySQL
Oracle
SQLite
IBM DB2
PostgreSQL
我们这里选用的是MySQL,MySQL的资源位置:
http://dev.mysql.com/downloads/file.php?id=450542
前端展示
Apache
PHP
客户端的浏览器必须要开启JavaScript和Cookies
服务端
| 软件需求 | 描述 |
| OpenIPMI | 需要支持IPMI |
| libssh2 | 需要支持SSH服务,大于1.0版本 |
| fping | ICMP的ping命令需要 |
| libcurl | 服务端监听需要 |
| libiksemel | Jabber支持需要 |
| net-snmp | SNMP支持需要 |
版本要求
相关软件的版本需参考官方文档中的描述:
https://www.zabbix.com/documentation/2.4/manual/installation/requirements
将2.4更换为相应版本号即可。
安装过程
安装Yum源
[root@localhost zabbix]# rpm -ivh http://mirrors.aliyun.com/zabbix/zabbix/2.4/rhel/6/i386/zabbix-release-2.4-1.el6.noarch.rpm

[root@localhost zabbix]# rpm -ivh http://dl.fedoraproject.org/pub/epel/6/x86_64/epel-release-6-8.noarch.rpm

[root@localhost zabbix]# rpm -ivh http://dev.mysql.com/get/mysql-community-release-el6-5.noarch.rpm
安装软件包
[root@localhost zabbix]# yum install -y zabbix zabbix-get zabbix-server zabbix-web-mysql zabbix-web zabbix-server-mysql mysql-server
到此我们Zabbix-Server端软件已经安装完毕.
软件配置
MySQL的配置
[root@localhost mysql]# vi /etc/my.cnf

# For advice on how to change settings please see

# http://dev.mysql.com/doc/refman/5.6/en/server-configuration-defaults.html

[mysqld]

#

# Remove leading # and set to the amount of RAM for the most important data

# cache in MySQL. Start at 70% of total RAM for dedicated server, else 10%.

# innodb_buffer_pool_size = 128M

#

# Remove leading # to turn on a very important data integrity option: logging

# changes to the binary log between backups.

# log_bin

#

# Remove leading # to set options mainly useful for reporting servers.

# The server defaults are faster for transactions and fast SELECTs.

# Adjust sizes as needed, experiment to find the optimal values.

# join_buffer_size = 128M

# sort_buffer_size = 2M

# read_rnd_buffer_size = 2M

datadir=/var/lib/mysql

socket=/var/lib/mysql/mysql.sock

user=mysql

# Disabling symbolic-links is recommended to prevent assorted security risks

symbolic-links=0

# Recommended in standard MySQL setup

sql_mode=NO_ENGINE_SUBSTITUTION,STRICT_TRANS_TABLES

character-set-server=utf8 #设置字符集为utf8

innodb_file_per_table=1 #让innodb的每个表文件单独存储

[mysqld_safe]

log-error=/var/log/mysqld.log

pid-file=/var/run/mysqld/mysqld.pid
启动MySQL
[root@localhost mysql]# service mysqld start
修改root用户密码
[root@localhost mysql]# mysqladmin -uroot password root
创建Zabbix数据库以及用户
[root@localhost mysql]# mysql -uroot -proot

Warning: Using a password on the command line interface can be insecure.

Welcome to the MySQL monitor.  Commands end with ; or \g.

Your MySQL connection id is 3

Server version: 5.6.26 MySQL Community Server (GPL)

Copyright (c) 2000, 2015, Oracle and/or its affiliates. All rights reserved.

Oracle is a registered trademark of Oracle Corporation and/or its

affiliates. Other names may be trademarks of their respective

owners.

Type 'help;' or '\h' for help. Type '\c' to clear the current input statement.

mysql> create database zabbix character set utf8;

Query OK, 1 row affected (0.00 sec)

mysql> grant all privileges on zabbix.* to zabbix@localhost identified by 'zabbix';

Query OK, 0 rows affected (0.00 sec)

mysql> flush privileges;

Query OK, 0 rows affected (0.01 sec)

mysql> quit

Bye

[root@localhost mysql]#
导入Zabbix-Server表结构和数据
[root@localhost mysql]# mysql -uzabbix -pzabbix

Warning: Using a password on the command line interface can be insecure.

Welcome to the MySQL monitor.  Commands end with ; or \g.

Your MySQL connection id is 4

Server version: 5.6.26 MySQL Community Server (GPL)

Copyright (c) 2000, 2015, Oracle and/or its affiliates. All rights reserved.

Oracle is a registered trademark of Oracle Corporation and/or its

affiliates. Other names may be trademarks of their respective

owners.

Type 'help;' or '\h' for help. Type '\c' to clear the current input statement.

mysql> use zabbix;

Database changed

mysql> source /usr/share/doc/zabbix-server-mysql-2.4.6/create/schema.sql;

mysql> source /usr/share/doc/zabbix-server-mysql-2.4.6/create/images.sql;

mysql> source /usr/share/doc/zabbix-server-mysql-2.4.6/create/data.sql;
Zabbix-Server的配置
Zabbix-Server端默认情况下只需要修改连接MySQL数据库的密码即可(其它参数可根据实际环境需求修改):
修改内容:
[root@localhost zabbix]# egrep -v "(^#|^$)" /etc/zabbix/zabbix_server.conf

LogFile=/var/log/zabbix/zabbix_server.log

LogFileSize=0

PidFile=/var/run/zabbix/zabbix_server.pid

DBName=zabbix

DBUser=zabbix

DBPassword=zabbix

DBSocket=/var/lib/mysql/mysql.sock

SNMPTrapperFile=/var/log/snmptt/snmptt.log

AlertScriptsPath=/usr/lib/zabbix/alertscripts

ExternalScripts=/usr/lib/zabbix/externalscripts
创建扩展脚本路径:
[root@localhost zabbix]# mkdir /etc/zabbix/alertscripts /etc/zabbix/externalscripts
httpd的配置
要这是前端展示的字符集和时区信息
[root@localhost conf.d]# vi zabbix.conf

<Directory "/usr/share/zabbix">

    Options FollowSymLinks

    AllowOverride None

    Order allow,deny

    Allow from all

    php_value max_execution_time 300

    php_value memory_limit 128M

    php_value post_max_size 16M

    php_value upload_max_filesize 2M

    php_value max_input_time 300

    php_value data.timezone Asia/Shanghai

    # php_value date.timezone Europe/Riga

</Directory>
服务启动
[root@localhost create]# service zabbix-server start

[root@localhost create]# service httpd start
配置开机启动
[root@localhost create]# chkconfig mysqld on

[root@localhost create]# chkconfig zabbix-server on

[root@localhost create]# chkconfig httpd on
检查验证
登录验证
http://192.168.80.210/zabbix/setup.php
进入设置页面
1、设置主页
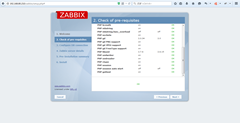
2、PHP相关参数检查
3、数据库连接配置,要注意进行验证连接是否可用

4、Zabbix-Server端详细信息

5、安装详情

6、完成安装

如果此步骤写入文件失败,可以尝试关闭SELINUX
[root@localhost conf.d]# vi /etc/selinux/config

SELINUX=disabled
然后重启启动Linux服务器
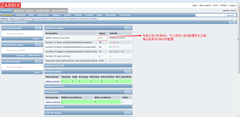
7、点击finish即可进入主页,默认用户名:admin 密码:zabbix

8、进入页面如下结果
常见问题:
1、添加完防火墙过滤规则后,执行service iptables restart出错(Center OS 7),如下所示:
[root@localhost sysconfig]# service iptables restart

Redirecting to /bin/systemctl restart  iptables.service

Failed to issue method call: Unit iptables.service failed to load: No such file or directory.

[root@localhost sysconfig]#
主要是因为没有安装iptables service导致的,所以当修改防火墙设置后,重启该服务无效。在Center OS7 或RHEL7 中防火墙引入进来管理iptables,在IMHO中,对于服务器环境而言,防火墙比工作站更安全、可靠。
所以可以通过如下办法解决:
[root@localhost sysconfig]# systemctl stop firewalld

[root@localhost sysconfig]# systemctl mask firewalld

ln -s '/dev/null' '/etc/systemd/system/firewalld.service'

[root@localhost sysconfig]# yum install iptables-services

已加载插件:fastestmirror

Loading mirror speeds from cached hostfile

 * base: centos.ustc.edu.cn

 * epel: mirror01.idc.hinet.net

 * extras: centos.ustc.edu.cn

 * updates: mirrors.aliyun.com

正在解决依赖关系

--> 正在检查事务

---> 软件包 iptables-services.x86_64.0.1.4.21-13.el7 将被 安装

--> 解决依赖关系完成

依赖关系解决

===============================================================================================================================================================================================

 Package                                              架构                                      版本                                             源                                       大小

===============================================================================================================================================================================================

正在安装:

 iptables-services                                    x86_64                                    1.4.21-13.el7                                    base                                     49 k

事务概要

===============================================================================================================================================================================================

安装  1 软件包

总下载量:49 k

安装大小:23 k

Is this ok [y/d/N]: t

Is this ok [y/d/N]: y

Downloading packages:

iptables-services-1.4.21-13.el7.x86_64.rpm                                                                                                                              |  49 kB  00:00:00

Running transaction check

Running transaction test

Transaction test succeeded

Running transaction

  正在安装    : iptables-services-1.4.21-13.el7.x86_64                                                                                                                                     1/1

warning: /etc/sysconfig/iptables created as /etc/sysconfig/iptables.rpmnew

  验证中      : iptables-services-1.4.21-13.el7.x86_64                                                                                                                                     1/1

已安装:

  iptables-services.x86_64 0:1.4.21-13.el7

完毕!

[root@localhost sysconfig]# systemctl start iptables

[root@localhost sysconfig]# service iptables restart

Redirecting to /bin/systemctl restart  iptables.service

[root@localhost sysconfig]# service iptables save
参考网址:http://stackoverflow.com/questions/24756240/how-can-i-use-iptables-on-centos-7
2、防火墙配置问题
如果连接不上80或者10051或者10050,需在/etc/sysconfig/iptables中添过滤规则:
[root@localhost create]# vi /etc/sysconfig/iptables

# Firewall configuration written by system-config-firewall

# Manual customization of this file is not recommended.

*filter

:INPUT ACCEPT [0:0]

:FORWARD ACCEPT [0:0]

:OUTPUT ACCEPT [0:0]

-A INPUT -m state --state ESTABLISHED,RELATED -j ACCEPT

-A INPUT -p icmp -j ACCEPT

-A INPUT -i lo -j ACCEPT

-A INPUT -m state --state NEW -m tcp -p tcp --dport 22 -j ACCEPT

-A INPUT -j REJECT --reject-with icmp-host-prohibited

-A FORWARD -j REJECT --reject-with icmp-host-prohibited

# http

-A INPUT -m state --state NEW -m tcp -p tcp --dport 80 -j ACCEPT

# zabbix-server

-A INPUT -m state --state NEW -m tcp -p tcp --dport 10051 -j ACCEPT

# zabbix-agent

-A OUTPUT -m state --state NEW -m tcp -p tcp --dport 10050 -j ACCEPT

-A INPUT -m state --state NEW -m tcp -p tcp --sport 10050 -j ACCEPT

COMMIT
[root@localhost create]# service iptables restart
如果还有问题,可以用如下命令尝试刷新路由表:
[root@localhost ~]# iptables -F
3、如果设置/etc/httpd/conf.d/zabbix.conf的timezone只不起作用
可以进行如下尝试
[root@localhost conf.d]# service httpd restart
如果依然存在问题,则进行如下操作:
[root@localhost conf.d]# vi /etc/php.ini

[Date]

; Defines the default timezone used by the date functions

; http://www.php.net/manual/en/datetime.configuration.php#ini.date.timezone

date.timezone = Asia/Shanghai
2.监控软件zabbix-服务端安装的更多相关文章
- 运用Zabbix实现内网服务器状态及局域网状况监控(3) —— Zabbix服务端安装
1. Zabbix服务端安装,基于LNMP PHP5.5+Nginx1.9安装配置:http://www.cnblogs.com/vurtne-lu/p/7707536.html MySQL5.5编译 ...
- 监控和安全运维 1.8 zabbix服务端安装
1. Zabbix简介基于web的开源软件,开源监控系统状态也可以监控网络设备.和nagios不同的是zabbix会把获取的数据保存在数据库中,所以zabbix需要有数据库支持 Zabbix还可以自动 ...
- zabbix 服务端安装(server)
zabbix版本:Zabbix 2.2 LTS 备注:Linux下安装zabbix需要有LAMP或者LNMP运行环境 准备篇: 一.Web环境:Nginx+MySQL+PHP CentOS 7.0编译 ...
- zabbix服务端安装
1.安装zabbix服务(1)先rpm安装lamp环境 yum install -y httpd mysql mysql-libs php php-mysql mysql-server php-bcm ...
- 2.监控软件zabbix-客户端安装
环境准备 Zabbix-Agent只要http://www.zabbix.com/download.php中可以下载的Zabbix-Agent均可以搭建Zabbix-Agent环境,本文选用CentO ...
- zabbix服务端安装配置
1.安装好httpd,mysql,php yum install httpd php mysql mysql-devel php-xmlwriter php-gd php-mbstring php-b ...
- Zabbix 3.4 服务端安装部署
关于zabbix的安装部署官方也提供了详细的安装文档,链接如下: https://www.zabbix.com/download 选择zabbix的版本,服务器平台及使用的数据库 安装和配置zabbi ...
- centos 7 上zabbix 3.0 服务端安装
zabbix服务端安装 安装完毕mysql-5.6.php5.6 mysql-5.6安装:https://www.cnblogs.com/xzlive/p/9771642.html 创建zabbix ...
- zabbix (一:zabbix服务端)
默认情况下zabbix有5个进程: zabbix_agent zabbix_get zabbix_proxy zabbix_sender zabbix_server,另外一个zabbix_java_ ...
随机推荐
- Weblogic的三种部署方式
Weblogic的三种部署方式 在weblogic中部署项目通常有三种方式:第一,在控制台中安装部署:第二,将部署包放在domain域中autodeploy目录下部署:第三,使用域中配置文件c ...
- Maven配置以及环境搭配
1. Maven简单介绍 Apache Maven是个项目管理和自动构建工具,基于项目对象模型(POM)的概念. 作用:完成项目的相关操作,如:编译,构建,单元测试,安装,网站生成和基于Maven部署 ...
- HTML与CSS学习笔记(7)
1.响应式布局 利用媒体查询,即media queries,可以针对不同的媒体类型定义不同的样式,从而实现响应式布局. 常见选项: 媒体类型 and.not min-width.max-width: ...
- HTTP 与HTTPS 简单理解
HTTP协议,即超文本传输协议(Hypertext transfer protocol).是一种详细规定了浏览器和万维网(WWW = World Wide Web)服务器之间互相通信的规则,通过因 ...
- django内容回顾:
Django 下载安装 命令行 pip install django==1.11.26 -i 源 pycharm 创建项目 命令行 django-admin startproject 项目名 pych ...
- Bliss OS 12.1下载 PC上Android10体验
下载也不是一帆风顺啊 这是设计者的secret: https://forum.xda-developers.com/android/software/bliss-os-x86-pc-s-12-x-de ...
- @Component, @Service, @Controller, @Repository区别
@Component, @Service, @Controller, @Repository是spring注解,注解后可以被spring框架所扫描并注入到spring容器来进行管理 @Componen ...
- c# 多线程 双色球
学习记录.仅供参考. 知识点: 多线程 Lock 环境: Visual Studio 2017 public partial class Form1 : Form { private static r ...
- nginx二级域名反向代理
nginx二级域名反向代理 添加两个开发测试的域名 test.xxx.com :8088 testmobile.xxx.com: 8089 内网地址:127.0.0.1 外网地址:127.0.0.1 ...
- D3力布图绘制--在曲线路径上添加文本标记
今天遇到一个在曲线路径上标识文本标记的问题,找到一个比较好的解决思路,在这里分享下: 使用d3建立的Force Layout,加上自定义的箭头形状,将多条连接线线改成弧线(https://www.cn ...