Tomcat源码分析 (四)----- Pipeline和Valve
在 Tomcat源码分析 (二)----- Tomcat整体架构及组件 中我们简单分析了一下Pipeline和Valve,并给出了整体的结构图。而这一节,我们将详细分析Tomcat里面的源码。
Valve
Valve作为一个个基础的阀门,扮演着业务实际执行者的角色。我们看看Valve这个接口有哪些方法。
public interface Valve {

    // 获取下一个阀门

    public Valve getNext();

    // 设置下一个阀门

    public void setNext(Valve valve);

    // 后台执行逻辑,主要在类加载上下文中使用到

    public void backgroundProcess();

    // 执行业务逻辑

    public void invoke(Request request, Response response)

        throws IOException, ServletException;

    // 是否异步执行

    public boolean isAsyncSupported();

}
Contained
ValveBase、Pipeline及其他相关组件都实现了Contained接口,我们看看这个接口有哪些方法。很简单,就是get/set容器操作。
public interface Contained {

    /**

     * Get the {@link Container} with which this instance is associated.

     *

     * @return The Container with which this instance is associated or

     *         <code>null</code> if not associated with a Container

     */

    Container getContainer();

    /**

     * Set the <code>Container</code> with which this instance is associated.

     *

     * @param container The Container instance with which this instance is to

     *  be associated, or <code>null</code> to disassociate this instance

     *  from any Container

     */

    void setContainer(Container container);

}
ValveBase
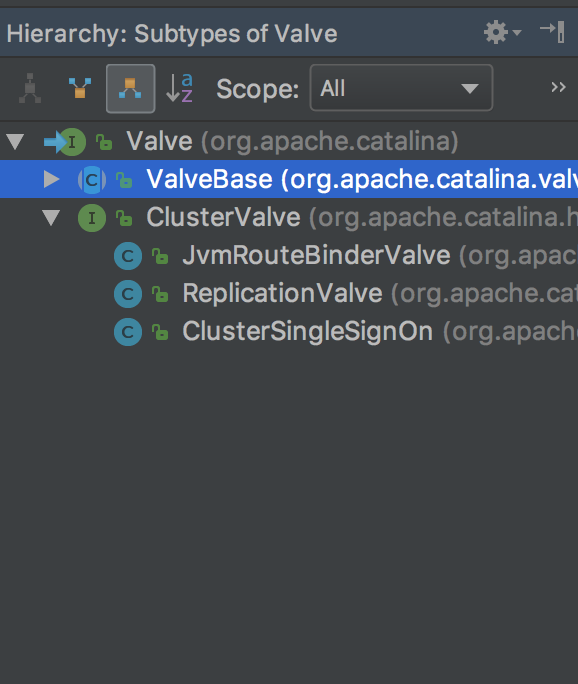
从Valve的类层次结构,我们发现几乎所有Valve都继承了ValveBase这个抽象类,所以这儿我们需要分析一下它。
public abstract class ValveBase extends LifecycleMBeanBase implements Contained, Valve {

    // 国际化管理器,可以支持多国语言

    protected static final StringManager sm = StringManager.getManager(ValveBase.class);

    //------------------------------------------------------ Instance Variables

    // 无参构造方法,默认不支持异步

    public ValveBase() {

        this(false);

    }

    // 有参构造方法,可传入异步支持标记

    public ValveBase(boolean asyncSupported) {

        this.asyncSupported = asyncSupported;

    }

    //------------------------------------------------------ Instance Variables

    // 异步标记

    protected boolean asyncSupported;

    // 所属容器

    protected Container container = null;

    // 容器日志组件对象

    protected Log containerLog = null;

    // 下一个阀门

    protected Valve next = null;

    //-------------------------------------------------------------- Properties

    // 获取所属容器

    @Override

    public Container getContainer() {

        return container;

    }

    // 设置所属容器

    @Override

    public void setContainer(Container container) {

        this.container = container;

    }

    // 是否异步执行

    @Override

    public boolean isAsyncSupported() {

        return asyncSupported;

    }

    // 设置是否异步执行

    public void setAsyncSupported(boolean asyncSupported) {

        this.asyncSupported = asyncSupported;

    }

    // 获取下一个待执行的阀门

    @Override

    public Valve getNext() {

        return next;

    }

    // 设置下一个待执行的阀门

    @Override

    public void setNext(Valve valve) {

        this.next = valve;

    }

    //---------------------------------------------------------- Public Methods

    // 后台执行,子类实现

    @Override

    public void backgroundProcess() {

        // NOOP by default

    }

    // 初始化逻辑

    @Override

    protected void initInternal() throws LifecycleException {

        super.initInternal();

        // 设置容器日志组件对象到当前阀门的containerLog属性

        containerLog = getContainer().getLogger();

    }

    // 启动逻辑

    @Override

    protected synchronized void startInternal() throws LifecycleException {

        setState(LifecycleState.STARTING);

    }

    // 停止逻辑

    @Override

    protected synchronized void stopInternal() throws LifecycleException {

        setState(LifecycleState.STOPPING);

    }

    // 重写toString,格式为[${containerName}]

    @Override

    public String toString() {

        StringBuilder sb = new StringBuilder(this.getClass().getName());

        sb.append('[');

        if (container == null) {

            sb.append("Container is null");

        } else {

            sb.append(container.getName());

        }

        sb.append(']');

        return sb.toString();

    }

    // -------------------- JMX and Registration  --------------------

    // 设置获取MBean对象的keyProperties,格式如:a=b,c=d,e=f...

    @Override

    public String getObjectNameKeyProperties() {

        StringBuilder name = new StringBuilder("type=Valve");

        Container container = getContainer();

        name.append(container.getMBeanKeyProperties());

        int seq = ;

        // Pipeline may not be present in unit testing

        Pipeline p = container.getPipeline();

        if (p != null) {

            for (Valve valve : p.getValves()) {

                // Skip null valves

                if (valve == null) {

                    continue;

                }

                // Only compare valves in pipeline until we find this valve

                if (valve == this) {

                    break;

                }

                if (valve.getClass() == this.getClass()) {

                    // Duplicate valve earlier in pipeline

                    // increment sequence number

                    seq ++;

                }

            }

        }

        if (seq > ) {

            name.append(",seq=");

            name.append(seq);

        }

        String className = this.getClass().getName();

        int period = className.lastIndexOf('.');

        if (period >= ) {

            className = className.substring(period + );

        }

        name.append(",name=");

        name.append(className);

        return name.toString();

    }

    // 获取所属域,从container获取

    @Override

    public String getDomainInternal() {

        Container c = getContainer();

        if (c == null) {

            return null;

        } else {

            return c.getDomain();

        }

    }

}
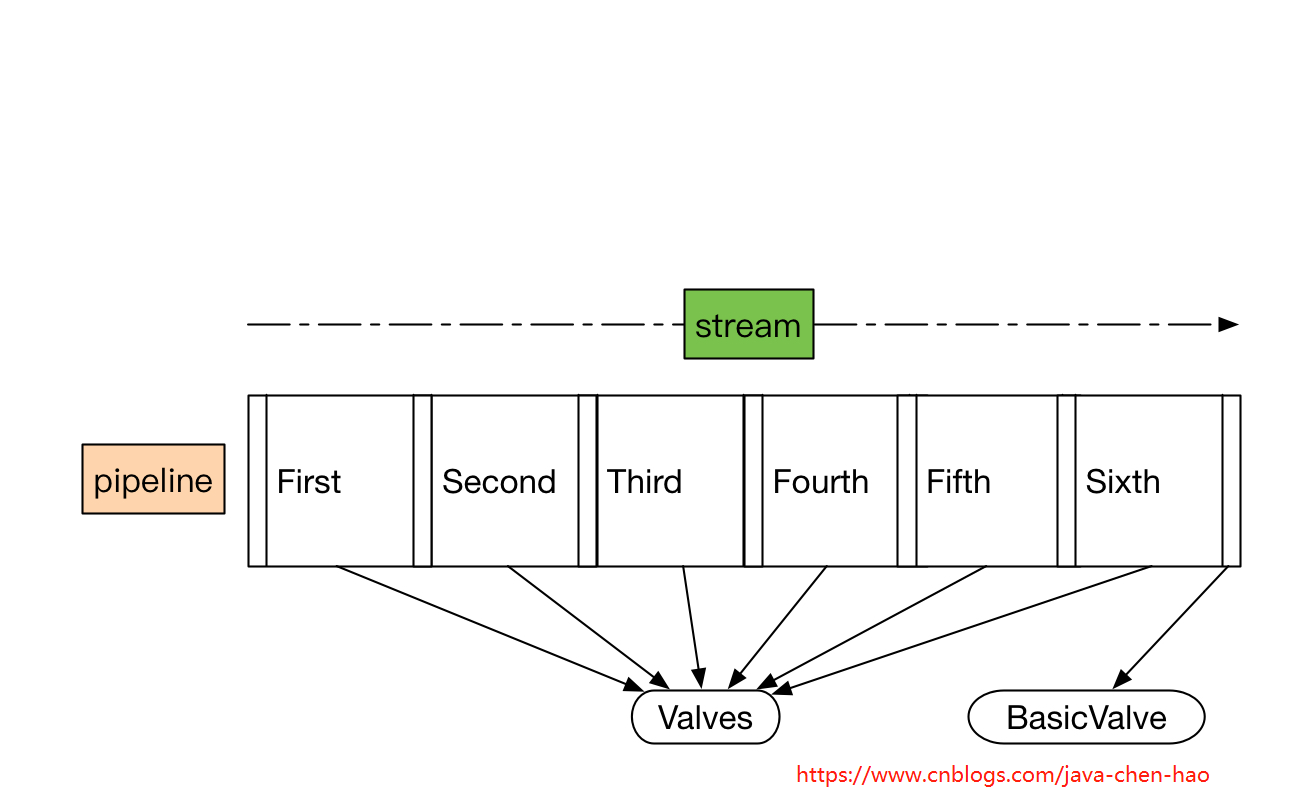
Pipeline
Pipeline作为一个管道,我们可以简单认为是一个Valve的集合,内部会对这个集合进行遍历,调用每个元素的业务逻辑方法invoke()。
是不是这样呢?我们还是分析一下源码,先看看接口定义。
public interface Pipeline {

    // ------------------------------------------------------------- Properties

    // 获取基本阀门

    public Valve getBasic();

    // 设置基本阀门

    public void setBasic(Valve valve);

    // --------------------------------------------------------- Public Methods

    // 添加阀门

    public void addValve(Valve valve);

    // 获取阀门数组

    public Valve[] getValves();

    // 删除阀门

    public void removeValve(Valve valve);

    // 获取首个阀门

    public Valve getFirst();

    // 管道内所有阀门是否异步执行

    public boolean isAsyncSupported();

    // 获取管道所属的容器

    public Container getContainer();

    // 设置管道所属的容器

    public void setContainer(Container container);

    // 查找非异步执行的所有阀门,并放置到result参数中,所以result不允许为null

    public void findNonAsyncValves(Set<String> result);

}
StandardPipeline
接着我们分析一下Pipeline唯一的实现StandardPipeline。代码很长,但是都很简单。
public class StandardPipeline extends LifecycleBase

        implements Pipeline, Contained {

    private static final Log log = LogFactory.getLog(StandardPipeline.class);

    // ----------------------------------------------------------- Constructors

    // 构造一个没有所属容器的管道

    public StandardPipeline() {

        this(null);

    }

    // 构造一个有所属容器的管道

    public StandardPipeline(Container container) {

        super();

        setContainer(container);

    }

    // ----------------------------------------------------- Instance Variables

    /**

     * 基本阀门,最后执行的阀门

     */

    protected Valve basic = null;

    /**

     * 管道所属的容器

     */

    protected Container container = null;

    /**

     * 管道里面的首个执行的阀门

     */

    protected Valve first = null;

    // --------------------------------------------------------- Public Methods

    // 是否异步执行,如果一个阀门都没有,或者所有阀门都是异步执行的,才返回true

    @Override

    public boolean isAsyncSupported() {

        Valve valve = (first!=null)?first:basic;

        boolean supported = true;

        while (supported && valve!=null) {

            supported = supported & valve.isAsyncSupported();

            valve = valve.getNext();

        }

        return supported;

    }

    // 查找所有未异步执行的阀门

    @Override

    public void findNonAsyncValves(Set<String> result) {

        Valve valve = (first!=null) ? first : basic;

        while (valve != null) {

            if (!valve.isAsyncSupported()) {

                result.add(valve.getClass().getName());

            }

            valve = valve.getNext();

        }

    }

    // ------------------------------------------------------ Contained Methods

    // 获取所属容器

    @Override

    public Container getContainer() {

        return (this.container);

    }

    // 设置所属容器

    @Override

    public void setContainer(Container container) {

        this.container = container;

    }

    // 初始化逻辑,默认没有任何逻辑

    @Override

    protected void initInternal() {

        // NOOP

    }

    // 开始逻辑,调用所有阀门的start方法

    @Override

    protected synchronized void startInternal() throws LifecycleException {

        // Start the Valves in our pipeline (including the basic), if any

        Valve current = first;

        if (current == null) {

            current = basic;

        }

        while (current != null) {

            if (current instanceof Lifecycle)

                ((Lifecycle) current).start();

            current = current.getNext();

        }

        setState(LifecycleState.STARTING);

    }

    // 停止逻辑,调用所有阀门的stop方法

    @Override

    protected synchronized void stopInternal() throws LifecycleException {

        setState(LifecycleState.STOPPING);

        // Stop the Valves in our pipeline (including the basic), if any

        Valve current = first;

        if (current == null) {

            current = basic;

        }

        while (current != null) {

            if (current instanceof Lifecycle)

                ((Lifecycle) current).stop();

            current = current.getNext();

        }

    }

    // 销毁逻辑,移掉所有阀门,调用removeValve方法

    @Override

    protected void destroyInternal() {

        Valve[] valves = getValves();

        for (Valve valve : valves) {

            removeValve(valve);

        }

    }

    /**

     * 重新toString方法

     */

    @Override

    public String toString() {

        StringBuilder sb = new StringBuilder("Pipeline[");

        sb.append(container);

        sb.append(']');

        return sb.toString();

    }

    // ------------------------------------------------------- Pipeline Methods

    // 获取基础阀门

    @Override

    public Valve getBasic() {

        return (this.basic);

    }

    // 设置基础阀门

    @Override

    public void setBasic(Valve valve) {

        // Change components if necessary

        Valve oldBasic = this.basic;

        if (oldBasic == valve)

            return;

        // Stop the old component if necessary

        // 老的基础阀门会被调用stop方法且所属容器置为null

        if (oldBasic != null) {

            if (getState().isAvailable() && (oldBasic instanceof Lifecycle)) {

                try {

                    ((Lifecycle) oldBasic).stop();

                } catch (LifecycleException e) {

                    log.error("StandardPipeline.setBasic: stop", e);

                }

            }

            if (oldBasic instanceof Contained) {

                try {

                    ((Contained) oldBasic).setContainer(null);

                } catch (Throwable t) {

                    ExceptionUtils.handleThrowable(t);

                }

            }

        }

        // Start the new component if necessary

        // 新的阀门会设置所属容器,并调用start方法

        if (valve == null)

            return;

        if (valve instanceof Contained) {

            ((Contained) valve).setContainer(this.container);

        }

        if (getState().isAvailable() && valve instanceof Lifecycle) {

            try {

                ((Lifecycle) valve).start();

            } catch (LifecycleException e) {

                log.error("StandardPipeline.setBasic: start", e);

                return;

            }

        }

        // Update the pipeline

        // 替换pipeline中的基础阀门,就是讲基础阀门的前一个阀门的next指向当前阀门

        Valve current = first;

        while (current != null) {

            if (current.getNext() == oldBasic) {

                current.setNext(valve);

                break;

            }

            current = current.getNext();

        }

        this.basic = valve;

    }

    // 添加阀门

    @Override

    public void addValve(Valve valve) {

        // Validate that we can add this Valve

        // 设置所属容器

        if (valve instanceof Contained)

            ((Contained) valve).setContainer(this.container);

        // Start the new component if necessary

        // 调用阀门的start方法

        if (getState().isAvailable()) {

            if (valve instanceof Lifecycle) {

                try {

                    ((Lifecycle) valve).start();

                } catch (LifecycleException e) {

                    log.error("StandardPipeline.addValve: start: ", e);

                }

            }

        }

        // Add this Valve to the set associated with this Pipeline

        // 设置阀门,将阀门添加到基础阀门的前一个

        if (first == null) {

            first = valve;

            valve.setNext(basic);

        } else {

            Valve current = first;

            while (current != null) {

                if (current.getNext() == basic) {

                    current.setNext(valve);

                    valve.setNext(basic);

                    break;

                }

                current = current.getNext();

            }

        }

        container.fireContainerEvent(Container.ADD_VALVE_EVENT, valve);

    }

    // 获取阀门数组

    @Override

    public Valve[] getValves() {

        ArrayList<Valve> valveList = new ArrayList<>();

        Valve current = first;

        if (current == null) {

            current = basic;

        }

        while (current != null) {

            valveList.add(current);

            current = current.getNext();

        }

        return valveList.toArray(new Valve[0]);

    }

    // JMX方法,在此忽略

    public ObjectName[] getValveObjectNames() {

        ArrayList<ObjectName> valveList = new ArrayList<>();

        Valve current = first;

        if (current == null) {

            current = basic;

        }

        while (current != null) {

            if (current instanceof JmxEnabled) {

                valveList.add(((JmxEnabled) current).getObjectName());

            }

            current = current.getNext();

        }

        return valveList.toArray(new ObjectName[0]);

    }

    // 移除阀门

    @Override

    public void removeValve(Valve valve) {

        Valve current;

        if(first == valve) {

            // 如果待移出的阀门是首个阀门,则首个阀门的下一个阀门变成首个阀门

            first = first.getNext();

            current = null;

        } else {

            current = first;

        }

        // 遍历阀门集合,并进行移除

        while (current != null) {

            if (current.getNext() == valve) {

                current.setNext(valve.getNext());

                break;

            }

            current = current.getNext();

        }

        if (first == basic) first = null;

        // 设置阀门所属容器为null

        if (valve instanceof Contained)

            ((Contained) valve).setContainer(null);

        // 调用待移除阀门的stop方法和destroy方法,并触发移除阀门事件

        if (valve instanceof Lifecycle) {

            // Stop this valve if necessary

            if (getState().isAvailable()) {

                try {

                    ((Lifecycle) valve).stop();

                } catch (LifecycleException e) {

                    log.error("StandardPipeline.removeValve: stop: ", e);

                }

            }

            try {

                ((Lifecycle) valve).destroy();

            } catch (LifecycleException e) {

                log.error("StandardPipeline.removeValve: destroy: ", e);

            }

        }

        container.fireContainerEvent(Container.REMOVE_VALVE_EVENT, valve);

    }

    // 获取首个阀门,如果阀门列表为null,返回基础阀门

    @Override

    public Valve getFirst() {

        if (first != null) {

            return first;

        }

        return basic;

    }

}
总结
通过上面的代码分析,我们发现了几个关键的设计模式:
- 模板方法模式,父类定义框架,子类实现
- 责任链模式,就是这儿的管道/阀门的实现方式,每个阀门维护一个next属性指向下一个阀门
Tomcat源码分析 (四)----- Pipeline和Valve的更多相关文章
- Tomcat 源码分析(转)
本文转自:http://blog.csdn.net/haitao111313/article/category/1179996 Tomcat源码分析(一)--服务启动 1. Tomcat主要有两个组件 ...
- Tomcat源码分析之—具体启动流程分析
从Tomcat启动调用栈可知,Bootstrap类的main方法为整个Tomcat的入口,在init初始化Bootstrap类的时候为设置Catalina的工作路径也就是Catalina_HOME信息 ...
- Tomcat源码分析--转
一.架构 下面谈谈我对Tomcat架构的理解 总体架构: 1.面向组件架构 2.基于JMX 3.事件侦听 1)面向组件架构 tomcat代码看似很庞大,但从结构上看却很清晰和简单,它主要由一堆组件组成 ...
- Tomcat源码分析
前言: 本文是我阅读了TOMCAT源码后的一些心得. 主要是讲解TOMCAT的系统框架, 以及启动流程.若有错漏之处,敬请批评指教! 建议: 毕竟TOMCAT的框架还是比较复杂的, 单是从文字上理解, ...
- Tomcat源码分析——请求原理分析(下)
前言 本文继续讲解TOMCAT的请求原理分析,建议朋友们阅读本文时首先阅读过<TOMCAT源码分析——请求原理分析(上)>和<TOMCAT源码分析——请求原理分析(中)>.在& ...
- Tomcat源码分析——请求原理分析(中)
前言 在<TOMCAT源码分析——请求原理分析(上)>一文中已经介绍了关于Tomcat7.0处理请求前作的初始化和准备工作,请读者在阅读本文前确保掌握<TOMCAT源码分析——请求原 ...
- Tomcat源码分析——请求原理分析(上)
前言 谈起Tomcat的诞生,最早可以追溯到1995年.近20年来,Tomcat始终是使用最广泛的Web服务器,由于其使用Java语言开发,所以广为Java程序员所熟悉.很多人早期的J2EE项目,由程 ...
- Tomcat源码分析(二)------ 一次完整请求的里里外外
Tomcat源码分析(二)------ 一次完整请求的里里外外 前几天分析了一下Tomcat的架构和启动过程,今天开始研究它的运转机制.Tomcat最本质就是个能运行JSP/Servlet的Web ...
- tomcat源码--springboot整合tomcat源码分析
1.测试代码,一个简单的springboot web项目:地址:https://gitee.com/yangxioahui/demo_mybatis.git 一:tomcat的主要架构:1.如果我们下 ...
随机推荐
- 【JavaScript】深入理解call,以及与apply、bind的区别
一.call call有两个妙用 1.继承(我前面的文章有提到用call实现call继承,有兴趣可以看下.https://www.cnblogs.com/pengshengguang/p/105476 ...
- Linux部署项目常用命令
前言:一般项目都会使用阿里云等服务器作为云服务器.此时必不可免会使用到一系列常用的命令.这里我整合一下常用的命令 1.一般链接阿里云服务器常用的的是xshell跟xftp. 下载路径:https:// ...
- c++学习书籍推荐《Beyond the C++ Standard Library》下载
百度云及其他网盘下载地址:点我 作者简介 Björn Karlsson works as a Senior Software Engineer at ReadSoft, where he spends ...
- NetCore 中间件获取请求报文和返回报文
using System; using System.IO; namespace WebApi.Restful.Middlewares { public class MemoryWrappedHttp ...
- Bzoj 4582 [Usaco2016 Open] Diamond Collector 题解
4582: [Usaco2016 Open]Diamond Collector Time Limit: 10 Sec Memory Limit: 128 MBSubmit: 204 Solved: ...
- 学习2:总结# 1.while # 2.字符串格式化 # 3.运算符 # 4.编码初始
目录 1.while循环 -- 死循环 2.字符串格式化: 3.运算符 4.编码 1.while循环 -- 死循环 while 条件: 循环体 打断死循环: break -- 终止当前循环 改变条件 ...
- HTML表单部分学习笔记
第一部分: <!-- action :指定处理提交表单的格式 method :指定提交表单的http方法 enctype:指明用来把表单提交给服务器时的互联网媒体形式 --> <fo ...
- Gym - 101194L World Cup 暴力
World CupInput file: Standard InputOutput file: Standard OuptutTime limit: 1 second Here is World Cu ...
- RecyclerView下拉加载集合越界问题
问题描述 在做毕业设计app中遇到这样一个问题,使用RecyclerView进行下拉加载数据的时候,比如我每次让它加载5条数据,当服务器端数据总数刚好是5的倍数的时候,不会出现下拉加载数据集合越界的问 ...
- C#3.0新增功能10 表达式树 05 解释表达式
连载目录 [已更新最新开发文章,点击查看详细] 表达式树中的每个节点将是派生自 Expression 的类的对象. 该设计使得访问表达式树中的所有节点成为相对直接的递归操作. 常规策略是从根节点 ...