springboot 整合Swagger2的使用
Swagger2相较于传统Api文档的优点
手写Api文档的几个痛点:
文档需要更新的时候,需要再次发送一份给前端,也就是文档更新交流不及时。
接口返回结果不明确
不能直接在线测试接口,通常需要使用工具,比如postman
接口文档太多,不好管理
Swagger也就是为了解决这个问题,当然也不能说Swagger就一定是完美的,当然也有缺点,最明显的就是代码移入性比较强。
可以直接使用Swagger editor编写接口文档,我们这里讲解的是SpringBoot整合Swagger2,直接生成接口文档的方式。
依赖文件
<dependency>

	<groupId>io.springfox</groupId>

	<artifactId>springfox-swagger2</artifactId>

	<version>2.6.1</version>

</dependency>

<dependency>

	<groupId>io.springfox</groupId>

	<artifactId>springfox-swagger-ui</artifactId>

	<version>2.6.1</version>

</dependency>
配置类
package com.boss.hr.train.fishkkmybatis.config;

import org.springframework.context.annotation.Bean;

import org.springframework.context.annotation.Configuration;

import springfox.documentation.builders.ApiInfoBuilder;

import springfox.documentation.builders.PathSelectors;

import springfox.documentation.builders.RequestHandlerSelectors;

import springfox.documentation.service.ApiInfo;

import springfox.documentation.spi.DocumentationType;

import springfox.documentation.spring.web.plugins.Docket;

/**

 * @author fishkk

 * @version 1.0.0

 * @since

 */

@Configuration

public class Swagger2Configuration {

    @Bean

    public Docket createRestApi() {

        return new Docket(DocumentationType.SWAGGER_2)

                .apiInfo(apiInfo())

                .select()

                .apis(RequestHandlerSelectors.basePackage("com.boss.hr.train.fishkkmybatis.controller"))

                .paths(PathSelectors.any())

                .build();

    }

    private ApiInfo apiInfo() {

        return new ApiInfoBuilder()

                .title("springboot利用swagger构建api文档")

                .description("fishkk的Swagger")

                .version("1.0")

                .build();

    }

}
在启动函数出天价@EnableSwagger2,到这里就可以正常的使用Swagger2 了
Swagger2 的具体使用
package com.boss.hr.train.fishkkmybatis.controller;

import com.boss.hr.train.fishkkmybatis.annotation.Logg;

import com.boss.hr.train.fishkkmybatis.entity.Dictionary;

import com.boss.hr.train.fishkkmybatis.entity.Result;

import com.boss.hr.train.fishkkmybatis.enums.DictionaryEnum;

import com.boss.hr.train.fishkkmybatis.exception.BaseException;

import com.boss.hr.train.fishkkmybatis.service.impl.DictionaryServiceImpl;

import io.swagger.annotations.ApiImplicitParam;

import io.swagger.annotations.ApiOperation;

import org.springframework.data.redis.core.RedisTemplate;

import org.springframework.validation.BindingResult;

import org.springframework.web.bind.annotation.*;

import javax.annotation.Resource;

import javax.validation.Valid;

import java.util.List;

import java.util.Random;

import java.util.concurrent.TimeUnit;

/**

 * @author fishkk

 * @version 1.0.0

 * @since 2019/7/27

 */

@RestController

@RequestMapping(value = "/dic")

@CrossOrigin

public class DictionaryController {

    /**

     * Redis 缓存

     */

    @Resource

    private RedisTemplate redisTemplate;

    @Resource

    private DictionaryServiceImpl dictionaryService;

    private List<Dictionary> list;

    /**

     *  创建字典实体

     * @author fishkk

     * @since  2017/7/25

     * @param  dictionary 字典实体

     * @return  Dictionary 放回创建的字典实体

     */

    @ApiOperation(value="创建字典", notes="根据Dictionary对象创建字典")

    @ApiImplicitParam(name = "dictionary", value = "字典详细实体dictionary", required = true, dataType = "Dictionary")

    @PostMapping(value = "/insert")

    public Result insertDic(@Valid Dictionary dictionary, BindingResult bindingResult){

        if (bindingResult.hasErrors()){

            return Result.error(DictionaryEnum.ERROR_INPUT);

        }

        dictionaryService.insert(dictionary);

        return Result.success(dictionary);

    }

    /**

     *  根据主键查找字典

     * @author fishkk

     * @since  2019/7/25

     * @param  id 主键id

     * @return dictionary查找到的实体对象

     */

    @ApiOperation(value = "获取字典信息",notes = "根据id获取字典信息")

    @ApiImplicitParam(name = "id",value = "字典id",required = true, dataType = "Long", paramType = "path")

    @GetMapping(value = "/dic")

    public Result findById(@RequestParam(value = "id") Integer id){

        if (list == null){

            list = dictionaryService.selectAll();

            for (Dictionary x:list) {

                long time = new Random().nextInt(10);

                redisTemplate.opsForValue().set(x.getCategoryId(),x,12,TimeUnit.HOURS);

            }

        }

        if (redisTemplate.opsForValue().get(id) != null){

            return Result.success(redisTemplate.opsForValue().get(id));

        }

        redisTemplate.opsForValue().set(id,dictionaryService.selectByPrimaryKey(id),12,TimeUnit.HOURS);

        return Result.success(dictionaryService.selectByPrimaryKey(id));

    }

    /**

     * 根据主键删除字典

     * @author fishkk

     * @since  2019/7/25

     * @param  id 字典主键

     */

    @ApiOperation(value = "根据id删除单个字典表",notes = "根据id删除字典")

    @ApiImplicitParam(name = "id",value = "用户id",required = true, dataType = "Long", paramType = "path")

    @GetMapping(value = "/remove/{id}")

    public Result deleteById(@PathVariable("id") Integer id){

        dictionaryService.deleteByPrimaryKey(id);

        return Result.success(null);

    }

    /**

     *  更新字典对象

     * @author fishkk

     * @since  2019/7/26

     * @param  dictionary 修改过的字典对象

     */

    @ApiOperation(value="更新字典", notes="根据Dictionary更新对应的字典")

    @ApiImplicitParam(name = "dictionary", value = "字典详细实体dictionary", required = true, dataType = "Dictionary")

    @PostMapping(value = "/updata")

    public Result updata(@Valid Dictionary dictionary, BindingResult bindingResult){

        if (bindingResult.hasErrors()){

            return Result.error(DictionaryEnum.ERROR_INPUT);

        }

        dictionaryService.updateByPrimaryKey(dictionary);

        return Result.success(null);

    }

    /**

      *  根据字典名查询

      * @author fishkk

      * @since  2019/7/28

      * @param  name 字典名

      */

    @GetMapping(value = "/get/{name}")

    public Result findByName(@PathVariable("name") String name ){

        return Result.success(dictionaryService.findByName(name));

    }

    /**

     *  根据字典类型查询

     * @author fishkk

     * @since  2019/7/28

     * @param type 字典类型

     */

    @GetMapping(value = "/gettype/{type}")

    public Result findByType(@PathVariable("type") String type){

        return Result.success(dictionaryService.findByType(type));

    }

    /**

     *  获取全部对象

     * @author fishkk

     * @since  2019/7/28

     */

    @Logg

    @GetMapping(value = "/getall")

    public Result findByType(){

        //throw new BaseException(DictionaryEnum.NOT_FOUND);

      return Result.success(dictionaryService.selectAll());

//        Float a = null;

//        Float b = Float.intBitsToFloat(11);

//        System.out.println(a + b);

//        return null;

    }

}
启动SpringBoot项目,访问 http://localhost:8080/swagger-ui.html
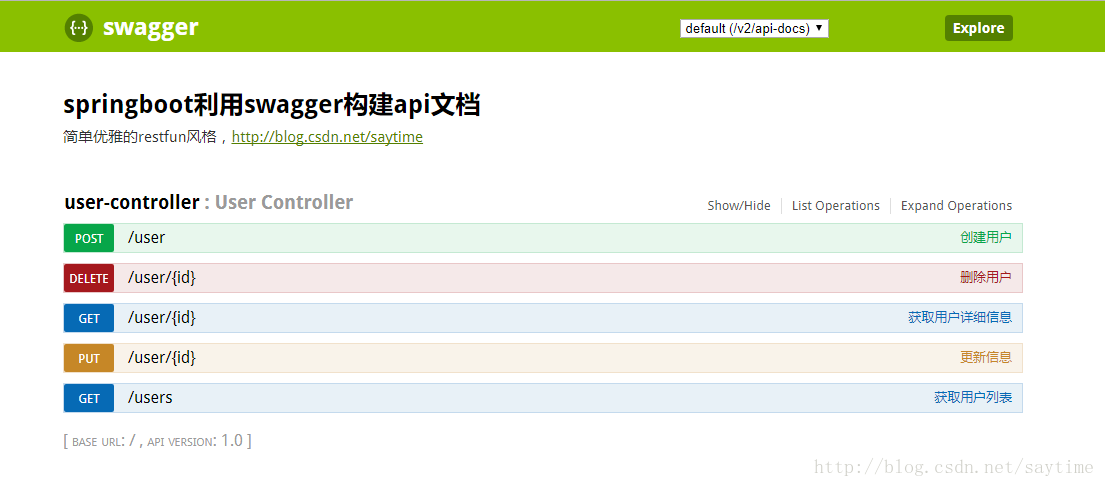
可以看到上诉类似的结果,我的项目启动太麻烦了含SpringCloud 就不展示了。
Swagger2的注解
swagger通过注解表明该接口会生成文档,包括接口名、请求方法、参数、返回信息的等等。
- @Api:修饰整个类,描述Controller的作用
- @ApiOperation:描述一个类的一个方法,或者说一个接口
- @ApiParam:单个参数描述
- @ApiModel:用对象来接收参数
- @ApiProperty:用对象接收参数时,描述对象的一个字段
- @ApiResponse:HTTP响应其中1个描述
- @ApiResponses:HTTP响应整体描述
- @ApiIgnore:使用该注解忽略这个API
- @ApiError :发生错误返回的信息
- @ApiImplicitParam:一个请求参数
- @ApiImplicitParams:多个请求参数
springboot 整合Swagger2的使用的更多相关文章
- SpringBoot(七):SpringBoot整合Swagger2
原文地址:https://blog.csdn.net/saytime/article/details/74937664 手写Api文档的几个痛点: 文档需要更新的时候,需要再次发送一份给前端,也就是文 ...
- SpringBoot整合Swagger2
相信各位在公司写API文档数量应该不少,当然如果你还处在自己一个人开发前后台的年代,当我没说,如今为了前后台更好的对接,还是为了以后交接方便,都有要求写API文档. 手写Api文档的几个痛点: 文档需 ...
- SpringBoot整合Swagger2(Demo示例)
写在前面 由于公司项目采用前后端分离,维护接口文档基本上是必不可少的工作.一个理想的状态是设计好后,接口文档发给前端和后端,大伙按照既定的规则各自开发,开发好了对接上了就可以上线了.当然这是一种非常理 ...
- SpringBoot整合Swagger2案例,以及报错:java.lang.NumberFormatException: For input string: ""原因和解决办法
原文链接:https://blog.csdn.net/weixin_43724369/article/details/89341949 SpringBoot整合Swagger2案例 先说SpringB ...
- SpringBoot整合Swagger2详细教程
1. 简介 随着前后端分离开发模式越来越流行,编写接口文档变成了开发人员非常头疼的事.而Swagger是一个规范且完整的web框架,用于生成.描述.调用可视化的RESTful风格的在线接口文档,并 ...
- SpringBoot整合Swagger2及使用
简介 swagger是一个流行的API开发框架,这个框架以"开放API声明"(OpenAPI Specification,OAS)为基础, 对整个API的开发周期都提供了相应的解决 ...
- SpringBoot整合Swagger2,再也不用维护接口文档了!
前后端分离后,维护接口文档基本上是必不可少的工作.一个理想的状态是设计好后,接口文档发给前端和后端,大伙按照既定的规则各自开发,开发好了对接上了就可以上线了.当然这是一种非常理想的状态,实际开发中却很 ...
- SpringBoot学习笔记(16)----SpringBoot整合Swagger2
Swagger 是一个规范和完整的框架,用于生成,描述,调用和可视化RESTful风格的web服务 http://swagger.io Springfox的前身是swagger-springmvc,是 ...
- Spring Boot2 系列教程(十七)SpringBoot 整合 Swagger2
前后端分离后,维护接口文档基本上是必不可少的工作. 一个理想的状态是设计好后,接口文档发给前端和后端,大伙按照既定的规则各自开发,开发好了对接上了就可以上线了.当然这是一种非常理想的状态,实际开发中却 ...
随机推荐
- Windows版的OpenJDK下载(Red Hat 提供)
OpenJDK 在linux下安装很简单(yum安装),但是OpenJDK的官网没有为我们提供Windows版的安装软件.庆幸的是,Red Hat(红帽)为我们提供了windows版的安装软件. 下载 ...
- ThinkPHP3(结构,路由,模板的调用,后台搭建,系统常量)
ThinkPHP的结构如下: 在ThinkPHP\Library\Think文件夹中,几个重要的文件 1.App.class.php 框架核心类文件 2.Think.class.php 每次请求都要执 ...
- cisco ap客户端无规律掉线
设备 cisco air-ct2504-50-k9 cisco air-ap1832I-H-k9 首先根据这个帖子 https://community.cisco.com/t5/other-wirel ...
- Codeforces Round #249 (Div. 2) C. Cardiogram
C. Cardiogram time limit per test 1 second memory limit per test 256 megabytes input standard input ...
- 洛谷--P1028 数的计算(递推)
题意:链接:https://www.luogu.org/problem/P1028 先输入一个自然数n (n≤1000) , 然后对此自然数按照如下方法进行处理: 不作任何处理; 在它的左边加上一个自 ...
- 使用adb命令对移动设备截图
步骤: 1) 首先要进入CMD窗口,命令行模式,连接设备. 2)使用screencap 命令,对安卓设备的当前屏幕进行截屏,示例: adb shell screencap -p /sdcard/0 ...
- CapsLock魔改大法——变废为宝实现高效编辑
前言 CapsLock,也就是键盘左边中间那个大写锁定.平时很少会用到,跟shift功能重复不谈,更多的时候还会带来各种额外的麻烦. 一直以来的都是一个非常碍事讨厌的存在.就是这么一个垃圾键,偏偏却占 ...
- Java核心技术梳理-类加载机制与反射
一.引言 反射机制是一个非常好用的机制,C#和Java中都有反射,反射机制简单来说就是在程序运行状态时,对于任意一个类,能够知道这个类的所有属性和方法,对于任意一个对象,能够调用它的任意属性和方法,其 ...
- VMware学习笔记之在虚拟机中使用Ghost系统盘安装xp黑屏卡在光标闪无法进入系统
使用ghost安装后,无法进入系统,卡在光标闪动,请参考如下: https://www.cnblogs.com/mq0036/p/3588058.html https://wenku.baidu.co ...
- 为 WPF 程序添加 Windows 跳转列表的支持
原文:为 WPF 程序添加 Windows 跳转列表的支持 Windows 跳转列表是自 Windows 7 时代就带来的功能,这一功能是跟随 Windows 7 的任务栏而发布的.当时应用程序要想用 ...