springboot整合ActiveMQ1(基本使用)
- 基本使用,https://www.tapme.top/blog/detail/2018-09-05-10-38
- 主备模式,https://www.tapme.top/blog/detail/2018-09-06-10-38
说明:acitveMQ 版本为:5.9.1,springboot 版本为 2.0.3
一. 下载安装(windows)
官方下载地址:点我跳转,选择 windows 安装包下载,然后解压,解压后运行 bin 目录下的activemq.bat启动服务,无报错即可启动成功。默认管理地址为:localhost:8161/admin,默认管理员账号密码为admin/admin。
二. springboot 整合
1. 创建 springboot 项目
创建 springboot web 项目,加入 spring-boot-starter-activemq 依赖。
<dependency>

    <groupId>org.springframework.boot</groupId>

    <artifactId>spring-boot-starter-activemq</artifactId>

</dependency>
然后编辑配合文件,加上一个配置:61616 为 activeMQ 的默认端口,暂时不做其他配置,使用默认值。
spring:

  activemq:

    broker-url: tcp://localhost:61616
2. 创建生产者消费者
springboot 中 activeMQ 的默认配置为生产-消费者模式,还有一种模式为发布-订阅模式后面再讲。项目目录如下:

首先编写配置类 Config.java,代码如下
@Configuration

public class Config {

    @Bean(name = "queue2")

    public Queue queue2(){

        return new ActiveMQQueue("active.queue2");

    }

    @Bean(name = "queue1")

    public Queue queue1(){

        return new ActiveMQQueue("active.queue1");

    }

}
上面的代码建立了两个消息队列 queue1,queue2,分别由 queue1 和 queue2 这两个 Bean 注入到 Spring 容器中。程序运行后会在 activeMQ 的管理页面->queue 中看到如下:

生产者 Producer.java 代码如下:
@RestController

public class Producer {

    @Autowired

    private JmsMessagingTemplate jmsMessagingTemplate;

    @Autowired()

    @Qualifier("queue2")

    private Queue queue2;

    @Autowired()

    @Qualifier("queue1")

    private Queue queue1;

    @GetMapping("/queue2")

    public void sendMessage1(String message){

            jmsMessagingTemplate.convertAndSend(queue2,"I'm from queue2:"+message);

    }

    @GetMapping("/queue1")

    public void sendMessage2(String message){

        jmsMessagingTemplate.convertAndSend(queue1,"I'm from queue1:"+message);

    }

}
上面的类创建了两个 GET 接口,访问这两个接口分别向 queue1 和 queue2 中发送消息。
消费者 Comsumer.java 代码如下:
@Component //将该类注解到Spring 容器中

public class Comsumer {

    //接受消息队列1消息

    @JmsListener(destination = "active.queue1") //监听active.queue1消息队列

    public void readActiveQueue11(String message){

        System.out.println(1+message);

    }

    //接受消息队列1消息

    @JmsListener(destination = "active.queue1")

    public void readActiveQueue12(String message){

        System.out.println(2+message);

    }

    //接受消息队列2消息

    @JmsListener(destination = "active.queue2")

    public void readActiveQueue21(String message){

        System.out.println(1+message);

    }

    //接受消息队列2消息

    @JmsListener(destination = "active.queue2")

    public void readActiveQueue22(String message){

        System.out.println(2+message);

    }

}
上面的代码定义了 4 个消费者,每两个消费一个消息队列。
3. 运行
启动项目后分别向/queue1?message=niihao,/queue2?message=nihaoa 发送 http 请求,然后我们可以在控制台中看到如下输出:
2I'm from queue2:nihaoa

1I'm from queue2:nihaoa

2I'm from queue1:nihao

1I'm from queue1:nihao
消息都成功被消费者消费,从打印结果也可看出生产者消费者的一个特点:一个消息只会被一个消费者消费。同时在管理页面中可以看到:
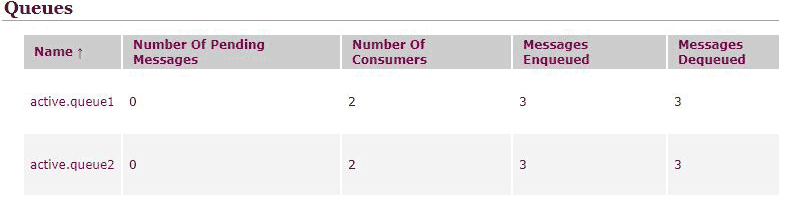
每个消息队列有两个消费者,队列进入了三个消息,出了三个消息,说明消息都被消费掉了,如果注释掉消费者代码,再次运行,然后发送消息就会发现 MessagesEnqueued 数量大于 MessagesDequeued,然后再让消费者上线会立即消费掉队列中的消息。
本文原创发布于:https://www.tapme.top/blog/detail/2018-09-05-10-38
源码:https://github.com/FleyX/demo-project/tree/master/jms_demo
springboot整合ActiveMQ1(基本使用)的更多相关文章
- spring-boot整合mybatis(1)
sprig-boot是一个微服务架构,加快了spring工程快速开发,以及简便了配置.接下来开始spring-boot与mybatis的整合. 1.创建一个maven工程命名为spring-boot- ...
- SpringBoot整合Mybatis之项目结构、数据源
已经有好些日子没有总结了,不是变懒了,而是我一直在奋力学习springboot的路上,现在也算是完成了第一阶段的学习,今天给各位总结总结. 之前在网上找过不少关于springboot的教程,都是一些比 ...
- springboot整合mq接收消息队列
继上篇springboot整合mq发送消息队列 本篇主要在上篇基础上进行activiemq消息队列的接收springboot整合mq发送消息队列 第一步:新建marven项目,配置pom文件 < ...
- springboot整合mybaits注解开发
springboot整合mybaits注解开发时,返回json或者map对象时,如果一个字段的value为空,需要更改springboot的配置文件 mybatis: configuration: c ...
- SpringBoot整合Redis、ApachSolr和SpringSession
SpringBoot整合Redis.ApachSolr和SpringSession 一.简介 SpringBoot自从问世以来,以其方便的配置受到了广大开发者的青睐.它提供了各种starter简化很多 ...
- SpringBoot整合ElasticSearch实现多版本的兼容
前言 在上一篇学习SpringBoot中,整合了Mybatis.Druid和PageHelper并实现了多数据源的操作.本篇主要是介绍和使用目前最火的搜索引擎ElastiSearch,并和Spring ...
- SpringBoot整合Kafka和Storm
前言 本篇文章主要介绍的是SpringBoot整合kafka和storm以及在这过程遇到的一些问题和解决方案. kafka和storm的相关知识 如果你对kafka和storm熟悉的话,这一段可以直接 ...
- SpringBoot整合SpringCloud搭建分布式应用
什么是SpringCloud? SpringCloud是一个分布式的整体解决方案.SpringCloud为开发者提供了在分布式系统中快速构建的工具,使用SpringCloud可以快速的启动服务或构建应 ...
- SpringBoot整合RabbitMQ-整合演示
本系列是学习SpringBoot整合RabbitMQ的练手,包含服务安装,RabbitMQ整合SpringBoot2.x,消息可靠性投递实现等三篇博客. 学习路径:https://www.imooc. ...
随机推荐
- 2019软工实践_Alpha(6/6)
队名:955 组长博客:https://www.cnblogs.com/cclong/p/11913269.html 作业博客:https://edu.cnblogs.com/campus/fzu/S ...
- 创建批处理文件.bat文件(删除指定文件夹下的文件及文件夹并循环)
1.针对仅仅是删除文件夹下的文件的操作:使用del命令,单纯的删除文件操作,如下:del /f /s /q C:\Users\dell\AppData\Local\Temp\*.* 2.删除文件夹操作 ...
- Java_jdbc 基础笔记之十三 数据库连接(DAO)
public class DAO { // INSERT, UPDATE, DELETE 操作都可以包含在其中 public void update(String sql, Object... arg ...
- postgres开启慢查询日志
1.全局设置修改配置postgres.conf: log_min_duration_statement=5000 然后加载配置: postgres=# select pg_reload_conf() ...
- PLSQL查询执行计划
转: PLSQL查询执行计划 01(转) 2019-05-15 15:15:43 p享自由q 阅读数 365 一般优化途径: 如果能通过修改语句优化,比如查询条件或执行顺序,sql改不了,可以通过 ...
- rqalpha学习-2
conf = default_config()deep_update(user_config(), conf)deep_update(project_config(), conf) 三种不同级别的 ...
- JavaScript和Jquery个人笔记
目录 前言 价格 * 数量 = 金额 js计算时间差值 判断敲回车或Shift+回车 js控制textarea换行 $(this)选择当前元素 前端调试禁止其他js js添加a标签href属性和文本 ...
- oracle 常用命令【创建表空间用户及删除】
/*第1步:创建临时表空间 */ create temporary tablespace ZJY_TEMP tempfile '/usr/u01/app/oradata/orcl/ZJY_TEMP.d ...
- mac的brew安装tomcat以及idea设置
Tomcat安装 brew search tomat 有tomcat@7. tomcat@8. tomcat最新版本(即tomcat9)三个版本 brew install tomcat 启动tomca ...
- 阿里云k8s构建镜像时设置版本号用于版本回滚
jenkins 构建配置参数化构建过程 构建 执行 shell , 将版本号参数传入 脚本 脚本push 带版本号的镜像到阿里云镜像仓库 #!/bin/bash #获取参数 while geto ...