
iOS 13-Sign In with Apple
最近了解了iOS 13新增功能之Sign In with Apple,Sign In with Apple是跨平台的,可以支持iOS、macOS、watchOS、tvOS、JS。本文主要内容为Sign In with Apple在iOS上的基础使用。详情参考WWDC 2019
- 审核备注
Sign In with Apple will be available for beta testing this summer. It will be required as an option for users in apps that support third-party sign-in when it is commercially available later this year.
也就是说,当 Sign In with Apple 服务正式上线以后,所有已接入其它第三方登录的 App,Sign In with Apple 将被要求作为一种登录选择,否则有可能就不给过。
开发Sign In with Apple的注意事项
需要在苹果后台打开该选项,并且重新生成Profiles配置文件,并安装到Xcode,如下图
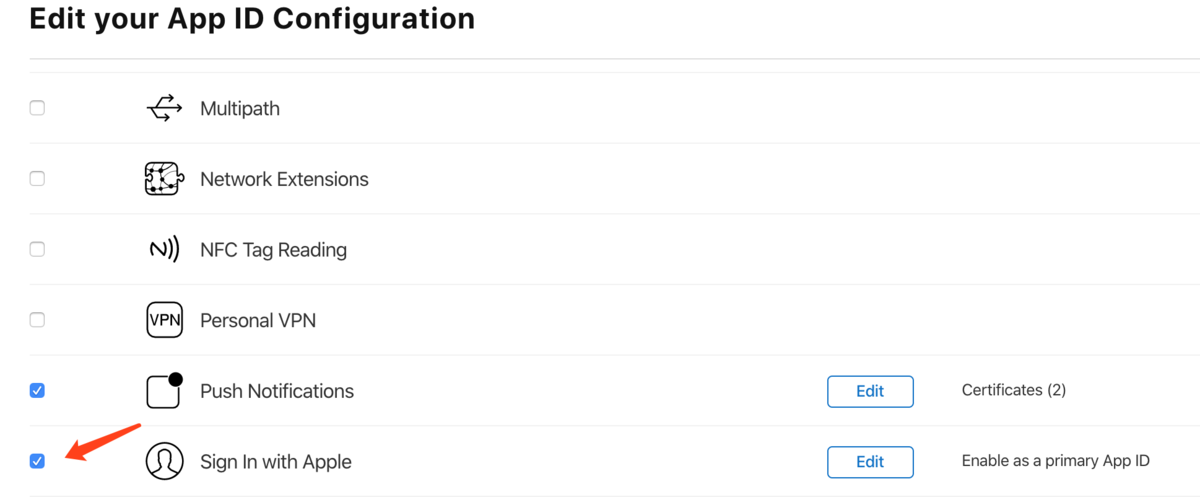
iOS使用Sign In with Apple在Xcode的准备工作
在Xcode11 Signing & Capabilities中添加Sign In With Apple,如下图

iOS Sign In with Apple流程
1、添加 Sign In with Apple 登录按钮,设置 ASAuthorizationAppleIDButton 相关布局,并添加按钮点击响应事件

2、获取授权码

3、验证
1、添加Sign In with Apple登录按钮,设置ASAuthorizationAppleIDButton相关布局,并添加按钮点击响应事件。
当然苹果也允许自定义苹果登录按钮的样式,样式要求详见这个文档:Human Interface Guidelines
- (void)configUI{

    // 用于展示Sign In With Apple 登录过程的信息

    _appleIDInfoLabel = [[UILabel alloc] initWithFrame:CGRectMake(0, 40.0, CGRectGetWidth(self.view.frame), CGRectGetHeight(self.view.frame) * 0.4)];

    _appleIDInfoLabel.font = [UIFont systemFontOfSize:22.0];

    _appleIDInfoLabel.numberOfLines = 0;

    _appleIDInfoLabel.lineBreakMode = NSLineBreakByWordWrapping;

    _appleIDInfoLabel.text = @"显示Sign In With Apple 登录信息\n";

    [self.view addSubview:_appleIDInfoLabel];

    if (@available(iOS 13.0, *)) {

        // Sign In With Apple Button

        ASAuthorizationAppleIDButton *appleIDBtn = [ASAuthorizationAppleIDButton buttonWithType:ASAuthorizationAppleIDButtonTypeDefault style:ASAuthorizationAppleIDButtonStyleWhite];

        appleIDBtn.frame = CGRectMake(30, self.view.bounds.size.height - 180, self.view.bounds.size.width - 60, 100);

        //    appleBtn.cornerRadius = 22.f;

        [appleIDBtn addTarget:self action:@selector(handleAuthorizationAppleIDButtonPress) forControlEvents:UIControlEventTouchUpInside];

        [self.view addSubview:appleIDBtn];

    }

}

// 处理授权

- (void)handleAuthorizationAppleIDButtonPress{

    NSLog(@"////////");

    if (@available(iOS 13.0, *)) {

        // 基于用户的Apple ID授权用户,生成用户授权请求的一种机制

        ASAuthorizationAppleIDProvider *appleIDProvider = [[ASAuthorizationAppleIDProvider alloc] init];

        // 创建新的AppleID 授权请求

        ASAuthorizationAppleIDRequest *appleIDRequest = [appleIDProvider createRequest];

        // 在用户授权期间请求的联系信息

        appleIDRequest.requestedScopes = @[ASAuthorizationScopeFullName, ASAuthorizationScopeEmail];

        // 由ASAuthorizationAppleIDProvider创建的授权请求 管理授权请求的控制器

        ASAuthorizationController *authorizationController = [[ASAuthorizationController alloc] initWithAuthorizationRequests:@[appleIDRequest]];

        // 设置授权控制器通知授权请求的成功与失败的代理

        authorizationController.delegate = self;

        // 设置提供 展示上下文的代理,在这个上下文中 系统可以展示授权界面给用户

        authorizationController.presentationContextProvider = self;

        // 在控制器初始化期间启动授权流

        [authorizationController performRequests];

    }

}
- 已经使用
Sign In with Apple登录过app的用户
如果设备中存在iCloud Keychain凭证或者AppleID凭证,提示用户直接使用TouchID或FaceID登录即可,代码如下
// 如果存在iCloud Keychain 凭证或者AppleID 凭证提示用户

- (void)perfomExistingAccountSetupFlows{

    NSLog(@"///已经认证过了/////");

    if (@available(iOS 13.0, *)) {

        // 基于用户的Apple ID授权用户,生成用户授权请求的一种机制

        ASAuthorizationAppleIDProvider *appleIDProvider = [[ASAuthorizationAppleIDProvider alloc] init];

        // 授权请求AppleID

        ASAuthorizationAppleIDRequest *appleIDRequest = [appleIDProvider createRequest];

        // 为了执行钥匙串凭证分享生成请求的一种机制

        ASAuthorizationPasswordProvider *passwordProvider = [[ASAuthorizationPasswordProvider alloc] init];

        ASAuthorizationPasswordRequest *passwordRequest = [passwordProvider createRequest];

        // 由ASAuthorizationAppleIDProvider创建的授权请求 管理授权请求的控制器

        ASAuthorizationController *authorizationController = [[ASAuthorizationController alloc] initWithAuthorizationRequests:@[appleIDRequest, passwordRequest]];

        // 设置授权控制器通知授权请求的成功与失败的代理

        authorizationController.delegate = self;

        // 设置提供 展示上下文的代理,在这个上下文中 系统可以展示授权界面给用户

        authorizationController.presentationContextProvider = self;

        // 在控制器初始化期间启动授权流

        [authorizationController performRequests];

    }

}
2、获取授权码
获取授权码需要在代码中实现两个代理回调ASAuthorizationControllerDelegate、ASAuthorizationControllerPresentationContextProviding分别用于处理授权登录成功和失败、以及提供用于展示授权页面的Window,代码如下
#pragma mark - delegate

//@optional 授权成功地回调

- (void)authorizationController:(ASAuthorizationController *)controller didCompleteWithAuthorization:(ASAuthorization *)authorization{

    NSLog(@"授权完成:::%@", authorization.credential);

    NSLog(@"%s", __FUNCTION__);

    NSLog(@"%@", controller);

    NSLog(@"%@", authorization);

    // 测试配置UI显示

    NSMutableString *mStr = [NSMutableString string];

    if ([authorization.credential isKindOfClass:[ASAuthorizationAppleIDCredential class]]) {

        // 用户登录使用ASAuthorizationAppleIDCredential

        ASAuthorizationAppleIDCredential *appleIDCredential = authorization.credential;

        NSString *user = appleIDCredential.user;

        NSString *familyName = appleIDCredential.fullName.familyName;

        NSString *givenName = appleIDCredential.fullName.givenName;

        NSString *email = appleIDCredential.email;

//        NSData *identityToken = appleIDCredential.identityToken;

//        NSData *authorizationCode = appleIDCredential.authorizationCode;

        // Create an account in your system.

        // For the purpose of this demo app, store the userIdentifier in the keychain.

        //  需要使用钥匙串的方式保存用户的唯一信息

        [YostarKeychain save:KEYCHAIN_IDENTIFIER(@"userIdentifier") data:user];

        [mStr appendString:user];

        [mStr appendString:@"\n"];

        [mStr appendString:familyName];

        [mStr appendString:@"\n"];

        [mStr appendString:givenName];

        [mStr appendString:@"\n"];

        [mStr appendString:email];

        NSLog(@"mStr:::%@", mStr);

        [mStr appendString:@"\n"];

        _appleIDInfoLabel.text = mStr;

    }else if ([authorization.credential isKindOfClass:[ASPasswordCredential class]]){

        // Sign in using an existing iCloud Keychain credential.

        // 用户登录使用现有的密码凭证

        ASPasswordCredential *passwordCredential = authorization.credential;

        // 密码凭证对象的用户标识 用户的唯一标识

        NSString *user = passwordCredential.user;

        // 密码凭证对象的密码

        NSString *password = passwordCredential.password;

        [mStr appendString:user];

        [mStr appendString:@"\n"];

        [mStr appendString:password];

        [mStr appendString:@"\n"];

        NSLog(@"mStr:::%@", mStr);

        _appleIDInfoLabel.text = mStr;

    }else{

        NSLog(@"授权信息均不符");

        mStr = [@"授权信息均不符" copy];

        _appleIDInfoLabel.text = mStr;

    }

}

// 授权失败的回调

- (void)authorizationController:(ASAuthorizationController *)controller didCompleteWithError:(NSError *)error{

    // Handle error.

    NSLog(@"Handle error:%@", error);

    NSString *errorMsg = nil;

    switch (error.code) {

        case ASAuthorizationErrorCanceled:

            errorMsg = @"用户取消了授权请求";

            break;

        case ASAuthorizationErrorFailed:

            errorMsg = @"授权请求失败";

            break;

        case ASAuthorizationErrorInvalidResponse:

            errorMsg = @"授权请求响应无效";

            break;

        case ASAuthorizationErrorNotHandled:

            errorMsg = @"未能处理授权请求";

            break;

        case ASAuthorizationErrorUnknown:

            errorMsg = @"授权请求失败未知原因";

            break;

        default:

            break;

    }

    NSMutableString *mStr = [_appleIDInfoLabel.text mutableCopy];

    [mStr appendString:@"\n"];

    [mStr appendString:errorMsg];

    [mStr appendString:@"\n"];

    _appleIDInfoLabel.text = mStr;

}

// 告诉代理应该在哪个window 展示内容给用户

- (ASPresentationAnchor)presentationAnchorForAuthorizationController:(ASAuthorizationController *)controller{

    NSLog(@"88888888888");

    // 返回window

    return self.view.window;

}
在授权登录成功回调中,我们可以拿到以下几类数据
- UserID:
Unique, stable, team-scoped user ID,苹果用户唯一标识符,该值在同一个开发者账号下的所有App下是一样的,开发者可以用该唯一标识符与自己后台系统的账号体系绑定起来(这与国内的微信、QQ、微博等第三方登录流程基本一致) - Verification data:
Identity token, code,验证数据,用于传给开发者后台服务器,然后开发者服务器再向苹果的身份验证服务端验证,本次授权登录请求数据的有效性和真实性,详见Sign In with Apple REST API - Account information:
Name, verified email,苹果用户信息,包括全名、邮箱等,注意:如果玩家登录时拒绝提供真实的邮箱账号,苹果会生成虚拟的邮箱账号
3、验证
关于验证的这一步,需要传递授权码给自己的服务端,自己的服务端调用苹果API去校验授权码Generate and validate tokens。如果验证成功,可以根据userIdentifier判断账号是否已存在,若存在,则返回自己账号系统的登录态,若不存在,则创建一个新的账号,并返回对应的登录状态给App
附:官方示例代码 Swift 版
附:What the Heck is Sign In with Apple?
附:苹果授权登陆后端验证
附:App Store审核指南的更新
附:Generate and validate tokens
附:SignInAppleDemo
iOS 13-Sign In with Apple的更多相关文章
- iOS sign in with Apple 苹果ID登录
http://www.cocoachina.com/articles/109104?filter=ios https://juejin.im/post/5deefc5e518825126416611d ...
- [其它]iOS 13 正式版发布 iPhone 6s或更新型号均可升级
苹果今天(2019.09.20)发布了 iOS 13 正式版,可以升级的设备包括 iPhone 6s 或更新型号.第七代 iPod Touch. iOS 13 推出深色模式,为 iPhone 带来截然 ...
- iOS - 适配 iOS 13 之工兵连扫雷
iOS 13 支持适配的机型 目前最新 iPhone 11.iPhone 11 Pro和iPhone 11 Pro Max iPhone X.iPhone XR.iPhone XS.iPhone XS ...
- iOS 13适配
1. 安装时,加入Xcode11.3 后 原xcode会安装开发工具插件时候出现 点击安装插件之后会出现 目前没找到解决方案.只能在一个mac电脑上安装使用一个版本. 2.编译时,会出现libstdc ...
- Sign in with Apple 流程总结
流程图 相关说明 UserId 与用户的 Apple Id 一一对应.在同一个开发帐号下的所有 app 里,获取到的值都一样. IdentityToken identityToken 是一个 Json ...
- iOS 13 正式发布,来看看有哪些 API 变动
iOS 13 已正式发布,网上对其用户体验上的新特性的描述也很多.对于开发来说,需要关注的另一方面是新系统在 API 层面做了哪些改动,从而会对我们现有的代码产生什么影响. 在这里,我们基于 iOS ...
- 关于Sign in with Apple 后台验证的一些记录
2019年10月9号 IOS端新增Sign in with Apple IOS真是世界上最垃圾的语言,没有之一,苹果是世界上最垃圾的公司,没有之一 关于Sign in with Apple 苹果官方 ...
- iOS 13 绕过锁屏密码漏洞
iOS 13 很快就要发布了,在未正式发布之前,西班牙的安全研究员 Jose Rodriguez 公开了一个漏洞,能够查绕过锁屏密码查看通讯录.照片.短信. 在 iOS 设备上,当屏幕锁定时,用户无法 ...
- iOS 13 presentViewController
升级了iOS 13,发现代码中使用presentViewController的都变成了这样的,顶部留了一部分 查看present样式,iOS 13 默认自动适配,需要在present的时候,设置sty ...
- Xcode 11新建工程.--iOS 13 SceneDelegate适配
收录文章::::::::::::::: iOS 13 适配要点总结 在Xcode 11 创建的工程,运行设备选择 iOS 13.0 以下的设备,运行应用时会出现黑屏现象.原因: Xcode 11 默认 ...
随机推荐
- 禁用wordpress新编辑器,使用经典编辑器的方法
新更新的wordpress推出勒个什么古腾堡编辑器?简直太难用了,怎么屏蔽古腾堡编辑器,如何使用wordpress的经典编辑器.有人说使用插件,比如ClassicEditor或者DisableGute ...
- Re3 : Real-Time Recurrent Regression Networks for Visual Tracking of Generic Objects
Re3 : Real-Time Recurrent Regression Networks for Visual Tracking of Generic Objects 2019-10-04 14:4 ...
- apache httpd 从2.2升级到2.4的过程及中间遇到的坑
背景描述: 最近集团在做安全扫描,扫出了http的漏洞,一看是监控nagios涉及到的httpd,于是就考虑将httpd升级到最新的版本,在升级的过程中,真是遇到了很多的坑,弄了2天终于搞定了,现在梳 ...
- layui flow loading占位图实现方法
如果流图片要加载失败, 就会显示找不到图片的裂痕 代码如下: <!DOCTYPE html> <html> <head> <meta charset=&quo ...
- wms证书异常问题
目前我司已定位到两个原因,详细如下, 1. 快速生成的证书存在问题,导致APACHE和NGINX显示的时间都是4号凌晨 2. 贵司在配置完成162和163两台应用的APACHE证书,以及其中10. ...
- Docker 运行Kafka容器
1. 启动Zookeeper docker run -d --name zookeeper -p 2181:2181 -t wurstmeister/zookeeper 2. 启动Kafka dock ...
- [Mobi] cordova requirements,Exception in thread "main" java.lang.NoClassDefFoundError
Cordova App Preparation https://quasar.dev/quasar-cli/developing-cordova-apps/preparation $ cordova ...
- 第2部分 Elasticsearch查询-请求体查询、排序
一.请求体查询 请求体 search API, 之所以称之为请求体查询(Full-Body Search),因为大部分参数是通过http请求体而非查询字符串来传递的. 请求体查询:不仅可以处理自身的查 ...
- 头部文件jq嵌入笔记
var headHtml = '<div class="container">' + '<div class="navbar-header"& ...
- javascript异步上传压缩图片并立即显示图片
javascript异步上传压缩图片并立即显示图片<pre><!doctype html><html><head><meta charset=&q ...