iptables 防火墙(下)
iptables 防火墙(下)
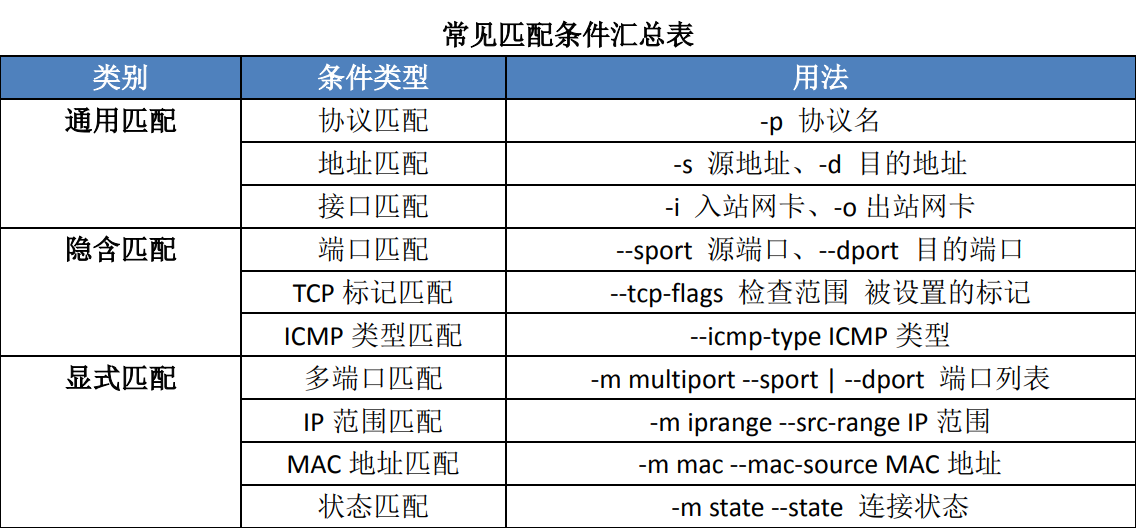
1. 常见的隐含匹配条件:
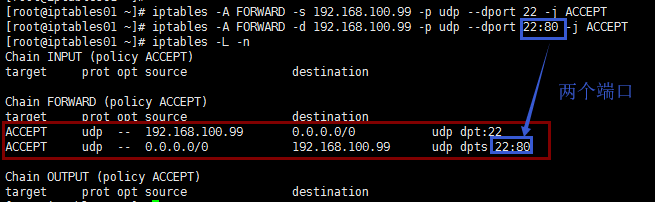
1.1 端口匹配: --sport 源端口、--dport 目的端口
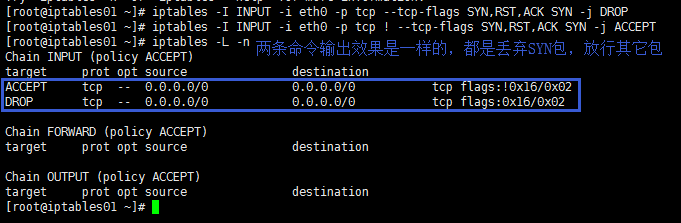
1.2 TCP标记匹配: -tcp-flags 检查范围被设置的标记
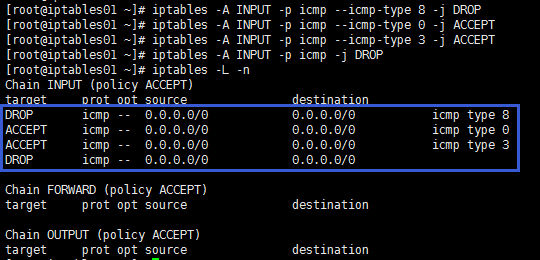
1.3 ICMP类型匹配: --icmp-type ICMP类型常见的icmp类型
- 8 Echo request--->回显请求( Ping请求)
- 8 0 Echo Reply--->回显应答(Ping 应答)
- 8 3 错误回显
2. 常用的显示匹配条件:
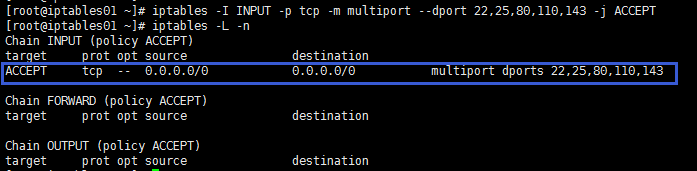
2.1 多端口匹配:
- -m multiport --sports源端口列表、
- -m multiport --dports目的端口列表
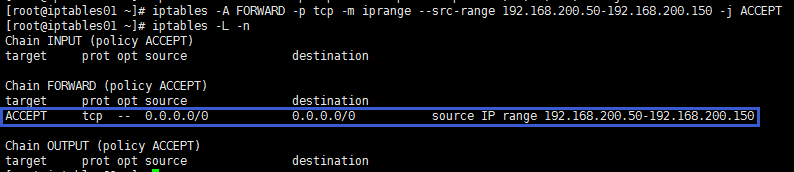
2.2 IP范围匹配:
-m iprange --src-range IP范围
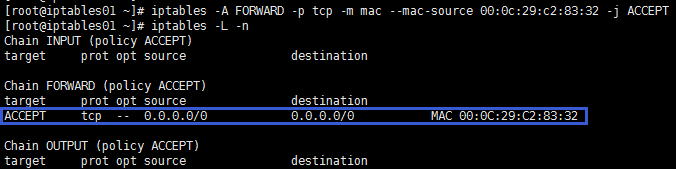
2.3 MAC地址匹配:
-m mac --mac-source MAC地址
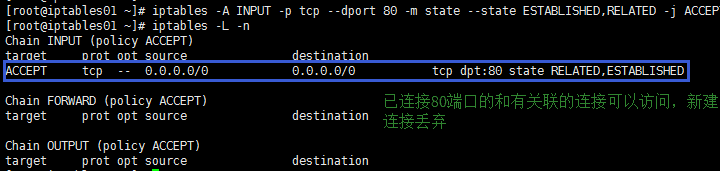
2.4 状态匹配: -m state --state 连接状态
- 常见的连接状态:
- NEW: 新连接,与任何连接无关
- ESTABLISHED: 响应请求或已建立连接的
- RELATED: 与已连接有相关性的,如FTP数据连接
3.SNAT策略
3.1 SNAT作用:
局域网主机共享单个公网IP地址接入Internet
3.2 SNAT策略的原理
源地址转换,Source Network Address Translation修改数据包的源地址
3.3 固定的外网IP地址
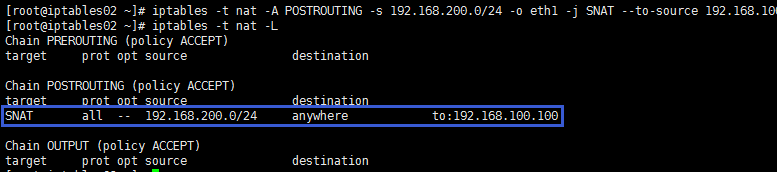
[root@iptables02 ~]# iptables -t nat -A POSTROUTING -s 192.168.200.0/24 -o eth1 -j SNAT --to-source 192.168.100.100
3.4 非固定外网IP地址或ADSL
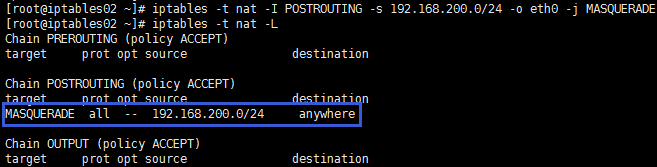
[root@iptables02 ~]# iptables -t nat -I POSTROUTING -s 192.168.200.0/24 -o eth0 -j MASQUERADE
4. DNAT策略
4.1 DNAT 原理
在Internet环境中,通过网关服务器中正确设置DNAT策略可实现企业所注册的网站或域名必须对应公网IP地址。
4.2 DNAT转发规则1:发内网Web服务

[root@iptables02 ~]# iptables -t nat -A PREROUTING -i eth1 -d 192.168.100.100 -p tcp --dport 80 -j DNAT --to-destination 192.168.200.99
4.3 (2) DNAT转换规则2:发布时修改目标端口

[root@iptables02 ~]# iptables -t nat -A PREROUTING -i eth1 -d 192.168.100.100 -p tcp --dport 80 -j DNAT --to-destination 192.168.200.99:8080
5. 项目实战
项目要求:三台主机,要求其中部署Nginx(iptables01),另外一台可以查看到网页内容
注:主机2与主机3均无网关
5.1 部署环境
| 主机名 | 主机IP(1) | 主机IP(2) | 网卡模式(1) | 网卡模式(2) | 主机网关 |
|---|---|---|---|---|---|
| iptables01 | 192.168.200.99 | NET8 | 192.168.200.100 | ||
| iptables02 | 192.168.200.100 | 192.168.100.100 | NET8 | NET1(仅主机) | |
| iptables03 | 192.168.100.110 | NET8 |
5.2 部署网卡配置文件
5.2.1 iptables01的网卡配置文件
[root@iptables01 network-scripts]# pwd

/etc/sysconfig/network-scripts

[root@iptables01 network-scripts]# cat ifcfg-eth0

DEVICE=eth0

TYPE=Ethernet

ONBOOT=yes

NM_CONTROLLED=yes

BOOTPROTO=none

IPADDR=192.168.200.99     #本主机的IP

NETMASK=255.255.255.0

GATEWAY=192.168.200.100   #本主机的网关,iptables02第一个网卡的IP
5.2.2 iptables02的网卡配置文件
[root@iptables02 network-scripts]# pwd

/etc/sysconfig/network-scripts

[root@iptables02 network-scripts]# cat ifcfg-eth0

DEVICE=eth0

TYPE=Ethernet

ONBOOT=yes

NM_CONTROLLED=yes

BOOTPROTO=none

IPADDR=192.168.200.100   #本主机的IP,iptables01的网关

NETMASK=255.255.255.0

[root@iptables02 network-scripts]# cat ifcfg-eth1

DEVICE=eth1

TYPE=Ethernet

ONBOOT=yes

NM_CONTROLLED=yes

BOOTPROTO=none

IPADDR=192.168.100.100   #本主机的IP,iptables03的网关

NETMASK=255.255.255.0
5.2.3 iptables03的网卡配置文件
[root@iptables03 network-scripts]# pwd

/etc/sysconfig/network-scripts

[root@iptables03 network-scripts]# cat ifcfg-eth0

DEVICE=eth0

TYPE=Ethernet

ONBOOT=yes

NM_CONTROLLED=yes

BOOTPROTO=none

IPADDR=192.168.100.110   #本主机的IP

NETMASK=255.255.255.0
5.2.4 Nginx
Nginx部署略。。。
[root@iptables01 ~]# curl www.yangwenbo.com

192.168.200.99 welcome to yunjisuan   Nginx网页内容
5.3 修改iptables02转发的配置
[root@iptables02 /]# sed -n '7p' /etc/sysctl.conf

net.ipv4.ip_forward = 1  #修改成1
5.4 对来往网卡IP做限制
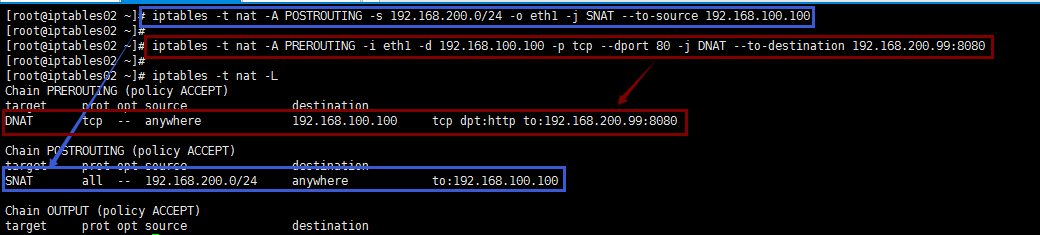
[root@iptables02 ~]# iptables -t nat -A POSTROUTING -s 192.168.200.0/24 -o eth1 -j SNAT --to-source 192.168.100.100
[root@iptables02 ~]# iptables -t nat -A PREROUTING -i eth1 -d 192.168.100.100 -p tcp --dport 80 -j DNAT --to-destination 192.168.200.99:8080
[root@iptables02 ~]# iptables -t nat -L

Chain PREROUTING (policy ACCEPT)

target     prot opt source               destination

DNAT       tcp  --  anywhere             192.168.100.100     tcp dpt:http to:192.168.200.99:8080

Chain POSTROUTING (policy ACCEPT)

target     prot opt source               destination

SNAT       all  --  192.168.200.0/24     anywhere            to:192.168.100.100

Chain OUTPUT (policy ACCEPT)

target     prot opt source               destination
5.5 PC主机映射并查看
[root@iptables03 ~]# curl www.yangwenbo.com

192.168.200.99 welcome to yunjisuan
iptables 防火墙(下)的更多相关文章
- 在iptables防火墙下开启vsftpd的端口
在开启vsftpd端口后发现用客户端工具能登陆,但无法浏览文件和新建文件.此时看了一下ftp的协议,发现ftp有主动模式和被动模式.在服务端开21端口是让客户端进来,并没有出去的端口,还在服务端开启出 ...
- Linux下iptables防火墙用法规则详解
管理网络流量是系统管理员必需处理的最棘手工作之一,我们必需规定连接系统的用户满足防火墙的传入和传出要求,以最大限度保证系统免受×××.很多用户把 Linux 中的iptables当成一个防火墙,从严格 ...
- CentOS下配置iptables防火墙 linux NAT(iptables)配置
CentOS下配置防火墙 配置nat转发服务CentOS下配置iptables防火墙 linux NAT(iptables)配置 CentOS下配置iptables 1,vim /etc/syscon ...
- (转载)Linux下IPTABLES防火墙的设定
(转载)http://www.jefflei.com/post/1760.html 1.iptables防火墙启动和停止 启动iptables防火墙时命令行输入 #service iptables s ...
- centos6.5下系统编译定制iptables防火墙扩展layer7应用层访问控制功能及应用限制QQ2016上网
iptables防火墙扩展之layer7应用层访问控制 概述: iptables防火墙是工作在网络层,针对TCP/IP数据包实施过滤和限制,属于典型的包过滤防火墙.以基于网络层的数据包过滤机制为主,同 ...
- Linux下 iptables防火墙 放开相关port 拒绝相关port 及查看已放开port
我用的是fedora 14 1. 查看iptables 防火墙已经开启的port:/etc/init.d/iptables status [root@hzswtb2-mpc ~]#/etc/rc.d/ ...
- Centos7下安装iptables防火墙
说明:centos7默认使用的firewalld防火墙,由于习惯使用iptables做防火墙,所以在安装好centos7系统后,会将默认的firewall关闭,并另安装iptables进行防火墙规则设 ...
- 编译内核实现iptables防火墙layer7应用层过滤 (三)
在前面的两篇文章中我们主要讲解了Linux防火墙iptables的原理及配置规则,想博友们也都知道iptables防火墙是工作在网络层,针对TCP/IP数据包实施过滤和限制,属于典型的包过滤防火墙.以 ...
- [moka同学摘录]iptables防火墙规则的添加、删除、修改、保存
文章来源:http://www.splaybow.com/post/iptables-rule-add-delete-modify-save.html 本文介绍iptables这个Linux下最强大的 ...
随机推荐
- java 多线程间通信(一)
synchronized同步 package com.test7; public class Run { public class MyObject { private int a; public M ...
- linux文件管理--压缩打包
目录 linux文件管理--压缩打包 1.压缩打包介绍 2.gzip压缩工具 3.zip压缩工具 注意: 4.tar压缩工具 5.tar生产案例实践 linux文件管理--压缩打包 1.压缩打包介绍 ...
- 数据库索引(BTree索引和Hash索引)
索引 索引是为了方便查找我们所需要的数据. mysql支持的索引数据类型 B-Tree索引的特点 B-Tree索引以B+Tree(树)的结构存储数据. B-Tree索引能够加快数据的查询速度: B-T ...
- springboot不能用 @SpringApplicationConfiguraction 解决方案
@SpringApplicationConfiguraction 是在springboot 1.4之前,之后改用 @RunWith(SpringJUnit4ClassRunner.class) @S ...
- echarts(4.0版本)
1.echarts 开发文档 :https://echarts.baidu.com/echarts2/doc/doc.html 或 https://echarts.baidu.com/option ...
- JS基础入门篇(二十四)—DOM(下)
1.offsetLeft/offsetTop offsetLeft/offsetTop : 到定位父级节点的距离. <!DOCTYPE html> <html lang=" ...
- Nodejs-交互式版本管理
n - npm:Interactively Manage Your Node.js Versions
- Linux命令之解压
Linux命令之解压 使用tar命令解压.zip文件的时候,遇到如下异常, tar -xzvf guangwang.zip gzip: stdin has more than one entry--r ...
- eclispse指针变成十字型
按ATL+Shift+A可以十字和箭头切换.
- python学习笔记:模块——time模块
timetime模块提供各种时间相关的功能,与时间相关的模块有:time,datetime,calendar等. 时间有三种表示方式,一种是时间戳.一种是格式化时间.一种是时间元组.时间戳和格式化时间 ...