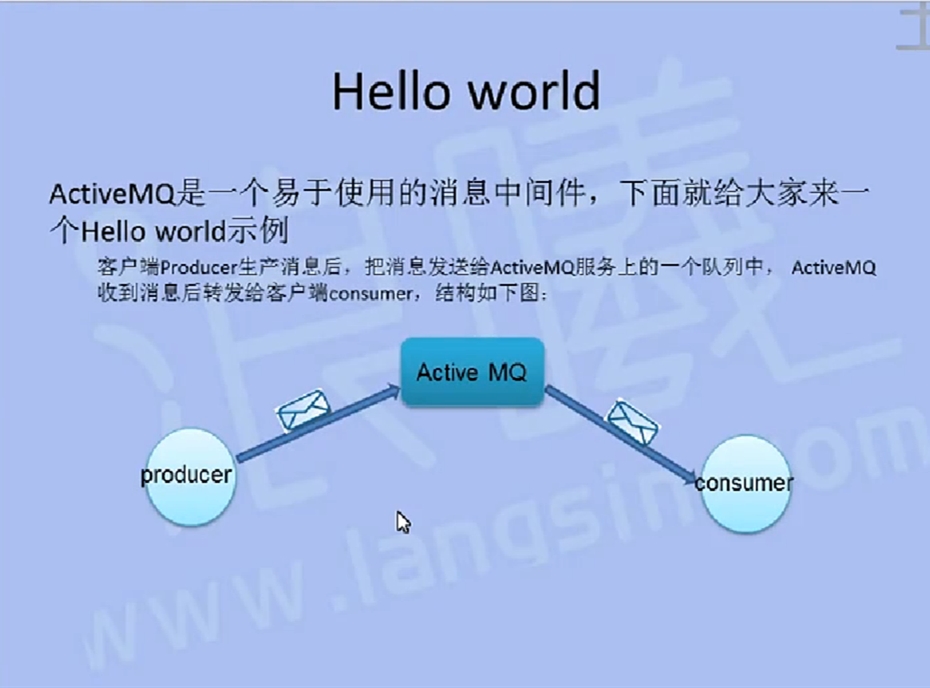
ActiveMQ消息中间件Producer和Consumer
ActiveMQ消息中间件Producer和Consumer

生产者代码:
|
1
2
3
4
5
6
7
8
9
10
11
12
13
14
15
16
17
18
19
20
21
22
23
24
25
26
27
28
29
30
31
32
33
34
35
36
37
38
39
40
41
42
43
44
45
46
47
48
49
50
51
52
53
54
55
56
57
58
59
60
61
62
63
64
65
66
67
68
69
70
71
72
73
|
package com.java1234.activemq;import javax.jms.Connection;import javax.jms.ConnectionFactory;import javax.jms.Destination;import javax.jms.JMSException;import javax.jms.MessageProducer;import javax.jms.Session;import javax.jms.TextMessage;import org.apache.activemq.ActiveMQConnection;import org.apache.activemq.ActiveMQConnectionFactory;/** * 消息生产者 * @author Administrator * */public class JMSProducer { private static final String USERNAME=ActiveMQConnection.DEFAULT_USER; // 默认的连接用户名 private static final String PASSWORD=ActiveMQConnection.DEFAULT_PASSWORD; // 默认的连接密码 private static final String BROKEURL=ActiveMQConnection.DEFAULT_BROKER_URL; // 默认的连接地址 private static final int SENDNUM=10; // 发送的消息数量 public static void main(String[] args) { ConnectionFactory connectionFactory; // 连接工厂 Connection connection = null; // 连接 Session session; // 会话 接受或者发送消息的线程 Destination destination; // 消息的目的地 MessageProducer messageProducer; // 消息生产者 // 实例化连接工厂 connectionFactory=new ActiveMQConnectionFactory(JMSProducer.USERNAME, JMSProducer.PASSWORD, JMSProducer.BROKEURL); try { connection=connectionFactory.createConnection(); // 通过连接工厂获取连接 connection.start(); // 启动连接 session=connection.createSession(Boolean.TRUE, Session.AUTO_ACKNOWLEDGE); // 创建Session destination=session.createQueue("FirstQueue1"); // 创建消息队列 messageProducer=session.createProducer(destination); // 创建消息生产者 sendMessage(session, messageProducer); // 发送消息 session.commit(); } catch (Exception e) { // TODO Auto-generated catch block e.printStackTrace(); } finally{ if(connection!=null){ try { connection.close(); } catch (JMSException e) { // TODO Auto-generated catch block e.printStackTrace(); } } } } /** * 发送消息 * @param session * @param messageProducer * @throws Exception */ public static void sendMessage(Session session,MessageProducer messageProducer)throws Exception{ for(int i=0;i<JMSProducer.SENDNUM;i++){ TextMessage message=session.createTextMessage("ActiveMQ 发送的消息"+i); System.out.println("发送消息:"+"ActiveMQ 发送的消息"+i); messageProducer.send(message); } }} |
消费者分两种:
1.主动接受消息receive()
|
1
2
3
4
5
6
7
8
9
10
11
12
13
14
15
16
17
18
19
20
21
22
23
24
25
26
27
28
29
30
31
32
33
34
35
36
37
38
39
40
41
42
43
44
45
46
47
48
49
50
51
52
53
54
|
package com.java1234.activemq;import javax.jms.Connection;import javax.jms.ConnectionFactory;import javax.jms.Destination;import javax.jms.JMSException;import javax.jms.MessageConsumer;import javax.jms.Session;import javax.jms.TextMessage;import org.apache.activemq.ActiveMQConnection;import org.apache.activemq.ActiveMQConnectionFactory;/** * 消息消费者 * @author Administrator * */public class JMSConsumer { private static final String USERNAME=ActiveMQConnection.DEFAULT_USER; // 默认的连接用户名 private static final String PASSWORD=ActiveMQConnection.DEFAULT_PASSWORD; // 默认的连接密码 private static final String BROKEURL=ActiveMQConnection.DEFAULT_BROKER_URL; // 默认的连接地址 public static void main(String[] args) { ConnectionFactory connectionFactory; // 连接工厂 Connection connection = null; // 连接 Session session; // 会话 接受或者发送消息的线程 Destination destination; // 消息的目的地 MessageConsumer messageConsumer; // 消息的消费者 // 实例化连接工厂 connectionFactory=new ActiveMQConnectionFactory(JMSConsumer.USERNAME, JMSConsumer.PASSWORD, JMSConsumer.BROKEURL); try { connection=connectionFactory.createConnection(); // 通过连接工厂获取连接 connection.start(); // 启动连接 session=connection.createSession(Boolean.FALSE, Session.AUTO_ACKNOWLEDGE); // 创建Session destination=session.createQueue("FirstQueue1"); // 创建连接的消息队列 messageConsumer=session.createConsumer(destination); // 创建消息消费者 while(true){ TextMessage textMessage=(TextMessage)messageConsumer.receive(100000); if(textMessage!=null){ System.out.println("收到的消息:"+textMessage.getText()); }else{ break; } } } catch (JMSException e) { // TODO Auto-generated catch block e.printStackTrace(); } }} |
2.使用listener被动监听消息(非阻塞的)(观察者模式)
Listener代码
|
1
2
3
4
5
6
7
8
9
10
11
12
13
14
15
16
17
18
19
20
21
22
23
24
25
26
|
package com.java1234.activemq;import javax.jms.JMSException;import javax.jms.Message;import javax.jms.MessageListener;import javax.jms.TextMessage;/** * 消息监听 * @author Administrator * */public class Listener implements MessageListener{ @Override public void onMessage(Message message) { // TODO Auto-generated method stub try { System.out.println("收到的消息:"+((TextMessage)message).getText()); } catch (JMSException e) { // TODO Auto-generated catch block e.printStackTrace(); } }} |
|
1
2
3
4
5
6
7
8
9
10
11
12
13
14
15
16
17
18
19
20
21
22
23
24
25
26
27
28
29
30
31
32
33
34
35
36
37
38
39
40
41
42
43
44
45
46
47
|
package com.java1234.activemq;import javax.jms.Connection;import javax.jms.ConnectionFactory;import javax.jms.Destination;import javax.jms.JMSException;import javax.jms.MessageConsumer;import javax.jms.Session;import javax.jms.TextMessage;import org.apache.activemq.ActiveMQConnection;import org.apache.activemq.ActiveMQConnectionFactory;/** * 消息消费者 * @author Administrator * */public class JMSConsumer2 { private static final String USERNAME=ActiveMQConnection.DEFAULT_USER; // 默认的连接用户名 private static final String PASSWORD=ActiveMQConnection.DEFAULT_PASSWORD; // 默认的连接密码 private static final String BROKEURL=ActiveMQConnection.DEFAULT_BROKER_URL; // 默认的连接地址 public static void main(String[] args) { ConnectionFactory connectionFactory; // 连接工厂 Connection connection = null; // 连接 Session session; // 会话 接受或者发送消息的线程 Destination destination; // 消息的目的地 MessageConsumer messageConsumer; // 消息的消费者 // 实例化连接工厂 connectionFactory=new ActiveMQConnectionFactory(JMSConsumer2.USERNAME, JMSConsumer2.PASSWORD, JMSConsumer2.BROKEURL); try { connection=connectionFactory.createConnection(); // 通过连接工厂获取连接 connection.start(); // 启动连接 session=connection.createSession(Boolean.FALSE, Session.AUTO_ACKNOWLEDGE); // 创建Session destination=session.createQueue("FirstQueue1"); // 创建连接的消息队列 messageConsumer=session.createConsumer(destination); // 创建消息消费者 messageConsumer.setMessageListener(new Listener()); // 注册消息监听 } catch (JMSException e) { // TODO Auto-generated catch block e.printStackTrace(); } }} |
如果想主动的去接受消息,而不用异步消息监听的话,把consumer.setMessageListener(this)改为Message message = consumer.receive(),手动去调用MessageConsumer的receive方法即可。
参考文章:
ActiveMQ消息中间件Producer和Consumer的更多相关文章
- 分布式--ActiveMQ 消息中间件(一) https://www.jianshu.com/p/8b9bfe865e38
1. ActiveMQ 1). ActiveMQ ActiveMQ是Apache所提供的一个开源的消息系统,完全采用Java来实现,因此,它能很好地支持J2EE提出的JMS(Java Message ...
- spring boot整合activemq消息中间件
spring boot整合activemq消息中间件 <project xmlns="http://maven.apache.org/POM/4.0.0" xmlns:xsi ...
- Apache Kafka - KIP-42: Add Producer and Consumer Interceptors
kafka 0.10.0.0 released Interceptors的概念应该来自flume 参考,http://blog.csdn.net/xiao_jun_0820/article/det ...
- python编写producer、consumer
自主producer.consumer 首先在不同的终端,分别开启两个consumer,保证groupid一致 ]# python consumer_kafka.py 执行一次producer ]# ...
- Java泛型 PECS(Producer Extends, Consumer Super)
本文转载自ImportNew,原文链接 Java 泛型: 什么是PECS(Producer Extends, Consumer Super) PECS指“Producer Extends,Consum ...
- 生产者和消费者模型producer and consumer(单线程下实现高并发)
#1.生产者和消费者模型producer and consumer modelimport timedef producer(): ret = [] for i in range(2): time.s ...
- ActiveMQ消息中间件的作用以及应用场景
ActiveMQ消息中间件的作用以及应用场景 一.ActiveMQ简介 ActiveMQ是Apache出品,最流行的,能力强劲的开源消息总线.ActiveMQ是一个完全支持JMS1.1和J2EE1.4 ...
- 如何创建Kafka客户端:Avro Producer和Consumer Client
1.目标 - Kafka客户端 在本文的Kafka客户端中,我们将学习如何使用Kafka API 创建Apache Kafka客户端.有几种方法可以创建Kafka客户端,例如最多一次,至少一次,以及一 ...
- Kafka-JavaAPI(Producer And Consumer)
Kafka--JAVA API(Producer和Consumer) Kafka 版本2.11-0.9.0.0 producer package com.yzy.spark.kafka; import ...
随机推荐
- $emit 和 $on 进行平行组件之间的传值
效果图: 注:$emit 和 $on 的事件必须在一个公共的实例上,才能够触发: $emit 触发 $on 接收 需求: 1.有A.B.C三个组件,同时挂载到入口组件中: 2.将A组件中的数据传递到C ...
- python之字符串切分
在工作中,经常遇到字符串切分,尤其是操作linux命令,返回一段文本,如下面这种格式 Filesystem Size Used Avail Use% Mounted on /dev/vda1 40G ...
- 远程桌面按键失效变成快捷键(远程桌面连接时会自动按下win键)
三个电脑快捷键 (无意中学会三个快捷键了.....)win + L 锁屏win + D 切换到桌面win + F 搜索 在使用远程桌面连接Windows 2008操作系统,发现一个很烦的问题,经常发现 ...
- python中得字典和常用函数总结
字典是python中一种常见得数据类型,用{}表示,并且以键值对得形式存放数据. dic={},其中得key键值是不可变得,类型可以是字符串.其中,列表,字典不可以作为键,键值是不可变得.字符串,元组 ...
- pytho装饰器参数那些事_inspect.getcallargs
''' Created on Jul 26, 2019 @author: tomcat ''' import inspect def chack_admin(func): def wrapper(*a ...
- sql:CallableStatement执行存储过程
/** * 使用CablleStatement调用存储过程 * @author APPle * */ public class Demo1 { /** * 调用带有输入参数的存储过程 * CALL p ...
- codeforces gym 100345I Segment Transformations [想法题]
题意简述 给定一个由A C G T四个字母组成的密码锁(每拨动一次 A变C C变G G变T T变A) 密码锁有n位 规定每次操作可以选取连续的一段拨动1~3次 问最少几次操作可以将初始状态变到末状态 ...
- Python 进阶_闭包 & 装饰器
目录 目录 闭包 函数的实质和属性 闭包有什么好处 小结 装饰器 更加深入的看看装饰器的执行过程 带参数的装饰器 装饰器的叠加 小结 装饰器能解决什么问题 小结 闭包 Closure: 如果内层函数引 ...
- Windows 08 R2_创建AD DS域服务(图文详解)
目录 目录 Active Directory概念 创建第一个AD域控制器 搭建DNS服务器 使用Windows窗口程序创建AD域控制器 AD与LDAP的关系 使用Powershell来创建ADDS域控 ...
- void*和void类型
| 版权声明:本文为博主原创文章,未经博主允许不得转载. void的类型是无类型的数据,void*表示无类型的指针.其中void*可以指向任何数据类型的指针. void类型的用法: (1).voi ...
