iOS开发融云即时通讯集成详细步骤
1.融云即时通讯iOS SDK下载地址 http://rongcloud.cn/downloads 选择iOS SDK下载
2.进行应用开发之前,需要先在融云开发者平台创建应用,如果您已经注册了融云开发者帐号,请前往 融云开发者平台 创建应用;如果您还没有注册融云开发者帐号,请前往 融云官方网站 首先注册开发者帐号,注册后创建应用。注册地址 https://developer.rongcloud.cn/signup
3.登陆融云开发者平台 https://developer.rongcloud.cn/signin 创建应用
4.进入后台之后点击创建应用,进入这样一个创建界面
图1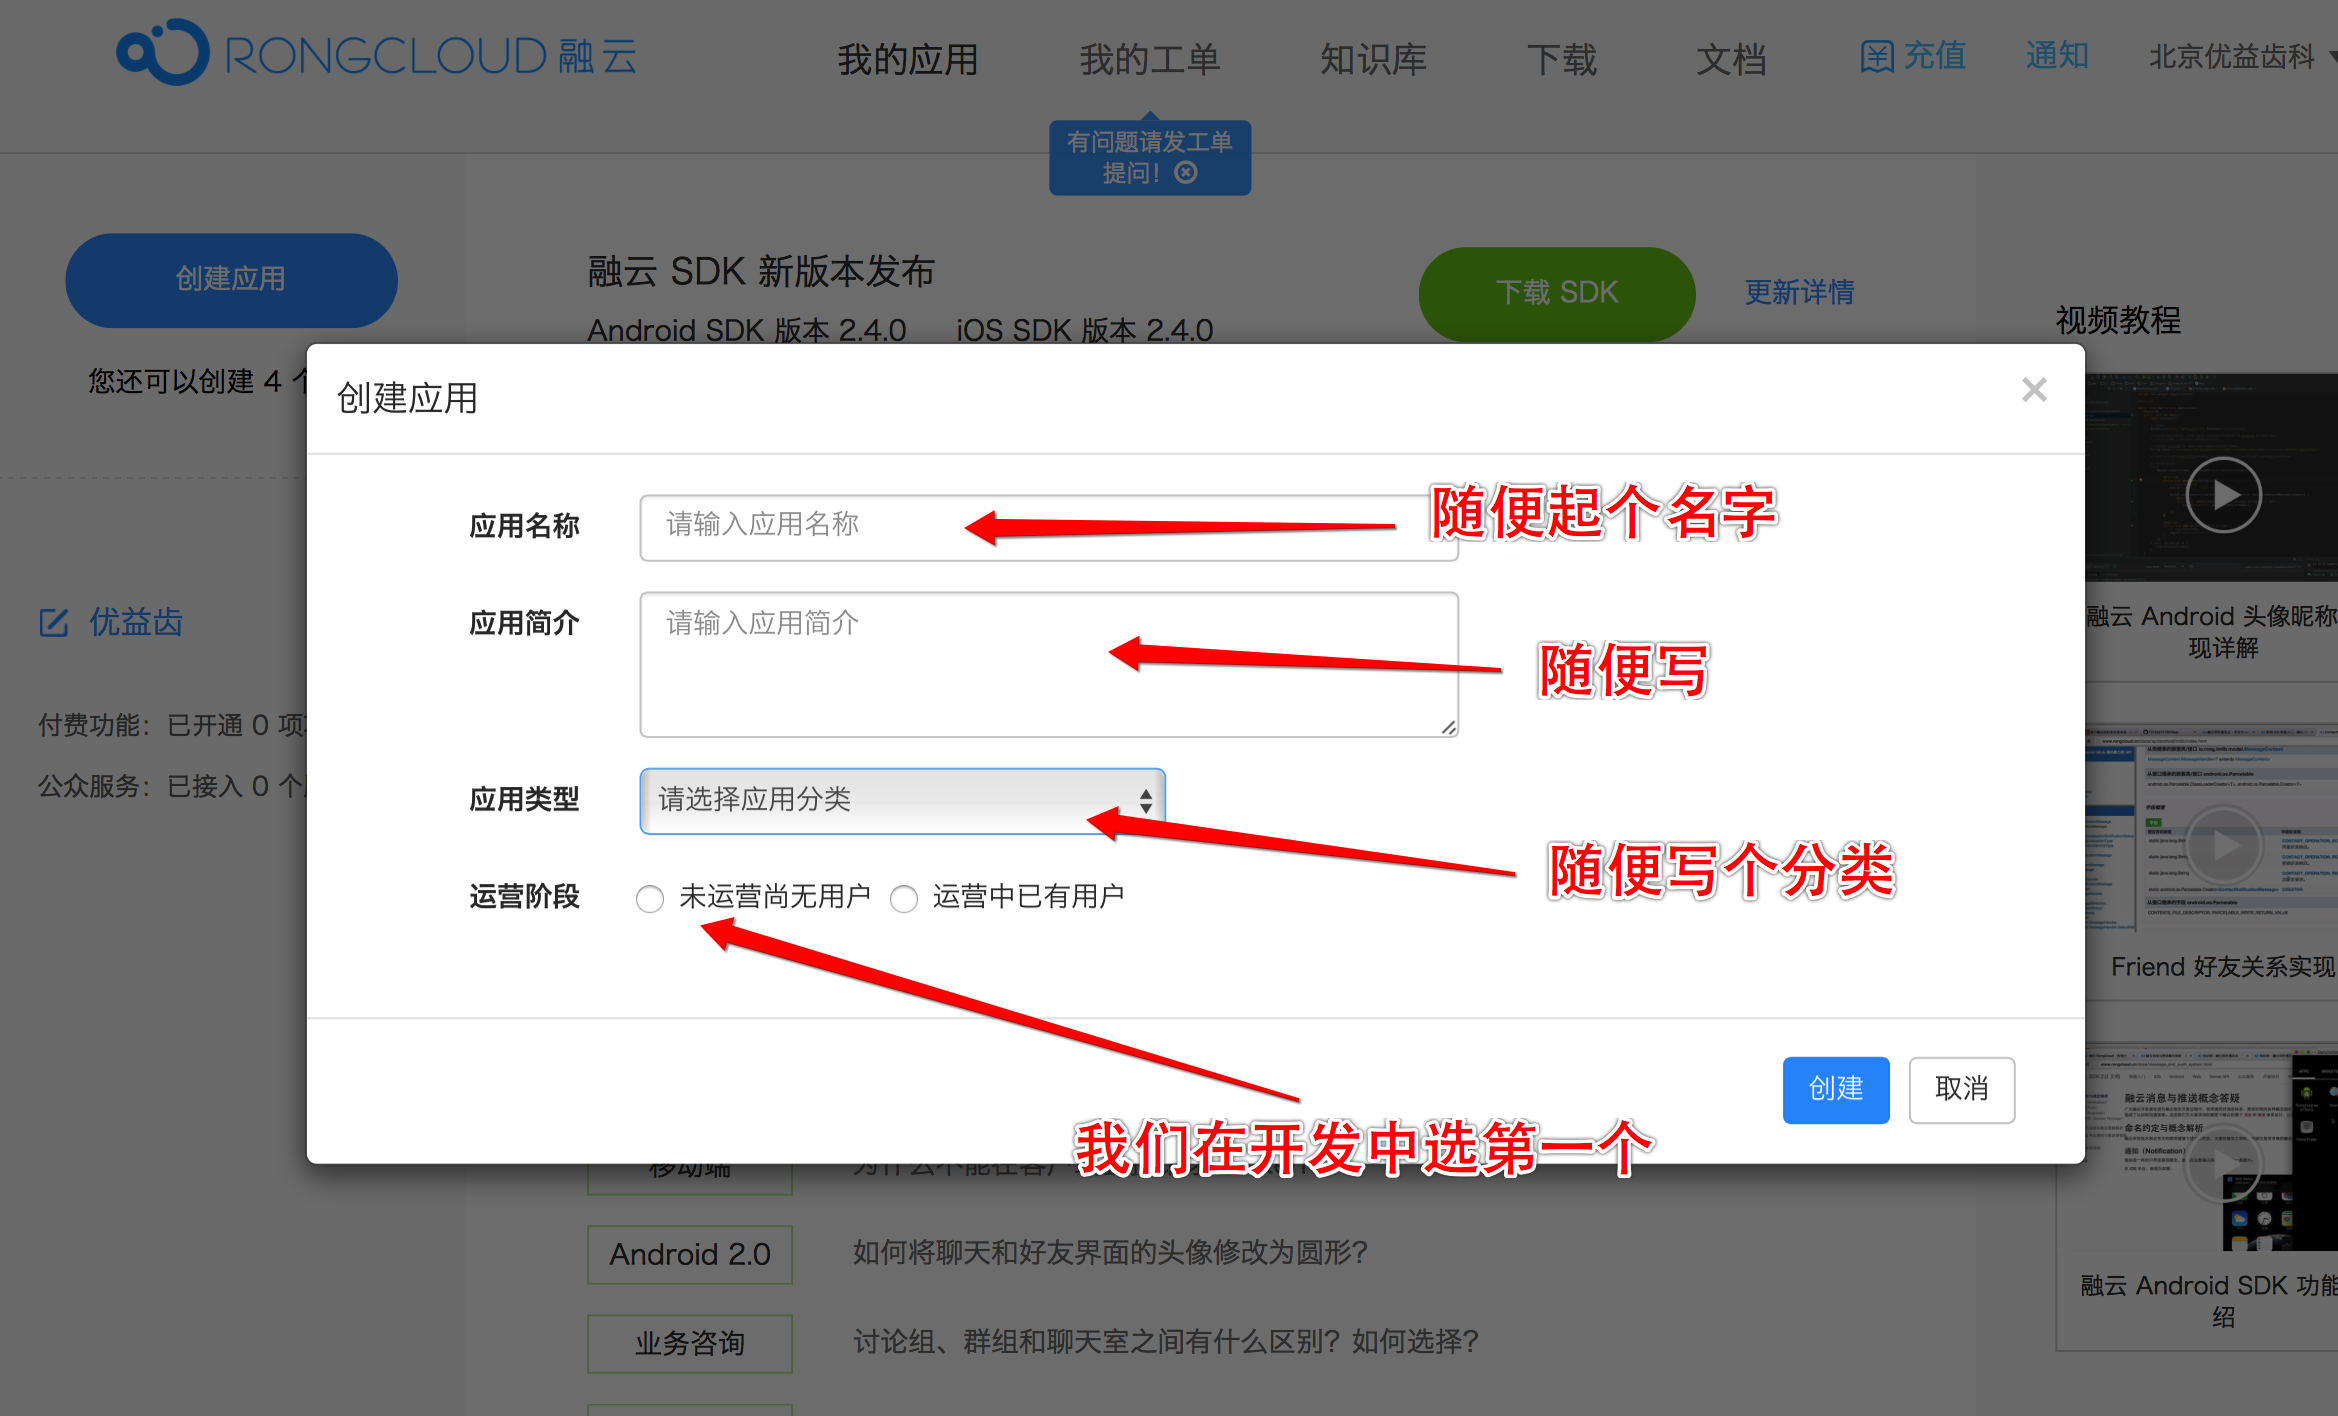
5.最后点击创建 点击我的应用 然后在左边点击我的应用名称
图2
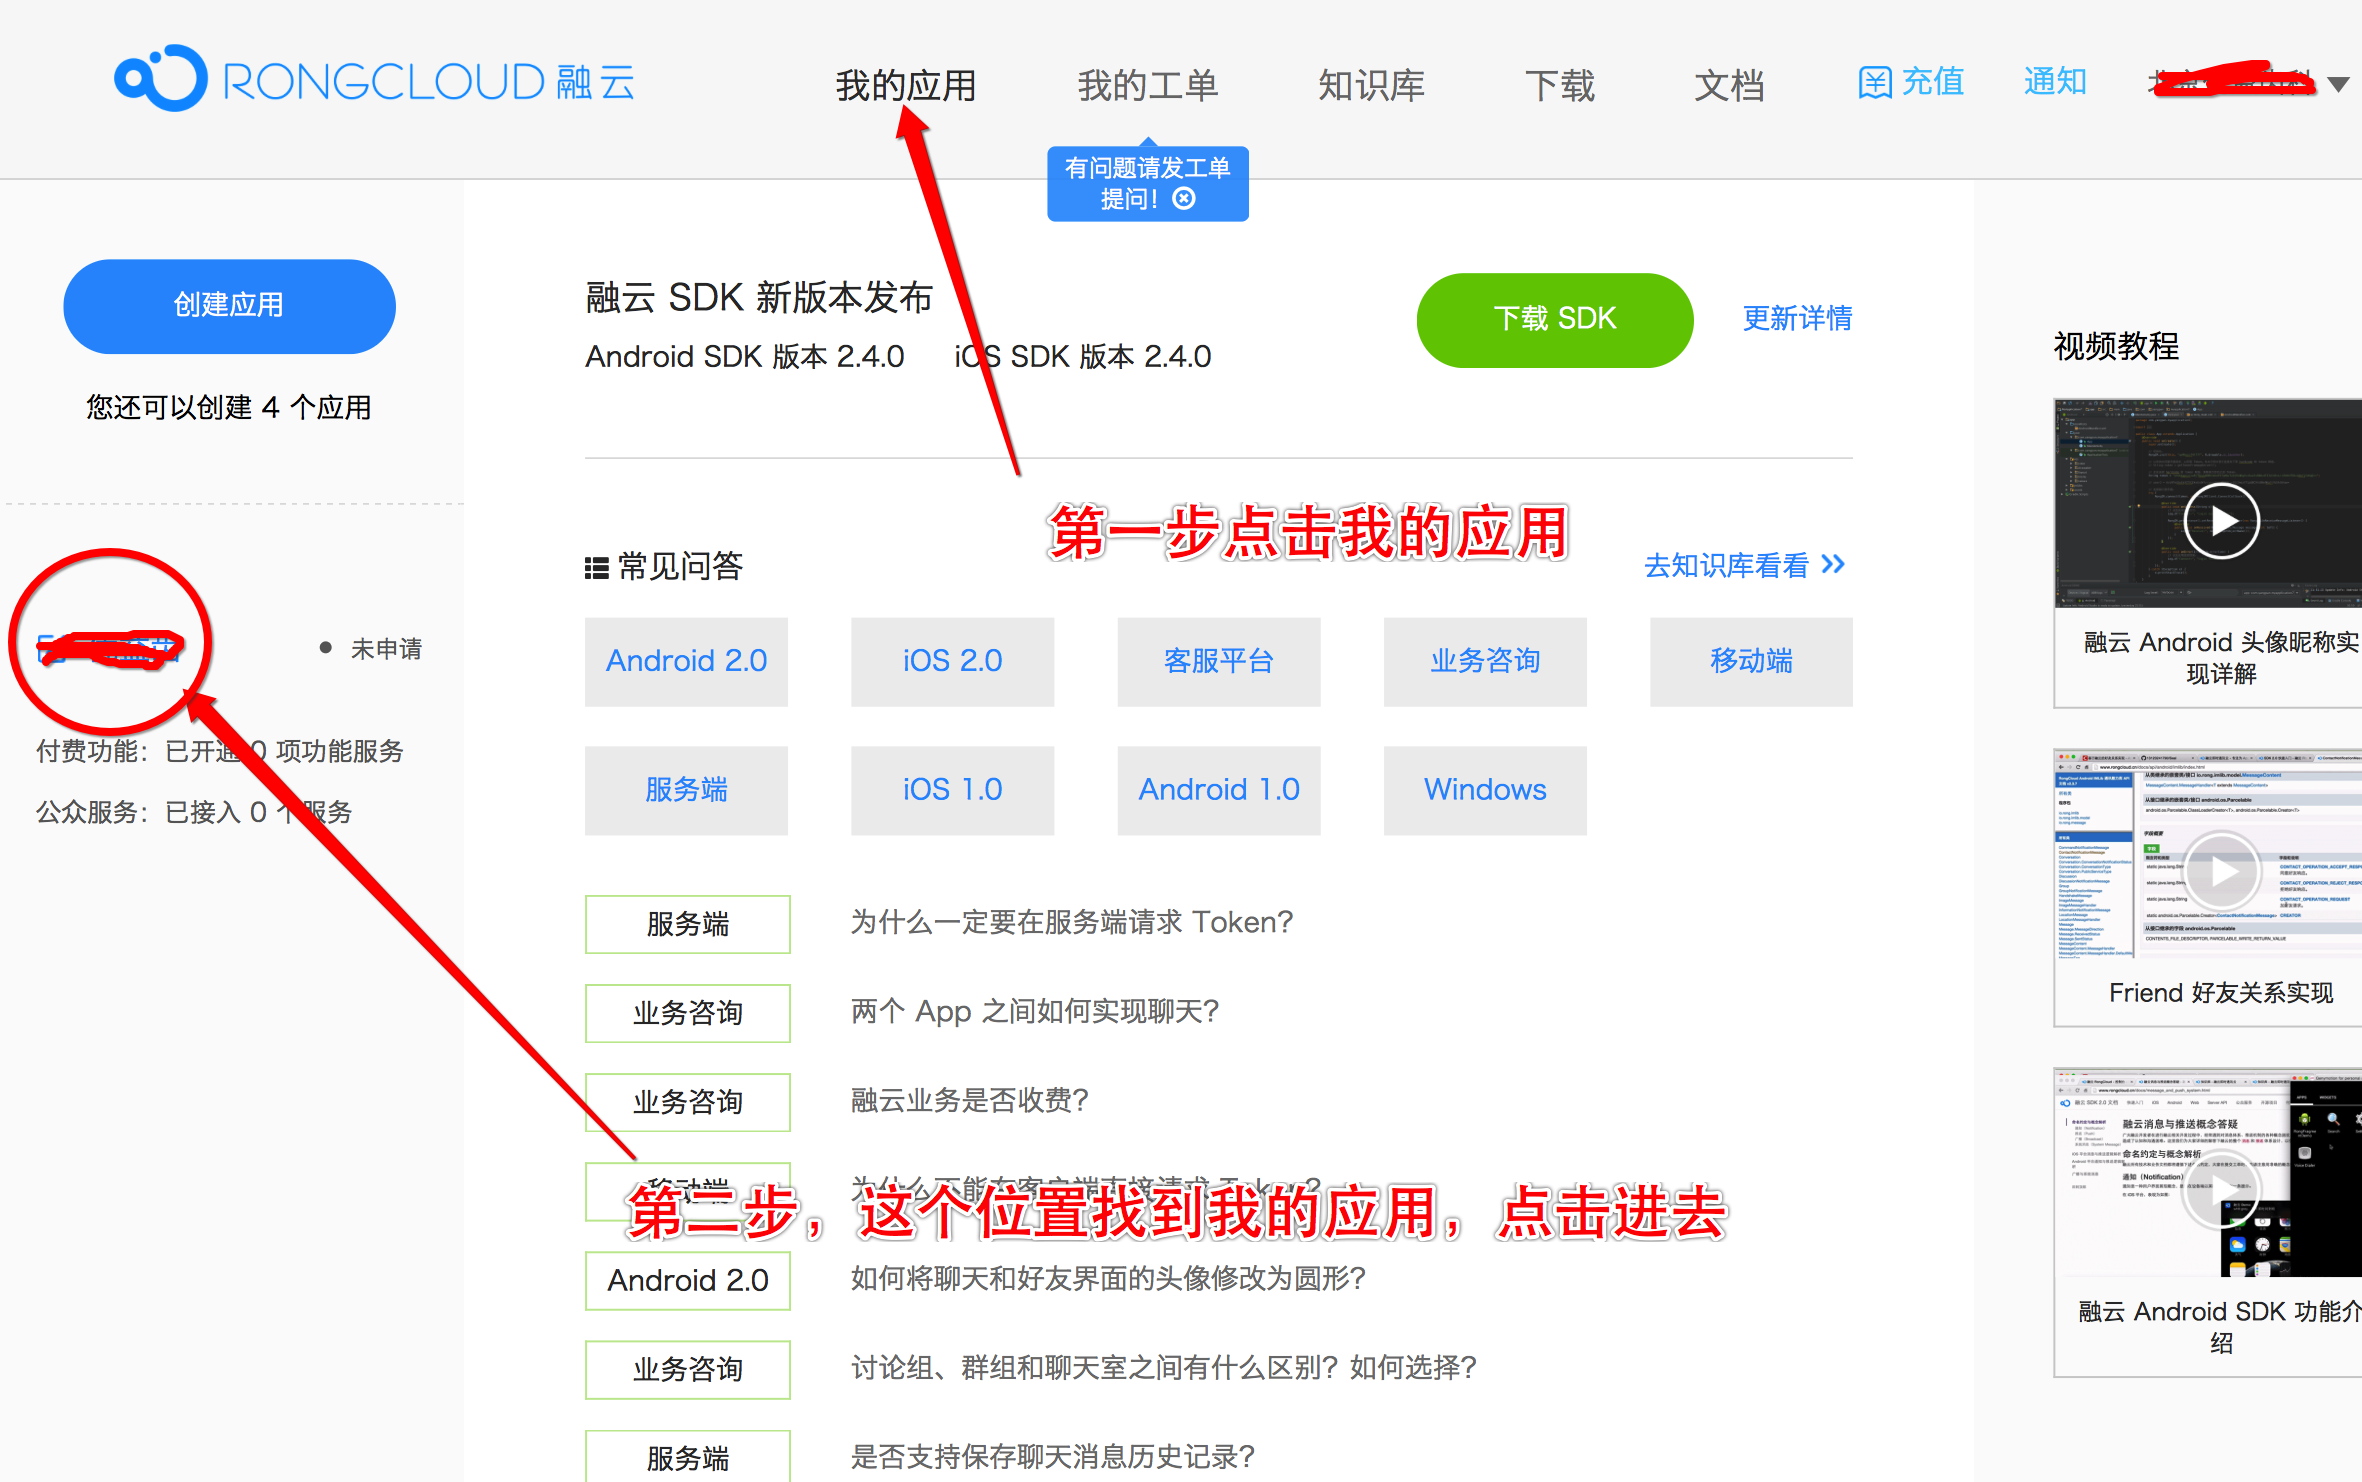
6.点击AppKey进入
图3
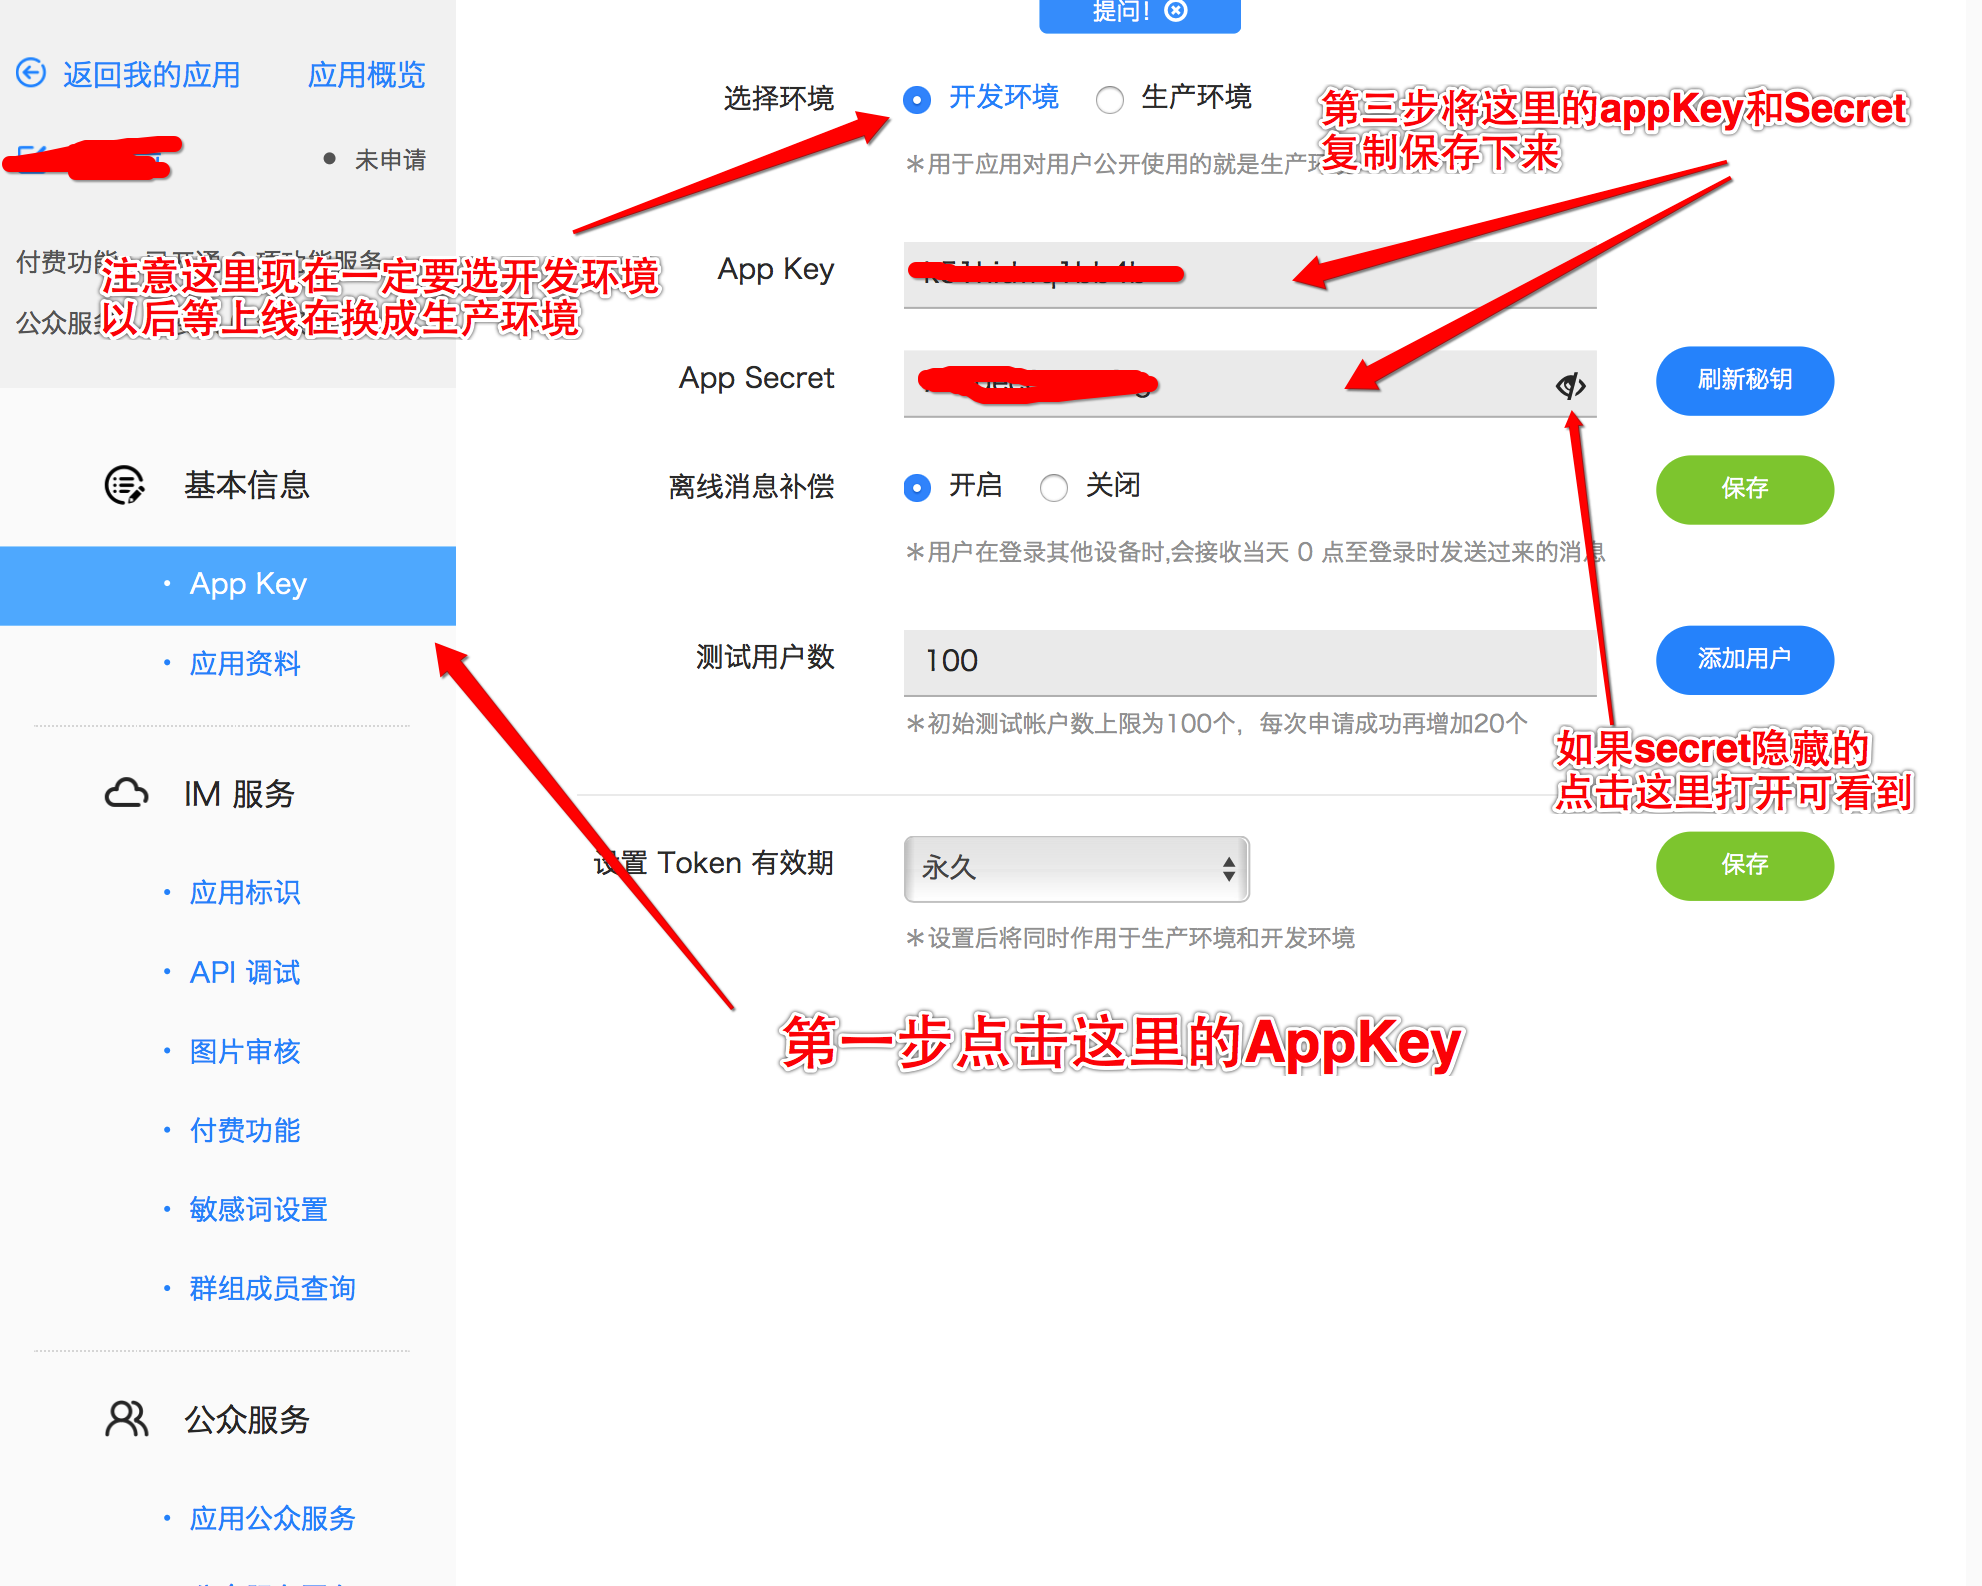
7.手动安装融云即时通讯SDK
7.1将下载好的最新的融云SDK导入到自己的项目中
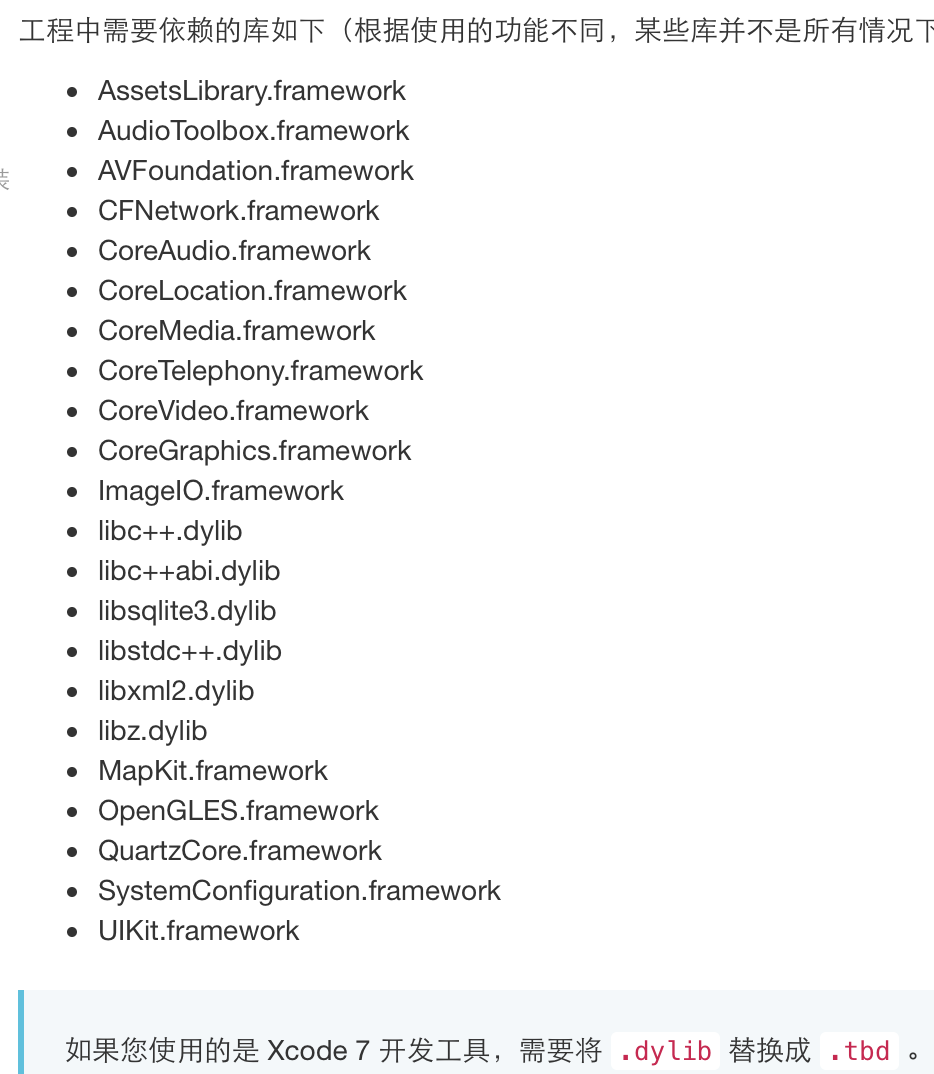
7.2添加依赖库 在Build Phases中第三个选项link中点击左下角+号添加依赖库
所需的依赖库
图4
8.获取Token
和第五步一样,进入融云后台点击我的应用—>自己的应用名称—>IM服务—>API调试
右边会进入一个界面,在这里获取调试Token
图5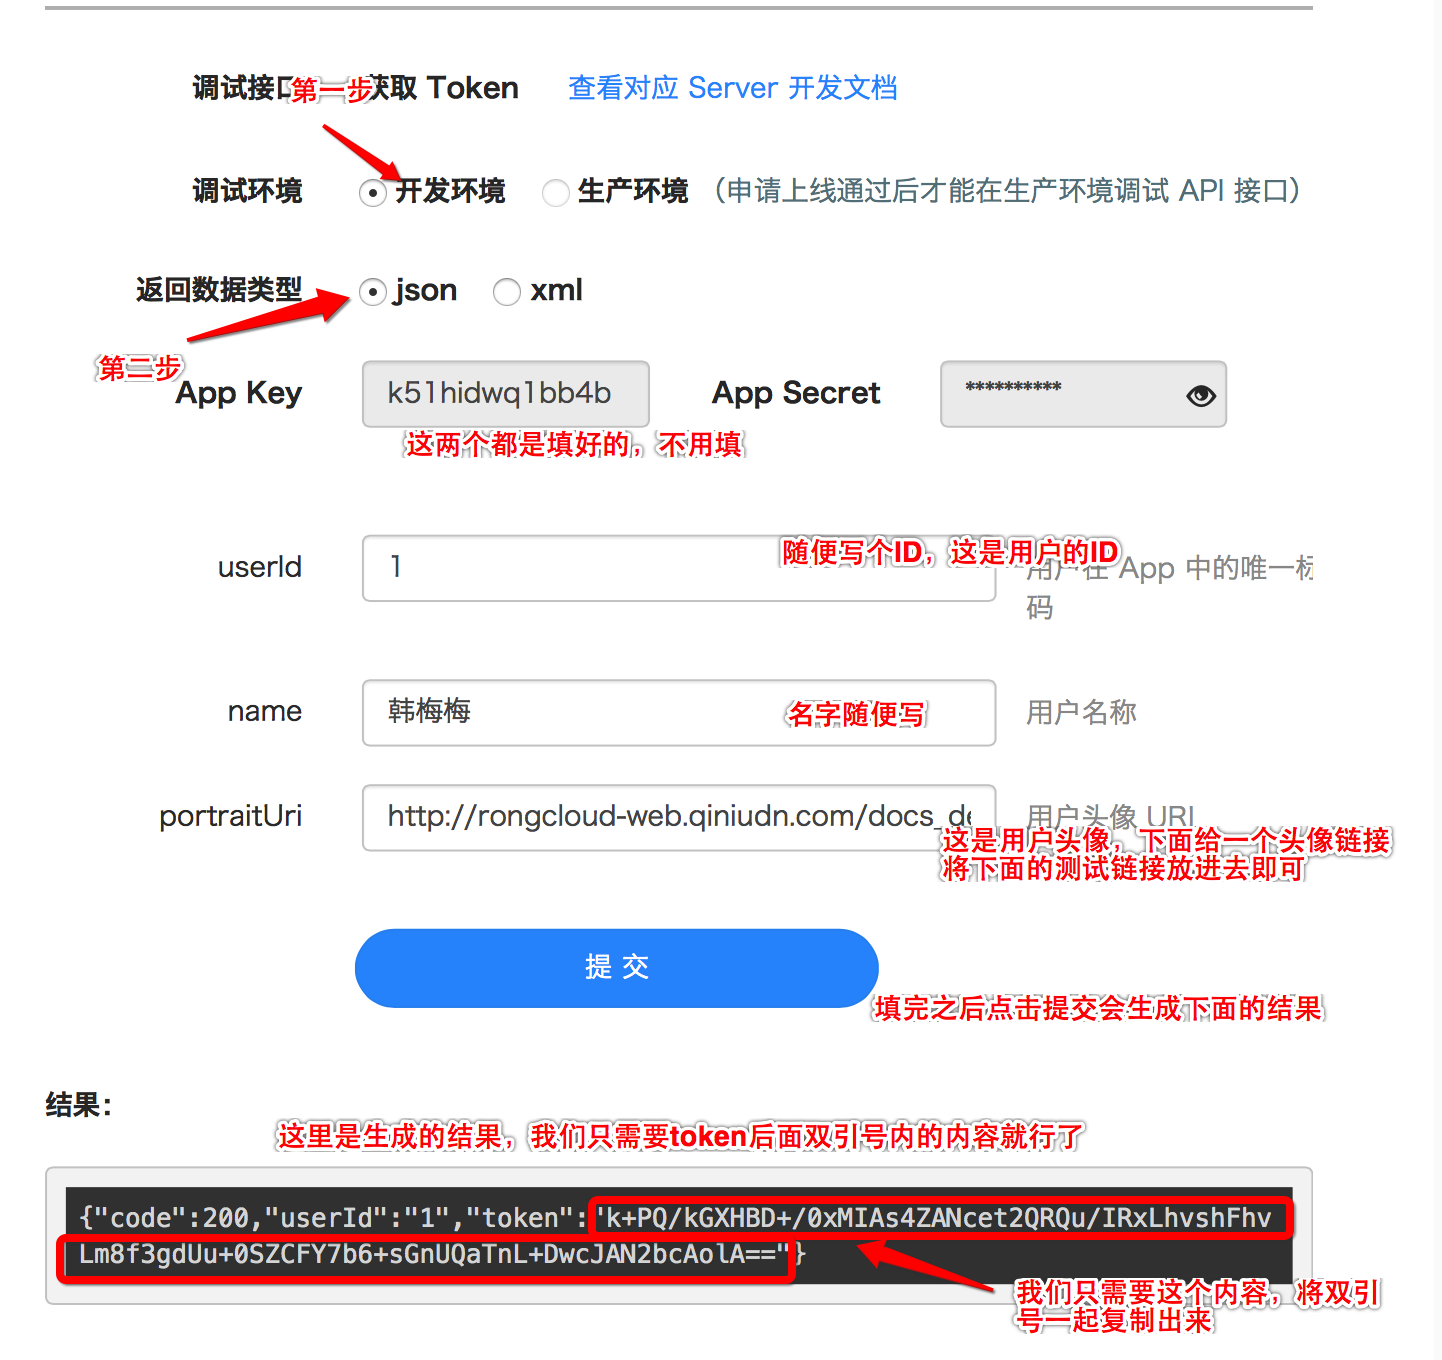
填的时候可以按照这个参数填,就是个案例
用户 Id:
userId = "1" // 用户在融云系统中唯一的身份 Id,可为任意数字或字符串,但必须保证全局唯一。
用户名称:
name = "韩梅梅" // 用户的显示名称,用来在 Push 推送时,或者客户端没有提供用户信息时,显示用户的名称。
用户头像图片:
portraitUri = "http://rongcloud-web.qiniudn.com/docs_demo_rongcloud_logo.png"
现在我们获得了AppKey和Token了 这是假数据,后面token会发送请求获取
当然在我们的真实项目中,我们的Token是通过发送网络请求获取的,具体怎么发看后台给你的数据
在AppDelegate.m文件
- (BOOL)application:(UIApplication *)application didFinishLaunchingWithOptions:(NSDictionary *)launchOptions {
}方法里链接融云服务器,到下面步骤中我会演示在这个方法里的获取token ,一般是在用户登陆成功之后发送请求获取token,在.m文件这个方法里先链接融云服务器,
然后在登陆成功之后断开融云服务器,然后再连接上
9.下面就开始快速集成了
9.1
在自己的项目中AppDelegate.h文件中导入头文件
#import <RongIMLib/RongIMLib.h>
#import <RongIMKit/RongIMKit.h>
然后遵守RCIMConnectionStatusDelegate这个代理方法
即变成这样@interface AppDelegate : UIResponder <UIApplicationDelegate,RCIMConnectionStatusDelegate>
9.2在AppDelegate.m文件中导入头文件
//融云即时通讯
#import <RongIMKit/RongIMKit.h>
#import <RongIMLib/RongIMLib.h>
#import <UIKit/UIKit.h>
然后将获得的融云的AppKey 写成一个宏 如下 将自己的AppKey 替换即可\
k51hidwq1bbcdds4b将这个换成自己的即可
//融云即时通讯AppKey
#define RONGCLOUD_IM_APPKEY @"k51hidwq1bbcdds4b"
10.在AppDelegate.m的文件中的
- (BOOL)application:(UIApplication *)application didFinishLaunchingWithOptions:(NSDictionary *)launchOptions
{
}
方法中加入以下代码
//融云即时通讯
//初始化融云SDK。
[[RCIM sharedRCIM] initWithAppKey:RONGCLOUD_IM_APPKEY];
//从本地获取token
NSString *token = [[NSUserDefaults standardUserDefaults] objectForKey:@"token"];
//判断是否存在token连接融云
if (token) {
[[RCIM sharedRCIM] connectWithToken:token success:^(NSString *userId) {
// [[RCIM sharedRCIM] setUserInfoDataSource:self];
} error:^(RCConnectErrorCode status) {
NSLog(@"login error status: %ld.", (long)status);
} tokenIncorrect:^{
NSLog(@"token 无效 ,请确保生成token 使用的appkey 和初始化时的appkey 一致");
}];
}
/**
* 推送处理1
*/
if ([application
respondsToSelector:@selector(registerUserNotificationSettings:)]) {
//注册推送, iOS 8
UIUserNotificationSettings *settings = [UIUserNotificationSettings
settingsForTypes:(UIUserNotificationTypeBadge |
UIUserNotificationTypeSound |
UIUserNotificationTypeAlert)
categories:nil];
[application registerUserNotificationSettings:settings];
} else {
UIRemoteNotificationType myTypes = UIRemoteNotificationTypeBadge |
UIRemoteNotificationTypeAlert |
UIRemoteNotificationTypeSound;
[application registerForRemoteNotificationTypes:myTypes];
}
//融云即时通讯
[[NSNotificationCenter defaultCenter]
addObserver:self
selector:@selector(didReceiveMessageNotification:)
name:RCKitDispatchMessageNotification
object:nil];
[[RCIM sharedRCIM] setConnectionStatusDelegate:self];
加入到方法中的代码到这里
下面是单独的方法 直接加在AppDelegate.m的文件中即可
/**
* 将得到的devicetoken 传给融云用于离线状态接收push ,您的app后台要上传推送证书
*
* @param application <#application description#>
* @param deviceToken <#deviceToken description#>
*/
- (void)application:(UIApplication *)application
didRegisterForRemoteNotificationsWithDeviceToken:(NSData *)deviceToken {
NSString *token =
[[[[deviceToken description] stringByReplacingOccurrencesOfString:@"<"
withString:@""]
stringByReplacingOccurrencesOfString:@">"
withString:@""]
stringByReplacingOccurrencesOfString:@" "
withString:@""];
[[RCIMClient sharedRCIMClient] setDeviceToken:token];
}
/**
* 网络状态变化。
*
* @param status 网络状态。
*/
- (void)onRCIMConnectionStatusChanged:(RCConnectionStatus)status {
if (status == ConnectionStatus_KICKED_OFFLINE_BY_OTHER_CLIENT) {
UIAlertView *alert = [[UIAlertView alloc]
initWithTitle:@"提示"
message:@"您"
@"的帐号在别的设备上登录,您被迫下线!"
delegate:nil
cancelButtonTitle:@"知道了"
otherButtonTitles:nil, nil];
[alert show];
//注意这里下面的4行,根据自己需要修改 也可以注释了,但是只能注释这4行,网络状态变化这个方法一定要实现
ViewController *loginVC = [[ViewController alloc] init];
UINavigationController *_navi =
[[UINavigationController alloc] initWithRootViewController:loginVC];
self.window.rootViewController = _navi;
}
}
- (void)didReceiveMessageNotification:(NSNotification *)notification {
[UIApplication sharedApplication].applicationIconBadgeNumber =
[UIApplication sharedApplication].applicationIconBadgeNumber + 1;
}
获取token
在你的登陆控制器 ,登陆成功之后
一般后台会返回你一个用来装个人信息的字典
你将这个字典写入沙盒保存起来,以方便后面的使用
不懂的可以参考:http://www.cnblogs.com/ithongjie/p/5320489.html
下面继续,在你登陆成功之后,根据你需要发送的参数来从沙盒中获取看这个值存不存在,然后再根据存不存在发送请求
//获取用户信息账号模型 我这是一个工具类,不懂的参考:http://www.cnblogs.com/ithongjie/p/5320489.html
YYCAccount *account=[YYCAccountTool account];
if (account.name) { //因为我发送请求的时候需要发name这个字段,所以取出来用来判断存不存在
int did=account.uid;
NSString *url=YYCUrl(@"/rongcloudToken/"); //获取token需要的请求链接 后台给你,还有下面的参数后台会给你
NSMutableDictionary *params=[NSMutableDictionary dictionary];
//根据后台给你的参数来发参数
params[@"userId"]=[NSNumber numberWithInt:did];
params[@"userName"]=account.name;
if (account.filename) { //这个一般是融云聊天时用户的头像 ,一般是必传,没有可以选个默认的
params[@"avartUrl"]=YYCHomeImageUrl(2, account.filename);
}else{
params[@"avartUrl"]=YYCHomeImageUrl(2, @"avartar.png");
}
//发送get请求获取token
[YYCHttpTool GET:url params:params success:^(id json) {
NSDictionary *dict=json;
YYCLog(@"%@",dict);
//获取融云Token
NSString *token=dict[@"token"];
//将token存到本地
NSUserDefaults *defaults=[NSUserDefaults standardUserDefaults];
[defaults setObject:token forKey:@"token"];
[defaults synchronize];
//断开融云链接
[[RCIM sharedRCIM] disconnect];
//链接融云
[[RCIM sharedRCIM] connectWithToken:token success:^(NSString *userId) {
// [[RCIM sharedRCIM] setUserInfoDataSource:self];
} error:^(RCConnectErrorCode status) {
NSLog(@"login error status: %ld.", (long)status);
} tokenIncorrect:^{
NSLog(@"token 无效 ,请确保生成token 使用的appkey 和初始化时的appkey 一致");
}];
11.开始创建会话
先创建一个继承RCConversationListViewController名为ChatListViewController的控制器
创建之后的控制器.h文件即为
#import <UIKit/UIKit.h>
#import <RongIMKit/RongIMKit.h>
@interface ChatListViewController : RCConversationListViewController
@end
这样的样式
在你要创建即时会话的界面的控制器的.h文件中导入头文件
//融云即时通讯
#import <RongIMKit/RongIMKit.h>
并遵守数据源方法RCIMUserInfoDataSource
即变成了
#import <RongIMKit/RongIMKit.h>
@interface ViewController : UIViewController<RCIMUserInfoDataSource>
在.m文件中导入头文件
//融云即时通讯
#import "ChatListViewController.h"
#import <RongIMKit/RCConversationViewController.h>
现在在我们界面的右上角有一个会话列表按钮,点击会话列表进入会话列表界面
/**
* 点击了会话列表
*/
-(void)chatList
{
[[RCIM sharedRCIM] setUserInfoDataSource:self];
dispatch_async(dispatch_get_main_queue(), ^{
//跳转到会话列表界面
ChatListViewController *chatListViewController = [[ChatListViewController alloc]init];
[self.navigationController pushViewController:chatListViewController animated:YES];
});
}
如果在这个界面都是你的联系人,一个tableView,每行一个联系人,如果你想点击每一个人的时候直接进入聊天界面也可以,在
/**
* 点击cell跳转界面执行的方法
*
* @param tableView <#tableView description#>
* @param indexPath <#indexPath description#>
*/
-(void)tableView:(UITableView *)tableView didSelectRowAtIndexPath:(NSIndexPath *)indexPath
{
//这个就是你这个tableView的数据模型和数组 一个模型装一个联系人的信息
YYCMainDoctorStatus *status=self.status[indexPath.row];
//数据源方法,要传递数据必须加上
[[RCIM sharedRCIM] setUserInfoDataSource:self];
//直接跳到聊天界面
RCConversationViewController *conversationVC = [[RCConversationViewController alloc]init];
conversationVC.conversationType =ConversationType_PRIVATE;
//一般在这个数据模型里会有每一个联系人的UserId,姓名,然后title一般和用户名一样即可
conversationVC.targetId =[NSString stringWithFormat:@"%d",status.did]; //这里模拟自己给自己发消息,您可以替换成其他登录的用户的UserId
conversationVC.userName = status.doctorName;
conversationVC.title = status.doctorName;
//跳转到控制器,直接会话聊天界面
[self.navigationController pushViewController:conversationVC animated:YES];
}
/**
*此方法中要提供给融云用户的信息,建议缓存到本地,然后改方法每次从您的缓存返回
*/
- (void)getUserInfoWithUserId:(NSString *)userId completion:(void(^)(RCUserInfo* userInfo))completion
{
//获取用户账户信息
YYCAccount *account=[YYCAccountTool account];
//获取用户id
int did=account.uid;
//自己的信息
if (did==[userId intValue]) {
RCUserInfo *user = [[RCUserInfo alloc]init];
user.userId =[NSString stringWithFormat:@"%d",did];
user.name = account.name;
if (![account.filename isEqualToString:@""]) {
user.portraitUri = YYCHomeImageUrl(1, account.filename);
}else{
user.portraitUri = YYCHomeImageUrl(2, @"avartar.png");
// YYCHomeImageUrl(2, @"avartar.png")
}
return completion(user);
}
//聊天对象的信息 和谁聊天的信息
YYCMainDoctorStatus *statusUser;
//遍历数据模型 取用户id和userId想对应的取出来
for (YYCMainDoctorStatus *status in self.status) {
if (status.did == [userId intValue]) {
statusUser = status;
break;
}
}
//传递聊天对象的信息 id 名字 头像链接 注意,这里一定要传一个链接
RCUserInfo *user = [[RCUserInfo alloc]init];
user.userId = userId;
user.name = statusUser.doctorName;
//如果聊天对象的头像不为空用网络的
if (![statusUser.doctorIcon isEqualToString:@""]) {
user.portraitUri = YYCHomeImageUrl(1, statusUser.doctorIcon);
}else{//如果为空,用个替代的链接图片
user.portraitUri = YYCHomeImageUrl(2, @"avartar.png");
}
return completion(user);
}
下面代码都一样
下面就是在我们的ChatListViewController.h文件中
#import <RongIMKit/RongIMKit.h>
#import <RongIMKit/RongIMKit.h>
@interface ChatListViewController : RCConversationListViewController
@end
在.m文件中 这是会话列表界面 一般都是默认,不用改什么东西,你可以将退出和单聊去掉,根据自己需要
现在时界面搭建 这样界面就搭建好了
// 会话聊天界面
#import "ChatListViewController.h"
@interface ChatListViewController ()
@end
@implementation ChatListViewController
- (void)viewDidLoad {
[super viewDidLoad];
[self setDisplayConversationTypes:@[@(ConversationType_PRIVATE),@(ConversationType_DISCUSSION)]];
//自定义导航左右按钮
UIBarButtonItem *rightButton = [[UIBarButtonItem alloc]initWithTitle:@"单聊" style:UIBarButtonItemStylePlain target:self action:@selector(rightBarButtonItemPressed:)];
[rightButton setTintColor:[UIColor whiteColor]];
UIButton *backBtn = [UIButton buttonWithType:UIButtonTypeCustom];
backBtn.frame = CGRectMake(0, 6, 67, 23);
UIImageView *backImg = [[UIImageView alloc] initWithImage:[UIImage imageNamed:@"navigator_btn_back"]];
backImg.frame = CGRectMake(-10, 0, 22, 22);
[backBtn addSubview:backImg];
UILabel *backText = [[UILabel alloc] initWithFrame:CGRectMake(12, 0, 65, 22)];
backText.text = @"退出";
backText.font = [UIFont systemFontOfSize:15];
[backText setBackgroundColor:[UIColor clearColor]];
[backText setTextColor:[UIColor whiteColor]];
[backBtn addSubview:backText];
[backBtn addTarget:self action:@selector(leftBarButtonItemPressed:) forControlEvents:UIControlEventTouchUpInside];
UIBarButtonItem *leftButton = [[UIBarButtonItem alloc] initWithCustomView:backBtn];
[self.navigationItem setLeftBarButtonItem:leftButton];
self.navigationItem.rightBarButtonItem = rightButton;
self.conversationListTableView.tableFooterView = [UIView new];
}
/**
*重写RCConversationListViewController的onSelectedTableRow事件
*
* @param conversationModelType 数据模型类型
* @param model 数据模型
* @param indexPath 索引
*/
-(void)onSelectedTableRow:(RCConversationModelType)conversationModelType conversationModel:(RCConversationModel *)model atIndexPath:(NSIndexPath *)indexPath
{
RCConversationViewController *conversationVC = [[RCConversationViewController alloc]init];
conversationVC.conversationType =model.conversationType;
conversationVC.targetId = model.targetId;
conversationVC.userName =model.conversationTitle;
conversationVC.title = model.conversationTitle;
[self.navigationController pushViewController:conversationVC animated:YES];
}
-(void)viewWillAppear:(BOOL)animated
{
[super viewWillAppear:animated];
self.tabBarController.navigationItem.title = @"会话";
}
/**
* 退出登录
*
* @param sender <#sender description#>
*/
- (void)leftBarButtonItemPressed:(id)sender {
UIAlertView *alertView = [[UIAlertView alloc] initWithTitle:@"提示" message:@"确定要退出?" delegate:self cancelButtonTitle:@"取消" otherButtonTitles:@"退出", nil];
[alertView show];
}
/**
* 重载右边导航按钮的事件 zheli
*
* @param sender <#sender description#>
*/
-(void)rightBarButtonItemPressed:(id)sender
{
RCConversationViewController *conversationVC = [[RCConversationViewController alloc]init];
conversationVC.conversationType =ConversationType_PRIVATE;
conversationVC.targetId = @"user"; //这里模拟自己给自己发消息,您可以替换成其他登录的用户的UserId
conversationVC.userName = @"测试1";
conversationVC.title = @"自问自答";
[self.navigationController pushViewController:conversationVC animated:YES];
}
- (void)alertView:(UIAlertView *)alertView clickedButtonAtIndex:(NSInteger)buttonIndex {
if (buttonIndex == 1) {
[[RCIM sharedRCIM]disconnect];
[self.navigationController popViewControllerAnimated:YES];
}
}
@end
这样就集成好了
更多进阶请参考一下官方文档
官方网站集成文档地址:http://www.rongcloud.cn/docs/ios.html
iOS开发融云即时通讯集成详细步骤的更多相关文章
- iOS:融云即时通讯快速集成
一.介绍 即时通讯在众多社交软件.生活软件以及教育软件中已经是必备的功能了,在当前国内,即时通讯SDK做的比较不错的有那么几家,例如环信SDK.融云SDK...,这两家做的都很不错,各有千秋吧,要是真 ...
- ThinkPHP 提供Auth 权限管理、支付宝、微信支付、阿里oss、友盟推送、融云即时通讯、云通讯短信、Email、Excel、PDF 等等
多功能 THinkPHP 开源框架 项目简介:使用 THinkPHP 开发项目的过程中把一些常用的功能或者第三方 sdk 整合好,开源供亲们参考,如 Auth 权限管理.支付宝.微信支付.阿里oss. ...
- iOS消息体系架构详解-融云即时通讯云
iOS SDK 体系架构 本文档将详细介绍融云的 SDK 产品架构和消息体系,以便于您更深入的了解融云并更快速的开发自己的产品. 融云 SDK 系统架构 IMKit IMKit 的功能主要是封装各种界 ...
- 对接融云即时通讯组件SDK,轻松实现App聊天室
我好像特别喜欢做聊天室类的东东,刚折腾完微软的SignalR又折腾App.本来想研究研究XMPP的,由于服务器的搭建问题,先采用一个第三方的吧,看看效果如何.听到弟弟说他们公司用到了融云,我也下载个S ...
- iOS开发小技巧--即时通讯项目:消息发送框(UITextView)高度的变化; 以及UITextView光标复位的小技巧
1.即时通讯项目中输入框(UITextView)跟随输入文字的增多,高度变化的实现 最主要的方法就是监听UITextView的文字变化的方法- (void)textViewDidChange:(UIT ...
- iOS开发小技巧--即时通讯项目:使用富文本在UILabel中显示图片和文字;使用富文本占位显示图片
Label借助富文本显示图片 1.即时通讯项目中语音消息UI的实现,样式如图: 借助富文本在UILabel中显示图片和文字 // 1.创建一个可变的富文本 NSMutableAttributedStr ...
- 开发一款即时通讯App,从这几步开始
欢迎大家前往腾讯云+社区,获取更多腾讯海量技术实践干货哦~ 本文由腾讯云视频发表于云+社区专栏 关注公众号"腾讯云视频",一键获取 技术干货 | 优惠活动 | 视频方案 " ...
- MQTT是IBM开发的一个即时通讯协议,构建于TCP/IP协议上,是物联网IoT的订阅协议,借助消息推送功能,可以更好地实现远程控制
最近一直做物联网方面的开发,以下内容关于使用MQTT过程中遇到问题的记录以及需要掌握的机制原理,主要讲解理论. 背景 MQTT是IBM开发的一个即时通讯协议.MQTT构建于TCP/IP协议上,面向M2 ...
- 李洪强iOS开发之-环信03_集成 SDK 基础功能
李洪强iOS开发之-环信03_集成 SDK 基础功能 集成 SDK 基础功能 在您阅读此文档时,我们假定您已经具备了基础的 iOS 应用开发经验,并能够理解相关基础概念. SDK 同步/异步方法区分 ...
随机推荐
- ruby -- 问题解决(八)解决Paperclip::NotIdentifiedByImageMagickError
好吧!又见 Paperclip::NotIdentifiedByImageMagickError,之前遇过一次... 最近又遇到一次,解决了之后,忘了写博客,然后再次遇到的时候,有一种被车撞到的节奏. ...
- Tips4:把 Inspector面板转换为Debug模式
你知道 Inspector 的调试(debug)模式吗? 当debug模式打开后, Inspector将会把游戏物体所有的属性都显示出来,包括公有(public)和私有(private)变量. 例如, ...
- Hadoop第12周练习—HBase安装部署
1 1.1 1.2 :安装HBase 2.1 内容 运行环境说明 1.1 硬软件环境 线程,主频2.2G,6G内存 l 虚拟软件:VMware® Workstation 9.0.0 build-8 ...
- [Python] raw_input
该函数输入的是字符串,如果想输入数字,可以用强制转换.
- 如何根据iframe内嵌页面调整iframe高宽
问题来自于工作的实例,我的一个域名A的页面,有个iframe,它可能内嵌了另一个域名B的页面,也可能内嵌域名C的页面,但是呢,B和C的页面大小是不一样的,特别是高是不一样的高,那么我如何设置ifram ...
- servlet中的细节
Get方法有大小限制:1024个字符.这些信息使用 Query_String头传递,并通过Query_String环境变量访问.Post方法:请求体信息使用FromData头传递.读取所有表单参数:g ...
- idea上实现github代码同步
1.先将github远程仓库clone到本地 2.将本地仓库中的项目导入到idea中 3.如果你的项目代码不是放在仓库的根目录下,idea会识别到你的项目是在git仓库目录下,必须点击add root ...
- 软件工程——sprint 1回顾总结
主题:“我们在本次sprint中做了什么?接下来的打算?” sprint总结:在本次sprint里,这是我们团队的成员们第一次开始以团队的形式进行一次团队项目开发,早在第一次团队会议之时,我们便因团队 ...
- Qt Style Sheet实践(二):组合框QComboBox的定制
导读 组合框是一个重要且应用广泛的组件,一般由两个子组件组成:文本下拉单部分和按钮部分.在许多既需要用户选择.又需要用户手动输入的应用场景下,组合框能够很好的满足我们的需求.如我们经常使用的聊天软件Q ...
- 设计模式--代理(Proxy)模式
在公司,经常性听到采购部的人说采购某样东材料,采购不了,需要通过代理商才可以.以前Insus.NET也做有一个练习<找人办事,代理设计模式(Proxy)>http://www.cnblog ...
