
IntelliJ IDEA 的 Jetty部署插件
jetty相对于tomcat来说,启动速度非常快,方便调试。
在idea的maven项目中,只需要在pom.xml配置文件中配置jetty的插件即可。
全部:
<project xmlns="http://maven.apache.org/POM/4.0.0" xmlns:xsi="http://www.w3.org/2001/XMLSchema-instance"

         xsi:schemaLocation="http://maven.apache.org/POM/4.0.0 http://maven.apache.org/maven-v4_0_0.xsd">

    <modelVersion>4.0.0</modelVersion>

    <groupId>com.gaussic</groupId>

    <artifactId>springdemo-list</artifactId>

    <packaging>war</packaging>

    <version>1.0-SNAPSHOT</version>

    <name>springdemo-list Maven Webapp</name>

    <url>http://maven.apache.org</url>

    <properties>

        <spring.version>4.2.6.RELEASE</spring.version>

        <hibernate.version>5.1.0.Final</hibernate.version>

        <project.build.sourceEncoding>UTF-8</project.build.sourceEncoding>

        <project.reporting.outputEncoding>UTF-8</project.reporting.outputEncoding>

        <!-- Jetty 属性, 保证Java web运行环境-->

        <jetty.version>8.1.9.v20130131</jetty.version>

    </properties>

    <dependencies>

        <dependency>

            <groupId>org.springframework</groupId>

            <artifactId>spring-webmvc</artifactId>

            <version>${spring.version}</version>

        </dependency>

        <dependency>

            <groupId>org.springframework.data</groupId>

            <artifactId>spring-data-jpa</artifactId>

            <version>1.10.1.RELEASE</version>

        </dependency>

        <dependency>

            <groupId>org.hibernate</groupId>

            <artifactId>hibernate-entitymanager</artifactId>

            <version>${hibernate.version}</version>

        </dependency>

        <dependency>

            <groupId>org.hibernate</groupId>

            <artifactId>hibernate-c3p0</artifactId>

            <version>${hibernate.version}</version>

        </dependency>

        <dependency>

            <groupId>com.mchange</groupId>

            <artifactId>c3p0</artifactId>

            <version>0.9.5.2</version>

        </dependency>

        <dependency>

            <groupId>javax.servlet</groupId>

            <artifactId>jstl</artifactId>

            <version>1.2</version>

        </dependency>

        <dependency>

            <groupId>mysql</groupId>

            <artifactId>mysql-connector-java</artifactId>

            <version>5.1.39</version>

        </dependency>

    </dependencies>

    <build>

        <finalName>springmvcdemo</finalName>

        <plugins>

            <plugin>

                <groupId>org.apache.maven.plugins</groupId>

                <artifactId>maven-compiler-plugin</artifactId>

                <configuration>

                    <source>1.8</source>

                    <target>1.8</target>

                </configuration>

            </plugin>

            <plugin>

                <groupId>org.mortbay.jetty</groupId>

                <artifactId>jetty-maven-plugin</artifactId>

                <version>${jetty.version}</version>

                <configuration>

                    <connectors>

                        <connector implementation="org.eclipse.jetty.server.nio.SelectChannelConnector">

                            <port>8012</port>

                        </connector>

                    </connectors>

                    <stopKey>exit</stopKey>

                    <stopPort>9090</stopPort>

                    <scanIntervalSeconds>10</scanIntervalSeconds>

                    <webAppConfig>

                        <contextPath>/${project.artifactId}</contextPath>

                    </webAppConfig>

                </configuration>

            </plugin>

        </plugins>

    </build>

</project>
properties节点:
 <properties>

        <spring.version>4.2.6.RELEASE</spring.version>

        <hibernate.version>5.1.0.Final</hibernate.version>

        <project.build.sourceEncoding>UTF-8</project.build.sourceEncoding>

        <project.reporting.outputEncoding>UTF-8</project.reporting.outputEncoding>

        <!-- Jetty 属性, 保证Java web运行环境-->

        <jetty.version>8.1.9.v20130131</jetty.version>

    </properties>
plugin节点:
 <plugin>

                <groupId>org.mortbay.jetty</groupId>

                <artifactId>jetty-maven-plugin</artifactId>

                <version>${jetty.version}</version>

                <configuration>

                    <connectors>

                        <connector implementation="org.eclipse.jetty.server.nio.SelectChannelConnector">

                            <port>8012</port>

                        </connector>

                    </connectors>

                    <stopKey>exit</stopKey>

                    <stopPort>9090</stopPort>

                    <scanIntervalSeconds>10</scanIntervalSeconds>

                    <webAppConfig>

                        <contextPath>/${project.artifactId}</contextPath>

                    </webAppConfig>

                </configuration>

            </plugin>
直接的:
  <plugin>

                <groupId>org.mortbay.jetty</groupId>

                <artifactId>jetty-maven-plugin</artifactId>

                <version>8.1.9.v20130131</version>

                <configuration>

                    <stopPort>9988</stopPort>

                    <stopKey>foo</stopKey>

                    <scanIntervalSeconds>5</scanIntervalSeconds>

                    <connectors>

                        <connector implementation="org.eclipse.jetty.server.nio.SelectChannelConnector">

                            <port>8014</port>

                            <maxIdleTime>60000</maxIdleTime>

                        </connector>

                    </connectors>

                    <webAppConfig>

                        <contextPath>/</contextPath>

                    </webAppConfig>

                </configuration>

            </plugin>
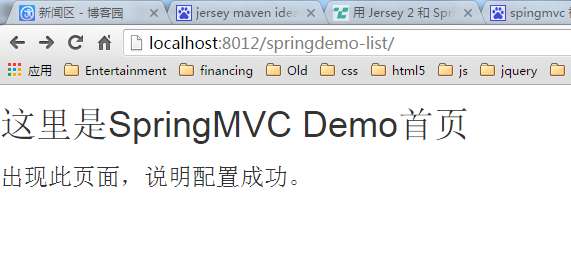
其中connector下的port就是启动端口,默认的是8080,这个端口很多应用都会用到,我们这里改成8012
contextPath配置的/springdemo-list
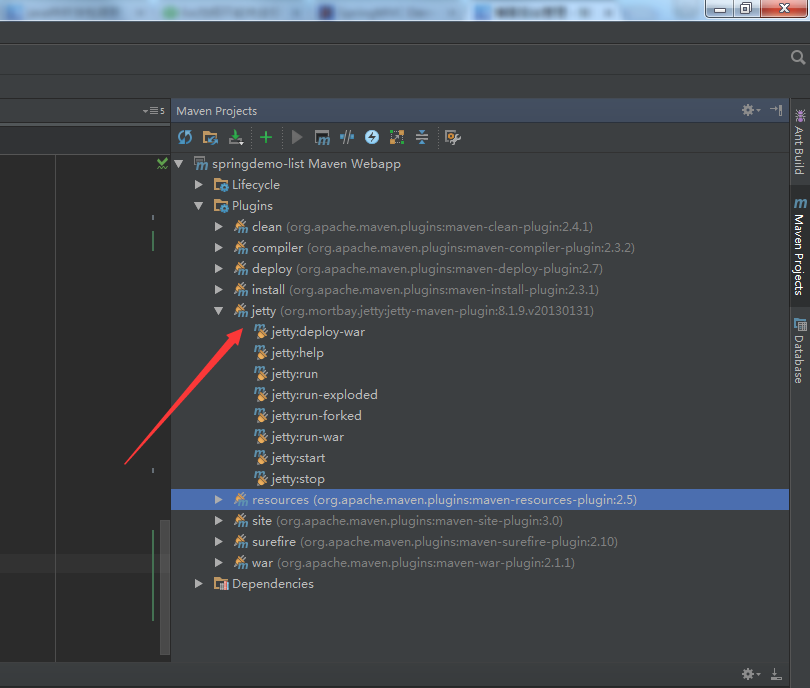
写好以后会发现右侧的插件部分多出jetty部分,直接点击上面的run就可以运行。

=================================================================================
如果是SpringBoot要设置成jetty方式的话,因为spring-boot-starter-web默认的是tomcat方式,如果要改,就必须去除spring-boot-starter-tomcat的依赖,再添加spring-boot-starter-jetty的依赖
添加依赖:
            <dependency>

                <groupId>org.springframework.boot</groupId>

                <artifactId>spring-boot-starter-web</artifactId>

                <exclusions>

                    <exclusion>

                        <groupId>org.springframework.boot</groupId>

                        <artifactId>spring-boot-starter-tomcat</artifactId>

                    </exclusion>

                </exclusions>

            </dependency>

            <dependency>

                <groupId>org.springframework.boot</groupId>

                <artifactId>spring-boot-starter-jetty</artifactId>

                <exclusions>

                    <exclusion>

                        <groupId>org.eclipse.jetty.websocket</groupId>

                        <artifactId>*</artifactId>

                    </exclusion>

                </exclusions>

            </dependency>
这样就可以了。
http://www.cnblogs.com/yjmyzz/p/4123054.html
http://blog.csdn.net/xiejx618/article/details/49936541
IntelliJ IDEA 的 Jetty部署插件的更多相关文章
- IntelliJ IDEA - 热部署插件JRebel 安装使用教程
IntelliJ IDEA - JRebel 安装使用教程 JRebel 能做什么? JRebel 是一款热部署插件.当你的 Java-web 项目在 tomcat 中 run/debug 的时候 , ...
- IntelliJ IDEA - 热部署插件JRebel ,对静态资源文件进行热部署?javascript、css、vm文件
IntelliJ IDEA - 热部署插件JRebel ,对静态资源文件进行热部署?javascript.css.vm文件https://blog.csdn.net/feng_pump/article ...
- Intellij热部署插件JRebel
Intellij热部署插件JRebel 安装JRebel 激活JRebel 相关设置 Intellij热部署插件JRebel 项目需求,一直用eclipse的我,也要改用IDEA了,一开始,很不习惯. ...
- Intellij热部署插件JRebel使用方法(转载)
Intellij热部署插件JRebel帮助开发者在项目处于运行状态下任意修改Java文件并动态反馈到运行的项目中.插件官方下载地址:https://plugins.jetbrains.com/plug ...
- Intellij 热部署插件 JRebel [转载]
原文:https://blog.csdn.net/weixin_42831477/article/details/82229436 Intellij热部署插件JRebel IDEA本身没有集成热部署工 ...
- Intellij IDEA +MAVEN+Jetty实现SpringMVC简单查询功能
利用 Intellij IDEA +MAVEN+Jetty实现SpringMVC读取数据库数据并显示在页面上的简单功能 1 新建maven项目,配置pom.xml <project xmlns= ...
- IntelliJ IDEA,酷炫插件系列,提高你的工作效率
今天介绍一下IDEA的一些炫酷的插件,IDEA强大的插件库,不仅能给我们带来一些开发的便捷,还能体现我们的与众不同. 1.插件的安装 打开setting文件选择Plugins选项 Ctrl + Alt ...
- 推荐 IntelliJ IDEA 牛逼的插件
1. activate-power-mode 和 Power mode II 根据Atom的插件activate-power-mode的效果移植到IDEA上 写代码是整个屏幕都在抖动,activate ...
- intellij idea 13&14 插件推荐及高速上手建议 (已更新!)
早些年 在外企的时候,公司用的是intellij idea ,当时也是从eclipse.MyEclipse转过去的非常是不习惯. 用了一周明显感觉爱上它了.由于它非常智能,并且能纠正你非常多不好的习惯 ...
随机推荐
- 分布式架构高可用架构篇_04_Keepalived+Nginx实现高可用Web负载均衡
参考: 龙果学院http://www.roncoo.com/share.html?hamc=hLPG8QsaaWVOl2Z76wpJHp3JBbZZF%2Bywm5vEfPp9LbLkAjAnB%2B ...
- Markdown基本用法
Markdown基本用法 不同的编辑器对本文中的功能可能显示情况不一样,马克飞象可以完美支持和显示. 一.标题 h1标题 #h1标题 h1标题 h1标题 == h2标题 ##h2标题 h2标题 h2标 ...
- Javascript 笔记与总结(2-8)对象2
注意:标签属性与 DOM 对象属性的对应关系,绝大部分 2 者是相同的,例如 imgobj.src 属性对应 <img src=""> 中的 src 属性 例外:< ...
- Rails--export csv
--controller def export_agent_impressions export_start_time = Time.parse(params[:es_time]) + 7.hours ...
- The world beyond batch: Streaming 101
https://www.oreilly.com/ideas/the-world-beyond-batch-streaming-101 https://www.oreilly.com/ideas/the ...
- 【转】最简单的CI框架入门示例--数据库取数据
1.下载CI框架(自己找) 2.配置 database.php配置: 为数据库服务器设置 connection 参数: $db['default']['hostname'] = "yo ...
- jfinal框架教程-学习笔记(二)
上一节介绍了jfinal框架的简单搭建,这节通过一个小例子了解jfinal的结构和特点 先上图 1.建数据库(我用的是oracle数据库,其他的相对也差不多) -- Create table crea ...
- 读书笔记——《图解TCP/IP》(4/4)
经典摘抄 第八章 应用层协议概要 1.应用协议是为了实现某种应用而设计和创造的协议. 2.TCP/IP的应用层包含了管理通信连接的会话层功能.转换数据格式的表示层功能,还包括与对端主机交互的应用层功能 ...
- HttpContext为null new HttpContextWrapper(System.Web.HttpContext.Current)
HttpContext = (context == null ? new HttpContextWrapper(System.Web.HttpContext.Current) : context);
- SAX解析XML
package ls.xml; import java.io.StreamCorruptedException; import javax.xml.stream.events.EndElement; ...