
Rsync+inotify实现实时同步
1.1 inotify介绍
inotify是一种强大的、细粒度的、异步的文件系统事件控制机制。linux内核从2.6.13起,加入了inotify支持,通过inotify可以监控文件系统中添加、删除、修改、移动等各种事件,利用这个内核接口,第三方软件就可以监控文件系统下文件的各种变化情况,而inotify-tools正是实施监控的软件。
2.1 rsync+inotify同步逻辑图
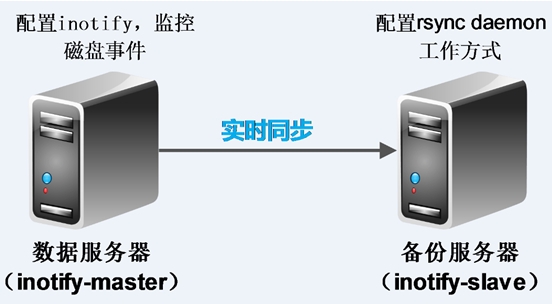
3.1 环境部署
|
主机名 |
主机IP地址 |
系统版本 |
系统内核版本 |
|
inotify-master (rsync客户端,inotify服务端) |
192.168.144.101 |
CentOS 64 |
2.6.32-573.el6.x86_64 |
|
inotify-slave (rsync服务端) |
192.168.144.100 |
CentOS 64 |
2.6.32-573.el6.x86_64 |
4.1 inotify-slave部署
这里就是部署rsync服务,rsync daemon工作模式。
4.1.1检查是否安装rsync
 ]# rpm -qa rsync

 rsync-3.0.-.el6.x86_64
4.1.2 新建rsync用户及模块目录并更改其用户组
 ]# useradd rsync -s /sbin/nologin  -M #添加rsync用户

 ]# mkdir /home/rsync/backup   #创建rsync daemon工作模式的模块目录

 ]# chown rsync.rsync /home/rsync/backup/   #更改模块目录的用户组
4.1.3 编写rsync daemon配置文件/etc/rsyncd.conf
]# vim /etc/rsyncd.conf
 ##rsyncd.conf start##

 #工作中指定用户(需要指定用户)

 uid = rsync

 gid = rsync

 #相当于黑洞.出错定位

 use chroot = no

 #有多少个客户端同时传文件

 max connections =

 #超时时间

 timeout =

 #进程号文件

 pid file = /var/run/rsyncd.pid

 #日志文件

 lock file = /var/run/rsync.lock

 #日志文件

 log file = /var/log/rsyncd.log

 #模块开始

 #这个模块对应的是推送目录

 #模块名称随便起

 [backup]

 #需要同步的目录

 path = /home/rsync/backup

 #表示出现错误忽略错误

 ignore errors

 #表示网络权限可写(本地控制真正可写)

 read only = false

 #这里设置IP或让不让同步

 list = false

 #指定允许的网段

 hosts allow = 192.168.114.101

 #拒绝链接的地址,一下表示没有拒绝的链接。

 hosts deny = 0.0.0.0/

 #不要动的东西(默认情况)

 #虚拟用户

 auth users = rsync_backup

 #虚拟用户的密码文件

 secrets file = /etc/rsync.password

 #配置文件的结尾

 #rsync_config_______________end
4.1.4 配置虚拟用户的密码文件
]# echo "rsync_backup:123456" > /etc/rsync.password 注:rsync_backup为虚拟用户,123456为这个虚拟用户的密码

]# chmod  /etc/rsync.password  #为密码文件提权,增加安全性
4.1.5 启动rsync 服务
 ]# rsync --daemon   #启动rsync服务

 ]# ps -ef |grep rsync

 root             : ?        :: rsync --daemon

 root         : pts/    :: grep rsync

 ]# netstat -lnutp |grep rsync

 tcp               0.0.0.0:                 0.0.0.0:*                   LISTEN      /rsync

 tcp               :::                      :::*                        LISTEN      /rsync
4.1.6 通过inotify-master测试推送
inotify-master配置密码文件,测试推送
 ]# echo "" > /etc/rsync.password

 ]# chmod  /etc/rsync.password

 ]# touch test1.txt

 ]# echo "hello" > test1.txt

 ]# cat test1.txt

 hello
[root@lys2 rsync]# rsync -avz test1.txt rsync_backup@192.168.144.100::backup --password-file=/etc/rsync.password

sending incremental file list

test1.txt

sent  bytes  received  bytes  206.00 bytes/sec

total size is   speedup is 0.06
inotify-slave检查:
 ]# ll /home/rsync/backup/

 总用量

 -rw-r--r--.  rsync rsync  8月    : test1.txt

 ]# cat /home/rsync/backup/test1.txt

 hello
5.1 inotify-master部署
注:
inotify是rsync客户端安装和执行的
企业场景压力测试200-300个同步限制,受网卡,磁盘,带宽等的制约。
5.1.1 下载inotify源码包并编译安装
]# wget http://github.com/downloads/rvoicilas/inotify-tools/inotify-tools-3.14.tar.gz  #下载inotify源码包

..................................

]# tar zxf inotify-tools-3.14.tar.gz

]# cd inotify-tools-3.14

]# ./configure --prefix=/usr/local/inotify #配置inotify,并指定安装路径为/usr/local/inotify

................................

]# make && make install
5.1.2 inotify之inotifywait命令常用参数详解
 []# cd /usr/local/inotify/

 ]# ./bin/inotifywait --help

 -r|--recursive   Watch directories recursively. #递归查询目录

 -q|--quiet      Print less (only print events). #打印监控事件的信息

 -m|--monitor   Keep listening for events forever.  Without this option, inotifywait will exit after one  event is received.        #始终保持事件监听状态

 --excludei <pattern>  Like --exclude but case insensitive.    #排除文件或目录时,不区分大小写。

 --timefmt <fmt> strftime-compatible format string for use with %T in --format string. #指定时间输出的格式

 --format <fmt>  Print using a specified printf-like format string; read the man page for more details.

 #打印使用指定的输出类似格式字符串

 -e|--event <event1> [ -e|--event <event2> ... ] Listen for specific event(s).  If omitted, all events are  listened for.   #通过此参数可以指定需要监控的事件,如下所示:

 Events:

 access           file or directory contents were read       #文件或目录被读取。

 modify           file or directory contents were written    #文件或目录内容被修改。

 attrib            file or directory attributes changed      #文件或目录属性被改变。

 close            file or directory closed, regardless of read/write mode    #文件或目录封闭,无论读/写模式。

 open            file or directory opened                    #文件或目录被打开。

 moved_to        file or directory moved to watched directory    #文件或目录被移动至另外一个目录。

 move            file or directory moved to or from watched directory    #文件或目录被移动另一个目录或从另一个目录移动至当前目录。

 create           file or directory created within watched directory     #文件或目录被创建在当前目录

 delete           file or directory deleted within watched directory     #文件或目录被删除

 unmount         file system containing file or directory unmounted  #文件系统被卸载
5.1.4 编写监控脚本并加载到后台执行
 ]# cat /scripts/rsync.sh

 #!/bin/bash

 #para

 host01=192.168.144.100  #inotify-slave的ip地址

 src=/home/rsync/backup        #本地监控的目录

 dst=backup         #inotify-slave的rsync服务的模块名

 user=rsync_backup      #inotify-slave的rsync服务的虚拟用户

 rsync_passfile=/etc/rsync.password   #本地调用rsync服务的密码文件

 inotify_home=/usr/local/inotify    #inotify的安装目录

 #judge

 if [ ! -e "$src" ] \

 || [ ! -e "${rsync_passfile}" ] \

 || [ ! -e "${inotify_home}/bin/inotifywait" ] \

 || [ ! -e "/usr/bin/rsync" ];

 then

 echo "Check File and Folder"

 exit

 fi

 ${inotify_home}/bin/inotifywait -mrq --timefmt '%d/%m/%y %H:%M' --format '%T %w%f' -e close_write,delete,create,attrib $src \

 | while read file

 do

 #  rsync -avzP --delete --timeout= --password-file=${rsync_passfile} $src $user@$host01::$dst >/dev/null >&

 cd $src && rsync -aruz -R --delete ./  --timeout= $user@$host01::$dst --password-file=${rsync_passfile} >/dev/null >&

 done

 exit
 ]# sh inotify.sh &  #将脚本加入后台执行

 []
5.1.4 实时同步测试
inotify-master操作:
 ]# cd /home/rsync/backup/

 ]# ll

 总用量

 -rw-r--r--.  root root  8月    : test1.txt
]# for i in $(seq );do touch $i.txt;done

]# ll | wc -l
inotify-slave检查
]# cd /home/rsync/backup/

]# ll | wc -l

]# ll

总用量

-rw-r--r--.  rsync rsync  8月    : .txt

-rw-r--r--.  rsync rsync  8月    : .txt

-rw-r--r--.  rsync rsync  8月    : .txt

-rw-r--r--.  rsync rsync  8月    : .txt

-rw-r--r--.  rsync rsync  8月    : .txt

-rw-r--r--.  rsync rsync  8月    : .txt

-rw-r--r--.  rsync rsync  8月    : .txt

-rw-r--r--.  rsync rsync  8月    : .txt

-rw-r--r--.  rsync rsync  8月    : .txt

-rw-r--r--.  rsync rsync  8月    : .txt
Rsync+inotify实现实时同步的更多相关文章
- linux rsync +inotify 实现 实时同步
前言: rsync可以实现触发式的文件同步,但是通过crontab守护进程方式进行触发,同步的数据和实际数据会有差异,而inotify可以监控文件系统的各种变化,当文件有任何变动时,就触发rs ...
- rsync + inotify 数据实时同步
一.rsync介绍 rsync英文全称为Remote synchronization,从软件的名称就可以看出来,Rsync具有可是本地和远程两台主机之间的数据快速复制同步镜像.远程备份的功能,这个功能 ...
- rsync+inotify实现实时同步案例--转
转自:http://chocolee.blog.51cto.com/8158455/1400596 随着应用系统规模的不断扩大,对数据的安全性和可靠性也提出的更好的要求,rsync在高端业务系统中也逐 ...
- rsync+inotify实现实时同步案例【转】
1.1 inotify介绍 inotify是一种强大的.细粒度的.异步的文件系统事件控制机制.linux内核从2.6.13起,加入了inotify支持,通过inotify可以监控文件系统中添加.删除. ...
- rsync简介与rsync+inotify配置实时同步数据
rsync简介 rsync是linux系统下的数据镜像备份工具.使用快速增量备份工具Remote Sync可以远程同步,支持本地复制,或者与其他SSH.rsync主机同步. rsync特性 rsync ...
- CentOS 7 rsync+inotify实现实时同步
测试环境如下: inotify-slave IP : 172.16.0.222 inotify-master IP : 172.16.0.233 对两台机的要求: 安装依赖包gcc: yum inst ...
- centos 配置rsync+inotify数据实时同步2
一.Rsync服务简介 1. 什么是Rsync 它是一个远程数据同步工具,它在同步文件的同时,可通过LAN/WAN快速同步多台主机间的文件.Rsync使用所谓的“rsync算法”来使本地和远程两个主机 ...
- centos 配置rsync+inotify数据实时同步
何为rsync? 定义: rsync是一个开源的快速备份工具,可以在不同主机之间镜像同步整个目录树,支持增量备份,保持链接和权限,非常适用于异地备份 何为源端和发起端? 在远程同步过程中,负责发起rs ...
- rsync+inotify实现实时同步案例
转自:http://chocolee.blog.51cto.com/8158455/1400596 随着应用系统规模的不断扩大,对数据的安全性和可靠性也提出的更好的要求,rsync在高端业务系统中也逐 ...
随机推荐
- POST内容太大的问题
背景: 最近项目进入尾声,需要做交付测试,发现CMS生成页面在反复修改保存多次后,由于页面存在动态加载js的缘故,使得页面的内容越来越大,最终出现页面没有办法保存(ajax post将页面的内容发送给 ...
- Qt 动画框架
最近一个项目中的需要做动画效果,很自然就想起来用qt animation framework .这个框架真的很强大.支持多个动画组合,线性动画,并行动画等.在此总结一下使用该框架一些需要注意的地方: ...
- Python中,添加写入数据到已经存在的Excel的xls文件,即打开excel文件,写入新数据
背景 Python中,想要打开已经存在的excel的xls文件,然后在最后新的一行的数据. 折腾过程 1.找到了参考资料: writing to existing workbook using xlw ...
- 【uTenux实验】事件标志
事件标志是一个用来实现同步的对象,由多个位组成,用作指示对应事件存在的标志.事件标志由用来指示对应事件存在的位模式(bitpattern)和一个等待事件标志的任务队列组成. uTenux提供了一组AP ...
- 33. Minimum Depth of Binary Tree && Balanced Binary Tree && Maximum Depth of Binary Tree
Minimum Depth of Binary Tree OJ: https://oj.leetcode.com/problems/minimum-depth-of-binary-tree/ Give ...
- 用自己的ID在appstore中更新app-黑苹果之路
由于之前套用了别人的镜像,在appstore中更新XCode时总要输别人id的密码,id还不能改.网上有的说要把XCode删掉,然后再用自己的ID更新,找到另外一个方法,更简单: 1.打开引用程序目录 ...
- 初识UML
最近的学习中,遇到几次UML图,很是迷糊,确切的说,看不太懂.查阅UML相关资料,基本解决了这个问题.UML看起来还是相当深奥,这里只提一下解决问题的部分知识.(以下知识来自网络) Unified M ...
- Activity
activity的生命周期: 第一个是:点击按钮切换到另一个activity界面. 第二个是:单击物理返回键的时候,是对当前的activity进行销毁动作. Activity的启动方式:直接启动和匿名 ...
- C++去掉字符串中首尾空格和所有空格
c++去掉首尾空格是参考一篇文章的,但是忘记文章出处了,就略过吧. 去掉首尾空格的代码如下: void trim(string &s) { if( !s.empty() ) { s.erase ...
- ie6并不是不支持!important
之前对ie6接触不多,并且认识也不深,虽然知道ie6中的!important很特别,但是并没有记住特别在哪里~今天就记录一下吧! 首先,很多人说ie6是不支持!important的,其实这个一个错误的 ...