C#使用windows服务定时调用api接口
使用VS创建windows服务项目:

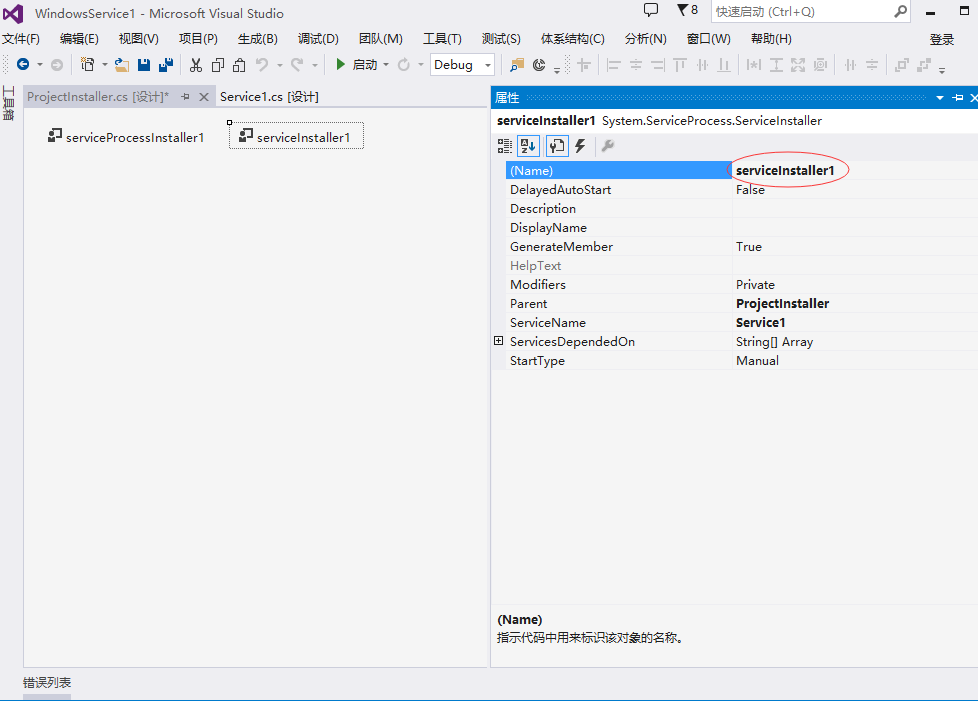
创建好项目 会出现一个设计界面 右键弹出对话框 选择添加安装程序

名字什么的自己可以改:
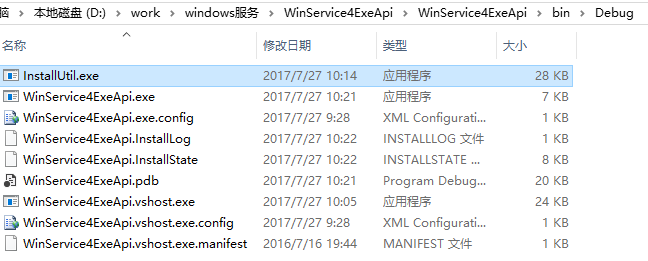
项目目录:

打开项目中的ProjectInstaller.Designer.cs 修改windows服务名称描述以及启动方式等:
partial class ProjectInstaller

    {

        /// <summary>

        /// 必需的设计器变量。

        /// </summary>

        private System.ComponentModel.IContainer components = null;

        /// <summary>

        /// 清理所有正在使用的资源。

        /// </summary>

        /// <param name="disposing">如果应释放托管资源,为 true;否则为 false。</param>

        protected override void Dispose(bool disposing)

        {

            if (disposing && (components != null))

            {

                components.Dispose();

            }

            base.Dispose(disposing);

        }

        #region 组件设计器生成的代码

        /// <summary>

        /// 设计器支持所需的方法 - 不要

        /// 使用代码编辑器修改此方法的内容。

        /// </summary>

        private void InitializeComponent()

        {

            components = new System.ComponentModel.Container();

            // 创建ServiceProcessInstaller对象和ServiceInstaller对象

            this.spInstaller = new System.ServiceProcess.ServiceProcessInstaller();

            this.sInstaller = new System.ServiceProcess.ServiceInstaller();

            // 设定ServiceProcessInstaller对象的帐号、用户名和密码等信息

            this.spInstaller.Account = System.ServiceProcess.ServiceAccount.LocalSystem;

            this.spInstaller.Username = null;

            this.spInstaller.Password = null;

            // 设定服务名称

            this.sInstaller.ServiceName = "CallApiExeTask";

            //服务描述

            this.sInstaller.Description = "定时调用api接口,获取任务后操作数据库";

            // 设定服务的启动方式

            this.sInstaller.StartType = System.ServiceProcess.ServiceStartMode.Automatic;

            //

            // ProjectInstaller

            //

            this.Installers.AddRange(new System.Configuration.Install.Installer[] {

            this.spInstaller,

            this.sInstaller});

        }

        #endregion

        private System.ServiceProcess.ServiceProcessInstaller spInstaller;

        private System.ServiceProcess.ServiceInstaller sInstaller;

    }
打开Service1 写入想要执行的操作等:
public partial class Service1 : ServiceBase

    {

        System.Timers.Timer timer1;  //计时器

        public Service1()

        {

            InitializeComponent();

        }

        protected override void OnStart(string[] args)

        {

            //服务开启执行代码

            //定时调用接口

            timer1 = new System.Timers.Timer();

            timer1.Interval = ;  //设置计时器事件间隔执行时间

            timer1.Elapsed += new System.Timers.ElapsedEventHandler(timer1_Elapsed);

            timer1.Enabled = true;

        }

        /// <summary>

        /// 定时器 调用的方法

        /// </summary>

        /// <param name="sender"></param>

        /// <param name="e"></param>

        private void timer1_Elapsed(object sender, System.Timers.ElapsedEventArgs e)

        {

            var client = new HttpClient();

            client.BaseAddress = new Uri("http://192.168.10.239:9000/");//接口url

            string data = client.GetStringAsync("ZyTest").Result;//接口action

        }

        protected override void OnStop()

        {

            //服务结束执行代码

            this.timer1.Enabled = false;

        }

        protected override void OnPause()

        {

            //服务暂停执行代码

            base.OnPause();

        }

        protected override void OnContinue()

        {

            //服务恢复执行代码

            base.OnContinue();

        }

        protected override void OnShutdown()

        {

            //系统即将关闭执行代码

            base.OnShutdown();

        }

    }
Program.cs中可以设置主方法调用的service服务:
static class Program

    {

        /// <summary>

        /// 应用程序的主入口点。

        /// </summary>

        static void Main()

        {

            ServiceBase[] ServicesToRun;

            ServicesToRun = new ServiceBase[]

            {

                new Service1()

            };

            ServiceBase.Run(ServicesToRun);

        }

    }
生成解决方案,以上就完成了windows服务的编写
下面需要把服务安装到服务器或者pc上:
首先在网上下载一个installutil.exe文件(百度直接搜索可以下载) 放到...\bin\Debug文件夹下:
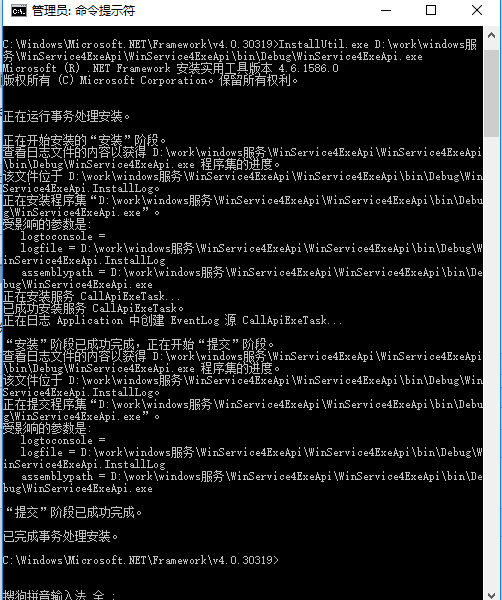
用管理员身份打开命令提示符:

输入 cd C:\Windows\Microsoft.NET\Framework\v4.0.30319 回车
如果你的程序是2.0的framework则需要输入 cd C:\Windows\Microsoft.NET\Framework\v2.0.50727

输入 InstallUtil.exe D:\work\windows服务\WinService4ExeApi\WinService4ExeApi\bin\Debug\WinService4ExeApi.exe 回车 完成安装
说明: D:\work\windows服务\WinService4ExeApi\WinService4ExeApi\bin\Debug\WinService4ExeApi.exe表示项目生成的exe文件位置(也可以把debug文件夹单独copy到其他地方重命名)
安装完成后:打开服务就可以看到了

如果需要卸载此服务:打开cmd 直接输入 sc delete CallApiExeTask便可 CallApiExeTask为你的服务名称

ps: 如果你的windows服务程序修改了 需要更新成新版本 不用卸载服务再安装 只需先停掉该服务 然后把文件夹内的文件替换为新的文件 重新启动该服务即可
C#使用windows服务定时调用api接口的更多相关文章
- 玩转Windows服务系列——无COM接口Windows服务启动失败原因及解决方案
将VS创建的Windows服务项目编译生成的程序,通过命令行 “服务.exe -Service”注册为Windows服务后,就可以通过服务管理器进行管理了. 问题 通过服务管理器进行启动的时候,发现服 ...
- js replace 全局替换 以表单的方式提交参数 判断是否为ie浏览器 将jquery.qqFace.js表情转换成微信的字符码 手机端省市区联动 新字体引用本地运行可以获得,放到服务器上报404 C#提取html中的汉字 MVC几种找不到资源的解决方式 使用Windows服务定时去执行一个方法的三种方式
js replace 全局替换 js 的replace 默认替换只替换第一个匹配的字符,如果字符串有超过两个以上的对应字符就无法进行替换,这时候就要进行一点操作,进行全部替换. <scrip ...
- Python调用API接口的几种方式 数据库 脚本
Python调用API接口的几种方式 2018-01-08 gaoeb97nd... 转自 one_day_day... 修改 微信分享: 相信做过自动化运维的同学都用过API接口来完成某些动作.AP ...
- Python调用API接口的几种方式
Python调用API接口的几种方式 相信做过自动化运维的同学都用过API接口来完成某些动作.API是一套成熟系统所必需的接口,可以被其他系统或脚本来调用,这也是自动化运维的必修课. 本文主要介绍py ...
- vs 2010创建Windows服务定时timer程序
vs 2010创建Windows服务定时timer程序: 版权声明:本文为搜集借鉴各类文章的原创文章,转载请注明出处: http://www.cnblogs.com/2186009311CFF/p/ ...
- 调用API接口,查询手机号码归属地(3)
从mysql数据库获取电话号码,查询归属地并插入到数据库 #!/usr/bin/python # -*- coding: utf-8 -*- import json, urllib, sys, pym ...
- 调用API接口,查询手机号码归属地(2)
使用pymysql pip install pymysql 创建mysql测试表 CREATE TABLE `userinfo` ( `id` int(20) NOT NULL AUTO_INCREM ...
- 调用API接口,查询手机号码归属地(1)
使用https://www.juhe.cn/提供的接口,查询归属地 在官网注册key即可使用. 代码如下 #!/usr/bin/python # -*- coding: utf-8 -*- impor ...
- 使用C#开发windows服务定时发消息到钉钉群_群组简单消息
前言:本提醒服务,是由C#语言开发的,主要由windows服务项目和winform项目组成,运行服务可实现功能:向钉钉自定义机器人群组里,定时,定次,推送多个自定义消息内容,并实现主要功能的日志记录. ...
随机推荐
- I/O的方法、输入流和输出流
1.文件常见方法 boolean flag=f.exists(); //文件是否存在 flag=f.isFile(); //是否是文件 flag=f.isDirectory(); //是否 ...
- 《Drools7.0.0.Final规则引擎教程》之Springboot集成
本来准备按部就班的一章一章更新Drools相关教程,怎奈QQ群组(593177274)有朋友急需Springboot与Drools的集成demo,于是抽出时间写了一个,现在拿出来分享一下.加入群组可免 ...
- 出书了!实战微信小程序
真正用心写完一本书,才知道写书真的很不容易. 我热衷喜欢分享一些技术,也喜欢钻研一些新东西,去年微信小程序刚内测的时候,我和我的同事四个人就一起研究,恰好公司有小程序相关的项目,做项目的同时,越发感觉 ...
- jquery自定义插件实现分页效果
这节介绍如何自定义jquery插件,实现分页效果,话不多说,先看看实现的效果: 分页插件 实现的代码如下: <!DOCTYPE HTML PUBLIC "-//W3C//DTD HTM ...
- mac brew安装使用卸载
(一)安装 1.浏览器打开brew.sh,进入homebrew主页.找到install homebrew 的命令: /usr/bin/ruby -e "$(curl -fsSL https: ...
- nginx 转发 由于php语法错误 导致的 50x
server { listen 8008; root /root/php-test; index index.php index.html index.htm ...
- 获取sonar扫描结果
api通过抓包获取 java 1.get和post方法 package com.tools.httpUtil; import java.io.BufferedReader; import java.i ...
- Fragment和FragmentActivity的使用
可以分为下面的几部分: 使用支持库 创建一个Fragment 创建一个动态UI 多个Fragment之间的通信 1.使用支持库 如果您的应用需要运行在3.0及以上的版本,可以忽略这部分内容. 如果您的 ...
- laravel修改命名空间中的App为各自项目的名称(个人喜好)
学习源头:https://blog.csdn.net/xx1129244705/article/details/77965618 laravel框架的应用默认命名空间是App,修改命名空间的可通过ap ...
- 初学者手册-IDEA常用快捷键
一.快速创建基于某个接口的类(引入相关包) 左键选择接口名称,使用快捷键Alt+enter,然后实现该类 二.打开选中的文件所在的文件夹 点选需要打开的文件,右键菜单,点击“Show in Explo ...