Angular23 loading组件、路由配置、子路由配置、路由懒加载配置
1 需求
由于Angular是单页面的应用,所以在进行数据刷新是进行的局部刷新;在进行数据刷新时从浏览器发出请求到后台响应数据是有时间延迟的,所以在这段时间就需要进行遮罩处理来提示用户系统正在请求数据。
2 loading组件简介
loading组件就是专门负责遮罩处理的,可以自定一个loading组件,也可以使用别人创建号的loading模块;loading组件生效后的效果如下:

3 编程步骤
3.1 创建一个angular项目
技巧01:版本必须是angular4及以上
3.2 创建一个组件
3.3 创建一个user模块
技巧01:在user模块中创建多个组件
3.4 路由配置
技巧01:每个模块单独设置路由配置文件
技巧02:利用路由实现模块懒加载
3.4.1 子模块路由配置文件
技巧01:子模块配置类中需要使用 forCild
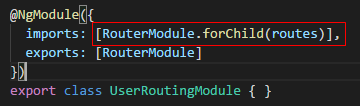
技巧02:子模块的配置文件配置好后需要在子模块中引入配置文件,直接引入配置模块中的那个类就行啦

import { NgModule } from '@angular/core';

import { Routes, RouterModule } from '@angular/router';

import { UserListComponent } from './user-list/user-list.component';

import { UserHomeComponent } from './user-home/user-home.component';

import { UserInfoComponent } from './user-info/user-info.component';

const routes: Routes = [

  {

    path:'',

    component:UserHomeComponent,

    children: [

        {

            path:'',

            redirectTo:'userList',

            pathMatch:'full'

        },

        {

            path:'userList',

            component:UserListComponent

        },

        {

            path:'userInfo',

            component:UserInfoComponent

        }

    ]

}

];

@NgModule({

  imports: [RouterModule.forChild(routes)],

  exports: [RouterModule]

})

export class UserRoutingModule { }
user.routing.module.ts
import { NgModule } from '@angular/core';

import { CommonModule } from '@angular/common';

import { UserRoutingModule } from './user-routing.module';

import { UserListComponent } from './user-list/user-list.component';

import { UserInfoComponent } from './user-info/user-info.component';

import { UserEditComponent } from './user-edit/user-edit.component';

import { UserDetailComponent } from './user-detail/user-detail.component';

import { UserListsComponent } from './user-lists/user-lists.component';

import { UserHomeComponent } from './user-home/user-home.component';

@NgModule({

  imports: [

    CommonModule,

    UserRoutingModule

  ],

  declarations: [UserListComponent, UserInfoComponent, UserEditComponent, UserDetailComponent, UserListsComponent, UserHomeComponent]

})

export class UserModule { }
user.module.ts
3.4.2 根模块路由配置
技巧01:根模块的路由配置文件中需要用 forRoot
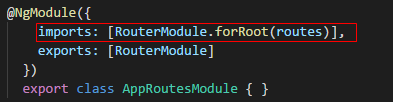
技巧02:需要在根模块中引入根路由配置类
import { LoginComponent } from "./login/login.component";

import { NgModule } from "@angular/core";

import { RouterModule } from "@angular/router";

export const routes = [

    {

        path:'',

        redirectTo:'login',

        pathMatch:'full'

    },

    {

        path: 'login',

        component: LoginComponent

    },

    {

        path:'user',

        loadChildren:'./user/user.module#UserModule'

    },

    {

        path:'**',

        component: LoginComponent

    }

]

@NgModule({

    imports: [RouterModule.forRoot(routes)],

    exports: [RouterModule]

  })

  export class AppRoutesModule { }
app.routes.module.ts
import { BrowserModule } from '@angular/platform-browser';

import { NgModule } from '@angular/core';

import { NgZorroAntdModule } from 'ng-zorro-antd';

import { LoadingModule, ANIMATION_TYPES  } from 'ngx-loading';

import { AppComponent } from './app.component';

import { TestDemoComponent } from './test-demo/test-demo.component';

import { BrowserAnimationsModule } from "@angular/platform-browser/animations";

import { LoginComponent } from './login/login.component';

import { RouterModule } from '@angular/router';

import { AppRoutesModule } from './app.routes.module';

@NgModule({

  declarations: [

    AppComponent,

    TestDemoComponent,

    LoginComponent

  ],

  imports: [

    BrowserModule,

    BrowserAnimationsModule,

    LoadingModule.forRoot({

      animationType: ANIMATION_TYPES.wanderingCubes,

      backdropBackgroundColour: 'rgba(0,0,0,0.1)',

      backdropBorderRadius: '4px',

      primaryColour: '#ffffff',

      secondaryColour: '#ffffff',

      tertiaryColour: '#ffffff'

  }),

    NgZorroAntdModule.forRoot(),

    AppRoutesModule

  ],

  providers: [],

  bootstrap: [AppComponent]

})

export class AppModule { }
app.module.ts
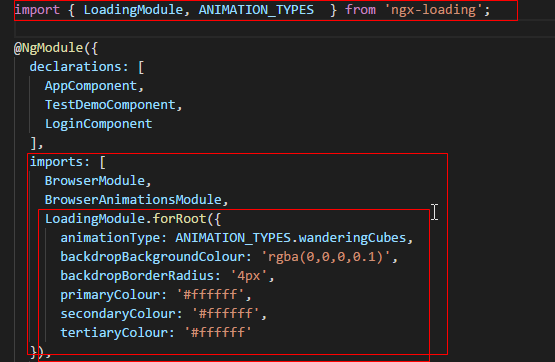
3.5 集成loading模块
3.5.1 下载相关依赖
npm install --save ngx-loading
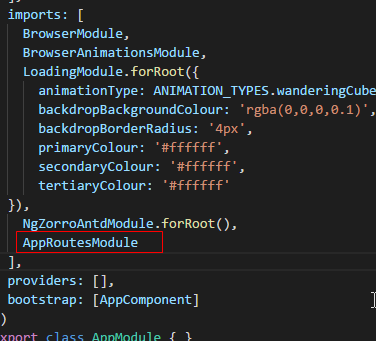
3.5.2 在模块级别引入
技巧01:loading模块需要共享,所以需要在共享模块或者跟模块进行引入
3.5.3 在组件级别使用loading组件
3.5.3.1 html编写

<div class="my-container">

  <ngx-loading [show]="loading" [config]="config"></ngx-loading>

  <h2>

    这是登录页面

  </h2>

  <hr />

  <label for="username">用户名</label>

  <input type="text" id="username" name="username" />

  <br />

  <label for="password">用户密码</label>

  <input type="password" id="password" name="password" />

  <button (click)="on_login_click()">登陆</button>

</div>
LoginComponent.html
3.5.3.2 ts编写
技巧01:点击登陆按钮后,开启遮罩;之后间隔5秒后交替开启遮罩
import { Component, OnInit } from '@angular/core';

import { ANIMATION_TYPES } from 'ngx-loading';

@Component({

  selector: 'login',

  templateUrl: './login.component.html',

  styleUrls: ['./login.component.css']

})

export class LoginComponent implements OnInit {

  loading: boolean = false;

  config: object = {};

  private timer;

  constructor() {

  }

  ngOnInit() {

    this.config = {

      animationType: ANIMATION_TYPES.rectangleBounce,

      backdropBorderRadius: '0px',

      // backdropBackgroundColour: '#9f9ec8',

      fullScreenBackdrop: true,

      primaryColour: 'skyblue',

      secondaryColour: 'red'

    }

  }

  on_login_click() {

    this.loading = true;

    this.timer = setInterval(

      () => {

        this.loading = !this.loading;

      },

      5000

    );

    alert("登陆");

  }

  ngOnDestroy() {

    if (this.timer) {

      alert('清除');

      clearInterval(this.timer);

    }

  }

}
LoginComponent.ts
3.6 loading模块源代码
3.7 本博文源代码
Angular23 loading组件、路由配置、子路由配置、路由懒加载配置的更多相关文章
- 配置Spring的用于解决懒加载问题的过滤器
<?xml version="1.0" encoding="UTF-8"?><web-app version="2.5" ...
- react以组件为中心的代码分割和懒加载
背景 随着项目越来越复杂,功能够越来越多,JS单个文件就会比较臃肿,js代码拆分显得必不可少. Js文件拆分主要分为按照路由进行js拆分.按照组件进行js拆分. 按照路由拆分:因为本项目请求路径得原因 ...
- 在web.xml中添加配置解决hibernate 懒加载异常
在web.xml添加如下,注意:在配置在struts2的拦截器之前,只能解决请求时出现的懒加载异常:如果没有请求,还需要lazy属性的添加(比如过滤器) <!-- 配置Spring的用于解决懒加 ...
- vue-router路由懒加载
正常配置 import Vue from 'vue' import Router from 'vue-router' import Login from '@/components/pages/log ...
- Ionic3新特性--页面懒加载2加载其他组件
在第一节中,我们介绍了页面的懒加载方式,并进行了初步的分析,这里,我们将进一步介绍如何配合页面懒加载进行其他组件Component.Pipe.Directive等的模块化,和加载使用. 首先说明一点, ...
- Ionic3 组件懒加载
使用懒加载能够减少程序启动时间,减少打包后的体积,而且可以很方便的使用路由的功能. 使用懒加载: 右侧红色区域可以省略掉(引用.声明也删掉) 若使用ionic命令新建page,则无需进行下面的操作,否 ...
- angular配置懒加载路由的思路
前言 本人记性不好,对于别人很容易记住的事情,我愣是记不住,所以还是靠烂笔头来帮我长长记性. 参考文章:https://blog.csdn.net/xif3681/article/details/84 ...
- Vue总结第五天:vue-router (使用模块化(创建Vue组件)机制编程)、router-link 标签的属性、路由代码跳转、懒加载、路由嵌套(子路由)、路由传递数据、导航守卫)
Vue总结第五天:vue-router ✿ 路由(器)目录: □ vue中路由作用 □ vue-router基本使用 □ vue-router嵌套路由 □ vue-router参数传递 □ ...
- vue 路由懒加载 resolve vue-router配置
使用方法 component:resolve => require(['@/pages/About'],resolve) //"@"相当于".." 懒加载 ...
随机推荐
- 在oracle里,如何取得本周、本月、本季度、本年度的第一天和最后一天的时间
在oracle里,如何取得本周.本月.本季度.本年度的第一天和最后一天的时间 --本周 select trunc(sysdate,'d')+1 from dual; select trunc(sysd ...
- Linq:Grouping Operators
[Category("Grouping Operators")] [Description("This sample uses group by to partition ...
- 转: django数据库操作-增删改查-多对多关系以及一对多(外键)关系
原文链接:http://blog.csdn.net/u010271717/article/details/22044415 一.一对多(外键) 例子:一个作者对应多本书,一本书只有一个作者 model ...
- 笔记:开源协议 Apache 2 和 GPL 兼容
笔记:开源协议 Apache 2 和 GPL 兼容 Apache 2 和 GPL v3 兼容. GPL 分了很多版本,LGPL 为最宽松的 GPL,而 AGPL 为最严格的 GPL 协议. Linux ...
- Cocoa Pod使用总结
1. 背景 CocoaPod是Swift,Objective-C语言编写的Cocoa项目的依赖管理工具.简单点说就是它管理了很多的Swift和Objective-C的库,然后通过CocoaPod可以比 ...
- 学习HTML5之路
Web 技术大致的时间轴 1991 HTML 1994 HTML 2 1996 CSS 1+JavaScript 1997HTML 4 1998 CSS2 2000 XHTML 1 2002 使用DI ...
- java工具类mht转html格式文件 及简单的HTML解析
package com.szy.project.utils; import java.io.BufferedInputStream; import java.io.BufferedOutputStre ...
- PCIE接口的说明
https://blog.csdn.net/u013253075/article/details/80835489
- xunsearch全文检索初体验
目录 测试添加数据 测试搜索 简单搜索 稍微复杂的搜索 搜索建议 测试添加数据 ./Indexer.php --source=csv --clean demo 清空现有索引数据 ... 初始化数据源 ...
- Linux学习笔记 -- Shell 变量
定义变量 语法: 变量名=值 myVal= 需要注意一下变量明德规则: 首个字符必须为字母(a-z,A-Z). 中间不能有空格,可以使用下划线(_). 不能使用标点符号. 不能使用bash里的关键字( ...