Angular23 loading组件、路由配置、子路由配置、路由懒加载配置
1 需求
由于Angular是单页面的应用,所以在进行数据刷新是进行的局部刷新;在进行数据刷新时从浏览器发出请求到后台响应数据是有时间延迟的,所以在这段时间就需要进行遮罩处理来提示用户系统正在请求数据。
2 loading组件简介
loading组件就是专门负责遮罩处理的,可以自定一个loading组件,也可以使用别人创建号的loading模块;loading组件生效后的效果如下:

3 编程步骤
3.1 创建一个angular项目
技巧01:版本必须是angular4及以上
3.2 创建一个组件
3.3 创建一个user模块
技巧01:在user模块中创建多个组件
3.4 路由配置
技巧01:每个模块单独设置路由配置文件
技巧02:利用路由实现模块懒加载
3.4.1 子模块路由配置文件
技巧01:子模块配置类中需要使用 forCild
技巧02:子模块的配置文件配置好后需要在子模块中引入配置文件,直接引入配置模块中的那个类就行啦

import { NgModule } from '@angular/core';
import { Routes, RouterModule } from '@angular/router';
import { UserListComponent } from './user-list/user-list.component';
import { UserHomeComponent } from './user-home/user-home.component';
import { UserInfoComponent } from './user-info/user-info.component';
const routes: Routes = [
{
path:'',
component:UserHomeComponent,
children: [
{
path:'',
redirectTo:'userList',
pathMatch:'full'
},
{
path:'userList',
component:UserListComponent
},
{
path:'userInfo',
component:UserInfoComponent
}
]
}
];
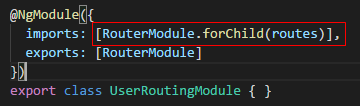
@NgModule({
imports: [RouterModule.forChild(routes)],
exports: [RouterModule]
})
export class UserRoutingModule { }
user.routing.module.ts
import { NgModule } from '@angular/core';

import { CommonModule } from '@angular/common';

import { UserRoutingModule } from './user-routing.module';

import { UserListComponent } from './user-list/user-list.component';

import { UserInfoComponent } from './user-info/user-info.component';

import { UserEditComponent } from './user-edit/user-edit.component';

import { UserDetailComponent } from './user-detail/user-detail.component';

import { UserListsComponent } from './user-lists/user-lists.component';

import { UserHomeComponent } from './user-home/user-home.component';

@NgModule({

  imports: [

    CommonModule,

    UserRoutingModule

  ],

  declarations: [UserListComponent, UserInfoComponent, UserEditComponent, UserDetailComponent, UserListsComponent, UserHomeComponent]

})

export class UserModule { }
user.module.ts
3.4.2 根模块路由配置
技巧01:根模块的路由配置文件中需要用 forRoot
技巧02:需要在根模块中引入根路由配置类
import { LoginComponent } from "./login/login.component";
import { NgModule } from "@angular/core";
import { RouterModule } from "@angular/router";
export const routes = [
{
path:'',
redirectTo:'login',
pathMatch:'full'
},
{
path: 'login',
component: LoginComponent
},
{
path:'user',
loadChildren:'./user/user.module#UserModule'
},
{
path:'**',
component: LoginComponent
}
]
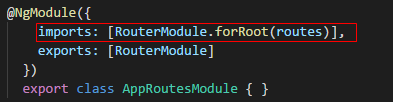
@NgModule({
imports: [RouterModule.forRoot(routes)],
exports: [RouterModule]
})
export class AppRoutesModule { }
app.routes.module.ts
import { BrowserModule } from '@angular/platform-browser';
import { NgModule } from '@angular/core';
import { NgZorroAntdModule } from 'ng-zorro-antd';
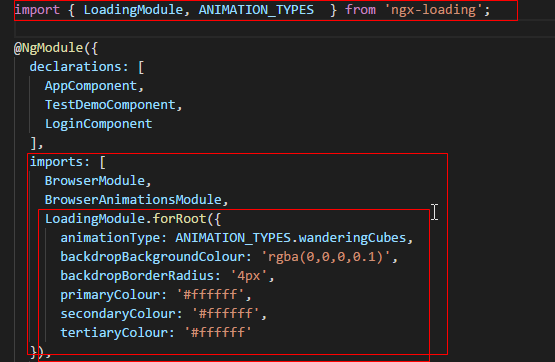
import { LoadingModule, ANIMATION_TYPES } from 'ngx-loading';
import { AppComponent } from './app.component';
import { TestDemoComponent } from './test-demo/test-demo.component';
import { BrowserAnimationsModule } from "@angular/platform-browser/animations";
import { LoginComponent } from './login/login.component';
import { RouterModule } from '@angular/router';
import { AppRoutesModule } from './app.routes.module';
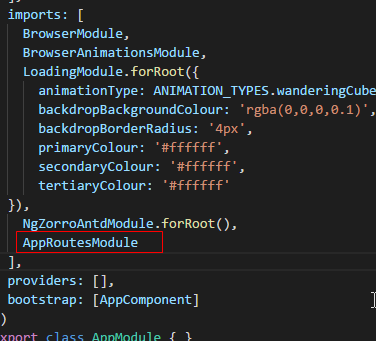
@NgModule({
declarations: [
AppComponent,
TestDemoComponent,
LoginComponent
],
imports: [
BrowserModule,
BrowserAnimationsModule,
LoadingModule.forRoot({
animationType: ANIMATION_TYPES.wanderingCubes,
backdropBackgroundColour: 'rgba(0,0,0,0.1)',
backdropBorderRadius: '4px',
primaryColour: '#ffffff',
secondaryColour: '#ffffff',
tertiaryColour: '#ffffff'
}),
NgZorroAntdModule.forRoot(),
AppRoutesModule
],
providers: [],
bootstrap: [AppComponent]
})
export class AppModule { }
app.module.ts
3.5 集成loading模块
3.5.1 下载相关依赖
npm install --save ngx-loading
3.5.2 在模块级别引入
技巧01:loading模块需要共享,所以需要在共享模块或者跟模块进行引入
3.5.3 在组件级别使用loading组件
3.5.3.1 html编写

<div class="my-container">

  <ngx-loading [show]="loading" [config]="config"></ngx-loading>

  <h2>

    这是登录页面

  </h2>

  <hr />

  <label for="username">用户名</label>

  <input type="text" id="username" name="username" />

  <br />

  <label for="password">用户密码</label>

  <input type="password" id="password" name="password" />

  <button (click)="on_login_click()">登陆</button>

</div>
LoginComponent.html
3.5.3.2 ts编写
技巧01:点击登陆按钮后,开启遮罩;之后间隔5秒后交替开启遮罩
import { Component, OnInit } from '@angular/core';

import { ANIMATION_TYPES } from 'ngx-loading';

@Component({

  selector: 'login',

  templateUrl: './login.component.html',

  styleUrls: ['./login.component.css']

})

export class LoginComponent implements OnInit {

  loading: boolean = false;

  config: object = {};

  private timer;

  constructor() {

  }

  ngOnInit() {

    this.config = {

      animationType: ANIMATION_TYPES.rectangleBounce,

      backdropBorderRadius: '0px',

      // backdropBackgroundColour: '#9f9ec8',

      fullScreenBackdrop: true,

      primaryColour: 'skyblue',

      secondaryColour: 'red'

    }

  }

  on_login_click() {

    this.loading = true;

    this.timer = setInterval(

      () => {

        this.loading = !this.loading;

      },

      5000

    );

    alert("登陆");

  }

  ngOnDestroy() {

    if (this.timer) {

      alert('清除');

      clearInterval(this.timer);

    }

  }

}
LoginComponent.ts
3.6 loading模块源代码
3.7 本博文源代码
Angular23 loading组件、路由配置、子路由配置、路由懒加载配置的更多相关文章
- 配置Spring的用于解决懒加载问题的过滤器
<?xml version="1.0" encoding="UTF-8"?><web-app version="2.5" ...
- react以组件为中心的代码分割和懒加载
背景 随着项目越来越复杂,功能够越来越多,JS单个文件就会比较臃肿,js代码拆分显得必不可少. Js文件拆分主要分为按照路由进行js拆分.按照组件进行js拆分. 按照路由拆分:因为本项目请求路径得原因 ...
- 在web.xml中添加配置解决hibernate 懒加载异常
在web.xml添加如下,注意:在配置在struts2的拦截器之前,只能解决请求时出现的懒加载异常:如果没有请求,还需要lazy属性的添加(比如过滤器) <!-- 配置Spring的用于解决懒加 ...
- vue-router路由懒加载
正常配置 import Vue from 'vue' import Router from 'vue-router' import Login from '@/components/pages/log ...
- Ionic3新特性--页面懒加载2加载其他组件
在第一节中,我们介绍了页面的懒加载方式,并进行了初步的分析,这里,我们将进一步介绍如何配合页面懒加载进行其他组件Component.Pipe.Directive等的模块化,和加载使用. 首先说明一点, ...
- Ionic3 组件懒加载
使用懒加载能够减少程序启动时间,减少打包后的体积,而且可以很方便的使用路由的功能. 使用懒加载: 右侧红色区域可以省略掉(引用.声明也删掉) 若使用ionic命令新建page,则无需进行下面的操作,否 ...
- angular配置懒加载路由的思路
前言 本人记性不好,对于别人很容易记住的事情,我愣是记不住,所以还是靠烂笔头来帮我长长记性. 参考文章:https://blog.csdn.net/xif3681/article/details/84 ...
- Vue总结第五天:vue-router (使用模块化(创建Vue组件)机制编程)、router-link 标签的属性、路由代码跳转、懒加载、路由嵌套(子路由)、路由传递数据、导航守卫)
Vue总结第五天:vue-router ✿ 路由(器)目录: □ vue中路由作用 □ vue-router基本使用 □ vue-router嵌套路由 □ vue-router参数传递 □ ...
- vue 路由懒加载 resolve vue-router配置
使用方法 component:resolve => require(['@/pages/About'],resolve) //"@"相当于".." 懒加载 ...
随机推荐
- R+markdown+LaTeX 中文编译解决方案
一丢丢前言 很久之前曾试图以Rmarkdown编译pdf文档,无奈怎么鼓捣都会error,搜索了很久都没能找到比较好的解决方案.在配置上将编译器调成了xeLaTeX后就不了了之.这两天心血来潮研究了一 ...
- JavaScript例子
模态框(JavaScript) <!DOCTYPE html> <html lang="en"> <head> <meta charset ...
- 剑指offer-第三章高质量代码(树的子结构)
题目:输入两个二叉树A和B,判断B是不是A的子结构. 思路:遍历A树找到B树的根节点,然后再判断左右子树是否相同.不相同再往下找.重复改过程. 子结构的描述如下图所示: C++代码: #include ...
- SqlServer 数据库负载均衡【转】
负载均衡集群是由一组相互独立的计算机系统构成,通过常规网络或专用网络进行连接,由路由器衔接在一起,各节点相互协作.共同负载.均衡压力,对客户端来说,整个群集可以视为一台具有超高性能的独立服务器. 1. ...
- Swift-自定制带有特殊按钮TabBar
---恢复内容开始--- 封装了一个带有中间凸起的自定制Tabbar,包含4个普通按钮和中间的一个凸起按钮- 首先封装了一个UIButton,重新设置了UIButton的图片位置和label位置 使用 ...
- numpy之通用函数ufunc
通用函数-元素级数组函数 通用函数(ufunc)是一种对ndarray执行元素级运算的函数. 一元ufunc import numpy as np arr = np.arange(-10,10,2) ...
- 第14篇 PSR-3规范(日志)
1. Specification 1.1 Basics The LoggerInterface exposes eight methods to write logs to the eight RFC ...
- FPGA论剑(续)
25年之后,第二次华山论剑之时,天下第一的王重阳已然仙逝,郭靖少年英杰刚过二十岁,接东邪黄药师.北丐洪七公300招不败,二人默认郭靖天下第一.南帝段智兴因为出家,法号“一灯”,早已看破名利,故没有参加 ...
- 初学者手册-IDEA常用快捷键
一.快速创建基于某个接口的类(引入相关包) 左键选择接口名称,使用快捷键Alt+enter,然后实现该类 二.打开选中的文件所在的文件夹 点选需要打开的文件,右键菜单,点击“Show in Explo ...
- PL/SQL 训练02--集合数组
1. 请列举关联数组.嵌套表.VARRAY三种集合类型的区别区别:1 关联数组只能在plsql中使用,嵌套表,varray可用于sql中,数据库表中的列2 嵌套表,varray必须在使用的时候初始化, ...