学习换脸:Switching Eds: Face swapping with Python, dlib, and OpenCV
学习GitHub上比较火换脸博客,原英文版:https://matthewearl.github.io/2015/07/28/switching-eds-with-python/
系统win10,x64
- 安装python 2.7
- opencv3.0下载,安装,配置环境变量(所需python版本为2.7)
- 下载numpy,版本numpy-1.10.2-win32-superpack-python2.7,必须与python版本一致,不然即使找到了cv模块也不能够运行。
- opencv文件夹中,build->python->2.7 复制2.7下面的所有文件 到C:\Python27\Lib\site-packages 中
- 测试是否配置成功:
import cv2

image = cv2.imread("0.png")

cv2.imshow("Image",image)

cv2.waitKey(0)
开始学习换脸:
- 下载boost,编译boost:解压,执行bootstrap.bat(使用vs2015编译),会在boost根目录生成 b2.exe 、bjam.exe 、project-config.jam 、bootstrap.log四个文件,其中,b2.exe 、bjam.exe 这两个exe作用是一样的,bjam.exe 是老版本,b2是bjam的升级版本。运行bjam.exe,编译c++版本的boost库,配置环境变量BOOST_ROOT=C:\boost_1_60_0;BOOST_LIBRARYDIR=C:\boost_1_60_0\stage\lib。再编译python动态链接库,b2.exe --with-python --build-type=complete。
- 下载dlib从http://dlib.net/,Dlib is a modern C++ toolkit containing machine learning algorithms and tools for creating complex software in C++ to solve real world problems.编译python API,命令python setup.py install
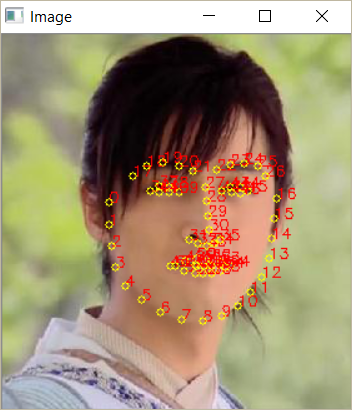
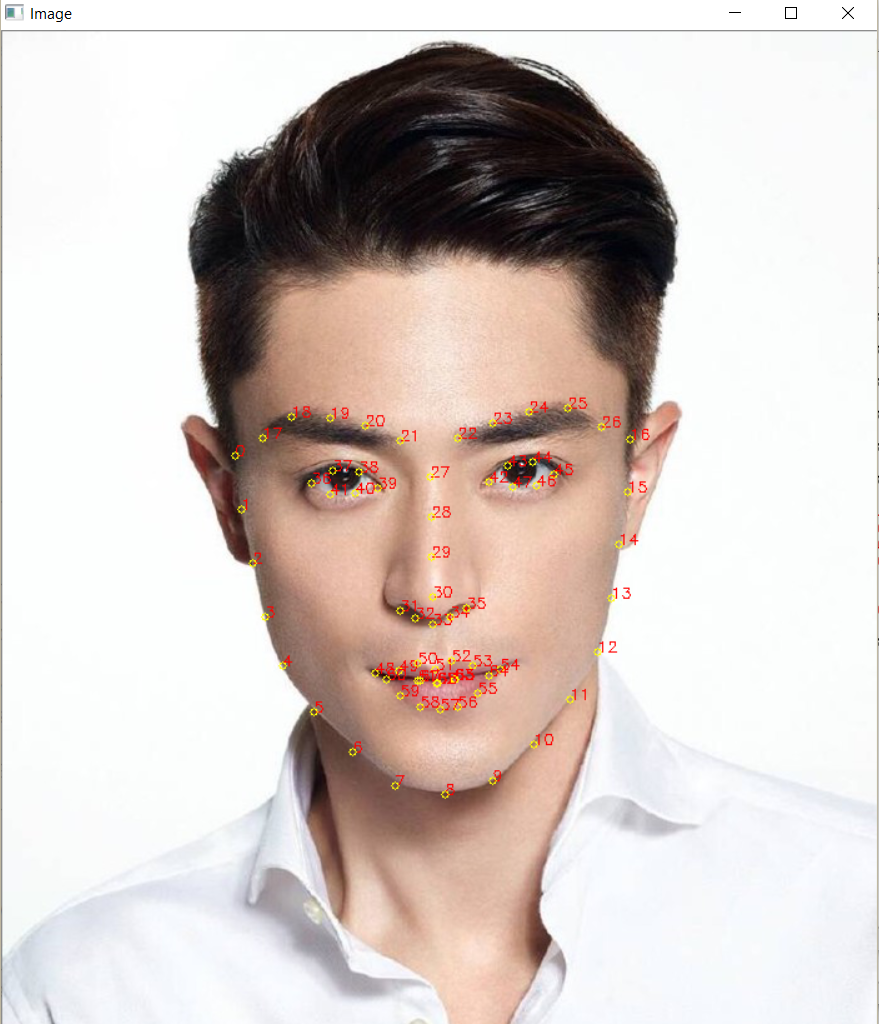
- 使用dlib抽取脸部标志点:Dlib实现了paper ”one millisecond face alignment with an ensemble of regression trees" by Vahid Kazemi and Josephine Sullivan. 虽然算法本身很复杂,但是它的python接口的使用很简单:
 import cv2

 import dlib

 import numpy

 import sys

 PREDICTOR_PATH = "shape_predictor_68_face_landmarks.dat"

 SCALE_FACTOR = 1

 FEATURE_AMOUNT = 11

 FACE_POINTS = list(range(17, 68))

 MOUTH_POINTS = list(range(48, 68))

 RIGHT_BROW_POINTS = list(range(17, 22))

 LEFT_BROW_POINTS = list(range(22, 27))

 RIGHT_EYE_POINTS = list(range(36, 42))

 LEFT_EYE_POINTS = list(range(42, 48))

 NOSE_POINTS = list(range(27, 35))

 JAW_POINTS = list(range(0, 17))

 # Points used to line up the images

 ALIGN_POINTS = (LEFT_BROW_POINTS + RIGHT_EYE_POINTS + LEFT_EYE_POINTS +

                 RIGHT_BROW_POINTS + NOSE_POINTS + MOUTH_POINTS)

 # Points from the second image to overlay on the first. The convex hull of

 # each element will be overlaid

 OVERLAY_POINTS = [

     LEFT_EYE_POINTS + RIGHT_EYE_POINTS + LEFT_BROW_POINTS

                   + RIGHT_BROW_POINTS,

     NOSE_POINTS + MOUSE_POINTS,

     ]

 # Amount of blur to use during color correction, as a fraction of the

 # pupillary distance

 COLOUR_CORRECT_BLUR_FRAC = 0.6

 detector = dlib.get_frontal_face_detector()

 predictor = dlib.shape_predictor(PREDICTOR_PATH)

 class TooManyFaces(Exception):

     pass

 class NoFaces(Exception):

     pass

 ## input: an image in the form of a numpy array

 ## return: a 68 * 2 element matrix, each row corresponding with

 ## the x, y coordintes of a pariticular feature point in the input image

 def get_landmarks(im):

     rects = detector(im, 1)

     if len(rects) > 1:

         raise TooManyFaces

     if len(rects) == 0:

         raise NoFaces

     # the feature extractor (predictor) requires a rough bounding box as input

     # to the algorithm. This is provided by a traditional face detector (

     # detector) which returns a list of rectangles, each of which corresponding

     # a face in the image

     return numpy.matrix([[p.x p.y] for p in predictor(im, rects[0]).parts()])
为了使用predictor,需要利用一个提前训练好的model:shape_predictor_68_face_landmarks.dat,从http://sourceforge.net/projects/dclib/files/dlib/v18.10/shape_predictor_68_face_landmarks.dat.bz2下载
4. 用Procrustes Analysis进行脸部对准:目前我们已经有两个人脸的landmark矩阵,矩阵的每一行代表一个脸部特征的坐标。现在我们要做的是找出如何通过旋转、平移、和尺度操作使得第一张脸的特征点与第二张脸的尽可能的匹配。找到这个合适的匹配变换之后,我们就可以将第二张脸用同样的变换覆盖第一张脸。
从数学上考虑,我们寻找平移参数T,尺度参数s,和旋转变换矩阵R使得如下目标函数
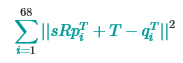
最小化,其中R是2*2的正交矩阵,s是标量,T是2*1的向量,pi和qi是landmark矩阵的行(对应的脸部特征坐标)。
这个问题可以被Ordinary Procrustes Analysis求解。
def transformation_from_points(points1, points2):

    """

    Return an affine transformation [s * R | T] such that:

        sum || s*R*p1,i + T - p2,i||^2

    is minimized.

    """

    # Solve the procrustes problem by substracting centroids, scaling by the

    # standard deviation, and then using the SVD to calculate the rotation. See

    # the following for more details:

    # https://en.wikipedia.org/wiki/Orthogonal_Procrustes_problem

    points1 = points1.astype(numpy.float64)

    points2 = points2.astype(numpy.float64)

    c1 = numpy.mean(points1, axis=0)

    c2 = numpy.mean(points2, axis=0)

    points1 -= c1

    points2 -= c2

    s1 = numpy.std(points1)

    s2 = numpy.std(points2)

    points1 /= s1

    points2 /= s2

    U, S, Vt = numpy.linalg.svd(points1.T * points2)

    # The R we seek is in fact the transpose of the one given by U * Vt. This

    # is because the above formulation assumes the matrix goes on the right

    # (with row vectors) where as our solution requires the matrix to be on the

    # left (with column vectors).

    R = (U * Vt).T

    return numpy.vstack([numpy.hstack(((s2 / s1) * R,

                                       c2.T - (s2 / s1) * R * c1.T)),

                         numpy.matrix([0., 0., 1.])])
求解步骤:
1) 将输入矩阵转化为浮点型,这一操作被后面步骤需要;
2) 每个点集减去中心点(去中心操作);
3) 每个点集除以标准差,解决尺度问题;
4) 使用SVD (Singular Value Decomposition) 计算旋转矩阵,解Orthogonal Procrustes Problem;
5) 返回完整的仿射变换矩阵,维度3* 3.
获得的仿射变换可以应用到第二幅图像,与第一张图像匹配:
 def warp_im(im, M, dshape):

     output_im = numpy.zeros(dshape, dtype=im.dtype)

     cv2.warpAffine(im,

                    M[:2],

                    (dshape[1], dshape[0]),

                    dst=output_im,

                    borderMode=cv2.BORDER_TRANSPARENT,

                    flags=cv2.WARP_INVERSE_MAP)

     return output_im


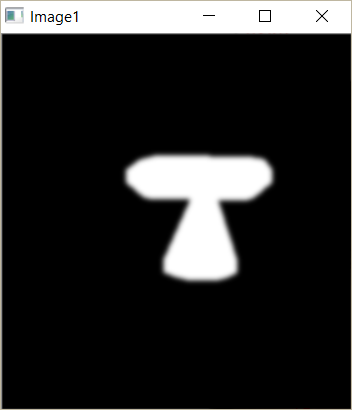
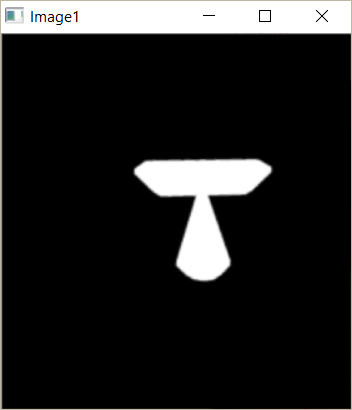
5. 计算mask,并进行色彩校正:利用眼部和眉毛区域特征点计算二维凸包,鼻子和嘴部特征点再计算二维凸包,获得一个五官的mask,代码和结果如下:
 def draw_convex_hull(im, points, color):

     points = cv2.convexHull(points)

     cv2.fillConvexPoly(im, points, color=color)

 def get_face_mask(im, landmarks):

     im = numpy.zeros(im.shape[:2], dtype=numpy.float64)

     for group in OVERLAY_POINTS:

         draw_convex_hull(im,

                          landmarks[group],

                          color=1)

     im = numpy.array([im, im, im]).transpose((1, 2, 0))

     im = (cv2.GaussianBlur(im, (FEATURE_AMOUNT, FEATURE_AMOUNT), 0) > 0) * 1.0

     im = cv2.GaussianBlur(im, (FEATURE_AMOUNT, FEATURE_AMOUNT), 0)

     return im
如果我们直接将脸部mask区域覆盖,我们会发现脸部颜色不一致的问题:
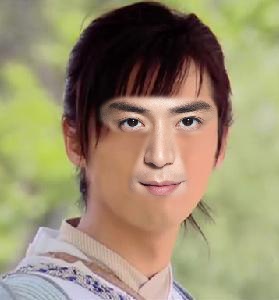
进行色彩矫正,改变第二张脸的颜色使其可以与第一张脸匹配。做法是将第二张脸的颜色除以第二张脸的高斯模糊值,再乘以第一张脸的高斯模糊值,点操作。参考https://en.wikipedia.org/wiki/Color_balance#Scaling_monitor_R.2C_G.2C_and_B,并没有将整幅图像乘以常数因子,而是将每个像素乘以它自己的尺度因子。
通过这个操作,可以一定程度上弥补两幅图像之间的亮度不同问题。代码如下:
def correct_colors(im1, im2, landmarks1):

    blur_amount = COLOUR_CORRECT_BLUR_FRAC * numpy.linalg.norm(

        numpy.mean(landmarks1[LEFT_EYE_POINTS], axis=0) -

        numpy.mean(landmarks2[RIGHT_EYE_POINTS], axis=0))

    blur_amount = int(blur_amount)

    if blur_amount % 2 == 0:

        blur_amount += 1

    print blur_amount

    im1_blur = cv2.GaussianBlur(im1, (blur_amount, blur_amount), 0)

    im2_blur = cv2.GaussianBlur(im2, (blur_amount, blur_amount), 0)

    cv2.imshow("Image", im1_blur) # warp_im(im2, M, im1.shape)

    cv2.waitKey(0)

    cv2.imshow("Image", im2_blur) # warp_im(im2, M, im1.shape)

    cv2.waitKey(0)

    # Avoid divide-by-zero errors:

    im2_blur += (128 * (im2_blur <= 1.0)).astype(im2_blur.dtype)

    cv2.imshow("Image", im2_blur) # warp_im(im2, M, im1.shape)

    cv2.waitKey(0)

    cv2.destroyWindow("Image")

    return (im2.astype(numpy.float64) * im1_blur.astype(numpy.float64) /

            im2_blur.astype(numpy.float64))
这种做法可以在粗略地解决色彩不一致问题,效果与高斯kernel的大小密切相关:kernel太小,第一张脸中本应该被覆盖的脸部特征会出现在最后的融合图中;kernel太大,第二张脸外部的像素会被引入融合图像,产生污点。下图的kernel size等于0.05*瞳间距。
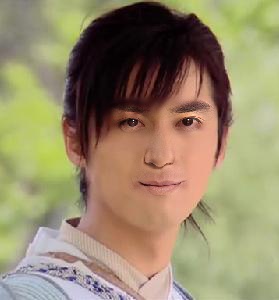
6. 融合:将经过色彩矫正的第二张脸的mask区域与第一张脸融合:
output_im = im1 * (1.0 - combined_mask) + warped_corrected_im2 * combined_mask
至此换脸全部完成,全部代码如下:
import cv2

import dlib

import numpy

import sys

PREDICTOR_PATH = "shape_predictor_68_face_landmarks.dat"

SCALE_FACTOR = 1

FEATURE_AMOUNT = 11

FACE_POINTS = list(range(17, 68))

MOUTH_POINTS = list(range(48, 61))

RIGHT_BROW_POINTS = list(range(17, 22))

LEFT_BROW_POINTS = list(range(22, 27))

RIGHT_EYE_POINTS = list(range(36, 42))

LEFT_EYE_POINTS = list(range(42, 48))

NOSE_POINTS = list(range(27, 35))

JAW_POINTS = list(range(0, 17))

# Points used to line up the images

ALIGN_POINTS = (LEFT_BROW_POINTS + RIGHT_EYE_POINTS + LEFT_EYE_POINTS +

                RIGHT_BROW_POINTS + NOSE_POINTS + MOUTH_POINTS)

# Points from the second image to overlay on the first. The convex hull of

# each element will be overlaid

OVERLAY_POINTS = [

    LEFT_EYE_POINTS + RIGHT_EYE_POINTS + LEFT_BROW_POINTS

                  + RIGHT_BROW_POINTS,

    NOSE_POINTS + MOUTH_POINTS,

    ]

# Amount of blur to use during color correction, as a fraction of the

# pupillary distance

COLOUR_CORRECT_BLUR_FRAC = 0.05

detector = dlib.get_frontal_face_detector()

predictor = dlib.shape_predictor(PREDICTOR_PATH)

class TooManyFaces(Exception):

    pass

class NoFaces(Exception):

    pass

## input: an image in the form of a numpy array

## return: a 68 * 2 element matrix, each row corresponding with

## the x, y coordintes of a pariticular feature point in the input image

def get_landmarks(im):

    rects = detector(im, 1)

    if len(rects) > 1:

        raise TooManyFaces

    if len(rects) == 0:

        raise NoFaces

    # the feature extractor (predictor) requires a rough bounding box as input

    # to the algorithm. This is provided by a traditional face detector (

    # detector) which returns a list of rectangles, each of which corresponding

    # a face in the image

    return numpy.matrix([[p.x, p.y] for p in predictor(im, rects[0]).parts()])

def annote_landmarks(im, landmarks):

    im = im.copy()

    for idx, point in enumerate(landmarks):

        pos = (point[0, 0], point[0, 1])

        cv2.putText(im, str(idx), pos,

                    fontFace=cv2.FONT_HERSHEY_SCRIPT_SIMPLEX,

                    fontScale=0.4,

                    color=(0, 0, 255))

        cv2.circle(im, pos, 3, color=(0, 255, 255))

    return im

def read_im_and_landmarks(fname):

    im = cv2.imread(fname, cv2.IMREAD_COLOR)

    im = cv2.resize(im, (im.shape[1] * SCALE_FACTOR,

                         im.shape[0] * SCALE_FACTOR))

    s = get_landmarks(im)

    return im, s

def transformation_from_points(points1, points2):

    """

    Return an affine transformation [s * R | T] such that:

        sum || s*R*p1,i + T - p2,i||^2

    is minimized.

    """

    # Solve the procrustes problem by substracting centroids, scaling by the

    # standard deviation, and then using the SVD to calculate the rotation. See

    # the following for more details:

    # https://en.wikipedia.org/wiki/Orthogonal_Procrustes_problem

    points1 = points1.astype(numpy.float64)

    points2 = points2.astype(numpy.float64)

    c1 = numpy.mean(points1, axis=0)

    c2 = numpy.mean(points2, axis=0)

    points1 -= c1

    points2 -= c2

    s1 = numpy.std(points1)

    s2 = numpy.std(points2)

    points1 /= s1

    points2 /= s2

    U, S, Vt = numpy.linalg.svd(points1.T * points2)

    # The R we seek is in fact the transpose of the one given by U * Vt. This

    # is because the above formulation assumes the matrix goes on the right

    # (with row vectors) where as our solution requires the matrix to be on the

    # left (with column vectors).

    R = (U * Vt).T

    return numpy.vstack([numpy.hstack(((s2 / s1) * R,

                                       c2.T - (s2 / s1) * R * c1.T)),

                         numpy.matrix([0., 0., 1.])])

def draw_convex_hull(im, points, color):

    points = cv2.convexHull(points)

    cv2.fillConvexPoly(im, points, color=color)

def get_face_mask(im, landmarks):

    im = numpy.zeros(im.shape[:2], dtype=numpy.float64)

    for group in OVERLAY_POINTS:

        draw_convex_hull(im,

                         landmarks[group],

                         color=1)

    im = numpy.array([im, im, im]).transpose((1, 2, 0))

    im = (cv2.GaussianBlur(im, (FEATURE_AMOUNT, FEATURE_AMOUNT), 0) > 0) * 1.0

    im = cv2.GaussianBlur(im, (FEATURE_AMOUNT, FEATURE_AMOUNT), 0)

    return im

def warp_im(im, M, dshape):

    output_im = numpy.zeros(dshape, dtype=im.dtype)

    cv2.warpAffine(im,

                   M[:2],

                   (dshape[1], dshape[0]),

                   dst=output_im,

                   borderMode=cv2.BORDER_TRANSPARENT,

                   flags=cv2.WARP_INVERSE_MAP)

    return output_im

def correct_colors(im1, im2, landmarks1):

    blur_amount = COLOUR_CORRECT_BLUR_FRAC * numpy.linalg.norm(

        numpy.mean(landmarks1[LEFT_EYE_POINTS], axis=0) -

        numpy.mean(landmarks2[RIGHT_EYE_POINTS], axis=0))

    blur_amount = int(blur_amount)

    if blur_amount % 2 == 0:

        blur_amount += 1

    print blur_amount

    im1_blur = cv2.GaussianBlur(im1, (blur_amount, blur_amount), 0)

    im2_blur = cv2.GaussianBlur(im2, (blur_amount, blur_amount), 0)

    # Avoid divide-by-zero errors:

    im2_blur += (128 * (im2_blur <= 1.0)).astype(im2_blur.dtype)

    return (im2.astype(numpy.float64) * im1_blur.astype(numpy.float64) /

            im2_blur.astype(numpy.float64))

im1, landmarks1 = read_im_and_landmarks("0.jpg")

im2, landmarks2 = read_im_and_landmarks("1.jpg")

# draw landmarks

##for i in landmarks2:

##    im2[i[0,1], i[0,0]] = [0,0,0]

##cv2.imshow("Image0", annote_landmarks(im1, landmarks1))

##cv2.waitKey(0)

##cv2.destroyWindow("Image0")

##cv2.imshow("Image1", annote_landmarks(im2, landmarks2))

##cv2.waitKey(0)

M = transformation_from_points(landmarks1[ALIGN_POINTS],

                               landmarks2[ALIGN_POINTS])

mask = get_face_mask(im2, landmarks2)

warped_mask = warp_im(mask, M, im1.shape)

combined_mask = numpy.max([get_face_mask(im1, landmarks1), warped_mask],

                          axis=0)

warped_im2 = warp_im(im2, M, im1.shape)

warped_corrected_im2 = correct_colors(im1, warped_im2, landmarks1)

output_im = im1 * (1.0 - combined_mask) + warped_corrected_im2 * combined_mask

cv2.imshow("Image1", output_im.astype(output_im.dtype)) # warp_im(im2, M, im1.shape)

cv2.waitKey(0)

cv2.destroyWindow("Image1")

cv2.imwrite("output.jpg", output_im)
学习换脸:Switching Eds: Face swapping with Python, dlib, and OpenCV的更多相关文章
- Python学习--使用dlib、opencv进行人脸检测标注
参考自https://www.pyimagesearch.com/2017/04/03/facial-landmarks-dlib-opencv-python/ 在原有基础上有一部分的修改(image ...
- 从零开始学习PYTHON3讲义(二)把Python当做计算器
<从零开始PYTHON3>第二讲 上一讲我们说过了如何启动Python IDLE集成开发学习环境,macOS/Linux都可以在命令行执行idle3.Windows则从开始菜单中去寻找ID ...
- golang学习笔记17 爬虫技术路线图,python,java,nodejs,go语言,scrapy主流框架介绍
golang学习笔记17 爬虫技术路线图,python,java,nodejs,go语言,scrapy主流框架介绍 go语言爬虫框架:gocolly/colly,goquery,colly,chrom ...
- Python学习之路【第一篇】-Python简介和基础入门
1.Python简介 1.1 Python是什么 相信混迹IT界的很多朋友都知道,Python是近年来最火的一个热点,没有之一.从性质上来讲它和我们熟知的C.java.php等没有什么本质的区别,也是 ...
- python dlib学习(五):比对人脸
前言在前面的博客中介绍了,如何使用dlib标定人脸(python dlib学习(一):人脸检测),提取68个特征点(python dlib学习(二):人脸特征点标定).这次要在这两个工作的基础之上,将 ...
- OpenCV-Python(1)在Python中使用OpenCV进行人脸检测
OpenCV是如今最流行的计算机视觉库,而我们今天就是要学习如何安装使用OpenCV,以及如何去访问我们的摄像头.然后我们一起来看看写一个人脸检测程序是如何地简单,简单到只需要几行代码. 在开始之前, ...
- OpenCV/Python/dlib眨眼检测
今天我们来使用面部标志和OpenCV 检测和计算视频流中的眨眼次数. 为了构建我们的眨眼检测器,我们将计算一个称为眼睛纵横比(EAR)的指标,由Soukupová和Čech在其2016年的论文&quo ...
- Python如何安装OpenCV库
转载:https://blog.csdn.net/weixin_35684521/article/details/81953047 OpenCV的概念可百度,在此不再赘述.https://baike. ...
- Python图像处理丨OpenCV+Numpy库读取与修改像素
摘要:本篇文章主要讲解 OpenCV+Numpy 图像处理基础知识,包括读取像素和修改像素. 本文分享自华为云社区<[Python图像处理] 二.OpenCV+Numpy库读取与修改像素> ...
随机推荐
- 第十六章:自定义push notification sound
前面一节已经讲过如何在ionic中集成jpush,这样我们的hybrid app在部署到ios或者android上面的时候,就可以接收通知了.如果不满足系统自带的声音,可以通过一些方式来播放自定义的通 ...
- 【学习】Unity手游之路<十二>手游资源热更新策略探讨
http://blog.csdn.net/janeky/article/details/17666409 =============================================== ...
- PHP流程控制之goto语句
goto 操作符可以用来跳转到程序中的另一位置.该目标位置可以用目标名称加上冒号来标记,而跳转指令是 goto 之后接上目标位置的标记.PHP 中的 goto 有一定限制,目标位置只能位于同一个文件和 ...
- python pickle命令执行与marshal 任意代码执行
1.python pickle反序列化漏洞 自己的理解: 由于在类的__reduce__方法中提供了我们可以自定义程序如何去解序列化的方法,因此如果应用程序接受了不可信任的序列化的数据,那么就可能导致 ...
- 微信小程序参考资料及网址
微信小程序 https://mp.weixin.qq.com/debug/wxadoc/dev/api/ http://www.w3cschool.cn/weixinapp/ 微信小程序 开发工具 h ...
- jquery 获取easyui combobox选中的值、赋值
jquery easyui combobox 控件支持单选和多选 1.获取选中的值 $('#comboboxlist').combobox('getValue'); //单选时 $('#combob ...
- tomcat常用技巧
1. 修改Tomcat的名称 适用场景: 在测试服务器资源有限或是在本机服务器部署多套应用系统时,由于要启动多个TOMCAT服务,且TOMCAT服务没有用名称去区分,会造成维护使用上存在一定晨读的不方 ...
- Use the list and while to Build Shop car
#Author: Gordonsalary = int(input("请输入你的工资:"))goods = [('0',"Iphone",5000),('1', ...
- lua load
load (chunk [, chunkname [, mode [, env]]]) 加载一个代码块. 如果 chunk 是一个字符串,代码块指这个字符串. 如果 chunk 是一个函数, load ...
- linux服务器上创建svn版本库
1. 创建存放各个svn版本库的目录svnrepos(自己定义路径) -bash: cd /usr/local/apache/htdocs/ -bash: mkdir svnrepos 2. 假设我要 ...