Hystrix 源码解读
转载请注明出处:
1.引入依赖:
        <dependency>

            <groupId>org.springframework.cloud</groupId>

            <artifactId>spring-cloud-starter-netflix-hystrix</artifactId>

        </dependency>

        <!--hystrix官网-->

        <dependency>

            <groupId>com.netflix.hystrix</groupId>

            <artifactId>hystrix-core</artifactId>

            <version>1.5.18</version>

        </dependency>

        <dependency>

            <groupId>com.netflix.hystrix</groupId>

            <artifactId>hystrix-javanica</artifactId>

            <version>1.5.18</version>

        </dependency>
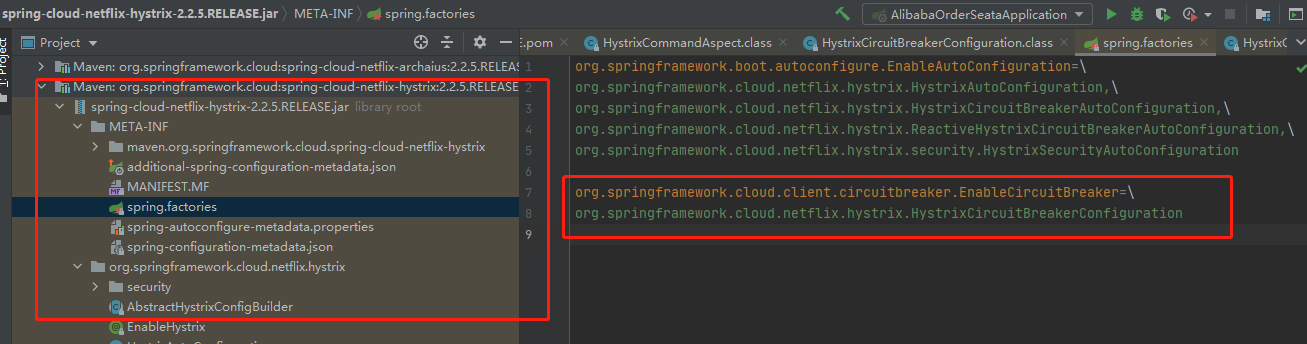
2. 查看自动配置类HystrixCircuitBreakerConfiguration
查看 org.springframework.cloud.spring-cloud-starter-netflix-hystrix 包中的自动配置类,Hystrix 的断路器的自动配置类在 org.springframework.cloud.netflix.hystrix.HystrixCircuitBreakerConfiguration 类中
3.查看 HystrixCircuitBreakerConfiguration 类的实现
@Configuration(

    proxyBeanMethods = false

)

public class HystrixCircuitBreakerConfiguration {

    public HystrixCircuitBreakerConfiguration() {

    }

    @Bean

    public HystrixCommandAspect hystrixCommandAspect() {

        return new HystrixCommandAspect();

    }

}
Hystrix 的熔断开启与实现时通过 上面中的 HystrixCommandAspect 类实现的
4.查看 HystrixCommandAspect 类的实现
该切面类中的实现为:
@Aspect

public class HystrixCommandAspect {

    private static final Map<HystrixCommandAspect.HystrixPointcutType, HystrixCommandAspect.MetaHolderFactory> META_HOLDER_FACTORY_MAP;

    public HystrixCommandAspect() {

    }

    @Pointcut("@annotation(com.netflix.hystrix.contrib.javanica.annotation.HystrixCommand)")

    public void hystrixCommandAnnotationPointcut() {

    }

    @Pointcut("@annotation(com.netflix.hystrix.contrib.javanica.annotation.HystrixCollapser)")

    public void hystrixCollapserAnnotationPointcut() {

    }

    @Around("hystrixCommandAnnotationPointcut() || hystrixCollapserAnnotationPointcut()")

    public Object methodsAnnotatedWithHystrixCommand(ProceedingJoinPoint joinPoint) throws Throwable {

        Method method = AopUtils.getMethodFromTarget(joinPoint);

        Validate.notNull(method, "failed to get method from joinPoint: %s", new Object[]{joinPoint});

        if (method.isAnnotationPresent(HystrixCommand.class) && method.isAnnotationPresent(HystrixCollapser.class)) {

            throw new IllegalStateException("method cannot be annotated with HystrixCommand and HystrixCollapser annotations at the same time");

        } else {

            HystrixCommandAspect.MetaHolderFactory metaHolderFactory = (HystrixCommandAspect.MetaHolderFactory)META_HOLDER_FACTORY_MAP.get(HystrixCommandAspect.HystrixPointcutType.of(method));

            MetaHolder metaHolder = metaHolderFactory.create(joinPoint);

            //构建hystrixCommand的实现类

            HystrixInvokable invokable = HystrixCommandFactory.getInstance().create(metaHolder);

            ExecutionType executionType = metaHolder.isCollapserAnnotationPresent() ? metaHolder.getCollapserExecutionType() : metaHolder.getExecutionType();

            try {

                Object result;

                if (!metaHolder.isObservable()) {

                    result = CommandExecutor.execute(invokable, executionType, metaHolder);

                } else {

                    result = this.executeObservable(invokable, executionType, metaHolder);

                }

                return result;

            } catch (HystrixBadRequestException var9) {

                throw var9.getCause();

            } catch (HystrixRuntimeException var10) {

                throw this.hystrixRuntimeExceptionToThrowable(metaHolder, var10);

            }

        }

    }

}
通过代码看出hystrix 通过封装一个切面,在切面中 拦截 对使用了 @HystrixCommand 与 @HystrixCollapser注解的方法进行增强;
重点看这行代码:
HystrixInvokable invokable = HystrixCommandFactory.getInstance().create(metaHolder);
是如何创建HystrixCommand对象的。
public HystrixInvokable create(MetaHolder metaHolder) {

        Object executable;

        //判断是不是HystrixCollapser注解

        if (metaHolder.isCollapserAnnotationPresent()) {

            executable = new CommandCollapser(metaHolder);

        } else if (metaHolder.isObservable()) {

            executable = new GenericObservableCommand(HystrixCommandBuilderFactory.getInstance().create(metaHolder));

        } else {

            //会执行这个。

            executable = new GenericCommand(HystrixCommandBuilderFactory.getInstance().create(metaHolder));

        }

        return (HystrixInvokable)executable;

    }
分析的是HystrixCommand注解,所以走else里的分析。整体构造过程是 GenericCommand -> AbstractHystrixCommand -> HystrixCommand -> AbstractCommand, 构建GenericCommand的过程,我们主要还是看AbstractCommand的构造方法。
abstract class AbstractCommand<R> implements HystrixInvokableInfo<R>, HystrixObservable<R> {

    //构造方法

    protected AbstractCommand(HystrixCommandGroupKey group, HystrixCommandKey key,

                              HystrixThreadPoolKey threadPoolKey, HystrixCircuitBreaker circuitBreaker,

                              HystrixThreadPool threadPool,

                              HystrixCommandProperties.Setter commandPropertiesDefaults,

                              HystrixThreadPoolProperties.Setter threadPoolPropertiesDefaults,

                              HystrixCommandMetrics metrics,

                              TryableSemaphore fallbackSemaphore,

                              TryableSemaphore executionSemaphore,

                              HystrixPropertiesStrategy propertiesStrategy,

                              HystrixCommandExecutionHook executionHook) {

        this.commandGroup = initGroupKey(group);

        this.commandKey = initCommandKey(key, getClass());

        this.properties = initCommandProperties(this.commandKey, propertiesStrategy, commandPropertiesDefaults);

        this.threadPoolKey = initThreadPoolKey(threadPoolKey,

                                               this.commandGroup,

                                               this.properties.executionIsolationThreadPoolKeyOverride().get());

        this.metrics = initMetrics(metrics, this.commandGroup, this.threadPoolKey, this.commandKey, this.properties);

        //初始化熔断器

        this.circuitBreaker = initCircuitBreaker(this.properties.circuitBreakerEnabled().get(),

                                                 circuitBreaker, this.commandGroup,

                                                 this.commandKey, this.properties, this.metrics);

        //初始化线程池

        this.threadPool = initThreadPool(threadPool, this.threadPoolKey, threadPoolPropertiesDefaults);

        //Strategies from plugins

        this.eventNotifier = HystrixPlugins.getInstance().getEventNotifier();

        this.concurrencyStrategy = HystrixPlugins.getInstance().getConcurrencyStrategy();

        HystrixMetricsPublisherFactory.createOrRetrievePublisherForCommand(this.commandKey, this.commandGroup,

                                                                           this.metrics, this.circuitBreaker,

                                                                           this.properties);

        this.executionHook = initExecutionHook(executionHook);

        this.requestCache = HystrixRequestCache.getInstance(this.commandKey, this.concurrencyStrategy);

        this.currentRequestLog = initRequestLog(this.properties.requestLogEnabled().get(), this.concurrencyStrategy);

        /* fallback semaphore override if applicable */

        this.fallbackSemaphoreOverride = fallbackSemaphore;

        /* execution semaphore override if applicable */

        this.executionSemaphoreOverride = executionSemaphore;

    }

}
5.查看 切面方法实现细节
hystrix 执行的流程图:
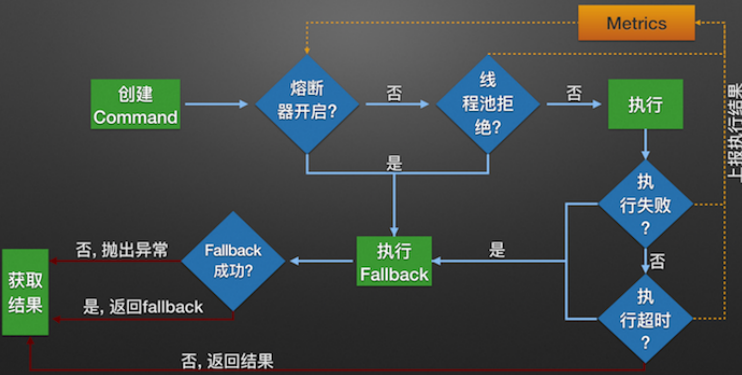
构造一个 HystrixCommand或HystrixObservableCommand对象,用于封装请求,并在构造方法配置请求被执行需要的参数;
执行命令,Hystrix提供了4种执行命令的方法
判断是否使用缓存响应请求,若启用了缓存,且缓存可用,直接使用缓存响应请求。Hystrix支持请求缓存,但需要用户自定义启动;
判断熔断器是否打开,如果打开,执行第8步;
判断线程池/队列/信号量是否已满,已满则执行第8步;
执行HystrixObservableCommand.construct()或HystrixCommand.run(),如果执行失败或者超时,执行第8步;否则,跳到第9步;
统计熔断器监控指标;
走Fallback备用逻辑
返回请求响应
6.核心实现
HystrixCommandAspect.methodsAnnotatedWithHystrixCommand 中的execute方法,execute 方法为 hystrix 实现的核心:
public static Object execute(HystrixInvokable invokable, ExecutionType executionType, MetaHolder metaHolder) throws RuntimeException {

        Validate.notNull(invokable);

        Validate.notNull(metaHolder);

        switch(executionType) {

        case SYNCHRONOUS:

            return castToExecutable(invokable, executionType).execute();

        case ASYNCHRONOUS:

            HystrixExecutable executable = castToExecutable(invokable, executionType);

            if (metaHolder.hasFallbackMethodCommand() && ExecutionType.ASYNCHRONOUS == metaHolder.getFallbackExecutionType()) {

                return new FutureDecorator(executable.queue());

            }

            return executable.queue();

        case OBSERVABLE:

            HystrixObservable observable = castToObservable(invokable);

            return ObservableExecutionMode.EAGER == metaHolder.getObservableExecutionMode() ? observable.observe() : observable.toObservable();

        default:

            throw new RuntimeException("unsupported execution type: " + executionType);

        }

    }
判断是否为同步,还是异步,还是观察着模式,异步方式是通过 Future 封装,用Future 对象的get方法,阻塞等待返回结果,以达到同步效果。
在这里只查看同步的方式: 调用链路是:HystrixCommand.execute() -> queue() -> toObservable()
1.是否使用缓存
如果开启缓存,请求首先会返回缓存中的结果。
2.是否开启熔断
当运行hystrix命令时,会判断是否熔断,如果已经熔断,hystrix将不会执行命令,而是直接执行fallback。等熔断关闭了,在执行命令。
熔断器关闭或打开的判断,
private Observable<R> applyHystrixSemantics(AbstractCommand<R> _cmd) {

        this.executionHook.onStart(_cmd);

        //判读是不是熔断了。

        if (this.circuitBreaker.allowRequest()) {

            /**

             *如果使用的是信号量返回TryableSemaphoreActual,不是返回

             *TryableSemaphoreNoOp,TryableSemaphoreNoOp.tryAcquire()永远都是返回true

              */

           final TryableSemaphore executionSemaphore = getExecutionSemaphore();

            。。。

            //信号量的控制

            if (executionSemaphore.tryAccaquire()) {

                try {

                    this.executionResult = this.executionResult.setInvocationStartTime(System.currentTimeMillis());

                       //如果都成功的话会执行executeCommandAndObserve

                    return this.executeCommandAndObserve(_cmd)

                        .doOnError(markExceptionThrown)

                        .doOnTerminate(singleSemaphoreRelease)

                        .doOnUnsubscribe(singleSemaphoreRelease);

                } catch (RuntimeException var7) {

                    return Observable.error(var7);

                }

            } else {

                return this.handleSemaphoreRejectionViaFallback();

            }

        } else {//执行熔断后的逻辑

            return this.handleShortCircuitViaFallback();

        }

    }
熔断器降级分析
接着分析 this.circuitBreaker.allowRequest()
static class HystrixCircuitBreakerImpl implements HystrixCircuitBreaker {

        private final HystrixCommandProperties properties;

        private final HystrixCommandMetrics metrics;

        //熔断器是否开启

        /* track whether this circuit is open/closed at any given point in time (default to false==closed) */

        private AtomicBoolean circuitOpen = new AtomicBoolean(false);

        /* when the circuit was marked open or was last allowed to try a 'singleTest' */

        private AtomicLong circuitOpenedOrLastTestedTime = new AtomicLong();

        protected HystrixCircuitBreakerImpl(HystrixCommandKey key, HystrixCommandGroupKey commandGroup, HystrixCommandProperties properties, HystrixCommandMetrics metrics) {

            this.properties = properties;

            this.metrics = metrics;

        }

    //当半开半闭状态下,如果这次请求成功而了,则把熔断器设为false,且让统计指标reset

        public void markSuccess() {

            if (circuitOpen.get()) {

                if (circuitOpen.compareAndSet(true, false)) {

                    //win the thread race to reset metrics

                    //Unsubscribe from the current stream to reset the health counts stream.  This only affects the health counts view,

                    //and all other metric consumers are unaffected by the reset

                    metrics.resetStream();

                }

            }

        }

        @Override

        public boolean allowRequest() {

            //判断是否强制打开熔断器

            if (properties.circuitBreakerForceOpen().get()) {

                return false;

            }

            //是否强制关闭熔断器

            if (properties.circuitBreakerForceClosed().get()) {

                isOpen();

                return true;

            }

            return !isOpen() || allowSingleTest();

        }

        public boolean allowSingleTest() {

            long timeCircuitOpenedOrWasLastTested = circuitOpenedOrLastTestedTime.get();

            // 1) if the circuit is open

            // 2) and it's been longer than 'sleepWindow' since we opened the circuit

            //熔断器是开启的,且当前时间比开启熔断器的时间加上sleepWindow时间还要长

            if (circuitOpen.get() && System.currentTimeMillis() > timeCircuitOpenedOrWasLastTested + properties.circuitBreakerSleepWindowInMilliseconds().get()) {

                // We push the 'circuitOpenedTime' ahead by 'sleepWindow' since we have allowed one request to try.

                // If it succeeds the circuit will be closed, otherwise another singleTest will be allowed at the end of the 'sleepWindow'.

                //设置当前时间到timeCircuitOpenedOrWasLastTested,

                //如果半开半闭的状态下,如果这次请求成功了则会调用markSuccess,让熔断器状态设为false,

                //如果不成功,就不需要了。

                //案例:半开半合状态下,熔断开启时间为00:00:00,sleepWindow为10s,如果00:00:15秒的时候调用,如果调用失败,

                //在00:00:15至00:00:25秒这个区间都是熔断的,

                if (circuitOpenedOrLastTestedTime.compareAndSet(timeCircuitOpenedOrWasLastTested, System.currentTimeMillis())) {

                    // if this returns true that means we set the time so we'll return true to allow the singleTest

                    // if it returned false it means another thread raced us and allowed the singleTest before we did

                    return true;

                }

            }

            return false;

        }

        @Override

        public boolean isOpen() {

            //判断是否熔断了,circuitOpen是熔断的状态 ,true为熔断,false为不熔断

            if (circuitOpen.get()) {

                return true;

            }

            //获取统计到的指标信息

            HealthCounts health = metrics.getHealthCounts();

             // 一个时间窗口(默认10s钟)总请求次数是否大于circuitBreakerRequestVolumeThreshold 默认为20s

            if (health.getTotalRequests() < properties.circuitBreakerRequestVolumeThreshold().get()) {

                return false;

            }

            // 错误率(总错误次数/总请求次数)小于circuitBreakerErrorThresholdPercentage(默认50%)

            if (health.getErrorPercentage() < properties.circuitBreakerErrorThresholdPercentage().get()) {

                return false;

            } else {

                // 反之,熔断状态将从CLOSED变为OPEN,且circuitOpened==>当前时间戳

                if (circuitOpen.compareAndSet(false, true)) {

                    //并且把当前时间设置到circuitOpenedOrLastTestedTime,可待后面的时间的对比

                    circuitOpenedOrLastTestedTime.set(System.currentTimeMillis());

                    return true;

                } else {

                    return true;

                }

            }

        }

    }
判断是否强制开启熔断器和强制关闭熔断器
先判断熔断是否开启,然后判断是否需要熔断,如果需要熔断则个性熔断状态并重置熔断时间为当前时间。熔断的条件是: 1)时间窗口内(默认10s钟)总请求次数大于20次 2)时间窗口内(默认10s钟)失败率大于50%
熔断的情况下就执行allowSingleTest,让开启熔断的都能往下执行。可以执行的条件是: 1)circuitOpen.get() 为true,确保是普通的熔断,而不是强制熔断 2)当前时间比开启熔断器的时间加上sleepWindow时间还要长
在半开半必的状态下请求成功了,再调用markSuccess()方法,从而将熔断器关闭并重新统计各项指标
其余的实现细节可以参考这篇文章:https://github.com/doocs/advanced-java/tree/main/docs/high-availability
https://www.iocoder.cn/Hystrix/command-execute-mode/
Hystrix 源码解读的更多相关文章
- SDWebImage源码解读之SDWebImageDownloaderOperation
第七篇 前言 本篇文章主要讲解下载操作的相关知识,SDWebImageDownloaderOperation的主要任务是把一张图片从服务器下载到内存中.下载数据并不难,如何对下载这一系列的任务进行设计 ...
- SDWebImage源码解读 之 NSData+ImageContentType
第一篇 前言 从今天开始,我将开启一段源码解读的旅途了.在这里先暂时不透露具体解读的源码到底是哪些?因为也可能随着解读的进行会更改计划.但能够肯定的是,这一系列之中肯定会有Swift版本的代码. 说说 ...
- SDWebImage源码解读 之 UIImage+GIF
第二篇 前言 本篇是和GIF相关的一个UIImage的分类.主要提供了三个方法: + (UIImage *)sd_animatedGIFNamed:(NSString *)name ----- 根据名 ...
- SDWebImage源码解读 之 SDWebImageCompat
第三篇 前言 本篇主要解读SDWebImage的配置文件.正如compat的定义,该配置文件主要是兼容Apple的其他设备.也许我们真实的开发平台只有一个,但考虑各个平台的兼容性,对于框架有着很重要的 ...
- SDWebImage源码解读_之SDWebImageDecoder
第四篇 前言 首先,我们要弄明白一个问题? 为什么要对UIImage进行解码呢?难道不能直接使用吗? 其实不解码也是可以使用的,假如说我们通过imageNamed:来加载image,系统默认会在主线程 ...
- SDWebImage源码解读之SDWebImageCache(上)
第五篇 前言 本篇主要讲解图片缓存类的知识,虽然只涉及了图片方面的缓存的设计,但思想同样适用于别的方面的设计.在架构上来说,缓存算是存储设计的一部分.我们把各种不同的存储内容按照功能进行切割后,图片缓 ...
- SDWebImage源码解读之SDWebImageCache(下)
第六篇 前言 我们在SDWebImageCache(上)中了解了这个缓存类大概的功能是什么?那么接下来就要看看这些功能是如何实现的? 再次强调,不管是图片的缓存还是其他各种不同形式的缓存,在原理上都极 ...
- AFNetworking 3.0 源码解读 总结(干货)(下)
承接上一篇AFNetworking 3.0 源码解读 总结(干货)(上) 21.网络服务类型NSURLRequestNetworkServiceType 示例代码: typedef NS_ENUM(N ...
- AFNetworking 3.0 源码解读 总结(干货)(上)
养成记笔记的习惯,对于一个软件工程师来说,我觉得很重要.记得在知乎上看到过一个问题,说是人类最大的缺点是什么?我个人觉得记忆算是一个缺点.它就像时间一样,会自己消散. 前言 终于写完了 AFNetwo ...
- AFNetworking 3.0 源码解读(十一)之 UIButton/UIProgressView/UIWebView + AFNetworking
AFNetworking的源码解读马上就结束了,这一篇应该算是倒数第二篇,下一篇会是对AFNetworking中的技术点进行总结. 前言 上一篇我们总结了 UIActivityIndicatorVie ...
随机推荐
- LLM面面观之LLM复读机问题及解决方案
1. 背景 关于LLM复读机问题,本qiang~在网上搜刮了好几天,结果是大多数客观整理的都有些支离破碎,不够系统. 因此,本qiang~打算做一个相对系统的整理,包括LLM复读机产生的原因以及对应的 ...
- NetSuite 开发日记:SDF 基础指南
VS Code 使用 SDF SuiteCloud : Create Project SuiteCloud : Set Up Account (连接沙盒环境) SuiteCloud : Import ...
- C# 输出的格式转换,占位/补位,字符串拼接、字符串内插法
// "0"描述:占位符,如果可能,填充位 Console.WriteLine(string.Format("{0:000000}", 12 ...
- ElasticSearch之cat plugins API
命令样例如下: curl -X GET "https://localhost:9200/_cat/plugins?v=true&pretty" --cacert $ES_H ...
- PHP中的反序列化漏洞理解
序列化serialize() 序列化说通俗点就是把一个对象变成可以传输的字符串,比如下面是一个对象: class S{ public $test="pikachu"; } $s=n ...
- libGDX游戏开发之Sprite、Texture和TextureRegion绘制旋转、反转(九)
libGDX游戏开发之Sprite.Texture和TextureRegion绘制反转(九) libGDX系列,游戏开发有unity3D巴拉巴拉的,为啥还用java开发?因为我是Java程序员emm- ...
- JavaFx 打开一个新窗口和窗口交互(四)
JavaFx 打开一个新窗口和窗口交互(四) JavaFX 从入门入门到入土系列 前面我演示的demo都是单个窗口,那么如何实现多个窗口呢?使用Stage secondStage = new Stag ...
- react-native在windows环境搭建并使用脚手架新建工程
截止到2024-1-11,使用的主要软件的版本如下: 软件实体 版本 react-native 0.73.1 react 18.2.0 react-native-cli 2.0.1 Android S ...
- Java 中常见类型的判空方式
引用类型(Reference Types): 使用 == 运算符判断是否为 null. 使用 != 运算符判断是否不为 null. 使用 Objects.isNull() 方法判断是否为 null. ...
- 百度高德地图JS-API学习手记:地图基本设置与省市区数据加载
无论是百度还是高德地图开发,还是高德地图开发.官方的给的案例启示很多,copy再修改下,就完成了 https://lbs.amap.com/api/javascript-api/summary ht ...