【Azure 应用服务】Azure Function App Linux环境下的Python Function,安装 psycopg2 模块错误
问题描述
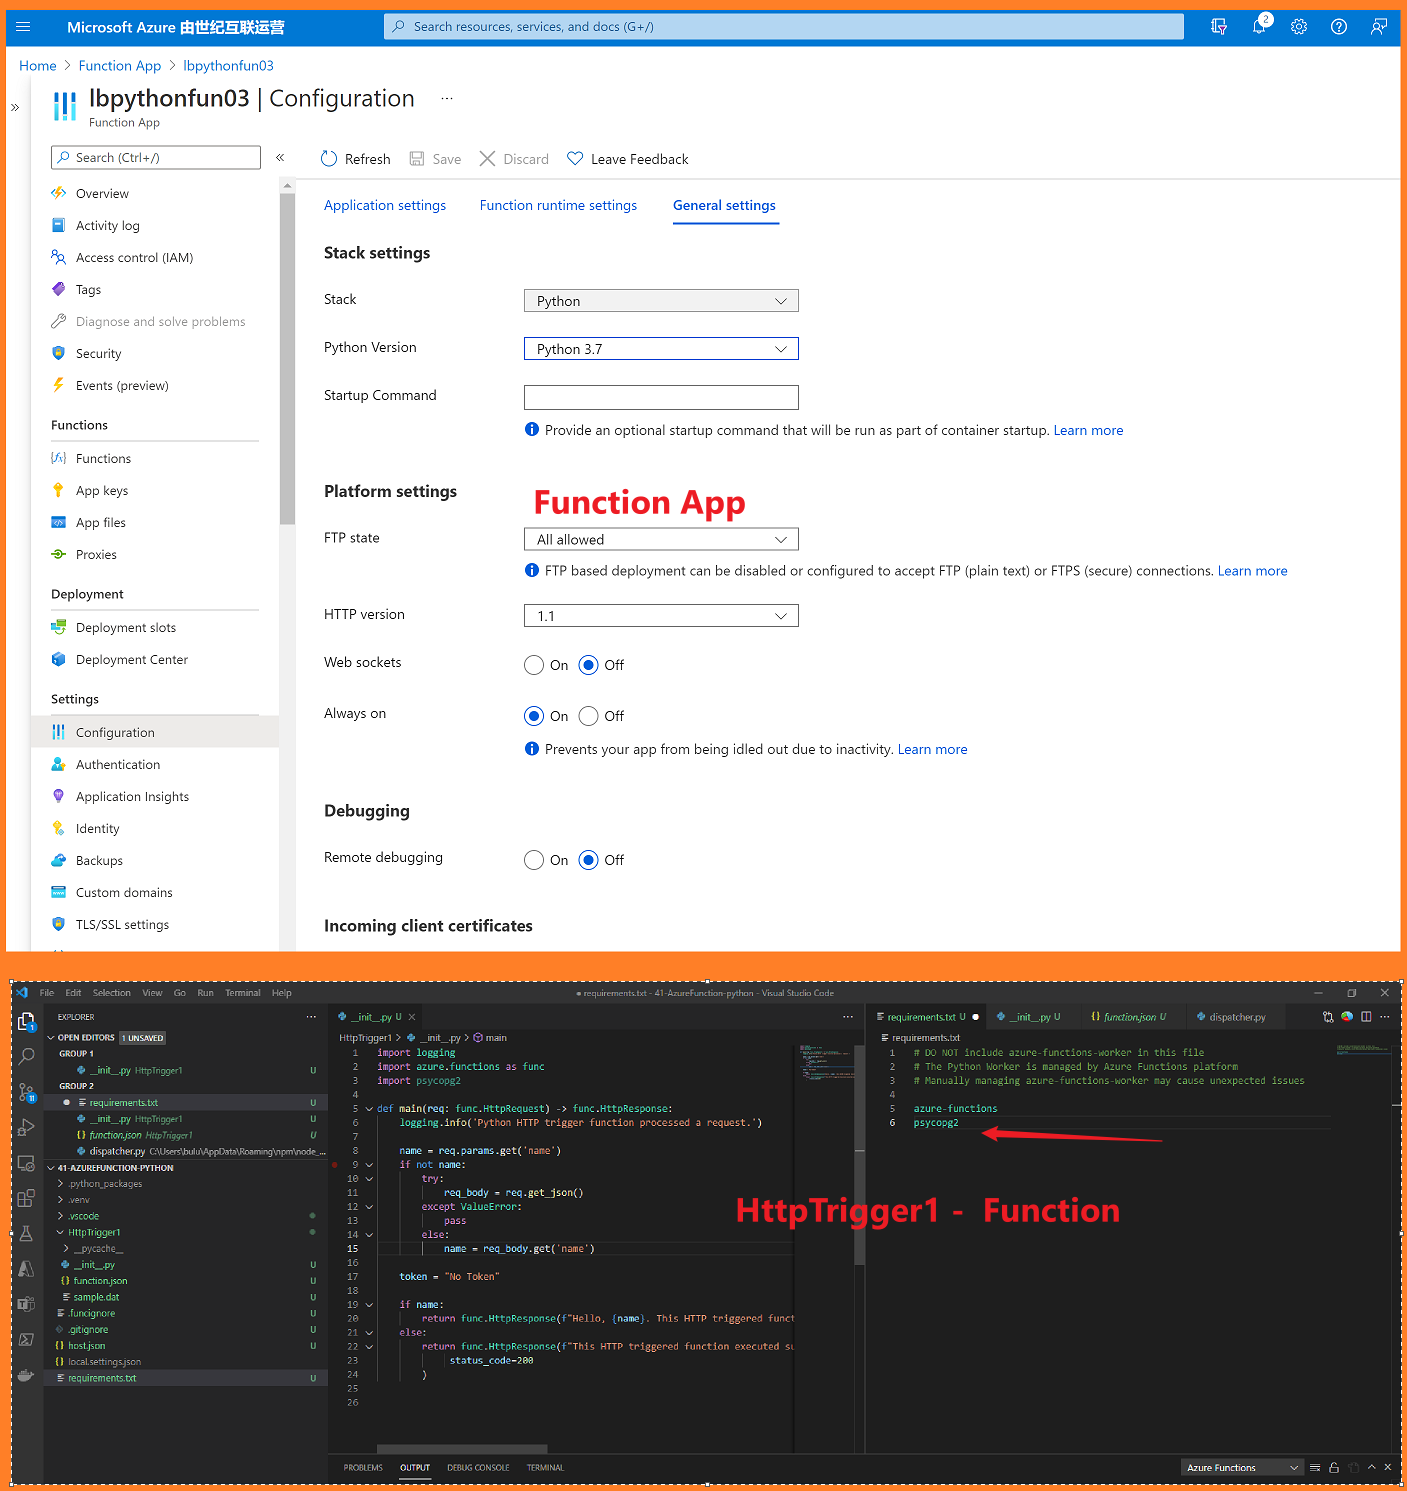
在Azure中创建Function App(函数应用), 用以运行Python代码(Python Version 3.7)。 通过VS Code创建一个HttpTrigger的Function,其中使用到了 psycopg2 模块,以便连接 Azure Database for PostgreSQL 数据库
当通过VS Code发布到Azure后,请求 Function URL 出错。通过高级工具(Kudu:https://<xxxxxxxx>.scm.chinacloudsites.cn/)登录到Logfiles中查看到错误消息为:
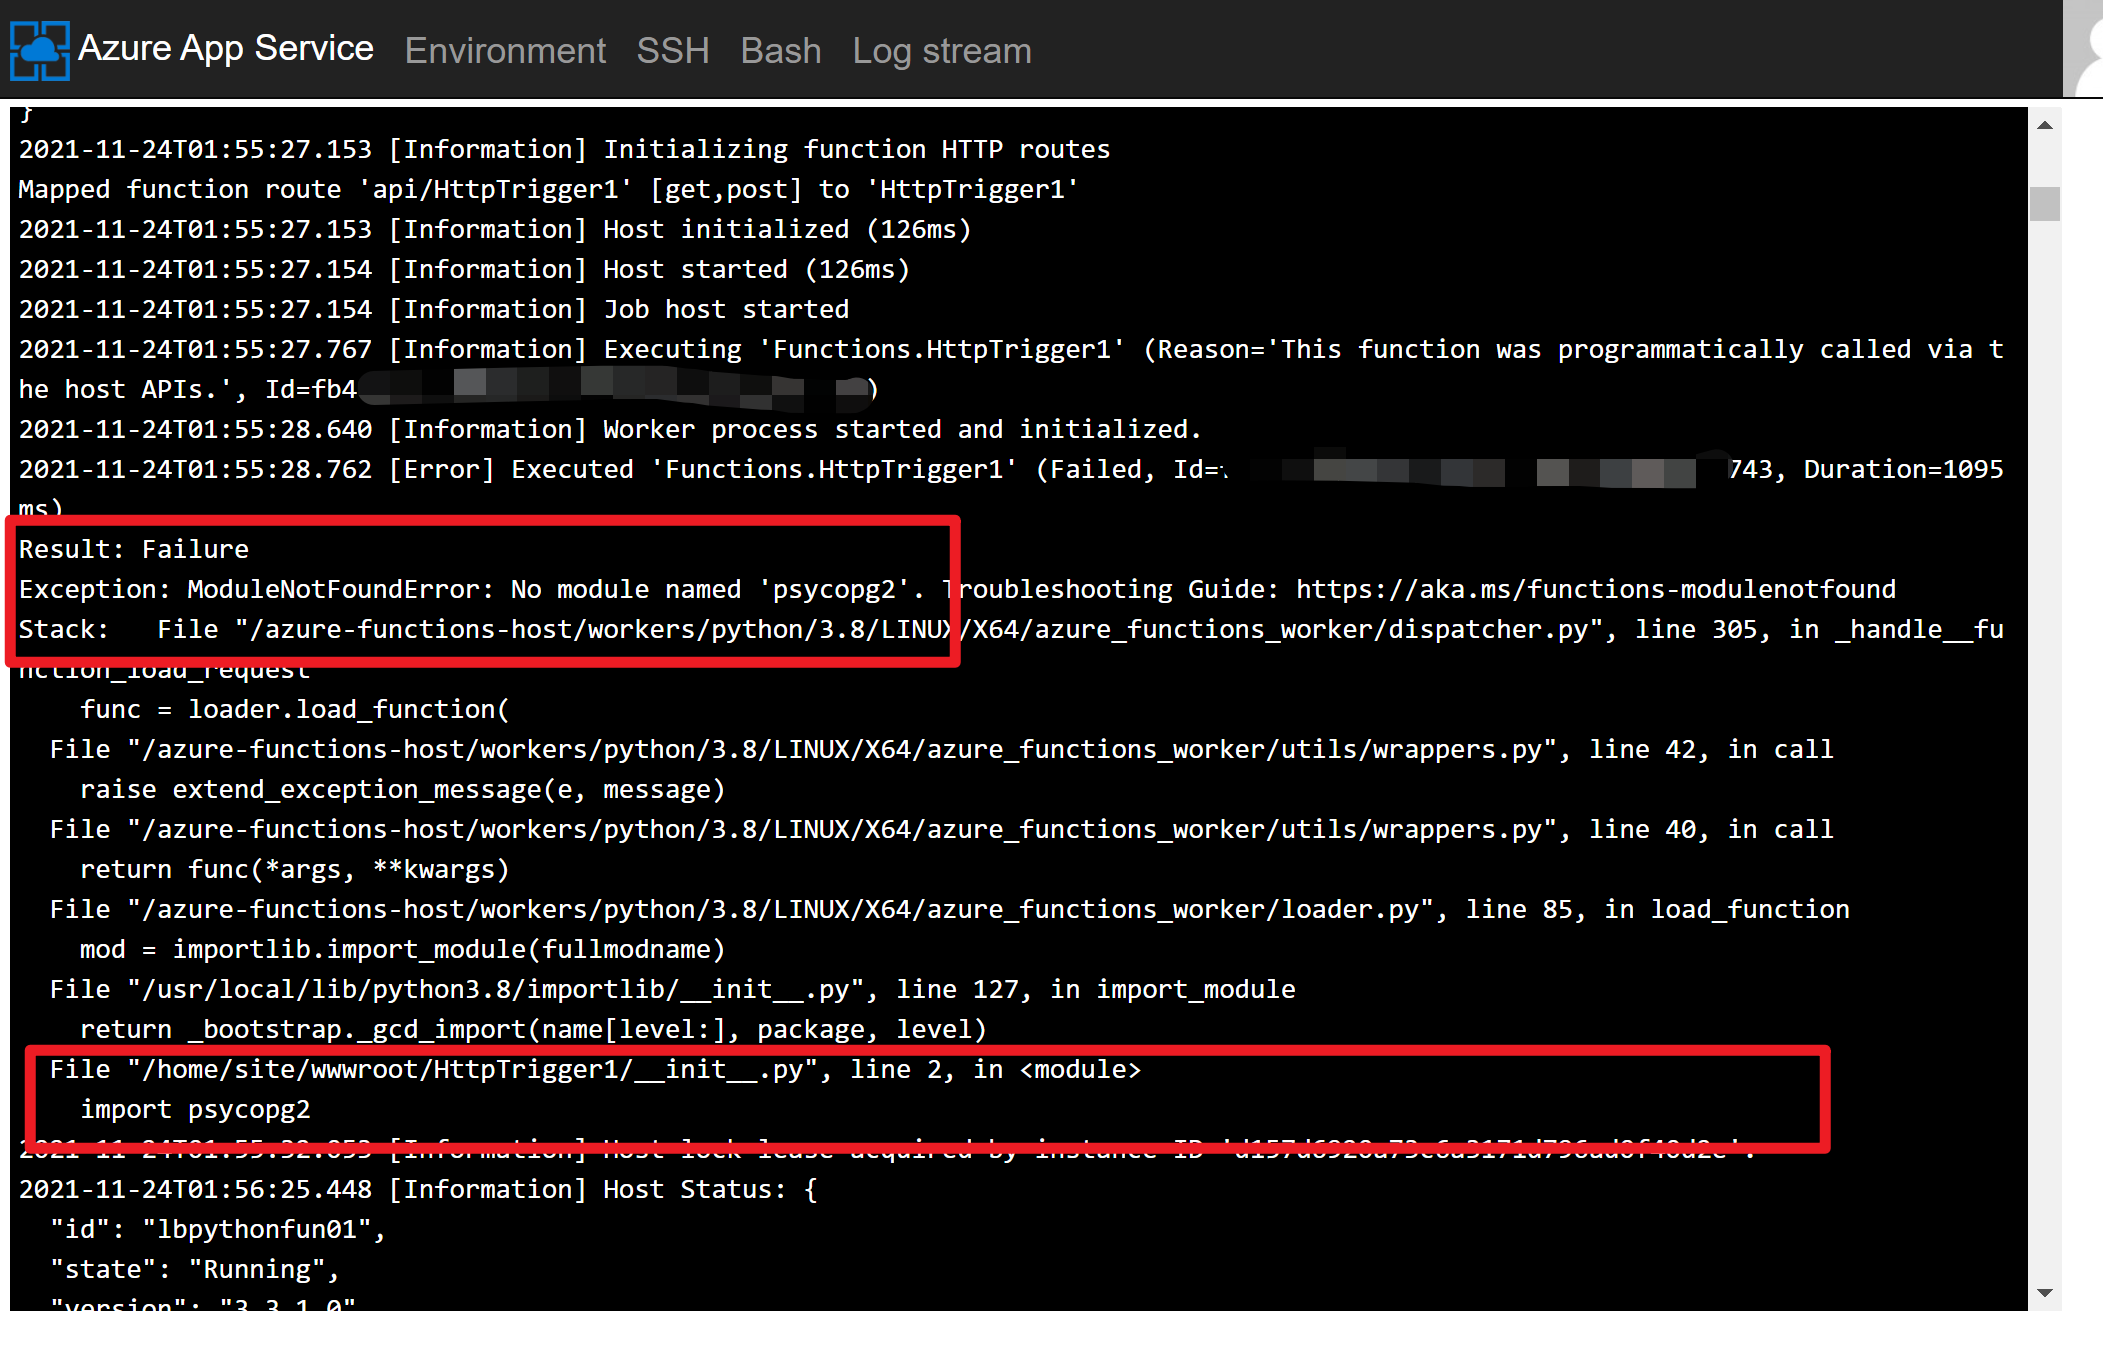
错误消息显示:ModuleNotFoundError: No module named 'psycopg2'. Troubleshooting Guide: https://aka.ms/functions-modulenotfound
完整的错误消息为:
2021-11-24T01:55:27.767 [Information] Executing 'Functions.HttpTrigger1' (Reason='This function was programmatically called via the host APIs.', Id=fb46530a-60db-4d44-b705-e81f805c9743)

2021-11-24T01:55:28.640 [Information] Worker process started and initialized.

2021-11-24T01:55:28.762 [Error] Executed 'Functions.HttpTrigger1' (Failed, Id=fb46530a-60db-4d44-b705-e81f805c9743, Duration=1095ms)

Result: Failure

Exception: ModuleNotFoundError: No module named 'psycopg2'. Troubleshooting Guide: https://aka.ms/functions-modulenotfound

Stack:   File "/azure-functions-host/workers/python/3.8/LINUX/X64/azure_functions_worker/dispatcher.py", line 305, in _handle__function_load_request

    func = loader.load_function(

  File "/azure-functions-host/workers/python/3.8/LINUX/X64/azure_functions_worker/utils/wrappers.py", line 42, in call

    raise extend_exception_message(e, message)

  File "/azure-functions-host/workers/python/3.8/LINUX/X64/azure_functions_worker/utils/wrappers.py", line 40, in call

    return func(*args, **kwargs)

  File "/azure-functions-host/workers/python/3.8/LINUX/X64/azure_functions_worker/loader.py", line 85, in load_function

    mod = importlib.import_module(fullmodname)

  File "/usr/local/lib/python3.8/importlib/__init__.py", line 127, in import_module

    return _bootstrap._gcd_import(name[level:], package, level)

  File "/home/site/wwwroot/HttpTrigger1/__init__.py", line 2, in <module>

    import psycopg2
问题分析
当遇见模块无法安装的时候,可以参考 TroubleShooting Guide (https://aka.ms/functions-modulenotfound) 进行逐步排查,还是非常有帮助的。
但是当前问题,并不是没有尝试安装psycopg2这个模块,而是虽然在Function的 requirements.txt 文件中已经添加了psycopg2,但是在安装的过程中出错。为了更明确的知道错误的消息,直接SSH连接到Function App所运行的Linux实例。通过 python -m pip install psycopg2 查看错误信息:
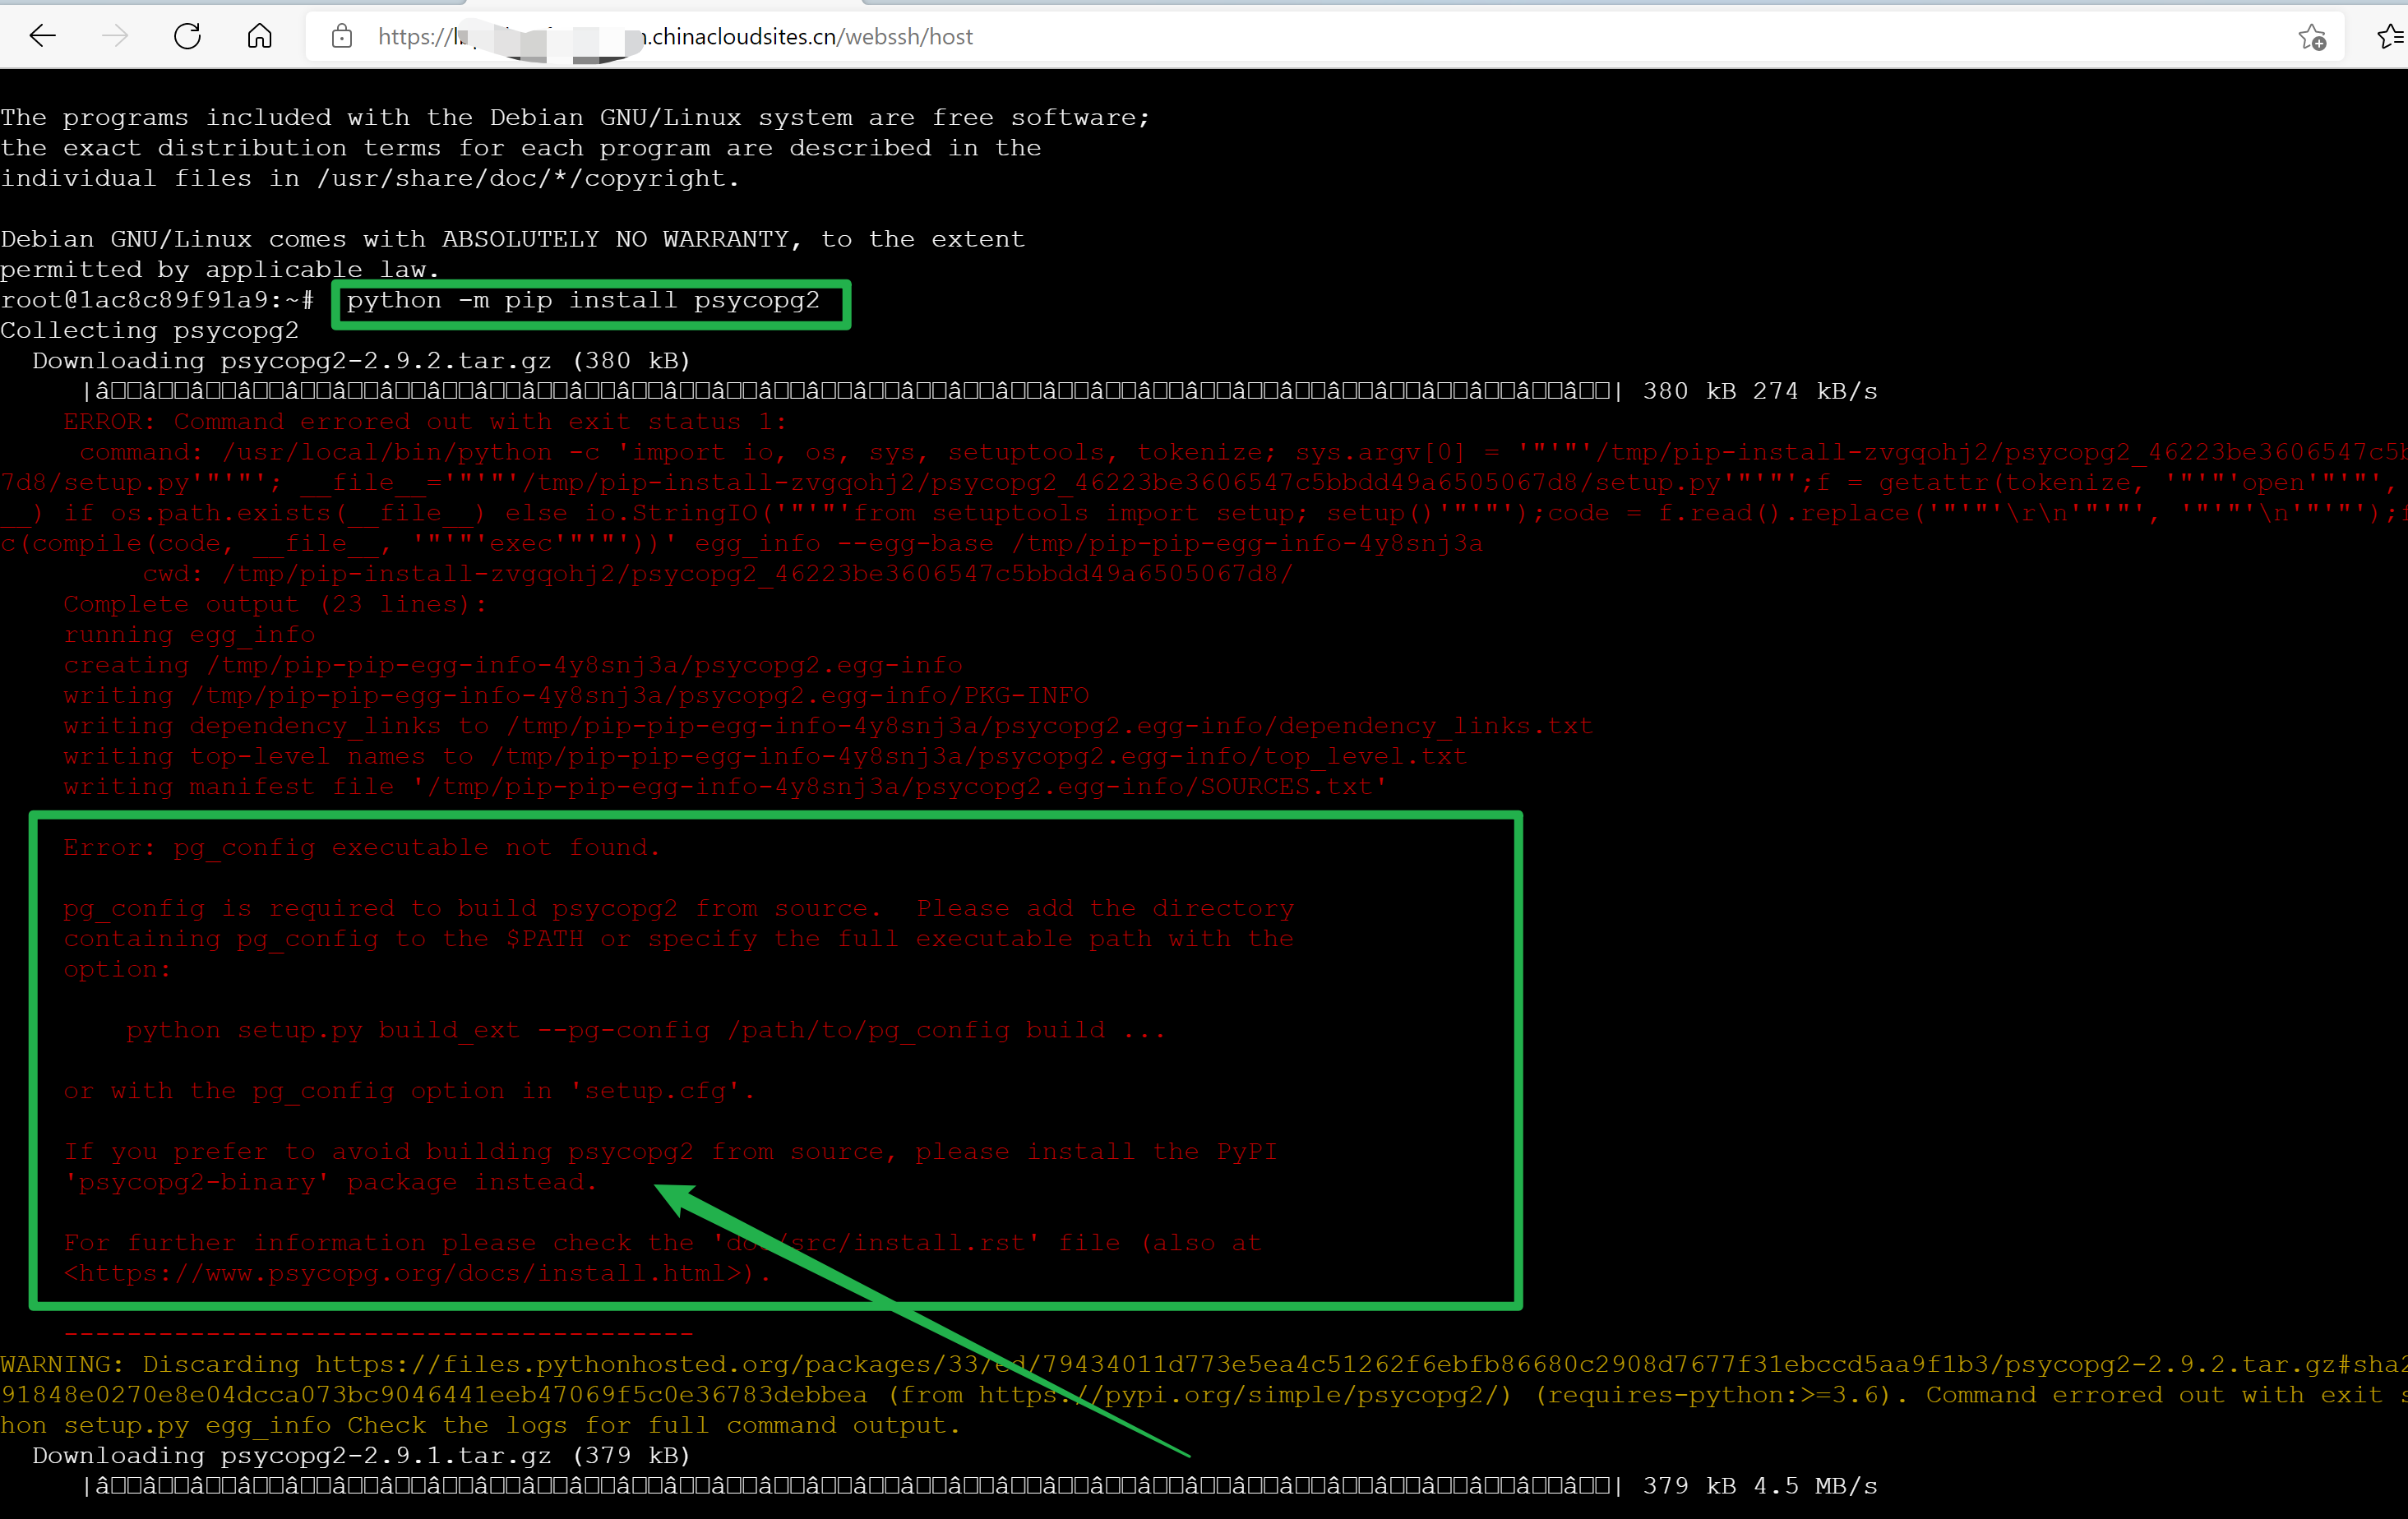
错误文本:
root@1ac8c89f91a9:~# python -m pip install psycopg2
Collecting psycopg2
Downloading psycopg2-2.9.2.tar.gz (380 kB)
|ââââââââââââââââââââââââââââââââ| 380 kB 274 kB/s
ERROR: Command errored out with exit status 1:
command: /usr/local/bin/python -c 'import io, os, sys, setuptools, tokenize; sys.argv[0] = '"'"'/tmp/pip-install-zvgqohj2/psycopg2_46223be3606547c5bbdd49a650506
7d8/setup.py'"'"'; __file__='"'"'/tmp/pip-install-zvgqohj2/psycopg2_46223be3606547c5bbdd49a6505067d8/setup.py'"'"';f = getattr(tokenize, '"'"'open'"'"', open)(__file
__) if os.path.exists(__file__) else io.StringIO('"'"'from setuptools import setup; setup()'"'"');code = f.read().replace('"'"'\r\n'"'"', '"'"'\n'"'"');f.close();exe
c(compile(code, __file__, '"'"'exec'"'"'))' egg_info --egg-base /tmp/pip-pip-egg-info-4y8snj3a
cwd: /tmp/pip-install-zvgqohj2/psycopg2_46223be3606547c5bbdd49a6505067d8/
Complete output (23 lines):
running egg_info
creating /tmp/pip-pip-egg-info-4y8snj3a/psycopg2.egg-info
writing /tmp/pip-pip-egg-info-4y8snj3a/psycopg2.egg-info/PKG-INFO
writing dependency_links to /tmp/pip-pip-egg-info-4y8snj3a/psycopg2.egg-info/dependency_links.txt
writing top-level names to /tmp/pip-pip-egg-info-4y8snj3a/psycopg2.egg-info/top_level.txt
writing manifest file '/tmp/pip-pip-egg-info-4y8snj3a/psycopg2.egg-info/SOURCES.txt' Error: pg_config executable not found. pg_config is required to build psycopg2 from source. Please add the directory
containing pg_config to the $PATH or specify the full executable path with the
option: python setup.py build_ext --pg-config /path/to/pg_config build ... or with the pg_config option in 'setup.cfg'. If you prefer to avoid building psycopg2 from source, please install the PyPI
'psycopg2-binary' package instead. For further information please check the 'doc/src/install.rst' file (also at
<https://www.psycopg.org/docs/install.html>). ----------------------------------------
WARNING: Discarding https://files.pythonhosted.org/packages/33/ed/79434011d773e5ea4c51262f6ebfb86680c2908d7677f31ebccd5aa9f1b3/psycopg2-2.9.2.tar.gz#sha256=a84da9fa8
91848e0270e8e04dcca073bc9046441eeb47069f5c0e36783debbea (from https://pypi.org/simple/psycopg2/) (requires-python:>=3.6). Command errored out with exit status 1: pyt
hon setup.py egg_info Check the logs for full command output.
真正的错误就是 pg_config 是必须的,但是Linux实例上并没有配置。而解决办法就是使用 psycopg2-binary 包代替,接着使用 python -m pip install psycopg2-binary 来测试是否可以安装成功。

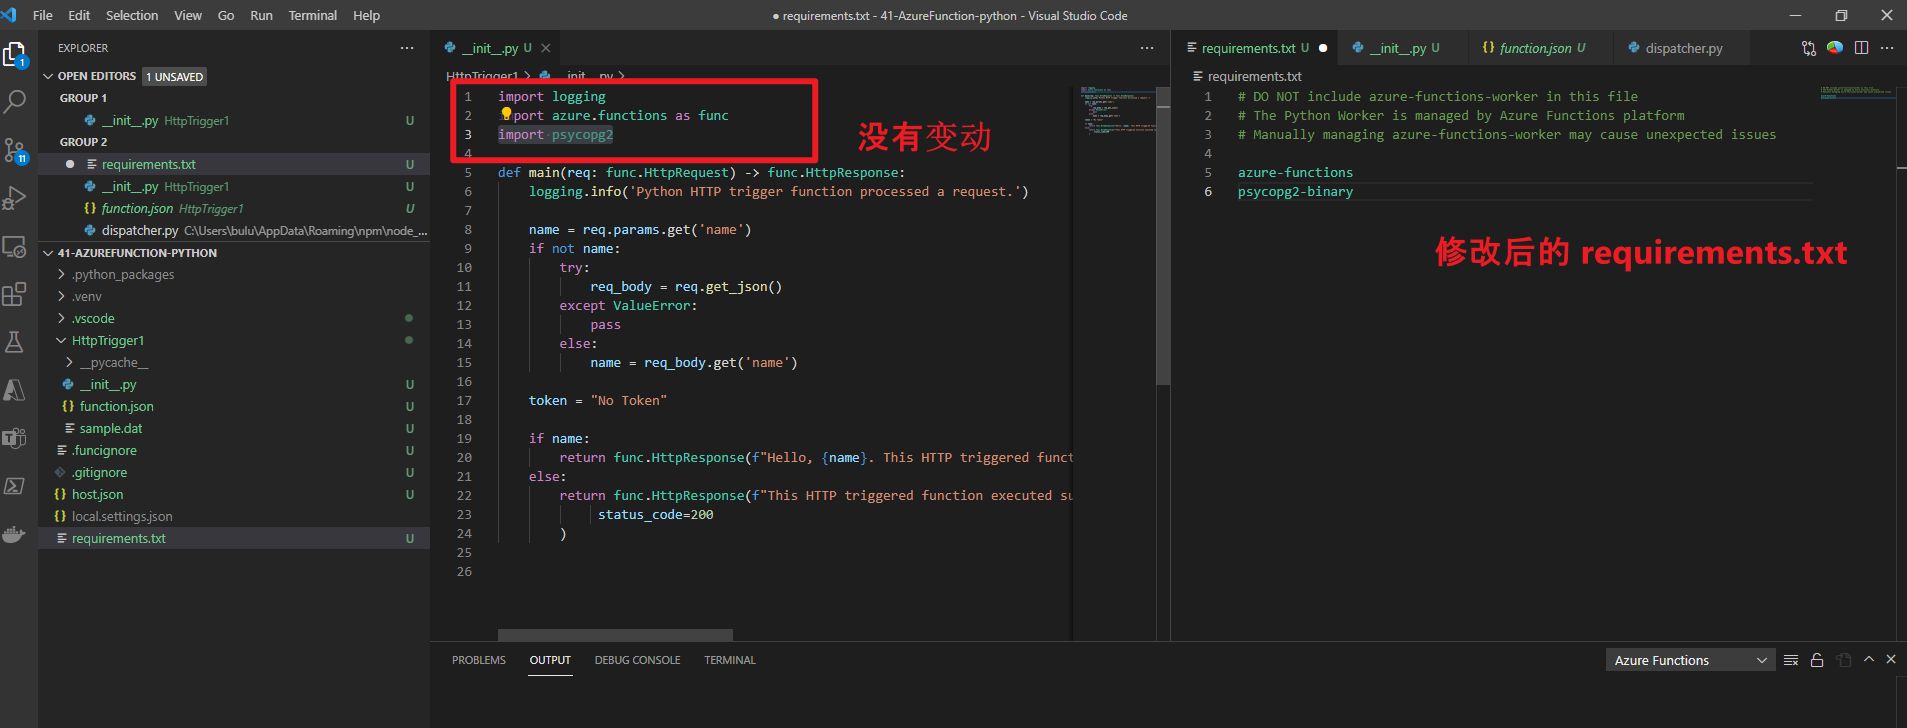
验证成功!
所以为了能在 Python Function 中使用 psycopg2 模块,需要在 requirements.txt 文件中,使用 psycopg2-binary 代替 psycopg2。 其他的(如代码中的 import psycopg2)则无需修改。
参考资料
在 Azure 中使用 Visual Studio Code 创建 Python 函数 : https://docs.azure.cn/zh-cn/azure-functions/create-first-function-vs-code-python
Use Python to connect and query data in Azure Database for PostgreSQL - Single Server : https://docs.microsoft.com/en-us/azure/postgresql/connect-python#prerequisites
Install psycopg2 using pip install psycopg2-binary in a terminal or command prompt window.
Using psycopg2 in Azure Functions : https://iotespresso.com/using-psycopg2-in-azure-functions/
psycopg2 is not a standalone package. It is built using libpq-dev package, during installation. Now, psycopg2 depends on the host OS to find this library. And Azure Functions don’t have libpq, as the error above clearly indicates.
You may be wondering that we can perhaps simply add libpq-dev to requirements.txt. But that doesn’t work. You will get the error:
No matching distribution found for libpq-dev
Thus, the required solution is to use a package of psycopg2 that doesn’t require libpq. psycopg2-binary is exactly that. I hope this provided a satisfactory explanation.
[End]
【Azure 应用服务】Azure Function App Linux环境下的Python Function,安装 psycopg2 模块错误的更多相关文章
- Linux环境下JDK/Eclipse一键安装脚本
-------------------------------------------------------------------- author:jiangxin Email:jiangxinn ...
- linux环境下,接着lnmp,安装redis
linux环境下,安装redis 操作记录: 回到家目录 cd ~查看 ls进入 lump cd lnmp1.3-fullls??? sudo ./addons.sh //---进入后选 ...
- 在Linux环境下采用压缩包方式安装JDK 13
本文地址:https://www.cnblogs.com/oberon-zjt0806/p/11663731.html 可以,转载,出处,格式,懂?? 什么是JDK?? 好吧如果你不知道这个问题的话我 ...
- [Python学习] Linux环境下的Python配置,必备库的安装配置
1.默认Python安装情况 一般情况,Linux会预装Python的,版本较低,比如Ubuntu15的系统一般预装的是Python2.7.10. 使用命令:which python可以查看当前的py ...
- Linux环境下SVN服务器端的安装与配置
最近尝试了下在Linux(CentOS6.5)环境下安装与配置SVN服务器端,安装过程中碰到了一些问题,参看了网友们分享的一些心得,并通过自己实际的操作,最终安装与配置成功!总的来说网上的说法芸芸,大 ...
- linux环境下的python安装过程
一.下载python源码包 打开ubuntu下的shell终端,通过wget命令下载python源码包,如下图所示: wget https://www.python.org/ftp/python/3. ...
- linux环境下的python安装过程(含setuptools)
这里我不想采用诸如ubuntu下的apt-get install方式进行python的安装,而是在linux下采用源码包的方式进行python的安装. 一.下载python源码包 打开ubuntu下的 ...
- Linux环境下的Docker的安装和部署、学习-一
CentOS Docker 安装Docker支持以下的CentOS版本:CentOS 7 (64-bit)CentOS 6.5 (64-bit) 或更高的版本 前提条件目前,CentOS 仅发行版本中 ...
- Linux环境下搭建python+selenium+webdriver环境
1.下载并安装python,一般安装linux系统,自带有python,则python不用安装.要下载可以在官网上下载: 或者使用下面命令安装: sudo apt-get install python ...
- Linux环境下Node.js的安装配置
1. 官网下载Node.js 2. 安装Node.js 根据下载内容的不同,提供三种安装方法,选择自己喜欢的方式 2.1. 绿色免安装版(Linux(.tar.gz)) 解压Node-XX ...
随机推荐
- zookeeper的Leader选举源码解析
作者:京东物流 梁吉超 zookeeper是一个分布式服务框架,主要解决分布式应用中常见的多种数据问题,例如集群管理,状态同步等.为解决这些问题zookeeper需要Leader选举进行保障数据的强一 ...
- 使用css 与 js 两种方式实现导航栏吸顶效果
场景描述 简单的说一下场景描述:这个页面有三个部分组成的. 顶部的头部信息--导航栏--内容 当页面滚动的时候.导航栏始终是固定在最顶部的. 我们使用的第一种方案就是使用css的粘性定位 positi ...
- js递归根据父级id获取所有的子节点
<!DOCTYPE html> <html lang="en"> <head> <meta charset="UTF-8&quo ...
- 玩一玩 golang 1.21 的 pgo 编译优化
作者:张富春(ahfuzhang),转载时请注明作者和引用链接,谢谢! cnblogs博客 zhihu Github 公众号:一本正经的瞎扯 1.下载镜像 暂时不想替换本机的 golang 版本,于是 ...
- 通过图片地址获取图片的base64,再通过base64获取二进制数据
class Program { static void Main(string[] args) { string base64 = getFileBase64("D:\\Users\\Vat ...
- Go语言的原子操作atomic
atomic 原子操作 Go中原子操作的支持 CompareAndSwap(CAS) Swap(交换) Add(增加或减少) Load(原子读取) Store(原子写入) 原子操作与互斥锁的区别 at ...
- 手把手教学小型金融知识图谱构建:量化分析、图数据库neo4j、图算法、关系预测、命名实体识别、Cypher Cheetsheet详细教学等
手把手教学小型金融知识图谱构建:量化分析.图数据库neo4j.图算法.关系预测.命名实体识别.Cypher Cheetsheet详细教学等 效果预览: 1. 知识图谱存储方式 知识图谱存储方式主要包含 ...
- 性能暴增70%!AMD线程撕裂者RPO 7000将于10月19日发布: 96核心Zen 4史无前例
据wccftech最新报道,AMD的下一代Ryzen Threadripper(线程撕裂者)PRO 7000"Storm Peak"CPU将于10月19日作为终极工作站解决方案亮相 ...
- Android 开机流程介绍
目录 一.目的 二.环境 三.相关概念 3.1 Android平台架构 3.2 Android启动架构 3.3 zImage 3.4 RAMDISK 3.5 RC文件 四.详细设计 4.1 Boot ...
- P9247 [集训队互测 2018] 完美的队列题解
题目链接:[集训队互测 2018] 完美的队列 神仙数据结构题,看了很多题解才搞懂.在做此题之前,最好对分块很熟悉,对各类标记非常熟练.考虑题意说的种类是相对于全局的.我们可以考虑局部影响对全局影响. ...