Quick Guide to Microservices with Spring Boot 2.0, Eureka and Spring Cloud
https://piotrminkowski.wordpress.com/2018/04/26/quick-guide-to-microservices-with-spring-boot-2-0-eureka-and-spring-cloud/
github源码:https://github.com/bigben0123/sample-spring-microservices-new
There are many articles on my blog about microservices with Spring Boot and Spring Cloud. The main purpose of this article is to provide a brief summary of the most important components provided by these frameworks that help you in creating microservices. The topics covered in this article are:
- Using Spring Boot 2.0 in cloud-native development
- Providing service discovery for all microservices with Spring Cloud Netflix Eureka
- Distributed configuration with Spring Cloud Config
- API Gateway pattern using a new project inside Spring Cloud:Spring Cloud Gateway
- Correlating logs with Spring Cloud Sleuth
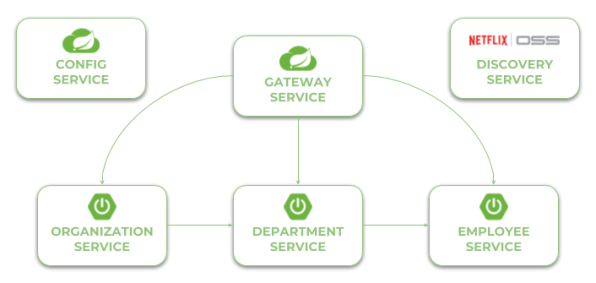
Before we proceed to the source code, let’s take a look on the following diagram. It illustrates the architecture of our sample system. We have three independent microservices, which register themself in service discovery, fetch properties from configuration service and communicate with each other. The whole system is hidden behind API gateway.
Currently, the newest version of Spring Cloud is Finchley.M9. This version of spring-cloud-dependencies should be declared as a BOM for dependency management.
|
1
2
3
4
5
6
7
8
9
10
11
|
<dependencyManagement> <dependencies> <dependency> <groupId>org.springframework.cloud</groupId> <artifactId>spring-cloud-dependencies</artifactId> <version>Finchley.M9</version> <type>pom</type> <scope>import</scope> </dependency> </dependencies></dependencyManagement> |
Now, let’s consider the further steps to be taken in order to create working microservices-based system using Spring Cloud. We will begin from Configuration Server.
The source code of sample applications presented in this article is available on GitHub in repositoryhttps://github.com/piomin/sample-spring-microservices-new.git.
Step 1. Building configuration server with Spring Cloud Config
To enable Spring Cloud Config feature for an application, first include spring-cloud-config-server to your project dependencies.
|
1
2
3
4
|
<dependency> <groupId>org.springframework.cloud</groupId> <artifactId>spring-cloud-config-server</artifactId></dependency> |
Then enable running embedded configuration server during application boot use @EnableConfigServer annotation.
|
1
2
3
4
5
6
7
8
9
|
@SpringBootApplication@EnableConfigServerpublic class ConfigApplication { public static void main(String[] args) { new SpringApplicationBuilder(ConfigApplication.class).run(args); }} |
By default Spring Cloud Config Server store the configuration data inside Git repository. This is very good choice in production mode, but for the sample purpose file system backend will be enough. It is really easy to start with config server, because we can place all the properties in the classpath. Spring Cloud Config by default search for property sources inside the following locations: classpath:/, classpath:/config, file:./, file:./config.
We place all the property sources insidesrc/main/resources/config. The YAML filename will be the same as the name of service. For example, YAML file for discovery-service will be located here: src/main/resources/config/discovery-service.yml.
And last two important things. If you would like to start config server with file system backend you have activate Spring Boot profile native. It may be achieved by setting parameter --spring.profiles.active=native during application boot. I have also changed the default config server port (8888) to 8061 by setting property server.port in bootstrap.yml file.
Step 2. Building service discovery with Spring Cloud Netflix Eureka
More to the point of configuration server. Now, all other applications, including discovery-service, need to add spring-cloud-starter-config dependency in order to enable config client. We also have to include dependency to spring-cloud-starter-netflix-eureka-server.
|
1
2
3
4
|
<dependency> <groupId>org.springframework.cloud</groupId> <artifactId>spring-cloud-starter-netflix-eureka-server</artifactId></dependency> |
Then you should enable running embedded discovery server during application boot by setting @EnableEurekaServer annotation on the main class.
|
1
2
3
4
5
6
7
8
9
|
@SpringBootApplication@EnableEurekaServerpublic class DiscoveryApplication { public static void main(String[] args) { new SpringApplicationBuilder(DiscoveryApplication.class).run(args); }} |
Application has to fetch property source from configuration server. The minimal configuration required on the client side is an application name and config server’s connection settings.
|
1
2
3
4
5
6
|
As I have already mentioned, the configuration file discovery-service.yml should be placed inside config-service module. However, it is required to say a few words about the configuration visible below. We have changed Eureka running port from default value (8761) to 8061. For standalone Eureka instance we have to disable registration and fetching registry.
|
1
2
3
4
5
6
7
8
9
10
11
|
server: port: 8061eureka: instance: hostname: localhost client: registerWithEureka: false fetchRegistry: false serviceUrl: defaultZone: http://${eureka.instance.hostname}:${server.port}/eureka/ |
Now, when you are starting your application with embedded Eureka server you should see the following logs.

Once you have succesfully started application you may visit Eureka Dashboard available under address http://localhost:8061/.
Step 3. Building microservice using Spring Boot and Spring Cloud
Our microservice has te perform some operations during boot. It needs to fetch configuration from config-service, register itself in discovery-service, expose HTTP API and automatically generate API documentation. To enable all these mechanisms we need to include some dependencies in pom.xml. To enable config client we should include starter spring-cloud-starter-config. Discovery client will be enabled for microservice after including spring-cloud-starter-netflix-eureka-client and annotating the main class with @EnableDiscoveryClient. To force Spring Boot application generating API documentation we should include springfox-swagger2 dependency and add annotation @EnableSwagger2.
Here is the full list of dependencies defined for my sample microservice.
|
1
2
3
4
5
6
7
8
9
10
11
12
13
14
15
16
17
|
<dependency> <groupId>org.springframework.cloud</groupId> <artifactId>spring-cloud-starter-netflix-eureka-client</artifactId></dependency><dependency> <groupId>org.springframework.cloud</groupId> <artifactId>spring-cloud-starter-config</artifactId></dependency><dependency> <groupId>org.springframework.boot</groupId> <artifactId>spring-boot-starter-web</artifactId></dependency><dependency> <groupId>io.springfox</groupId> <artifactId>springfox-swagger2</artifactId> <version>2.8.0</version></dependency> |
And here is the main class of application that enables Discovery Client and Swagger2 for the microservice.
|
1
2
3
4
5
6
7
8
9
10
11
12
13
14
15
16
17
18
19
20
21
22
|
@SpringBootApplication@EnableDiscoveryClient@EnableSwagger2public class EmployeeApplication { public static void main(String[] args) { SpringApplication.run(EmployeeApplication.class, args); } @Bean public Docket swaggerApi() { return new Docket(DocumentationType.SWAGGER_2) .select() .apis(RequestHandlerSelectors.basePackage("pl.piomin.services.employee.controller")) .paths(PathSelectors.any()) .build() .apiInfo(new ApiInfoBuilder().version("1.0").title("Employee API").description("Documentation Employee API v1.0").build()); } ...} |
Application has to fetch configuration from a remote server, so we should only provide bootstrap.yml file with service name and server URL. In fact, this is the example of Config First Bootstrapapproach, when an application first connects to a config server and takes a discovery server address from a remote property source. There is also Discovery First Bootstrap, where a config server address is fetched from a discovery server.
|
1
2
3
4
5
6
|
There is no much configuration settings. Here’s application’s configuration file stored on a remote server. It stores only HTTP running port and Eureka URL. However, I also placed file employee-service-instance2.yml on remote config server. It sets different HTTP port for application, so you can esily run two instances of the same service locally basing on remote properties. Now, you may run the second instance of employee-service on port 9090 after passing argument spring.profiles.active=instance2 during an application startup. With default settings you will start the microservice on port 8090.
|
1
2
3
4
5
6
7
|
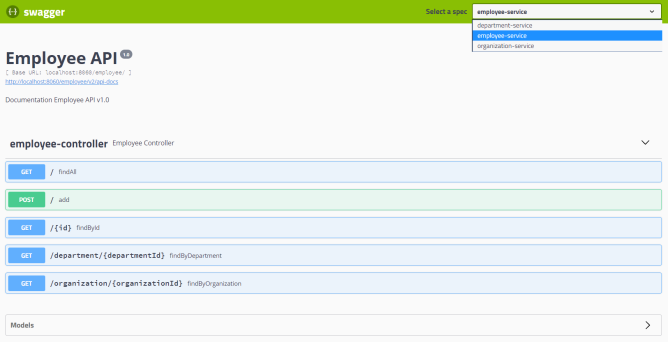
Here’s the code with implementation of REST controller class. It provides an implementation for adding new employee and searching for employee using different filters.
|
1
2
3
4
5
6
7
8
9
10
11
12
13
14
15
16
17
18
19
20
21
22
23
24
25
26
27
28
29
30
31
32
33
34
35
36
37
38
39
|
@RestControllerpublic class EmployeeController { private static final Logger LOGGER = LoggerFactory.getLogger(EmployeeController.class); @Autowired EmployeeRepository repository; @PostMapping public Employee add(@RequestBody Employee employee) { LOGGER.info("Employee add: {}", employee); return repository.add(employee); } @GetMapping("/{id}") public Employee findById(@PathVariable("id") Long id) { LOGGER.info("Employee find: id={}", id); return repository.findById(id); } @GetMapping public List findAll() { LOGGER.info("Employee find"); return repository.findAll(); } @GetMapping("/department/{departmentId}") public List findByDepartment(@PathVariable("departmentId") Long departmentId) { LOGGER.info("Employee find: departmentId={}", departmentId); return repository.findByDepartment(departmentId); } @GetMapping("/organization/{organizationId}") public List findByOrganization(@PathVariable("organizationId") Long organizationId) { LOGGER.info("Employee find: organizationId={}", organizationId); return repository.findByOrganization(organizationId); }} |
Step 4. Communication between microservice with Spring Cloud Open Feign
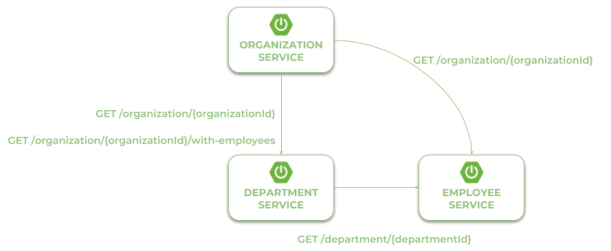
Our first microservice has been created and started. Now, we will add other microservices that communicate with each other. The following diagram illustrates the communication flow between three sample microservices: organization-service, department-service and employee-service. Microservice organization-service collect list of departments with (GET /organization/{organizationId}/with-employees) or without employees (GET /organization/{organizationId}) fromdepartment-service, and list of employees without dividing them into different departments directly from employee-service. Microservice department-service is able to collect list of employees assigned to the particular department.
In the scenario described above both organization-service anddepartment-service have to localize other microservices and communicate with them. That’s why we need to include additional dependency for those modules: spring-cloud-starter-openfeign. Spring Cloud Open Feign is a declarative REST client that used Ribbon client-side load balancer in order to communicate with other microservice.
|
1
2
3
4
|
<dependency> <groupId>org.springframework.cloud</groupId> <artifactId>spring-cloud-starter-openfeign</artifactId></dependency> |
The alternative solution to Open Feign is Spring RestTemplate with@LoadBalanced. However, Feign provides more ellegant way of defining client, so I prefer it instead of RestTemplate. After including the required dependency we should also enable Feign clients using @EnableFeignClients annotation.
|
1
2
3
4
5
6
7
8
9
10
11
12
13
|
@SpringBootApplication@EnableDiscoveryClient@EnableFeignClients@EnableSwagger2public class OrganizationApplication { public static void main(String[] args) { SpringApplication.run(OrganizationApplication.class, args); } ...} |
Now, we need to define client’s interfaces. Because organization-service communicates with two other microservices we should create two interfaces, one per single microservice. Every client’s interface should be annotated with @FeignClient. One field inside annotation is required – name. This name should be the same as the name of target service registered in service discovery. Here’s the interface of the client that calls endpoint GET /organization/{organizationId} exposed by employee-service.
|
1
2
3
4
5
6
7
|
@FeignClient(name = "employee-service")public interface EmployeeClient { @GetMapping("/organization/{organizationId}") List findByOrganization(@PathVariable("organizationId") Long organizationId);} |
The second client’s interface available inside organization-servicecalls two endpoints from department-service. First of them GET /organization/{organizationId} returns organization only with the list of available departments, while the second GET /organization/{organizationId}/with-employees return the same set of data including the list employees assigned to every department.
|
1
2
3
4
5
6
7
8
9
10
|
@FeignClient(name = "department-service")public interface DepartmentClient { @GetMapping("/organization/{organizationId}") public List findByOrganization(@PathVariable("organizationId") Long organizationId); @GetMapping("/organization/{organizationId}/with-employees") public List findByOrganizationWithEmployees(@PathVariable("organizationId") Long organizationId);} |
Finally, we have to inject Feign client’s beans to the REST controller. Now, we may call the methods defined inside DepartmentClientand EmployeeClient, which is equivalent to calling REST endpoints.
|
1
2
3
4
5
6
7
8
9
10
11
12
13
14
15
16
17
18
19
20
21
22
23
24
25
26
27
28
29
30
31
32
33
34
35
36
37
38
39
40
41
42
43
44
45
|
@RestControllerpublic class OrganizationController { private static final Logger LOGGER = LoggerFactory.getLogger(OrganizationController.class); @Autowired OrganizationRepository repository; @Autowired DepartmentClient departmentClient; @Autowired EmployeeClient employeeClient; ... @GetMapping("/{id}") public Organization findById(@PathVariable("id") Long id) { LOGGER.info("Organization find: id={}", id); return repository.findById(id); } @GetMapping("/{id}/with-departments") public Organization findByIdWithDepartments(@PathVariable("id") Long id) { LOGGER.info("Organization find: id={}", id); Organization organization = repository.findById(id); organization.setDepartments(departmentClient.findByOrganization(organization.getId())); return organization; } @GetMapping("/{id}/with-departments-and-employees") public Organization findByIdWithDepartmentsAndEmployees(@PathVariable("id") Long id) { LOGGER.info("Organization find: id={}", id); Organization organization = repository.findById(id); organization.setDepartments(departmentClient.findByOrganizationWithEmployees(organization.getId())); return organization; } @GetMapping("/{id}/with-employees") public Organization findByIdWithEmployees(@PathVariable("id") Long id) { LOGGER.info("Organization find: id={}", id); Organization organization = repository.findById(id); organization.setEmployees(employeeClient.findByOrganization(organization.getId())); return organization; }} |
Step 5. Building API gateway using Spring Cloud Gateway
Spring Cloud Gateway is relatively new Spring Cloud project. It is built on top of Spring Framework 5, Project Reactor and Spring Boot 2.0. It requires the Netty runtime provided by Spring Boot and Spring Webflux. This is really nice alternative to Spring Cloud Netflix Zuul, which has been the only one Spring Cloud project providing API gateway for microservices until now.
API gateway is implemented inside module gateway-service. First, we should include starter spring-cloud-starter-gateway to the project dependencies.
|
1
2
3
4
|
<dependency> <groupId>org.springframework.cloud</groupId> <artifactId>spring-cloud-starter-gateway</artifactId></dependency> |
We also need to have discovery client enabled, because gateway-service integrates with Eureka in order to be able to perform routing to the downstream services. Gateway will also expose API specification of all the endpoints exposed by our sample microservices. That’s why we enabled Swagger2 also on the gateway.
|
1
2
3
4
5
6
7
8
9
10
|
@SpringBootApplication@EnableDiscoveryClient@EnableSwagger2public class GatewayApplication { public static void main(String[] args) { SpringApplication.run(GatewayApplication.class, args); }} |
Spring Cloud Gateway provides three basic components used for configuration: routes, predicates and filters. Route is the basic building block of the gateway. It contains destination URI and list of defined predicates and filters. Predicate is responsible for matching on anything from the incoming HTTP request, such as headers or parameters. Filter may modify request and response before and after sending it to downstream services. All these components may be set using configuration properties. We will create and place on the confiration server file gateway-service.yml with the routes defined for our sample microservices.
But first, we should enable integration with discovery server for the routes by setting propertyspring.cloud.gateway.discovery.locator.enabled to true. Then we may proceed to defining the route rules. We use the Path Route Predicate Factory for matching the incoming requests, and the RewritePath GatewayFilter Factory for modifying the requested path to adapt it to the format exposed by downstream services. The uri parameter specifies the name of target service registered in discovery server. Let’s take a look on the following routes definition. For example, in order to make organization-service available on gateway under path /organization/**, we should define predicatePath=/organization/**, and then strip prefix /organization from the path, because the target service is exposed under path /**. The address of target service is fetched for Eureka basing uri valuelb://organization-service.
|
1
2
3
4
5
6
7
8
9
10
11
12
13
14
15
16
17
18
19
20
21
22
23
24
25
|
spring: cloud: gateway: discovery: locator: enabled: true routes: - id: employee-service predicates: - Path=/employee/** filters: - RewritePath=/employee/(?.*), /$\{path} - id: department-service predicates: - Path=/department/** filters: - RewritePath=/department/(?.*), /$\{path} - id: organization-service predicates: - Path=/organization/** filters: - RewritePath=/organization/(?.*), /$\{path} |
Step 6. Enabling API specification on gateway using Swagger2
Every Spring Boot microservice that is annotated with@EnableSwagger2 exposes Swagger API documentation under path/v2/api-docs. However, we would like to have that documentation located in the single place – on API gateway. To achieve it we need to provide bean implementing SwaggerResourcesProvider interface inside gateway-service module. That bean is responsible for defining list storing locations of Swagger resources, which should be displayed by the application. Here’s the implementation ofSwaggerResourcesProvider that takes the required locations from service discovery basing on the Spring Cloud Gateway configuration properties.
Unfortunately, SpringFox Swagger still does not provide support for Spring WebFlux. It means that if you include SpringFox Swagger dependencies to the project application will fail to start… I hope the support for WebFlux will be available soon, but now we have to use Spring Cloud Netflix Zuul as a gateway, if we would like to run embedded Swagger2 on it.
I created module proxy-service that is an alternative API gateway based on Netflix Zuul to gateway-service based on Spring Cloud Gateway. Here’s a bean with SwaggerResourcesProvider implementation available inside proxy-service. It usesZuulProperties bean to dynamically load routes definition into the bean.
|
1
2
3
4
5
6
7
8
9
10
11
12
13
14
15
16
17
18
19
20
21
22
23
24
25
26
|
@Configurationpublic class ProxyApi { @Autowired ZuulProperties properties; @Primary @Bean public SwaggerResourcesProvider swaggerResourcesProvider() { return () -> { List resources = new ArrayList(); properties.getRoutes().values().stream() .forEach(route -> resources.add(createResource(route.getServiceId(), route.getId(), "2.0"))); return resources; }; } private SwaggerResource createResource(String name, String location, String version) { SwaggerResource swaggerResource = new SwaggerResource(); swaggerResource.setName(name); swaggerResource.setLocation("/" + location + "/v2/api-docs"); swaggerResource.setSwaggerVersion(version); return swaggerResource; }} |
Here’s Swagger UI for our sample microservices system available under address http://localhost:8060/swagger-ui.html.
Step 7. Running applications
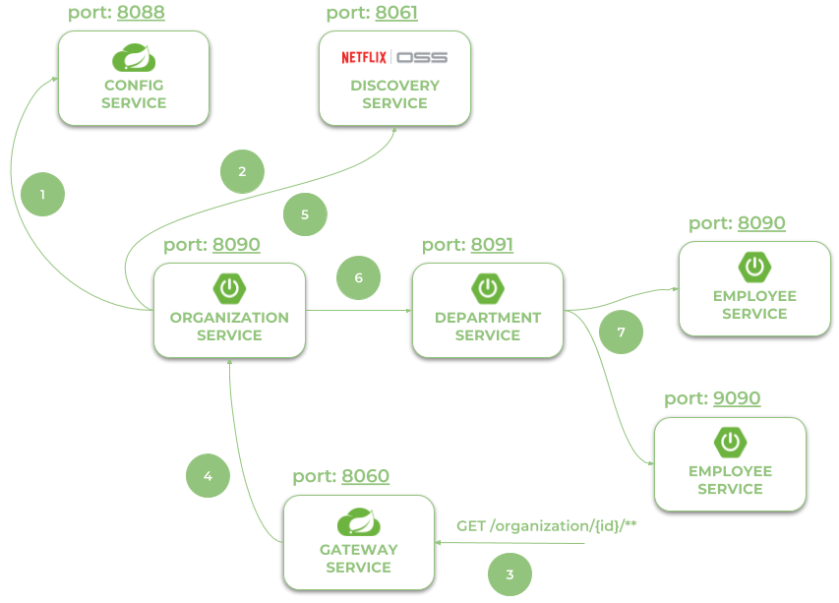
Let’s take a look on the architecture of our system visible on the following diagram. We will discuss it from the organization-service point of view. After starting organization-serviceconnects to config-service available under address localhost:8088(1). Basing on remote configuration settings it is able to register itself in Eureka (2). When the endpoint of organization-service is invoked by external client via gateway (3) available under addresslocalhost:8060, the request is forwarded to instance oforganization-service basing on entries from service discovery (4). Then organization-service lookup for address of department-service in Eureka (5), and call its endpoint (6). Finallydepartment-service calls endpont from employee-service. The request as load balanced between two available instance ofemployee-service by Ribbon (7).
Let’s take a look on the Eureka Dashboard available under addresshttp://localhost:8061. There are four instances of microservices registered there: a single instance of organization-service anddepartment-service, and two instances of employee-service.

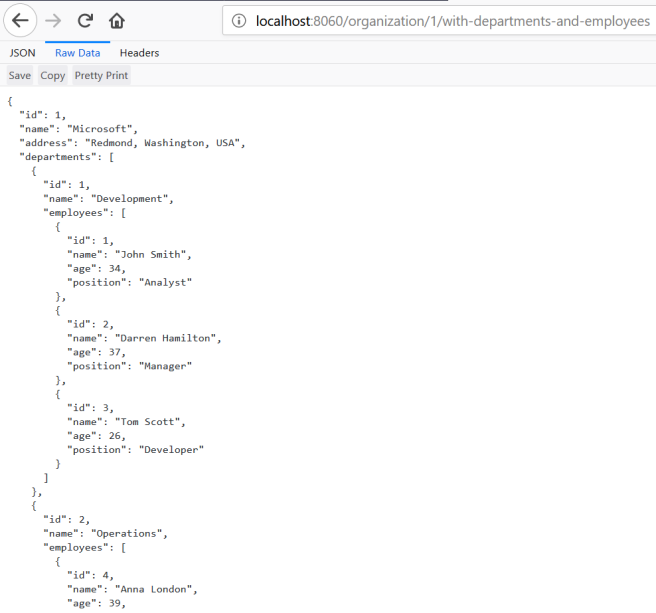
Now, let’s call endpointhttp://localhost:8060/organization/1/with-departments-and-employees.
Step 8. Correlating logs between independent microservices using Spring Cloud Sleuth
Correlating logs between different microservice using Spring Cloud Sleuth is very easy. In fact, the only thing you have to do is to add starter spring-cloud-starter-sleuth to the dependencies of every single microservice and gateway.
|
1
2
3
4
|
<dependency> <groupId>org.springframework.cloud</groupId> <artifactId>spring-cloud-starter-sleuth</artifactId></dependency> |
For clarification we will change default log format a little to: %d{yyyy-MM-dd HH:mm:ss} ${LOG_LEVEL_PATTERN:-%5p} %m%n. Here are the logs generated by our three sample miccroservices. There are four entries inside braces [] generated by Spring Cloud Stream. The most important for us is the second entry, which indicates on traceId, that is set once per incoming HTTP request on the edge of the system.


Quick Guide to Microservices with Spring Boot 2.0, Eureka and Spring Cloud的更多相关文章
- Spring Boot 2.0(八):Spring Boot 集成 Memcached
Memcached 介绍 Memcached 是一个高性能的分布式内存对象缓存系统,用于动态Web应用以减轻数据库负载.它通过在内存中缓存数据和对象来减少读取数据库的次数,从而提高动态.数据库驱动网站 ...
- Spring Boot 2.0(二):Spring Boot 2.0尝鲜-动态 Banner
Spring Boot 2.0 提供了很多新特性,其中就有一个小彩蛋:动态 Banner,今天我们就先拿这个来尝尝鲜. 配置依赖 使用 Spring Boot 2.0 首先需要将项目依赖包替换为刚刚发 ...
- Spring Boot 2.0(三):Spring Boot 开源软件都有哪些?
2016年 Spring Boot 还没有被广泛使用,在网上查找相关开源软件的时候没有发现几个,到了现在经过2年的发展,很多互联网公司已经将 Spring Boot 搬上了生产,而使用 Spring ...
- Spring Boot 2.0(七):Spring Boot 如何解决项目启动时初始化资源
在我们实际工作中,总会遇到这样需求,在项目启动的时候需要做一些初始化的操作,比如初始化线程池,提前加载好加密证书等.今天就给大家介绍一个 Spring Boot 神器,专门帮助大家解决项目启动初始化资 ...
- Spring Boot 2.0(二):Spring Boot 开源软件都有哪些?(转)
2016年 Spring Boot 还没有被广泛使用,在网上查找相关开源软件的时候没有发现几个,到了现在经过2年的发展,很多互联网公司已经将 Spring Boot 搬上了生产,而使用 Spring ...
- springboot2.0(一):【重磅】Spring Boot 2.0权威发布
就在昨天Spring Boot2.0.0.RELEASE正式发布,今天早上在发布Spring Boot2.0的时候还出现一个小插曲,将Spring Boot2.0同步到Maven仓库的时候出现了错误, ...
- 第64节:Java中的Spring Boot 2.0简介笔记
Java中的Spring Boot 2.0简介笔记 spring boot简介 依赖java8的运行环境 多模块项目 打包和运行 spring boot是由spring framework构建的,sp ...
- (转)Spring Boot 2(一):【重磅】Spring Boot 2.0权威发布
http://www.ityouknow.com/springboot/2018/03/01/spring-boot-2.0.html 就在今天Spring Boot2.0.0.RELEASE正式发布 ...
- Spring Boot 2.0 返回JSP页面实战
1. 模板引擎JSP的限制 在开始之前呢,我觉得我们有必要先去了解下 Spring Boot 2.0 官方文档中提到的如下内容: 模板引擎 除了REST Web服务之外,还可以使用Spring MVC ...
随机推荐
- 使用PSR-4配合composer autoload 自动加载文件夹
require 文件很麻烦,使用PSR-4搭配composer一次加载,终生受用. 感觉类似java中的import了,自己先记录一下最近理解的. 用composer管理自己的包吧 安装compose ...
- day 7-11 初识MySQL数据库及安装密码设置破解
一. 什么是数据库 之前所学,数据要永久保存,比如用户注册的用户信息,都是保存于文件中,而文件只能存在于某一台机器上. 如果我们不考虑从文件中读取数据的效率问题,并且假设我们的程序所有的组件都运行在一 ...
- unsupported time zone specified undefined
unsupported time zone specified undefined 出现了这个问题,莫名其妙的,上次被我下回去了,真的是下回去的,我一去查看,坐在电脑前面问题就不见了…… 具体出现 ...
- HTML实现包含公共部分:通过ECMA6的模块化,纯前端实现类似jsp:include的功能
以前一直是用 jsp:include 的方式来引入 html 头部的公共部分 php也有类似的方式 但以上两种,个人感觉都并不纯粹,本着折腾的精神,优化原有代码,解耦合 使用 ECMA6 的模块化方式 ...
- fiddler 学习笔记1-下载安装、开启、关闭抓包功能
1 下载安装(安装于C盘之外的空间中) https://www.telerik.com/fiddler 2 开启抓包功能:安装后默认为开启状态 点击 file-capture 或左下角capture ...
- CS新建排版
1.拉菜单栏barmanage,去掉不要的头部和尾部 ,选择控件bar属性optionsbar 全部为false,防止菜单拖动. 2.拉一个panelcontrol属性dock 设置顶部,在拉一个p ...
- ubuntu16.04下 搭建 lnmp 环境
apt-get install nginx apt-get php7.-mysql apt-get install mysql 编辑nginx配置文件 vim /etc/nginx/sites-ena ...
- js中对URL进行转码与解码
1. escape 和 unescape escape()不能直接用于URL编码,它的真正作用是返回一个字符的Unicode编码值. 采用unicode字符集对指定的字符串除0-255以外进行编码.所 ...
- WebAPI MVC Change Identity Default Table
看过之前的文章小伙伴们应该已经明白了,当我们新建一个带有身份验证的模板时,会自带Identity Server,并且它的表名和字段名也都是默认的. 那么该如何修改它,并让EF知道呢?不废话,直接上代码 ...
- [SimplePlayer] 实现一个简单的播放器
简单的播放器需要实现一个最基本的功能:播放视频文件. 实现这个功能需要包含以下几个步骤: 从视频文件中提取视频图像 在屏幕上显示视频图像 视频帧的同步,也就是保证视频图像在合适的时间在屏幕上显示 从视 ...