Unet 项目部分代码学习
github地址:https://github.com/orobix/retina-unet
主程序:
###################################################

#

#   Script to:

#   - Load the images and extract the patches

#   - Define the neural network

#   - define the training

#

##################################################

import numpy as np

import configparser as ConfigParser

from keras.models import Model

from keras.layers import Input, concatenate, Conv2D, MaxPooling2D, UpSampling2D, Reshape, core, Dropout

from keras.optimizers import Adam

from keras.callbacks import ModelCheckpoint, LearningRateScheduler

from keras import backend as K

from keras.utils.vis_utils import plot_model as plot

from keras.optimizers import SGD

import sys

sys.path.insert(0, './lib/')

from help_functions import *

#function to obtain data for training/testing (validation)

from extract_patches import get_data_training

#Define the neural network

def get_unet(n_ch,patch_height,patch_width):

    inputs = Input(shape=(n_ch,patch_height,patch_width))

    conv1 = Conv2D(32, (3, 3), activation='relu', padding='same',data_format='channels_first')(inputs)

    conv1 = Dropout(0.2)(conv1)

    conv1 = Conv2D(32, (3, 3), activation='relu', padding='same',data_format='channels_first')(conv1)

    pool1 = MaxPooling2D((2, 2))(conv1)

    #

    conv2 = Conv2D(64, (3, 3), activation='relu', padding='same',data_format='channels_first')(pool1)

    conv2 = Dropout(0.2)(conv2)

    conv2 = Conv2D(64, (3, 3), activation='relu', padding='same',data_format='channels_first')(conv2)

    pool2 = MaxPooling2D((2, 2))(conv2)

    #

    conv3 = Conv2D(128, (3, 3), activation='relu', padding='same',data_format='channels_first')(pool2)

    conv3 = Dropout(0.2)(conv3)

    conv3 = Conv2D(128, (3, 3), activation='relu', padding='same',data_format='channels_first')(conv3)

    up1 = UpSampling2D(size=(2, 2))(conv3)

    up1 = concatenate([conv2,up1],axis=1)

    conv4 = Conv2D(64, (3, 3), activation='relu', padding='same',data_format='channels_first')(up1)

    conv4 = Dropout(0.2)(conv4)

    conv4 = Conv2D(64, (3, 3), activation='relu', padding='same',data_format='channels_first')(conv4)

    #

    up2 = UpSampling2D(size=(2, 2))(conv4)

    up2 = concatenate([conv1,up2], axis=1)

    conv5 = Conv2D(32, (3, 3), activation='relu', padding='same',data_format='channels_first')(up2)

    conv5 = Dropout(0.2)(conv5)

    conv5 = Conv2D(32, (3, 3), activation='relu', padding='same',data_format='channels_first')(conv5)

    #

    conv6 = Conv2D(2, (1, 1), activation='relu',padding='same',data_format='channels_first')(conv5)

    conv6 = core.Reshape((2,patch_height*patch_width))(conv6)

    conv6 = core.Permute((2,1))(conv6)

    ############

    conv7 = core.Activation('softmax')(conv6)

    model = Model(inputs=inputs, outputs=conv7)

    # sgd = SGD(lr=0.01, decay=1e-6, momentum=0.3, nesterov=False)

    model.compile(optimizer='sgd', loss='categorical_crossentropy',metrics=['accuracy'])

    return model

#Define the neural network gnet

#you need change function call "get_unet" to "get_gnet" in line 166 before use this network

def get_gnet(n_ch,patch_height,patch_width):

    inputs = Input((n_ch, patch_height, patch_width))

    conv1 = Convolution2D(32, 3, 3, activation='relu', border_mode='same')(inputs)

    conv1 = Dropout(0.2)(conv1)

    conv1 = Convolution2D(32, 3, 3, activation='relu', border_mode='same')(conv1)

    up1 = UpSampling2D(size=(2, 2))(conv1)

    #

    conv2 = Convolution2D(16, 3, 3, activation='relu', border_mode='same')(up1)

    conv2 = Dropout(0.2)(conv2)

    conv2 = Convolution2D(16, 3, 3, activation='relu', border_mode='same')(conv2)

    pool1 = MaxPooling2D(pool_size=(2, 2))(conv2)

    #

    conv3 = Convolution2D(32, 3, 3, activation='relu', border_mode='same')(pool1)

    conv3 = Dropout(0.2)(conv3)

    conv3 = Convolution2D(32, 3, 3, activation='relu', border_mode='same')(conv3)

    pool2 = MaxPooling2D(pool_size=(2, 2))(conv3)

    #

    conv4 = Convolution2D(64, 3, 3, activation='relu', border_mode='same')(pool2)

    conv4 = Dropout(0.2)(conv4)

    conv4 = Convolution2D(64, 3, 3, activation='relu', border_mode='same')(conv4)

    pool3 = MaxPooling2D(pool_size=(2, 2))(conv4)

    #

    conv5 = Convolution2D(128, 3, 3, activation='relu', border_mode='same')(pool3)

    conv5 = Dropout(0.2)(conv5)

    conv5 = Convolution2D(128, 3, 3, activation='relu', border_mode='same')(conv5)

    #

    up2 = merge([UpSampling2D(size=(2, 2))(conv5), conv4], mode='concat', concat_axis=1)

    conv6 = Convolution2D(64, 3, 3, activation='relu', border_mode='same')(up2)

    conv6 = Dropout(0.2)(conv6)

    conv6 = Convolution2D(64, 3, 3, activation='relu', border_mode='same')(conv6)

    #

    up3 = merge([UpSampling2D(size=(2, 2))(conv6), conv3], mode='concat', concat_axis=1)

    conv7 = Convolution2D(32, 3, 3, activation='relu', border_mode='same')(up3)

    conv7 = Dropout(0.2)(conv7)

    conv7 = Convolution2D(32, 3, 3, activation='relu', border_mode='same')(conv7)

    #

    up4 = merge([UpSampling2D(size=(2, 2))(conv7), conv2], mode='concat', concat_axis=1)

    conv8 = Convolution2D(16, 3, 3, activation='relu', border_mode='same')(up4)

    conv8 = Dropout(0.2)(conv8)

    conv8 = Convolution2D(16, 3, 3, activation='relu', border_mode='same')(conv8)

    #

    pool4 = MaxPooling2D(pool_size=(2, 2))(conv8)

    conv9 = Convolution2D(32, 3, 3, activation='relu', border_mode='same')(pool4)

    conv9 = Dropout(0.2)(conv9)

    conv9 = Convolution2D(32, 3, 3, activation='relu', border_mode='same')(conv9)

    #

    conv10 = Convolution2D(2, 1, 1, activation='relu', border_mode='same')(conv9)

    conv10 = core.Reshape((2,patch_height*patch_width))(conv10)

    conv10 = core.Permute((2,1))(conv10)

    ############

    conv10 = core.Activation('softmax')(conv10)

    model = Model(input=inputs, output=conv10)

    # sgd = SGD(lr=0.01, decay=1e-6, momentum=0.3, nesterov=False)

    model.compile(optimizer='sgd', loss='categorical_crossentropy',metrics=['accuracy'])

    return model

#========= Load settings from Config file

config = ConfigParser.RawConfigParser()

config.read('configuration.txt')

#patch to the datasets

path_data = config.get('data paths', 'path_local')

#Experiment name

name_experiment = config.get('experiment name', 'name')

#training settings

N_epochs = int(config.get('training settings', 'N_epochs'))

batch_size = int(config.get('training settings', 'batch_size'))

#============ Load the data and divided in patches

patches_imgs_train, patches_masks_train = get_data_training(

    DRIVE_train_imgs_original = path_data + config.get('data paths', 'train_imgs_original'),

    DRIVE_train_groudTruth = path_data + config.get('data paths', 'train_groundTruth'),  #masks

    patch_height = int(config.get('data attributes', 'patch_height')),

    patch_width = int(config.get('data attributes', 'patch_width')),

    N_subimgs = int(config.get('training settings', 'N_subimgs')),

    inside_FOV = config.getboolean('training settings', 'inside_FOV') #select the patches only inside the FOV  (default == True)

)

#========= Save a sample of what you're feeding to the neural network ==========

N_sample = min(patches_imgs_train.shape[0],40)#这里规定,要显示的图片最多不超过40张

visualize(group_images(patches_imgs_train[0:N_sample,:,:,:],5),'./'+name_experiment+'/'+"sample_input_imgs")#.show()

visualize(group_images(patches_masks_train[0:N_sample,:,:,:],5),'./'+name_experiment+'/'+"sample_input_masks")#.show()

#显示的结果会在下面贴出来

#=========== Construct and save the model arcitecture =====

n_ch = patches_imgs_train.shape[1]#得到每个patch的通道数

patch_height = patches_imgs_train.shape[2]#得到每个patch的高

patch_width = patches_imgs_train.shape[3]#得到每个patch的宽

model = get_unet(n_ch, patch_height, patch_width)  #the U-net model

print ("Check: final output of the network:")

print (model.output_shape)

plot(model, to_file='./'+name_experiment+'/'+name_experiment + '_model.png')   #check how the model looks like

json_string = model.to_json()#model.to_json:返回代表模型的JSON字符串,仅包含网络结构,不包含权值。可以从JSON字符串中重构原模型:

open('./'+name_experiment+'/'+name_experiment +'_architecture.json', 'w').write(json_string)

#============  Training ==================================

checkpointer = ModelCheckpoint(filepath='./'+name_experiment+'/'+name_experiment +'_best_weights.h5', verbose=1, monitor='val_loss', mode='auto', save_best_only=True) #save at each epoch if the validation decreased

# def step_decay(epoch):

#     lrate = 0.01 #the initial learning rate (by default in keras)

#     if epoch==100:

#         return 0.005

#     else:

#         return lrate

#

# lrate_drop = LearningRateScheduler(step_decay)

patches_masks_train = masks_Unet(patches_masks_train)  #reduce memory consumption

model.fit(patches_imgs_train, patches_masks_train, nb_epoch=N_epochs, batch_size=batch_size, verbose=2, shuffle=True, validation_split=0.1, callbacks=[checkpointer])

#========== Save and test the last model ===================

model.save_weights('./'+name_experiment+'/'+name_experiment +'_last_weights.h5', overwrite=True)

#test the model

# score = model.evaluate(patches_imgs_test, masks_Unet(patches_masks_test), verbose=0)

# print('Test score:', score[0])

# print('Test accuracy:', score[1])
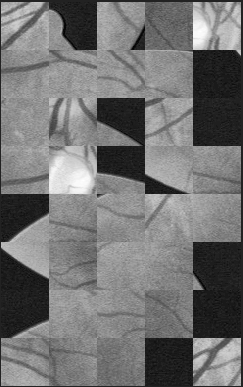
实验结果显示:上中下分别为原图-groundTruth-预测图

Unet 项目部分代码学习的更多相关文章
- R2CNN项目部分代码学习
首先放出大佬的项目地址:https://github.com/yangxue0827/R2CNN_FPN_Tensorflow 那么从输入的数据开始吧,输入的数据要求为tfrecord格式的数据集,好 ...
- FCN 项目部分代码学习
下面代码由搭档注释,保存下来用作参考. github项目地址:https://github.com/shekkizh/FCN.tensorflowfrom __future__ import prin ...
- CTPN项目部分代码学习
上次拜读了CTPN论文,趁热打铁,今天就从网上找到CTPN 的tensorflow代码实现一下,这里放出大佬的github项目地址:https://github.com/eragonruan/text ...
- JAVAEE——BOS物流项目02:学习计划、动态添加选项卡、ztree、项目底层代码构建
1 学习计划 1.jQuery easyUI中动态添加选项卡 2.jquery ztree插件使用 n 下载ztree n 基于标准json数据构造ztree n 基于简单json数据构造ztree( ...
- Android开源项目SlidingMenu本学习笔记(两)
我们已经出台SlidingMenu使用:Android开源项目SlidingMenu本学习笔记(一个),接下来再深入学习下.依据滑出项的Menu切换到相应的页面 文件夹结构: watermark/2/ ...
- IDEA 学习笔记之 Java项目开发深入学习(1)
Java项目开发深入学习(1): 定义编译输出路径: 继承以上工程配置 重新定义新的项目编译路径 添加source目录:点击添加,再点击移除: 编译项目: 常用快捷键总结: Ctrl+Space 代码 ...
- 201671010447 杨露露 实验十四 团队项目评审&课程学习总结
项目 内容 这个作业属于哪个课程 2016计算机科学与工程学院软件工程(西北师范大学) 这个作业的要求在哪里 实验十四 团队项目评审&课程学习总结 作业学习目标 总结这学期软件工程学习获得 一 ...
- 实验十四 团队项目评审&课程学习总结
项目 内容 这个作业属于哪个课程 2016计算机科学与工程学院软件工程(西北师范大学) 这个作业的要求在哪里 实验十四 团队项目评审&课程学习总结 团队名称 快活帮 作业学习目标 (1)掌握软 ...
- 201671010449 杨天超 实验十四 团队项目评审&课程学习总结
项目 内容 这个作业属于哪个课程 任课教师博客主页链接 这个作业的要求在哪里 作业链接地址 作业学习目标 1.掌握软件评审流程及内容 2.个人总结 实验一问题解答 实验一问题链接:https://ww ...
随机推荐
- oracle12.2.1 坑
1.ORA-28040: No matching authentication protocol 解决:在Oracle用户(不是grid用户)下,将$ORACLE_HOME/network/admin ...
- Android SpannableString实现TextView的点击事件
最近项目中遇到一个问题,就是一段文字中股票可点击并跳到股票详情,只记得SpannableString可以实现富文本功能,但并不知道可实现的富文本有点击功能,就开始借助万能搜索引擎,结果不出意料,的确有 ...
- Spring Boot默认Initializer(1)——ConfigurationWarningsApplicationContextInitializer
ConfigurationWarningsApplicationContextInitializer的作用是用来报告Spring容器的一些常见的错误配置的.这个类中定义了两个内部类: 1. 定义了一个 ...
- ansible 常见指令表
Play 指令 说明 accelerate 开启加速模式 accelerate_ipv6 是否开启ipv6 accelerate_port 加速模式的端口 always_run any_error ...
- Linux下设置时间
Linux下设置时间 提供两种最根本有效的方式,就是更改时区.这里以更改为国内上海时间例子,其他地方时区同理. 方法一 备份文件 mv /etc/localtime /etc/localtime.ba ...
- 线性回归,逻辑回归,神经网络,SVM的总结
目录 线性回归,逻辑回归,神经网络,SVM的总结 线性回归,逻辑回归,神经网络,SVM的总结 详细的学习笔记. markdown的公式编辑手册. 回归的含义: 回归就是指根据之前的数据预测一个准确的输 ...
- <TCP/IP>ICMP报文的分类
Internet控制报文协议,即为ICMP(Internet Control Message Protocal),用于主机,路由器之间传递信息,其目的是让我们能够检测网路的连线状况﹐也能确保连线的准确 ...
- c++ 值转换
1.double,float 四舍五入,保留小数位数. void MainWindow::on_pushButton_clicked() { double number=3.141592; ); qD ...
- java对图片进行透明化处理
package utils; import java.awt.Graphics2D; import java.awt.image.BufferedImage; import java.io.File; ...
- python 基础 three day
本节主要内容: 一. python基本数据类型有哪些? 1. int ==> 整数.主要用来进行数学计算. 2. str ==> 字符串,可以保存少量数据并进行相应的操作 3. boo ...