
Kong管理UI -kong-dashboard
本文仍然是在ubuntu18的环境下进行
https://github.com/PGBI/kong-dashboard
kong dashboart如果要正常使用管理UI,前提为kong已经正常run(可参考)起来,此UI可看作为一层薄薄的皮,包装好了我们需要的请求与返回的显示问题(懒人必备?).
在Kong的git上可以看到丰富的三方工具,本文选用的管理UI也是上面的一个admin ui 项目
Here is a list of third-party tools maintained by the community:
- Ansible role for Kong on Ubuntu
- Biplane: declarative configuration in Crystal
- Bonobo: key management (with Mashery migration scripts)
- Chef cookbook
- Django Kong Admin: Admin UI in Python
- Jungle: Admin UI in JavaScript
- Kong Dashboard: Admin UI in JavaScript
- Kong for CanopyCloud
- Kong image waiting for Cassandra
- Kong image for Tutum
- Kong-UI: Admin UI in JavaScript
- Konga: CLI Admin tool in JavaScript
- Kongfig: Declarative configuration in JavaScript
- Kongfig on Puppet Forge
- Puppet recipe
- Python-Kong: Admin client library for Python
- .NET-Kong: Admin client library for .NET
- 安装
准备工作(整个准备工作以用源码安装为例 form source):
1.使用的管理UI kong-dashboard 基于nodejs 所以需要安装nodejs(友情提示,使用node 5.11.1版本比较好,其他版本例如6.几没有跑起来,或者有朋友运行起来了可以告知一下)
2.由于会使用到github资源和可能偶尔在墙外的资源,所以建议使用淘宝npm;
3.同时会使用到bower;
4.npm install 过程需要c++ 11(由于小Eight用的环境gcc版本低于4.8无法支持c++11 需要升级gcc版本到4.8或4.8以上;关于如何升级的园子里面文章不少如果大家需要我后续可以poll一篇我的升级过程)
5.git clone下来的文件夹权限
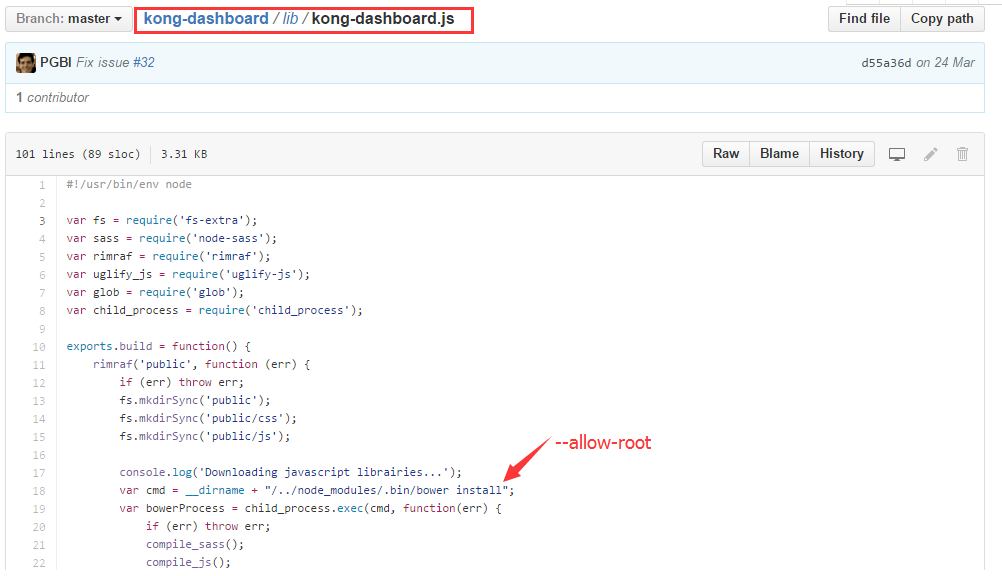
6.如果使用root用户进行install 需要修改(如下图)
搞定准备工作之后,就可以根据git步骤上进行安装了(以通过源码安装为例,具体命令有些许不同):
# Pull repository

git clone https://github.com/PGBI/kong-dashboard.git
sudo chmod -R 777 kong-dashboard   (!!!!该步非必须,根据实际使用进行文件夹读写权限调整)
cd kong-dashboard
#npm install
sudo apt install npm # Build Kong Dashboard
sudo npm install --unsafe-perm --registry=https://registry.npm.taobao.org
# Start Kong Dashboard

npm start

# To start Kong Dashboard on a custom port

npm start -- -p [port]

#或者使用下面的命令启动kong-dashboard
# Install Kong Dashboard
npm install -g kong-dashboard # Start Kong Dashboard
kong-dashboard start --kong-url http://kong:8001 # 使用自定义端口启动kong-dashboard
kong-dashboard start \
--kong-url http://localhost:8001 \
--port 8088
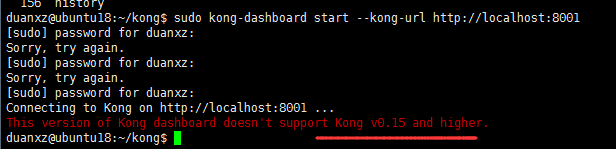
启动成功后访问:http://你的机器或绑定的域名:8080
重新安装kong-0.13.x
1、安装数据库postgresql9.6
安装环境:CentOS7.2,与此处环境相同
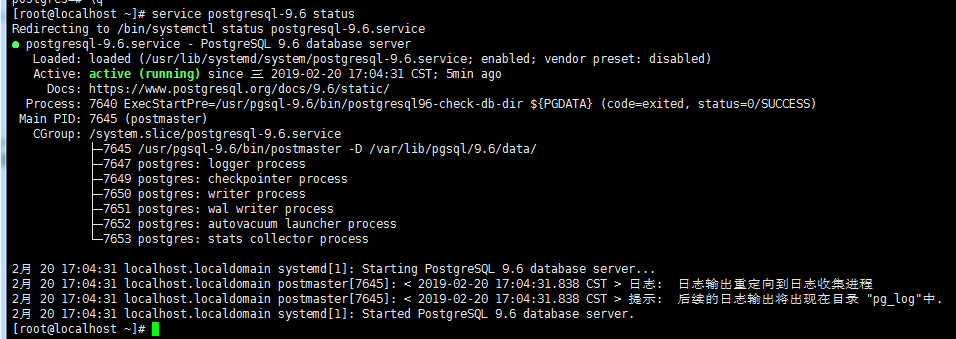
2. 检查数据库服务状态,有绿色,没红色说明启动OK了
service postgresql-9.5 status
2、安装kong
安装包下载:https://kong.bintray.com/kong-community-edition-rpm/centos/7/
目前最新版本kong-community-edition-0.14.0.el7.noarch.rpm
我们安装kong-community-edition-0.13.1.el7.noarch.rpm原因是Kong UI管理工具目前最高支持的版本就是13.1
1)、直接安装
# rpm -vih kong-community-edition-0.13.0.el7.noarch.rpm
2)、配置kong
# vi /etc/kong/kong.conf.default
以下为kong连接postgresql数据库的相关配置
database = postgres   # 指明用哪个数据库

pg_host = 127.0.0.1  #数据库所在主机ip地址

pg_port =                   # 端口号

pg_user = kong                  #  数据库用户

pg_password =kong                   # 数据库密码

pg_database = kong              # 数据库名
3)、启动kong
迁移数据库,将kong所需的表刷入数据库
# kong migrations up -c /etc/kong/kong.conf.default
启动kong
# kong start -c /etc/kong/kong.conf.default
测试kong是否启动成功
# curl -i http://localhost:8001/
3、安装Kong UI管理工具
Using npm (使用 npm)
1. 安装 nodejs:
curl -sL https://rpm.nodesource.com/setup_6.x | bash -
yum install -y nodejs
如果提示你需要安装构建工具 gcc gcc++ 什么的你就安装就行了,安装完了再重新安装 nodejs
命令:node -v 如果输出版本号就安装成功了。
2. 更新 npm (此时的 npm 命令已经随 nodejs 的安装过程给安装了,这里可能只是为了更新一下我也不太明白)
npm install npm@latest -g
命令:npm -v 输出版本号就成功安装了。
开始kong-dashboard安装了
    # Install Kong Dashboard

    npm install -g kong-dashboard

    # Start Kong Dashboard

    kong-dashboard start --kong-url http://kong:8001

    # Start Kong Dashboard on a custom port

    kong-dashboard start \

    --kong-url http://kong:8001 \

    --port [port]

    # Start Kong Dashboard with basic auth

    kong-dashboard start \

    --kong-url http://kong:8001 \

    --basic-auth user1=password1 user2=password2

    # See full list of start options

    kong-dashboard start --help

通过Docker方式安装 Using Docker (使用 Docker )
    # Start Kong Dashboard

    docker run --rm -p : pgbi/kong-dashboard start --kong-url http://kong:8001

    # Start Kong Dashboard on a custom port

    docker run --rm -p [port]: pgbi/kong-dashboard start --kong-url http://kong:8001

    # Start Kong Dashboard with basic auth

    docker run --rm -p : pgbi/kong-dashboard start \

    --kong-url http://kong:8001

    --basic-auth user1=password1 user2=password2

    # See full list of start options

    docker run --rm -p : pgbi/kong-dashboard start --help
使用Admin UI
具体使用和UI上显示内容的含义可参考kong的doc,下面只简单提及一些需要注意的地方,补赘述具体使用
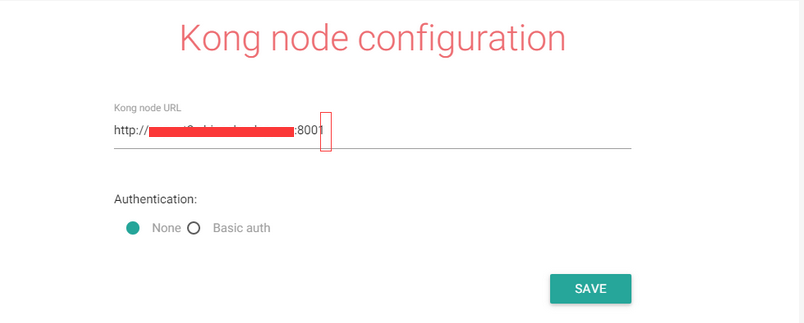
1.配置注意地址(kong的管理地址,默认为http://kong server机器或绑定的域名:8001)后面不要多加"/"如下图 否则点击API会出现not found api之类的提示,当然也要确保kong server正常运行中
2.新增API与使用新增的API时,需要注意如果需要使用地址方式指向api即 需要勾选strip-request path 如果使用head中带请求地址的方式,需要在head中带 X-Host-Override post.demo (即request host)
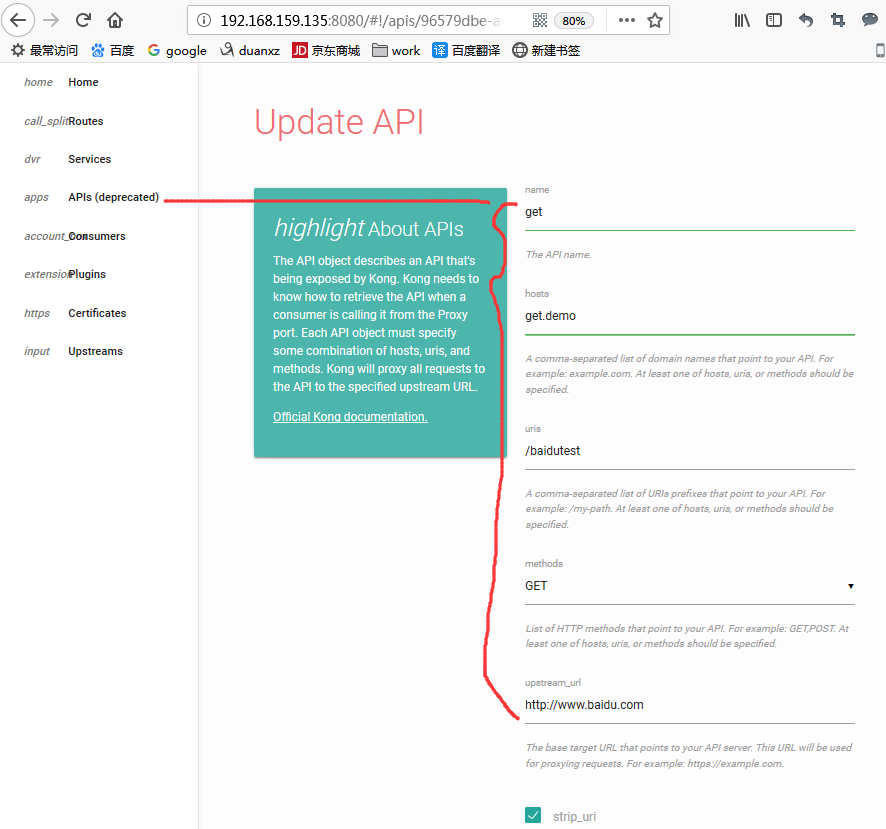
使用时需要注意,请求的地址为http://kong server机器或绑定的域名:8000 (下图为在url中带请求的api的方式)

3.插件使用实例,使用key-
i.需要在api基础上新建插件auth key
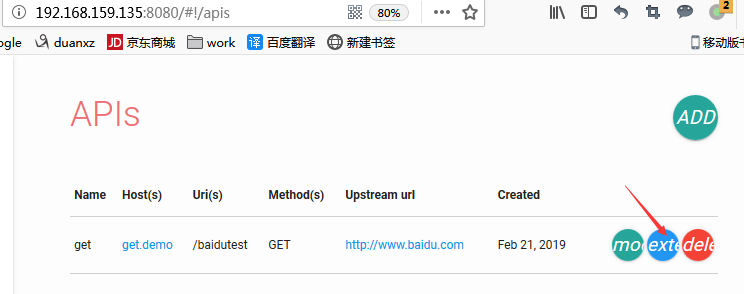

ii.设置插件 keyname(需要注意此keyname会在后面url中使用)

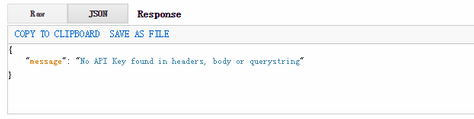
当启用插件后
如果后面keyname在地址栏或header中不正确会有如下提示
iii.新建customer并设置其key的内容也可以认为为keyname对应的值上面(该处暂时使用的对应上述auth key),用于实际访问使用
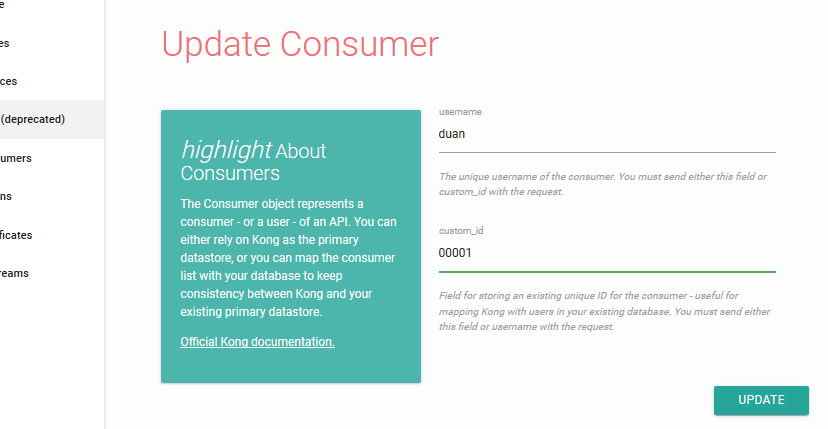

在consumers的列表中,点击Auth下的链接:

如下页面:
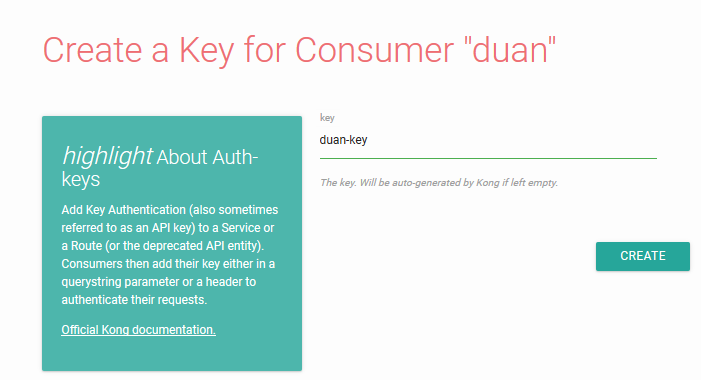
列表:

iiii.使用(请求的地址为http://kong server机器或绑定的域名:8000)
header方式如下图

后注:
1.其他插件的使用方式大同小异(例如日志等插件大家可以自行检查尝试)
2.对于使用kong来处理webservice的情况,由于我们想达到的效果是可以每次都管控到调用而非仅仅在引用的时候,所以需要对引用后自动生成的配置文件中的endpoint进行修改,实质为wdsl内容进行处理.将地址替换为kong包装过的地址即可.
以c#为例小Eight的处理方式,在引用端调用生成类使用时,只需要指明调用的是那个端口即使用多个endpoint对应的name
1.引入HttpsReflector

using System;

using System.Data;

using System.Configuration;

using System.Linq;

using System.Web;

using System.Web.Security;

using System.Web.UI;

using System.Web.UI.HtmlControls;

using System.Web.UI.WebControls;

using System.Web.UI.WebControls.WebParts;

using System.Xml.Linq;

using System.Web.Services.Description;

namespace WebService4Test

{

    public class HttpsReflector : SoapExtensionReflector

    {

        public override void ReflectMethod()

        {

            //no-op

        }

        public override void ReflectDescription()

        {

            ServiceDescription description = ReflectionContext.ServiceDescription;

            foreach (Service service in description.Services)

            {

                foreach (Port port in service.Ports)

                {

                    foreach (ServiceDescriptionFormatExtension extension in port.Extensions)

                    {

                        SoapAddressBinding binding = extension as SoapAddressBinding;

                        if (null != binding)

                        {

                            binding.Location = binding.Location.Replace("localhost:9933/Service1.asmx", "kong server机器或绑定的域名:8000/wbstest?apikey=testbaidukey"); ;//http://localhost:9933/Service1.asmx

                        }

                    }

                }

            }

        }

    }

}
2.修改Web.Config 新增HttpsReflector system.web中加入如下code
<webServices>

      <soapExtensionReflectorTypes>

        <add type="WebService4Test.HttpsReflector, WebService4Test"/>

      </soapExtensionReflectorTypes>

</webServices>
解决报错: Connecting to Kong on http ... Could not reach Kong on http://xxx.xxx.xxx.xxx:8001
1. Docker 中安装并启动好网关 kong 后,想要安装 kong 的图形化界面 kong-dashboard ,运行命令:
docker run --rm -p 8080:8080 --name kong-dashboard pgbi/kong-dashboard start --kong-url http://xxx.xxx.xxx.xxx:8001
报错如下:
Connecting to Kong on http://xxx.xxx.xxx.xxx:8001 ...
Could not reach Kong on http://xxx.xxx.xxx.xxx:8001
Error details:
{ Error: connect ETIMEDOUT xxx.xxx.xxx.xxx:8001
at Object._errnoException (util.js:1019:11)
at _exceptionWithHostPort (util.js:1041:20)
at TCPConnectWrap.afterConnect [as oncomplete] (net.js:1175:14)
code: 'ETIMEDOUT',
errno: 'ETIMEDOUT',
syscall: 'connect',
address: 'xxx.xxx.xxx.xxx',
port: 8001 }
2. 原因:连接拒绝错误的是因为2个容器(kong 和 kong-dashboard)在默认桥接网络上,这不会执行DNS解析。
需要创建一个用户定义的桥接网络并将这两个容器添加到该网络 。
3. 解决:
创建桥梁网络
docker network create my-net
将Kong容器添加到它
docker network connect my-net kong
运行kong-dashboard时提供网络信息
docker run --rm --network my-net -p 8080:8080 pgbi/kong-dashboard start --kong-url http://kong:8001
PS : 最后一行命令运行 kong-dashboard 时,最末我原本是写的是“http://xxx.xxx.xxx.xxx:8001”,这样报错依旧,直到改为如上写成:“http://kong:8001”才行。
Kong管理UI -kong-dashboard的更多相关文章
- Kong管理UI -kong-dashboard (附kong封装webservice方法)
本文仍然是在centos 6.7的环境下进行 本文转载请注明出处 —— xiaoEight btw如果要正常使用管理UI,前提为kong已经正常run(可参考)起来,此 ...
- KONG -- 图形化管理(Kong Dashboard)
前面安装的 KONG 的版本是社区版的 1.0.2,官方的 KONG Manager 好像只有企业版才提供.在 github 上找了一个开源的图形化管理应用 -- Kong Dashboard (ht ...
- 【k8s部署kong一】kong k8s 安装 以及可视化管理界面
官方安装:https://getkong.org/install/kubernetes/ 扩展讲解:https://blog.fleeto.us/post/intro-kong/ 提示:本文是在k8s ...
- Kubernetes 部署Web UI (Dashboard)
Kubernetes 部署Web UI (Dashboard) 项目下载地址:https://github.com/kubernetes/kubernetes/tree/master/cluster/ ...
- 后台管理UI皮肤的选择
后台管理UI的选择 目录 一.EasyUI 二.DWZ JUI 三.HUI 四.BUI 五.Ace Admin 六.Metronic 七.H+ UI 八.Admin LTE 九.INSPINIA 十. ...
- Kong for Enterprise | Kong - Open-Source API and Microservice Management Layer
Kong for Enterprise | Kong - Open-Source API and Microservice Management Layer undefined
- 后台管理UI
后台管理UI 目录 一.EasyUI 二.DWZ JUI 三.HUI 四.BUI 五.Ace Admin 六.Metronic 七.H+ UI 八.Admin LTE 九.INSPINIA 十.Lig ...
- Kerrigan:配置中心管理UI的实现思路和技术细节
去年写过一篇文章『中小团队落地配置中心详解』,介绍了我们借助etcd+confd实现的配置中心方案,这是一个对运维友好,与开发解耦的极佳方案,经过了一年多的实践也确实帮我们解决了配置文件无版本.难回滚 ...
- Docker部署Portainer搭建轻量级可视化管理UI
1. 简介 Portainer是一个轻量级的可视化的管理UI,其本身也是运行在Docker上的单个容器,提供用户更加简单的管理和监控宿主机上的Docker资源. 2. 安装Docker Doc ...
随机推荐
- 『TensorFlow』读书笔记_Inception_V3_下
极为庞大的网络结构,不过下一节的ResNet也不小 线性的组成,结构大体如下: 常规卷积部分->Inception模块组1->Inception模块组2->Inception模块组3 ...
- HTML中引用外部JS文件失效原因
今天在练习中碰到“引用外部的一个js文件但是却失效”的情况,实在不懂,百度后才知是引用的位置不对,错误的代码如下: <head> <meta charset="UTF-8& ...
- mst总结
1.jsonp跨域 Jsop的原理:利用script不存在跨域的问题,动态创建script标签,把需要请求的数据源地址赋值给其src属性,并且指定一个回调函数,从而接受到我们想要的数据 后台设置下 ...
- 八大排序算法——插入排序(动图演示 思路分析 实例代码java 复杂度分析)
一.动图演示 二.思路分析 例如从小到大排序: 1. 从第二位开始遍历, 2. 当前数(第一趟是第二位数)与前面的数依次比较,如果前面的数大于当前数,则将这个数放在当前数的位置上,当前数的下标-1 ...
- Python之时间(time)模块
在Python中,通常有这几种方式来表示时间: 时间戳(timestamp):通常来说,时间戳表示的是从1970年1月1日00:00:00开始按秒计算的偏移量.我们运行“type(time.time( ...
- Win10系列:C#应用控件基础23
Telerik UI Controls for Windows 8 Telerik UI Controls for Windows 8是一套为创建Windows UWP应用而设计的工具集,开发人员可以 ...
- 201621123075 week8-集合
1. 本周学习总结 以你喜欢的方式(思维导图或其他)归纳总结集合相关内容. 2. 书面作业 1. ArrayList代码分析 1.1 解释ArrayList的contains源代码 indexOf中对 ...
- jq demo 轮播图,图片可调用,向上,自动+鼠标点击切换
1 <!doctype html> <html> <head> <meta http-equiv="Content-Type" conte ...
- 剑指offer题库
1.题目描述 在一个二维数组中,每一行都按照从左到右递增的顺序排序,每一列都按照从上到下递增的顺序排序.请完成一个函数,输入这样的一个二维数组和一个整数,判断数组中是否含有该整数. 思路: 因为矩阵的 ...
- 1.配置OpenCV开发环境VS2010