
k8s服务网关ambassador部署
1、ambassador是datawire开源的服务网关,很好的支持kubernetes。具体详细介绍参考官网:https://www.getambassador.io/about/why-ambassador
本节主要讲述整个部署过程和简单实用,具体详细的资料抢参考官网。
2、部署
本次主要介绍将ambassador部署到自己的kubernetes集群里面,根据官网介绍部署方式有几种:
1)yaml部署,即定义yaml文件,使用kubectl 直接部署
2) helm部署,如果用helm部署则需要在kubernetes中现安装tiller(helm的server端)
yaml部署:
新版本的k8s集群都开启了rbac认证,所以需要提前创建rbac文件,进行授权:
wget https://getambassador.io/yaml/ambassador/ambassador-rbac.yaml
---

apiVersion: v1

kind: Service

metadata:

  labels:

    service: ambassador-admin

  name: ambassador-admin

  namespace: tiller-world

spec:

  type: NodePort

  ports:

  - name: ambassador-admin

    port:

    targetPort:

  selector:

    service: ambassador---

apiVersion: rbac.authorization.k8s.io/v1beta1

kind: ClusterRole

metadata:

  name: ambassador

rules:

- apiGroups: [""]

  resources:

  - services

  verbs: ["get", "list", "watch"]

- apiGroups: [""]

  resources:

  - configmaps

  verbs: ["create", "update", "patch", "get", "list", "watch"]

- apiGroups: [""]

  resources:

  - secrets

  verbs: ["get", "list", "watch"]

- apiGroups: [""]

  resources:

  - namespaces

  verbs: ["get", "list", "watch"]

---

apiVersion: v1

kind: ServiceAccount

metadata:

  name: ambassador

  namespace: tiller-world

---

apiVersion: rbac.authorization.k8s.io/v1beta1

kind: ClusterRoleBinding

metadata:

  name: ambassador

roleRef:

  apiGroup: rbac.authorization.k8s.io

  kind: ClusterRole

  name: ambassador

subjects:

- kind: ServiceAccount

  name: ambassador

  namespace: tiller-world

---

apiVersion: extensions/v1beta1

kind: Deployment

metadata:

  name: ambassador

  namespace: tiller-world

spec:

  replicas:

  template:

    metadata:

      annotations:

        sidecar.istio.io/inject: "false"

        "consul.hashicorp.com/connect-inject": "false"

      labels:

        service: ambassador

    spec:

      serviceAccountName: ambassador

      containers:

      - name: ambassador

        image: quay.io/datawire/ambassador:0.50.-rc5

        resources:

          limits:

            cpu: 200m

            memory: 200Mi

          requests:

            cpu: 100m

            memory: 100Mi

        env:

        - name: AMBASSADOR_NAMESPACE

          valueFrom:

            fieldRef:

              fieldPath: metadata.namespace

        ports:

        - name: http

          containerPort:

        - name: https

          containerPort:

        - name: admin

          containerPort:

        livenessProbe:

          httpGet:

            path: /ambassador/v0/check_alive

            port:

          initialDelaySeconds:

          periodSeconds:

        readinessProbe:

          httpGet:

            path: /ambassador/v0/check_ready

            port:

          initialDelaySeconds:

          periodSeconds:

      restartPolicy: Always
我只修改了部署的namespace,tiller-world这个namespace是创建用helm部署程序用的。
创建角色及权限

kubectl  apply -f  ambassador-rbac.yaml
接下来创建ambassador的service:
暴漏服务有多种方式:LoadBalancer、NodePort、Ingress
这里我们使用NodePort暴漏服务,k8s默认的服务暴漏端口范围是30000~32767,当然这个端口的范围可以在启动apiserver的时候进行修改,指定--service-node-port-range=1-65535,修改为需要的端口范围,最好是不要将常见服务的端口包含在内,否则容易冲突。
# cat ambassador-svc.yaml

---

apiVersion: v1

kind: Service

metadata:

  labels:

    service: ambassador

  name: ambssador
  namespace: tiller-world

spec:

  type: NodePort

  ports:

  - port:

    targetPort:

    nodePort:

  selector:

    service: ambassador
这里采用NodePort方式暴漏到服务器的30009端口。可以根据需要自己制定。
创建一个测试route:
# cat httpbin.yaml

---

apiVersion: v1

kind: Service

metadata:

  name: httpbin

  annotations:

    getambassador.io/config: |

       ---

       apiVersion: ambassador/v0

       kind: Mapping

       name: httpbin_mapping

       prefix: /httpbin/

       service: httpbin.org:

       host_rewrite: httpbin.org

spec:

  ports:

  - name: httpbin

    port:
# kubectl apply -f httpbin.yaml
查看部署:
# kubectl get pods -n tiller-world

NAME                             READY   STATUS    RESTARTS   AGE

ambassador-5f66f5fd89-b2tqh      /     Running             138m

ambassador-5f66f5fd89-nbrgj      /     Running             138m

ambassador-5f66f5fd89-qxz55      /     Running             138m
# kubectl get  svc -n tiller-world

NAME               TYPE        CLUSTER-IP       EXTERNAL-IP   PORT(S)          AGE

ambassador-admin   NodePort    10.108.245.217   <none>        :/TCP   138m

ambssador          NodePort    10.105.112.156   <none>        :/TCP     104m

httpbin            ClusterIP   10.103.94.31     <none>        /TCP           104m
测试访问:
访问的url:http://ip:30009/httpbin/,ip为kubernetes服务器的ip

部署一个service测试,部署qotm服务:
# cat qotm.yaml

---

apiVersion: v1

kind: Service

metadata:

  name: qotm

  annotations:

    getambassador.io/config: |

      ---

      apiVersion: ambassador/v0

      kind: Mapping

      name: qot_mapping

      prefix: /qotm/

      service: qotm

spec:

  selector:

    app: qotm

  ports:

  - port:

    name: http-qotm

    targetPort: http-api

---

apiVersion: extensions/v1beta1

kind: Deployment

metadata:

  name: qotm

spec:

  replicas:

  strategy:

    type: RollingUpdate

  template:

    metadata:

      labels:

        app: qotm

    spec:

      containers:

      - name: qotm

        image: datawire/qotm:1.1

        ports:

        - name: http-api

          containerPort:

        resources:

          limits:

            cpu: "0.1"

            memory: 100Mi
kubectl apply -f qotm.yaml
service使用ambassador,只需要在service的定义里面添加注解就可以自动识别:
 annotations:

    getambassador.io/config: |

      ---

      apiVersion: ambassador/v0

      kind: Mapping

      name: qot_mapping

      prefix: /qotm/

      service: qotm
这里使用的是Mapping,uri前缀是/qotm/。详细的配置参考官网:https://www.getambassador.io/reference/mappings
先查看一下部署的服务:
# kubectl get svc  -n tiller-world

NAME               TYPE        CLUSTER-IP       EXTERNAL-IP   PORT(S)          AGE

ambassador-admin   NodePort    10.108.245.217   <none>        :/TCP   147m

ambssador          NodePort    10.105.112.156   <none>        :/TCP     113m

httpbin            ClusterIP   10.103.94.31     <none>        /TCP           113m

qotm               ClusterIP   10.108.253.202   <none>        /TCP           72m

tiller-deploy      ClusterIP   10.102.176.214   <none>        /TCP        4h47m

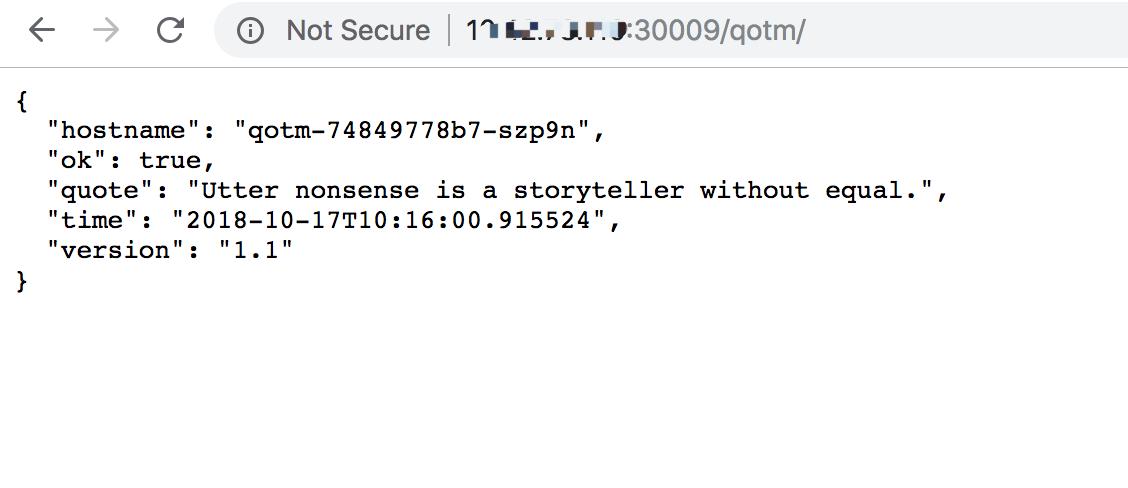
访问地址:http://ip:30009/qotm/
helm部署:
helm repo add datawire https://www.getambassador.io

helm upgrade --install --wait ambassador datawire/ambassador
当然也可以直接将chart fetch到本地,自己根据需求进行定制:
helm fetch --name ambassador datawire/ambassador
k8s服务网关ambassador部署的更多相关文章
- Bumblebee微服务网关的部署和扩展
Bumblebee是.netcore下开源基于BeetleX.FastHttpApi扩展的HTTP微服务网关组件,它的主要作用是针对WebAPI集群服务作一个集中的转发和管理:作为应用网关它提供了应用 ...
- Blazor+Dapr+K8s微服务之基于WSL安装K8s集群并部署微服务
前面文章已经演示过,将我们的示例微服务程序DaprTest1部署到k8s上并运行.当时用的k8s是Docker for desktop 自带的k8s,只要在Docker for deskto ...
- 微服务架构学习与思考(10):微服务网关和开源 API 网关01-以 Nginx 为基础的 API 网关详细介绍
微服务架构学习与思考(10):微服务网关和开源 API 网关01-以 Nginx 为基础的 API 网关详细介绍 一.为什么会有 API Gateway 网关 随着微服务架构的流行,很多公司把原有的单 ...
- api-gateway实践(02)新服务网关 - 运行环境
一.服务网关的运行环境 1.服务配置中心 1.1.服务配置中心前台 前台 http://10.110.17.20/#/login:无源码,德奎部署在10.110.17.20的DockerStatck环 ...
- .net core Ocelot实现API网关并部署在docker中
基于Ocelot(http://ocelot.readthedocs.io)搭建的API网关demo 软件以及系统版本: Asp.Net Core 2.2 Ocelot 13.5.0 CentOS ...
- 微服务-网关-node.js by 大雄daysn
目录 序言 一.node.js入门1.1 下载并安装1.2 从helloworld到一个web应用1.3 Express框架二.node.js搭建网关 三.node.js集群搭建 序言 首先一个问 ...
- 使用 Node.js 搭建微服务网关
目录 Node.js 是什么 安装 node.js Node.js 入门 Node.js 应用场景 npm 镜像 使用 Node.js 搭建微服务网关 什么是微服务架构 使用 Node.js 实现反向 ...
- .NET Core 微服务架构-Docker部署
本文主要介绍通过Docker来部署通过.NET Core开发的微服务架构,部署的微服务主要包括统一网关(使用Ocelot开发).统一认证(IdentityServer4).应用服务(ASP.NET C ...
- ambassador 学习九 多ambassador部署说明
目前官方稳文档没有写,但是demo 里面有,所以就整理出来,其实目前demo里面的 多实例部署用了多个服务的service(使用nodeport 暴露地址,具体使用就是制定ambassador 实例的 ...
随机推荐
- POJ3111 K Best 2017-05-11 18:12 31人阅读 评论(0) 收藏
K Best Time Limit: 8000MS Memory Limit: 65536K Total Submissions: 10261 Accepted: 2644 Case Time ...
- csdn上讲一个实时计算架构比较清晰的一篇文章
https://blog.csdn.net/ymh198816/article/details/51998085
- hdu 3030
这道题主要就是问你,长度为n的序列,有多少种上升的子序列 当前点的情况种数等于前面所有小于它的点的种数相加 + 1 1就是只有这一个点的时候的序列 那就是要多次查询前面比它小的点的种数的和 那么就是区 ...
- codeforces 891 b
B. Gluttony time limit per test 2 seconds memory limit per test 256 megabytes input standard input o ...
- CI、CD和dev-ops概念
传统的开发方式是:需求方提供文档,实现方按照文档一步步开发,中间很少变动和修改. 但是随着市场的变化,产品更新迭代的加快,也要求开放方更快的响应变化,用最短的时间开发,部署上线. 这样,持续集成(CI ...
- [mysql]当mysql查询语句查询的结果为空时,返回query结果是什么类型的呢?
php > $con = mysql_connect('localhost' , 'hnb' , 'alyHnb2015'); php > print_r($con);Resource i ...
- NHibernate问题求大神解决!!!
这是我定义的实体类 对应的数据库表 映射文件 数据访问层写的是插入语句 错误: 捕捉到 NHibernate.Exceptions.GenericADOException HResult=-21462 ...
- 配置kali linux
在7月底的时候,安全加介绍Fireeye出品的 免费恶意软件分析工具FlareVM,还可进行逆向工程和渗透测试 .今天是看到绿盟科技的一篇介绍Kali Linux配置的文章,这个工具也进入了 渗透测试 ...
- [宁波集训]0827Day1
1.\(CF771D\ Bear\ and\ Company\)(原题,比赛时改为多组数据) 一道毒瘤\(dp\)题,\(dp[i][j][k][0/1]\)表示有\(i\)个\(V\),有\(j\) ...
- GoLang学习控制语句之switch
基本结构 相比较 C 和 Java 等其它语言而言,Go 语言中的 switch 结构使用上更加灵活.它接受任意形式的表达式,例如: switch var1 { case val1: ... case ...