
CCNA 之 八 交换基础 VLAN TRUNK VTP
交换基础
主要知识点:
- 二层交换基础
- Vlan的概念
- Trunk的概念
- VTP
- 二层交换基本配置
首先来看下园区网分层结构
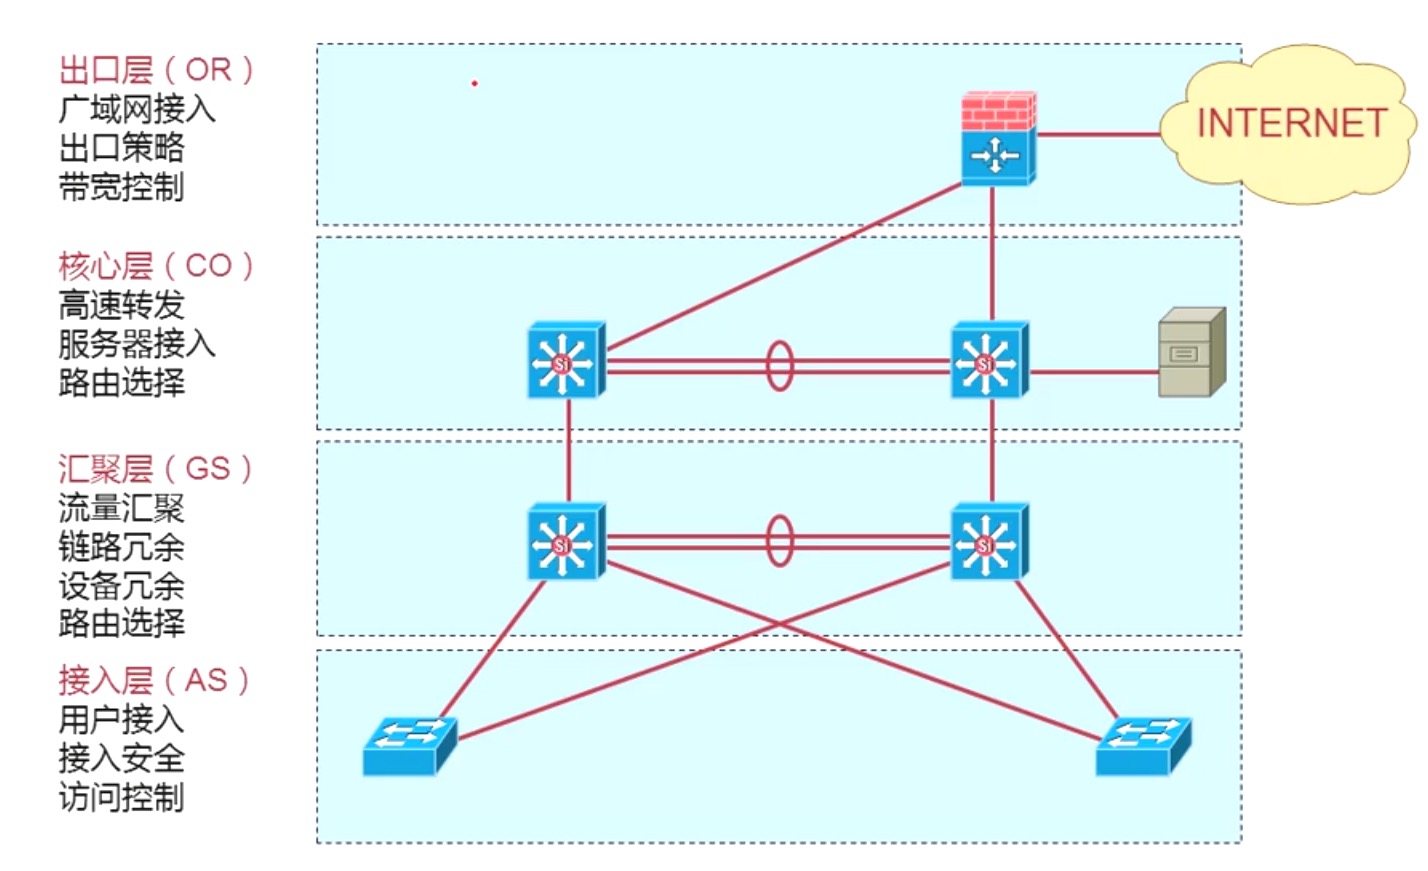
交换机的主要功能:
- Address learning 学习MAC地址
会维护一张MAC地址表,数据会根据此张表进行数据转发
- Forward/filter decision
转发和过滤的决策,主要是二层的转发(帧)
- Loop avoidance
环路的避免
MAC地址
硬件地址,一般像网卡,路由器的接口,交换机的端口,会在出厂的时候烧录一个地址。全球唯一;在一个LAN中,是绝对不允许MAC重复;
Vlan的概念
- 分段性
- 灵活性
- 安全性
默认一个没有配置的交换机,所有的接口在一个vlan中;
一个Vlan就是一个独立的广播域,一个单独的逻辑子网。
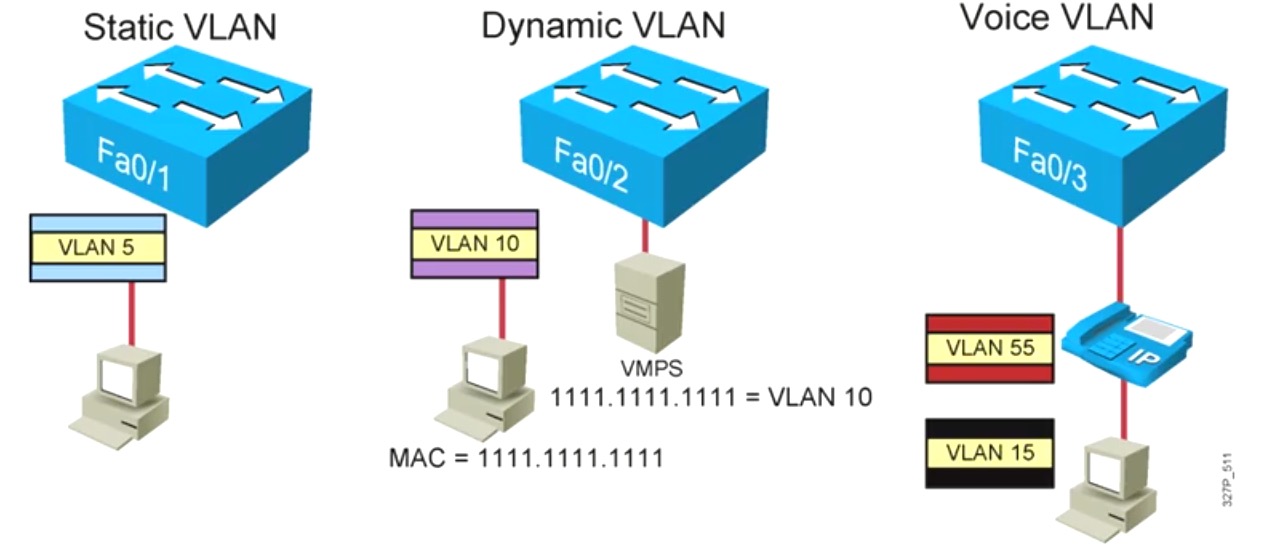
VLAN的成员模式
- 静态VLAN - 交换机上的端口以手动方式分配给VLAN;
- 动态VLAN - 使用VMPS可以根据链接到交换机端口的设备的源MAC地址,动态的将端口分配给VLAN;
- 语音VLAN - 将端口配置到语音模式可以使端口支持连接到改端口的IP电话;
Trunk的概念
ISL协议(思科私有协议)
- 通过硬件(ASIC)实现
- ISL表示不会出现在工作站,客户端并不知道ISL的封装信息
- 在交换机或路由器与交换机之间,在交换机与具有ISL网卡的服务器之间可以实现;
802.1Q共有协议
802.1Q 帧标记:
- 默认情况,在802.1Q Trunk上对所有的VLAN打Tag,除了Native VLAN;
- 交换机根据以太网帧头信息来转发数据包;
Tag标记字段详细信息:
Tag 标记字段包含一个2 bytes EtherType(以太类型)字段、一个3bits的PRI字段、1bit的CFI字段、12bits的VLAN ID字段;
VLAN的特点
- 一个
VLan钟的所有设备都是在同一个广播域内;广播域不能跨越VLAN传播 - 一个
VLAN为一个逻辑子网;由被配置为此VLAN成员的设备组成,不同的VLAN间需要通过路由器实现相互通信 VLAN中成员多基于Switch端口号码,划分VLAN就是对Switch接口划分VLAN工作于OSI参考模型的第二层
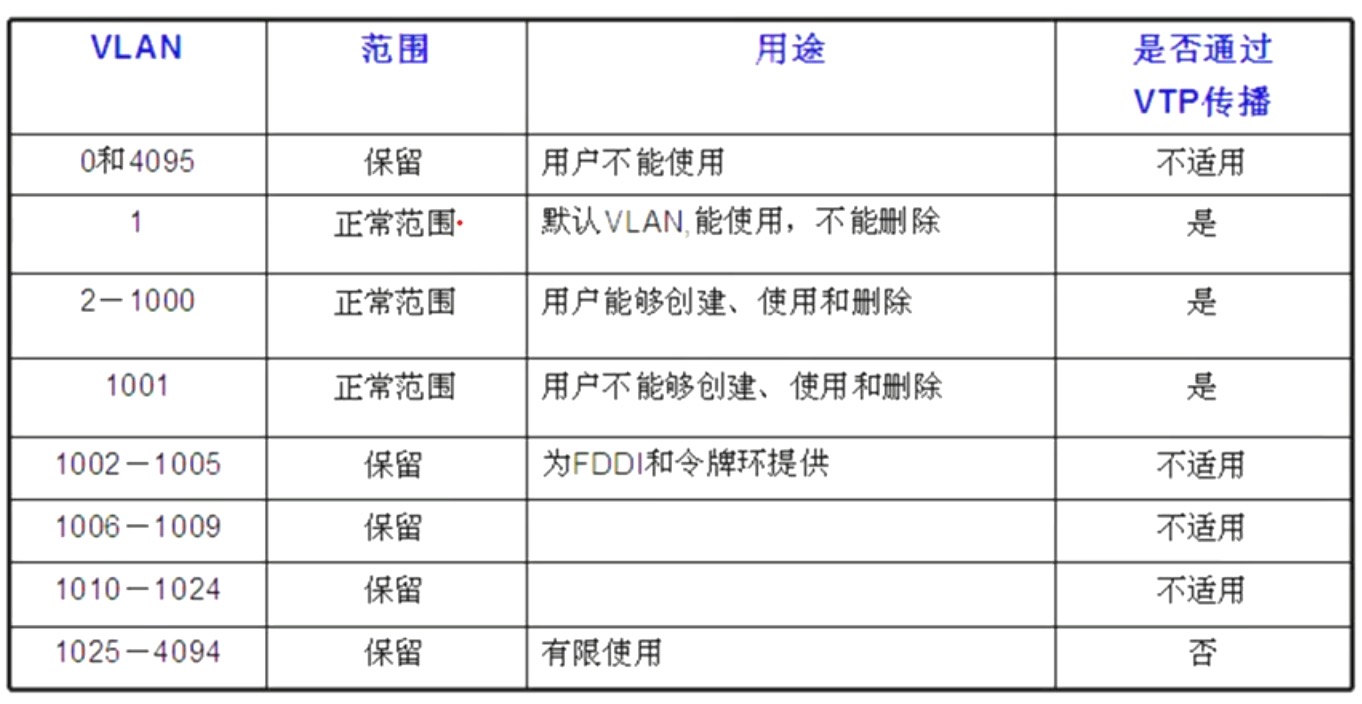
VLAN的范围
如下图:
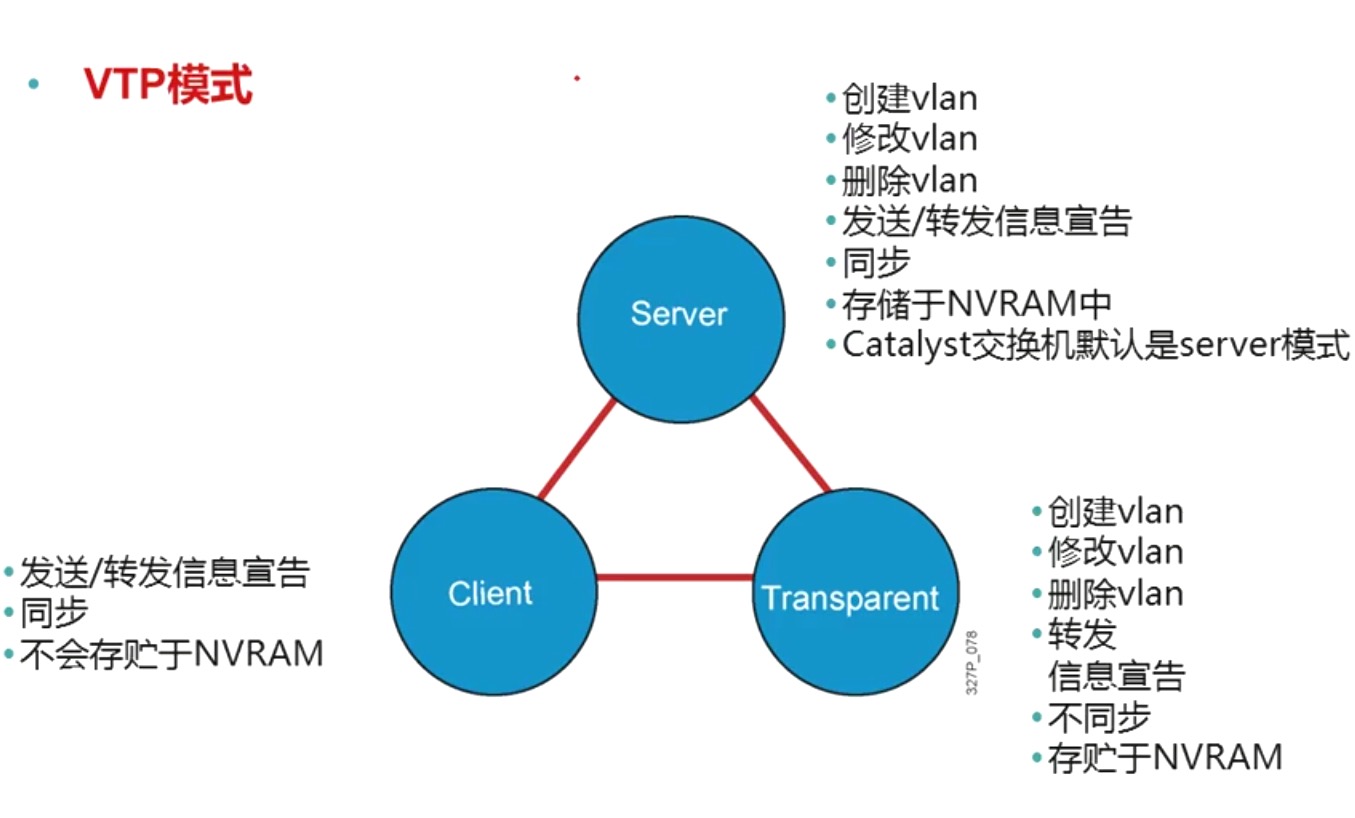
VTP
VTP是思科的私有协议;使用性质不广泛;
- 一个能够宣告
VLAN配置信息的信息系统; - 通过一个工友的管理俞,维持
VLAN配置信息的一致性; VTP只能在主干端口发送和宣告的信息;- 支持混合的截止主干链接(快速以太网,FDDI,ATM);
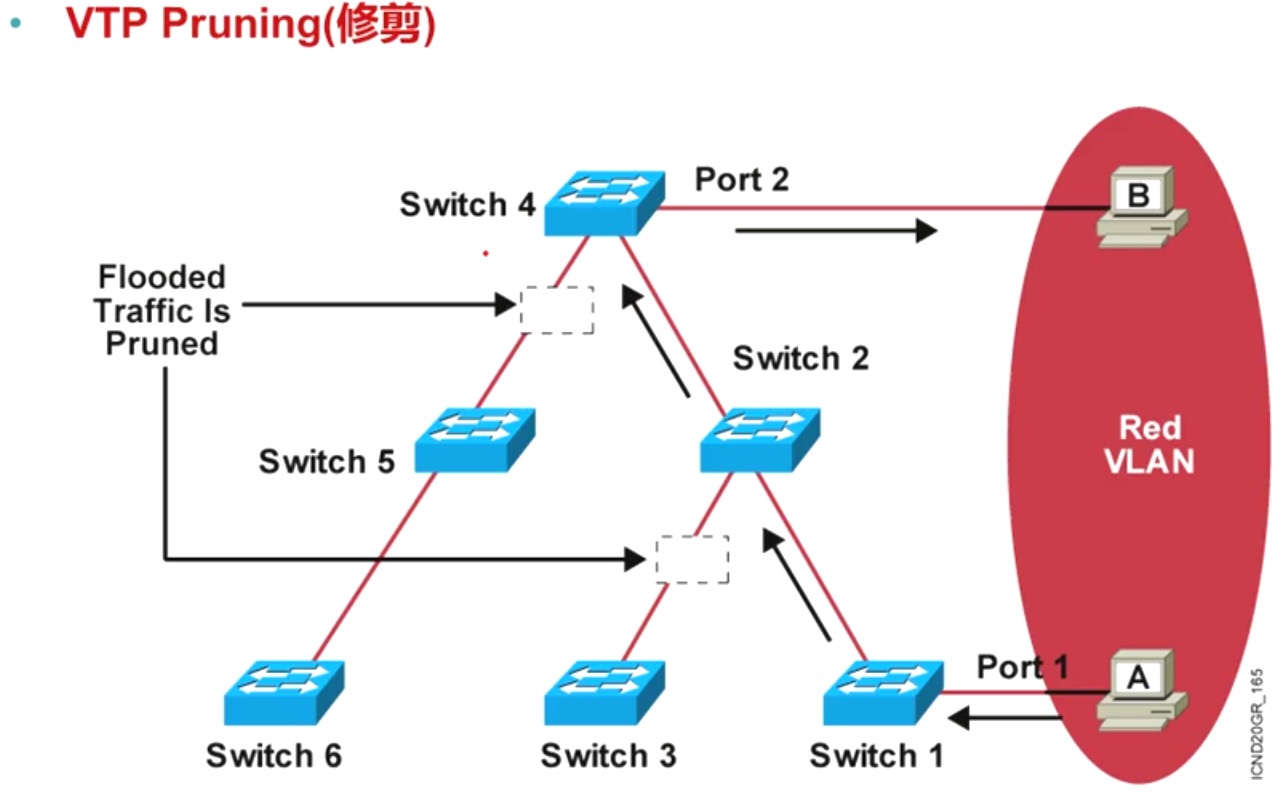
VTP的运作
VTP协议通过组播地址01-00--c-cc-cc-cc在Trunk链路上发送VTP通告;VTP Server和clients通过最高的修订号来同步数据库;VTP协议每隔5分钟发送一次VTP通告或者有变化时发生;
VLAN的配置
VLAN的基本配置
分为两步:
第一步:创建VLAN信息
Switch(config)#vlan 2
Switch(config-vlan)#name VLAN2
第二步:将端口划入特定的VLAN
Switch(config)#interface fa0/1
Switch(config-if)#switchport mode access
Switch(config-if)#switchport access [vlan vlan# | dynamic]
Trunk的基本配置
第一步:配置Trunk封装方式
Switch(config)#interface f0/5
Switch(config-if)#switchport trunk encapsulation {isl | dot1q | negotiate}
第二步:开启端口trunk模式
Switch(config-if)#switchport mode {dynamic {auto | desirable} | trunk}
VTP的基本配置
Switch#configure terminal
Switch(config)#vtp mode [server | client | transparent]
Switch(config)#vtp domain domain-name
Switch(config)#vtp password password
Switch(config)#vtp runing
备注:
- 默认情况:VTP模式为server;
- VTP域名有大小敏感;
- VTP修建默认关闭;
Trunk 基本配置
本次试验环境中的交换机和PC都使用路由器来代替;
路由代替PC配置:
下面是配置案例
R3>en
R3#conf t
R3(config)#hostname PC1
PC1(config)#no ip routing
PC1(config)#int f 0/0
PC1(config-if)#ip add 192.168.1.1 255.255.255.0
PC1(config-if)#no shutdown
网络架构图
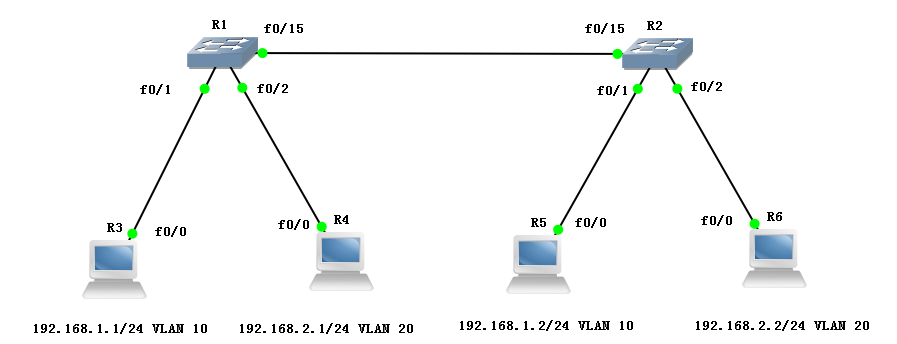
具体配置如下:
SW1
R1>en
R1#conf t
R1(config)#hostname SW1
SW1(config)#exit
SW1#
SW1#vlan database
SW1(vlan)#vlan 10
VLAN 10 modified:
SW1(vlan)#vlan 20
VLAN 20 modified:
SW1(vlan)#exit
APPLY completed.
Exiting....
SW1#conf t
SW1(config)#int f 0/1
SW1(config-if)#switchport mode access
SW1(config-if)#switchport access vlan 10
SW1(config-if)#int f 0/2
SW1(config-if)#switchport mode access
SW1(config-if)#switchport access vlan 20
SW1(config-if)#int f 0/15
SW1(config-if)#switchport trunk encapsulation dot1q
SW1(config-if)#switchport mode trunk
SW1(config-if)#end
查看SW1配置:
SW1#show vlan-s
VLAN Name Status Ports
---- -------------------------------- --------- -------------------------------
1 default active Fa0/0, Fa0/3, Fa0/4, Fa0/5
Fa0/6, Fa0/7, Fa0/8, Fa0/9
Fa0/10, Fa0/11, Fa0/12, Fa0/13
Fa0/14
10 VLAN0010 active > Fa0/1
20 VLAN0020 active > Fa0/2
1002 fddi-default active
1003 token-ring-default active
1004 fddinet-default active
1005 trnet-defaul activeVLAN Type SAID MTU Parent RingNo BridgeNo Stp BrdgMode Trans1 Trans2
---- ----- ---------- ----- ------ ------ -------- ---- -------- ------ ------
1 enet 100001 1500 >- - - - >- 1002 1003
10 enet 100010 1500 >- - - - >- 0 0
20 enet 100020 1500 - - >- - - 0 0
1002 fddi 101002 1500 - >- - - - > 1 1003
1003 tr 101003 1500 1005 >0 - - >srb 1 1002
1004 fdnet 101004 1500 - >- 1 ibm - > 0 0
1005 trnet 101005 1500 - >- 1 ibm - &nbs>p; 0 0
SW1#show interfaces trunk
Port Mode Encapsulation Status Native vlan
Fa0/15 on 802.1q trunking 1
Port Vlans allowed on trunk
Fa0/15 1-1005
Port Vlans allowed and active in management domain
Fa0/15 1,10,20
Port Vlans in spanning tree forwarding state and not pruned
Fa0/15 1,10,20
SW2
R2>en
R2#conf t
R2(config)#hostname SW2
SW2(config)#exit
SW2#vlan database
SW2(vlan)#vlan 10
VLAN 10 modified:
SW2(vlan)#vlan 20
VLAN 20 modified:
SW2(vlan)#exit
APPLY completed.
Exiting....
SW2#conf t
SW2(config)#int f 0/1
SW2(config-if)#switchport mode access
SW2(config-if)#switchport access vlan 10
SW2(config-if)#int f 0/2
SW2(config-if)#switchport mode access
SW2(config-if)#switchport access vlan 20
SW2(config-if)#int f 0/15
SW2(config-if)#switchport trunk encapsulation dot1q
SW2(config-if)#switchport mode trunk
查看SW2配置:
SW2#show vlan-s
VLAN Name Status Ports
---- -------------------------------- --------- -------------------------------
1 default active Fa0/0, Fa0/3, Fa0/4, Fa0/5
Fa0/6, Fa0/7, Fa0/8, Fa0/9
Fa0/10, Fa0/11, Fa0/12, Fa0/13
Fa0/14
10 VLAN0010 active > Fa0/1
20 VLAN0020 active > Fa0/2
1002 fddi-default active
1003 token-ring-default active
1004 fddinet-default active
1005 trnet-defaul activeVLAN Type SAID MTU Parent RingNo BridgeNo Stp BrdgMode Trans1 Trans2
---- ----- ---------- ----- ------ ------ -------- ---- -------- ------ ------
1 enet 100001 1500 >- - - - >- 1002 1003
10 enet 100010 1500 >- - - - >- 0 0
20 enet 100020 1500 - - >- - - 0 0
1002 fddi 101002 1500 - >- - - - > 1 1003
1003 tr 101003 1500 1005 >0 - - >srb 1 1002
1004 fdnet 101004 1500 - >- 1 ibm - > 0 0
1005 trnet 101005 1500 - >- 1 ibm - &nbs>p; 0 0
SW2#show interfaces trunk
Port Mode Encapsulation Status Native vlan
Fa0/15 on 802.1q trunking 1
Port Vlans allowed on trunk
Fa0/15 1-1005
Port Vlans allowed and active in management domain
Fa0/15 1,10,20
Port Vlans in spanning tree forwarding state and not pruned
Fa0/15 1,10,20
PC1配置:
R3>en
R3#conf t
R3(config)#hostname PC1
PC1(config)#no ip routing
PC1(config)#int f 0/0
PC1(config-if)#ip add 192.168.1.1 255.255.255.0
PC1(config-if)#no shutdown
PC2配置:
R4>en
R4#conf t
R4(config)#hostname PC2
PC2(config)#no ip routing
PC2(config)#int f 0/0
PC2(config-if)#ip address 192.168.2.1 255.255.255.0
PC2(config-if)#no shutdown
PC3配置:
R5>en
R5#conf t
R5(config)#hostname PC3
PC3(config)#no ip routing
PC3(config)#int f 0/0
PC3(config-if)#ip add 192.168.1.2 255.255.255.0
PC3(config-if)#no sh
PC4配置:
R6>en
R6#conf t
R6(config)#hostname PC4
PC4(config)#no ip routing
PC4(config)#int f 0/0
PC4(config-if)#ip add 192.168.2.2 255.255.255.0
PC4(config-if)#no sh
验证:
只要在PC1上能ping通PC3,在PC2上能ping通PC4的地址,则表示试验完成;
PC1验证:
PC1#ping 192.168.1.2
Type escape sequence to abort.
Sending 5, 100-byte ICMP Echos to 192.168.1.2, timeout is 2 seconds:
.!!!!
P2验证:
PC2#ping 192.168.2.2
Type escape sequence to abort.
Sending 5, 100-byte ICMP Echos to 192.168.2.2, timeout is 2 seconds:
.!!!!
单臂路由
上面的试验配置了两个VLAN,而这两个VLAN之间是不能相同通信的,如果想实现相互访问,则需要通过路由
本次使用单臂路由的方式,也就是在一个借口上,同时跑两个VLAN,使之能通信;
增加一个路由,如下图:
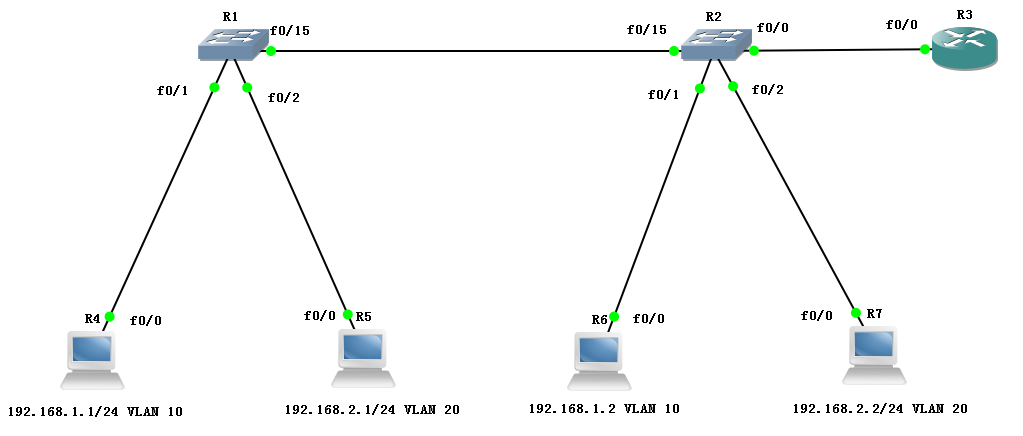
配置如下:
使用上面的试验,其他所有的设备不需要配置,需要对SW2和对R3进行配置
需要把SW2的 f0/0 接口配置成Trunk
SW2配置:
R2(config)#int f 0/0
R2(config-if)#switchport mode trunk
R2(config-if)#switchport trunk encapsulation dot1q
R3配置:
R3>en
R3#conf t
R3(config)#int f 0/0
R3(config-if)#no sh
R3(config-if)#exit
R3(config)#int f 0/0.10
R3(config-subif)#encapsulation dot1Q 10
R3(config-subif)#ip add 192.168.1.254 255.255.255.0
R3(config-subif)#no sh
R3(config-subif)#int f 0/0.20
R3(config-subif)#encapsulation dot1Q 20
R3(config-subif)#ip add 192.168.2.254 255.255.255.0
R3(config-subif)#no sh
R3(config-subif)#exit
R3(config)#exit
R3#show ip route
Codes: C - connected, S - static, R - RIP, M - mobile, B - BGP
D - EIGRP, EX - EIGRP external, O - OSPF, IA - OSPF inter area
N1 - OSPF NSSA external type 1, N2 - OSPF NSSA external type 2
E1 - OSPF external type 1, E2 - OSPF external type 2
i - IS-IS, su - IS-IS summary, L1 - IS-IS level-1, L2 - IS-IS level-2
ia - IS-IS inter area, * - candidate default, U - per-user static route
o - ODR, P - periodic downloaded static route
Gateway of last resort is not set
C 192.168.1.0/24 is directly connected, FastEthernet0/0.10
C 192.168.2.0/24 is directly connected, FastEthernet0/0.20
R3#show ip int b
Interface IP-Address OK? Method Status Protocol
FastEthernet0/0 unassigned YES unset up up
FastEthernet0/0.10 192.168.1.254 YES manual up up
FastEthernet0/0.20 192.168.2.254 YES manual up up
验证
PC1:
PC1#ping 192.168.2.1
Type escape sequence to abort.
Sending 5, 100-byte ICMP Echos to 192.168.2.1, timeout is 2 seconds:
!!!!!
Success rate is 100 percent (5/5), round-trip min/avg/max = 4/12/36 ms
PC2:
PC2#ping 192.168.1.1
Type escape sequence to abort.
Sending 5, 100-byte ICMP Echos to 192.168.1.1, timeout is 2 seconds:
!!!!!
Success rate is 100 percent (5/5), round-trip min/avg/max = 4/22/60 ms
CCNA 之 八 交换基础 VLAN TRUNK VTP的更多相关文章
- 2.1-VLAN/TRUNK/VTP
2.1-VLAN/TRUNK/VTP 注意:配置VLAN时要退出VLAN配置模式才会执行 如果VLAN被删除或者shutdown,那么属于这个vlan的接口将被阻塞(灯一直是橙色,变不了绿色) ...
- 实验13:VLAN/TRUNK/VTP/
实验10-1: 划分VLAN Ø 实验目的通过本实验,读者可以掌握如下技能:(1) 熟悉VLAN 的创建(2) 把交换机接口划分到特定VLAN Ø 实验拓扑 实验步骤要配置VLAN,首先要 ...
- vlan trunk vtp端口聚合
第一步:端口聚合(两端都需要做相同的操作) 第二步:在服务器端配置为服务器模式 第四步:在服务器端添加vlan 第五步:在两端分别将不同的端口添加到不同的vlan
- 交换知识 VLAN VTP STP 单臂路由
第1章 交换基础 1.1 园区网分层结构 层次 作用 出口层 广域网接入 出口策略 带宽控制 核心层 高速转发 服务器接入 路由选择 汇聚层 流量汇聚 链路冗余 设备冗余 路由选择 接入层 用户接入 ...
- 交换机上的trunk,hybrid,access配置和应用(转)
交换机上的trunk,hybrid,access配置和应用 以太网端口的链路类型: Access类型:端口只能属于一个vlan,一般用于连接计算机. Trunk类型:端口可以属于端个vlan,可以接收 ...
- vlan trunk配置
vlan trunk配置 Trunk:中继干道 作用:一条链路能承载多个vlan的流量,并对不同vlan的流量进行不同标记 trunk能够使vlan跨越交换机 PT配置 配置vlan:两台交换机同样的 ...
- Swift语言指南(八)--语言基础之元组
原文:Swift语言指南(八)--语言基础之元组 元组 元组(Tuples)将多个值组合为一个复合值.元组内的值可以是任何类型,各个元素不需要为相同类型(各个元素之间类型独立,互不干扰--Joe.Hu ...
- 实验八 Web基础 SQL注入原理
实验八 Web基础 实验要求 (1)Web前端HTML 能正常安装.启停Apache.理解HTML,理解表单,理解GET与POST方法,编写一个含有表单的HTML. (2)Web前端javascipt ...
- 2017-2018-2 20155225《网络对抗技术》实验八 Web基础
2017-2018-2 20155225<网络对抗技术>实验八 Web基础 1.Web前端HTML 输入命令apachectl start打开apahce,并使用netstat -aptn ...
随机推荐
- postman的基本用法,请求,断言,环境变量
postman基本用法 Postman是一款功能强大的网页调试与发送网页HTTP请求的Chrome插件. 它提供功能强大的 Web API & HTTP 请求调试. 它能够发送任何类型的HTT ...
- 【MySQL】MySQL 8.0.X的安装与卸载命令
1.请读者自行下载MySQL Server https://dev.mysql.com/downloads/mysql/ 2.解压.zip文件 将mysql-8.0.12-winx64.zip解压到 ...
- 初识mysql索引 - 小白篇
:接触mysq也有两年左右的时间了,但是对该数据库的理解自认还比较初级,看过很多文章,也看过一些相关的书籍,依然小白....(这里个人总结是两点主要原因:1.对mysql的学习大部分都是源于看一些杂七 ...
- Knative Serving 健康检查机制分析
作者| 阿里云智能事业群技术专家牛秋霖(冬岛) 导读:从头开发一个Serverless引擎并不是一件容易的事情,今天咱们就从Knative的健康检查说起.通过健康检查这一个点来看看Serverles ...
- VB.NET 与 SAP RFC连接问题点
与SAP RFC连接,电脑上必须要安装SAP软件,否则会报错ActiveX 输入工单号,无法带出SAP内接口RFC信息. 确认原因为:RFC接口需求的工单参数需要在前面加两位00,例如:1000541 ...
- Vim任意代码执行漏洞(CVE-2019-12735)
Vim通过Modelines执行任意代码 漏洞概要: 在8.1.1365之前的Vim和在0.3.6之前的Neovim很容易通过打开特制的文本文件而通过模型执行任意代码. 复现条件: 确保未禁用mode ...
- 转:redis-cli 命令总结
redis-cli常用命令,原文地址:https://maoxian.de/2015/08/1342.html Redis提供了丰富的命令(command)对数据库和各种数据类型进行操作,这些comm ...
- VS2008给图标工具栏-状态栏添加响应函数
1.在对话框的:OnInitDialog()函数中添加以下红色代码: BOOL CGSM_MessageDlg::OnInitDialog() { CDialog::OnInitDialog(); / ...
- CSP-S 95 (sb lsc yy赛)
sb lsc 终于改完题了!(心力交悴.png)
- mysql找出重复数据的方法
mysql找出重复数据的方法<pre>select openid,count(openid) from info group by openid,jichushezhi_id HAVING ...