
Kubernetes5-集群上搭建基于redis和docker的留言薄
一、简介
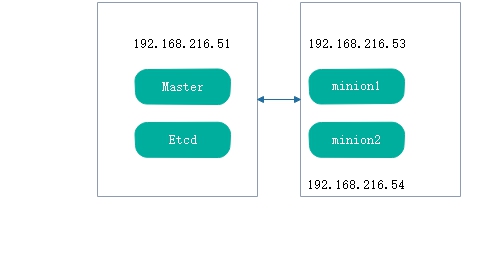
1、环境依旧是kubernetes之前文章的架构
2、需要docker的镜像
1)php-forntend web 前端镜像
docker.io-kubeguide-guestbook-php-frontend.tar
2)redis master
docker.io-kubeguide-redis-master.tar
3)redis slave
web前端通过javascript redis api 和redis master交互,可以在阿里上或自行下载
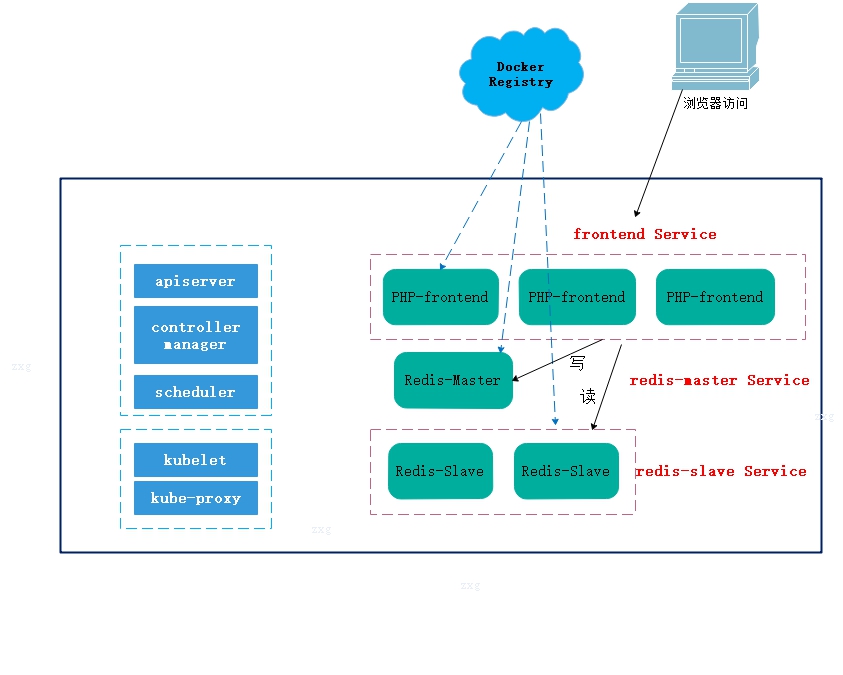
3、架构示意图
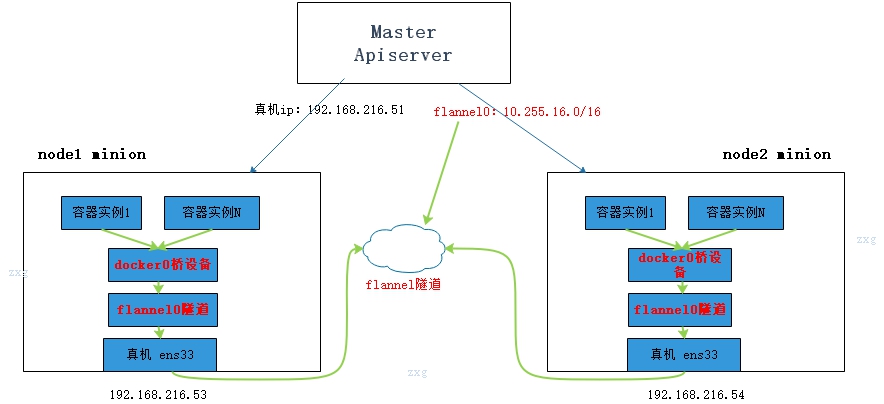
4、底层网络架构图
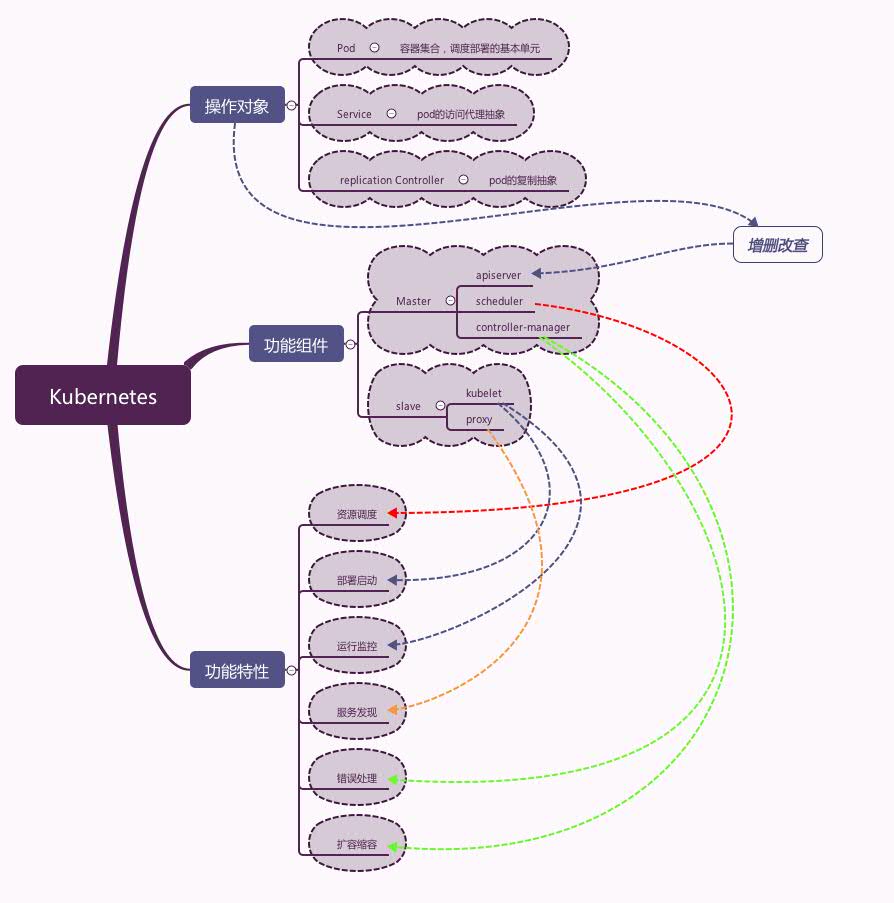
5、补充kubernetes系统架构图
二、开始部署
1、上传导入镜像
先下载相关镜像
互联网自行下载,或者直接docker pull
docker load导入
[root@node1 k8s]# docker load -i docker.io-kubeguide-redis-master.tar               #---导入redis-master

[root@node1 k8s]# docker load -i docker.io-kubeguide-guestbook-php-frontend.tar         #---导入guestbook-php-frontend

[root@node1 k8s]# docker load -i docker.io-kubeguide-guestbook-redis-slave.tar          #---导入guestbook-redis-slave
2、创建redis master deployment配置文件
回顾:deployment作用,是描述想要的目标状态是什么
1)创建vim redis-master-deployment.yaml
[root@master k8s]# cd /etc/kubernetes/yaml/
[root@master k8s]# vim redis-master-deployment.yaml

apiVersion: extensions/v1beta1

kind: Deployment

metadata:

  name: redis-master

  # these labels can be applied automatically

  # from the labels in the pod template if not set              #---如果没有设置,这些标签可以自动应用于POD模板中的标签

  # labels:

  #   app: redis

  #   role: master

  #   tier: backend

spec:

  # this replicas value is default

  # modify it according to your case

  replicas: 1                                    #---此副本值,根据情况修改

  # selector can be applied automatically

  # from the labels in the pod template if not set              #---如果没有设置

  # selector:

  #   matchLabels:

  #     app: guestbook

  #     role: master

  #     tier: backend

  template:                                     #---模板,如果没有设置,选择自动使用从此模板中默认的标签

    metadata:

      labels:

        app: redis

        role: master

        tier: backend

    spec:

      containers:

      - name: master

        image: docker.io/kubeguide/redis-master:latest           #---自行修改,镜像地址

        imagePullPolicy: IfNotPresent

        resources:

          requests:

            cpu: 100m

            memory: 100Mi

        ports:

        - containerPort:
2)启动这个deployment
[root@master yaml]# kubectl create -f /etc/kubernetes/yaml/redis-master-deployment.yaml

deployment "redis-master" created

[root@master yaml]# kubectl get deployment

NAME           DESIRED   CURRENT   UP-TO-DATE   AVAILABLE   AGE

nginx                                                   21h

redis-master                                            4s

[root@master yaml]# kubectl get deployment

NAME           DESIRED   CURRENT   UP-TO-DATE   AVAILABLE   AGE

nginx                                                   21h

redis-master                                            6s
3、创建redis master service配置文件
1)编辑redis-master-service.yaml
[root@master yaml]# vim /etc/kubernetes/yaml/redis-master-service.yaml

apiVersion: v1

kind: Service

metadata:                                       #---metadata.name定义了service的服务名,spec.selector确定了pod对应到本服务

  name: redis-master

  labels:                                        #---这里的定义表面拥有redis-master标签的pod属于redis-master服务

    app: redis

    role: master

    tier: backend

spec:

  ports:

    # the port that this service should serve on

  - port: 6379                                    #---ports部分中targetport属性用来确定提供该服务的容器所暴露(expose)的端口号,port定义server的虚拟端口

    targetPort: 6379

  selector:

    app: redis

    role: master

    tier: backend
2)启动这个service
[root@master yaml]# kubectl create -f /etc/kubernetes/yaml/redis-master-service.yaml

service "redis-master" created

[root@master yaml]# kubectl get svc

NAME           CLUSTER-IP     EXTERNAL-IP   PORT(S)        AGE

kubernetes     10.254.0.1     <none>        /TCP        14d

nginx          10.254.8.125   <nodes>       :/TCP   9d

redis-master   10.254.16.93   <none>        6379/TCP       6s

[root@master yaml]#
4、创建redis slave deployment配置文件
1)创建redis-salve-deployment
[root@master yaml]# vim redis-slave-deployment.yaml

apiVersion: extensions/v1beta1

kind: Deployment

metadata:

  name: redis-slave

  # these labels can be applied automatically

  # from the labels in the pod template if not set

  # labels:

  #   app: redis

  #   role: slave

  #   tier: backend

spec:

  # this replicas value is default

  # modify it according to your case

  replicas:

  # selector can be applied automatically

  # from the labels in the pod template if not set

  # selector:

  #   matchLabels:

  #     app: guestbook

  #     role: slave

  #     tier: backend

  template:

    metadata:

      labels:

        app: redis

        role: slave

        tier: backend

    spec:

      containers:

      - name: slave

        image: docker.io/kubeguide/guestbook-redis-slave:latest

        imagePullPolicy: IfNotPresent

        resources:

          requests:

            cpu: 100m

            memory: 100Mi

        env:

        - name: GET_HOSTS_FROM

          value: env

          # If your cluster config does not include a dns service, then to

          # instead access an environment variable to find the master

          # service's host, comment out the 'value: dns' line above, and

          # uncomment the line below.

          # value: env

        ports:

        - containerPort:
2)启动redis-slave-deployment
[root@master yaml]# kubectl create -f /etc/kubernetes/yaml/redis-slave-deployment.yaml

deployment "redis-slave" created

[root@master yaml]# kubectl get deploy                                   #---查看deployment

NAME           DESIRED   CURRENT   UP-TO-DATE   AVAILABLE   AGE

nginx                                                   22h

redis-master                                            11m

redis-slave                                             7s

[root@master yaml]# kubectl get pods                                    #---查看pods

NAME                            READY     STATUS    RESTARTS   AGE

nginx--n5wsr          /       Running             22h

nginx--zngv0          /       Running             22h

redis-master--vjx86   /       Running             30m

redis-slave--9nk3l    /       Running             19m

redis-slave--vfd4b    /       Running             19m

[root@master yaml]# kubectl get pods -o wide                                #---查看pod 详细信息,可以看到一个master两个slave

NAME                            READY     STATUS    RESTARTS   AGE       IP             NODE

nginx--n5wsr          /       Running             22h       10.255.101.2   node2

nginx--zngv0          /       Running             22h       10.255.58.2    node1

redis-master-3671804942-vjx86   1/1       Running   0          31m       10.255.58.3    node1

redis-slave-2377017994-9nk3l    1/1       Running   0          19m       10.255.101.4   node2

redis-slave-2377017994-vfd4b    1/1       Running   0          19m       10.255.58.4    node1

[root@master yaml]#
5、创建slave service 配置文件
1)创建redis-slave-service.yaml
[root@master yaml]# vim /etc/kubernetes/yaml/redis-slave-service.yaml

apiVersion: v1

kind: Service

metadata:

  name: redis-slave

  labels:

    app: redis

    role: slave

    tier: backend

spec:

  ports:

    # the port that this service should serve on

  - port:

  selector:

    app: redis

    role: slave

    tier: backend
2)启动这service
[root@master yaml]# kubectl create -f /etc/kubernetes/yaml/redis-slave-service.yaml

service "redis-slave" created

[root@master yaml]# kubectl get svc -o wide

NAME           CLUSTER-IP      EXTERNAL-IP   PORT(S)        AGE       SELECTOR

kubernetes     10.254.0.1      <none>        /TCP        14d       <none>

nginx          10.254.8.125    <nodes>       :/TCP   9d        name=nginx

redis-master   10.254.16.93    <none>        6379/TCP       32m       app=redis,role=master,tier=backend

redis-slave    10.254.22.156   <none>        6379/TCP       10s       app=redis,role=slave,tier=backend

[root@master yaml]#
6、创建fronteng guestbook deployment配置文件
这个是一个简单的PHP服务,用来和master service (写请求),slave service(读请求)交互
1)创建编辑frontend-deployment.yaml
[root@master yaml]# vim frontend-deployment.yaml

apiVersion: extensions/v1beta1

kind: Deployment

metadata:

  name: frontend

  # these labels can be applied automatically

  # from the labels in the pod template if not set

  # labels:

  #   app: guestbook

  #   tier: frontend

spec:

  # this replicas value is default

  # modify it according to your case

  replicas: 3

  # selector can be applied automatically

  # from the labels in the pod template if not set

  # selector:

  #   matchLabels:

  #     app: guestbook

  #     tier: frontend

  template:

    metadata:

      labels:

        app: guestbook

        tier: frontend

    spec:

      containers:

      - name: php-redis

        image: docker.io/kubeguide/guestbook-php-frontend:latest

        imagePullPolicy: IfNotPresent

        resources:

          requests:

            cpu: 100m

            memory: 100Mi

        env:

        - name: GET_HOSTS_FROM

          value: env

          # If your cluster config does not include a dns service, then to

          # instead access environment variables to find service host

          # info, comment out the 'value: dns' line above, and uncomment the

          # line below.

          # value: env

        ports:

        - containerPort:
2)启动这个deployment
可以看到三个frontend,一个master,两个slave
[root@master yaml]# kubectl create -f frontend-deployment.yaml

deployment "frontend" created

[root@master yaml]# kubectl get deploy

NAME           DESIRED   CURRENT   UP-TO-DATE   AVAILABLE   AGE

frontend                                                10s

nginx                                                   22h

redis-master   1         1         1            1           48m

redis-slave    2         2         2            2           37m

[root@master yaml]# kubectl get pods -o wide

NAME                            READY     STATUS    RESTARTS   AGE       IP             NODE

frontend-1186687533-0g08q       1/1       Running   0          24s       10.255.58.5    node1

frontend-1186687533-fxf29       1/1       Running   0          24s       10.255.101.5   node2

frontend-1186687533-q38fx       1/1       Running   0          24s       10.255.101.6   node2

nginx--n5wsr          /       Running             22h       10.255.101.2   node2

nginx--zngv0          /       Running             22h       10.255.58.2    node1

redis-master-3671804942-vjx86   1/1       Running   0          49m       10.255.58.3    node1

redis-slave-2377017994-9nk3l    1/1       Running   0          37m       10.255.101.4   node2

redis-slave-2377017994-vfd4b    1/1       Running   0          37m       10.255.58.4    node1

[root@master yaml]#
7、创建frontend guestbook service 配置文件
1)创建frontend-service.yaml
[root@master yaml]# vim frontend-service.yaml

apiVersion: v1

kind: Service

metadata:

  name: frontend

  labels:

    app: guestbook

    tier: frontend

spec:

  # if your cluster supports it, uncomment the following to automatically create

  # an external load-balanced IP for the frontend service.

  # type: LoadBalancer

  type: NodePort

  ports:

    # the port that this service should serve on

  - port:

    nodePort: 30001

  selector:

    app: guestbook

    tier: frontend
2)启动这个service
[root@master yaml]# kubectl create -f /etc/kubernetes/yaml/frontend-service.yaml

service "frontend" created

[root@master yaml]# kubectl get svc -o wide

NAME           CLUSTER-IP       EXTERNAL-IP   PORT(S)        AGE       SELECTOR

frontend       10.254.129.194   <nodes>       80:30001/TCP   4m        app=guestbook,tier=frontend

kubernetes     10.254.0.1       <none>        /TCP        14d       <none>

nginx          10.254.8.125     <nodes>       :/TCP   9d        name=nginx

redis-master   10.254.16.93     <none>        /TCP       52m       app=redis,role=master,tier=backend

redis-slave    10.254.22.156    <none>        /TCP       20m       app=redis,role=slave,tier=backend

[root@master yaml]#
3)node1 查看端口
[root@node1 k8s]# netstat -antup |grep 30001

tcp6       0      0 :::30001                :::*                    LISTEN      1110/kube-proxy
三、验证
1、访问web端
http://192.168.216.53:30001/
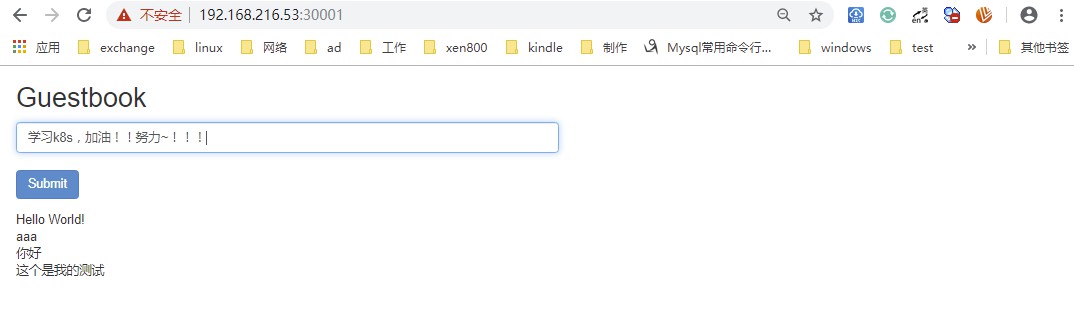
参考:互联网内容
总结流程:准备deployment和service配置文件》导入镜像》启动deployment和service
kubernetes系列文章请见:
部署:请见Kubernetes2-K8s的集群部署
kubectl:请见Kubernetes3-kubectl管理Kubernetes容器平台-1
kubectl:请见Kubernetes3-kubectl管理Kubernetes容器平台-2
Kubernetes Dashboard web界面:请见Kubernetes4-web管理界面
转载请注明出处:https://www.cnblogs.com/zhangxingeng/p/11847953.html
Kubernetes5-集群上搭建基于redis和docker的留言薄的更多相关文章
- Hadoop集群上搭建Ranger
There are two types of people in the world. I hate both of them. Hadoop集群上搭建Ranger 在搭建Ranger工程之前,需要完 ...
- 在Hadoop集群上,搭建HBase集群
(1)下载Hbase包,并解压:这里下载的是0.98.4版本,对应的hadoop-1.2.1集群 (2)覆盖相关的包:在这个版本里,Hbase刚好和Hadoop集群完美配合,不需要进行覆盖. 不过这里 ...
- Kubernetes-在Kubernetes集群上搭建HBase集群
经过3天的努力,终于在Kubernetes上把HBase集群搭建起来了,搭建步骤如下. 创建HBase镜像 配置文件包含core-site.xml.hbase-site.xml.hdfs-site ...
- STORM_0002_在做好的zookeeper集群上搭建storm的开发环境
参考文献http://www.cnblogs.com/panfeng412/archive/2012/11/30/how-to-install-and-deploy-storm-cluster.htm ...
- 深入剖析Redis系列: Redis集群模式搭建与原理详解
前言 在 Redis 3.0 之前,使用 哨兵(sentinel)机制来监控各个节点之间的状态.Redis Cluster 是 Redis 的 分布式解决方案,在 3.0 版本正式推出,有效地解决了 ...
- 这次一定要教会你搭建Redis集群和MySQL主从同步(非Docker)
前言 一直都想自己动手搭建一个Redis集群和MySQL的主从同步,当然不是依靠Docker的一键部署(虽然现在企业开发用的最多的是这种方式),所以本文就算是一个教程类文章吧,但在动手搭建之前,会先聊 ...
- Redis 5.0.7 讲解,单机、集群模式搭建
Redis 5.0.7 讲解,单机.集群模式搭建 一.Redis 介绍 不管你是从事 Python.Java.Go.PHP.Ruby等等... Redis都应该是一个比较熟悉的中间件.而大部分经常写业 ...
- Redis集群环境搭建实践
0 Redis集群简介 Redis集群(Redis Cluster)是Redis提供的分布式数据库方案,通过分片(sharding)来进行数据共享,并提供复制和故障转移功能.相比于主从复制.哨兵模式, ...
- linux环境(CentOS-6.7)下redis集群的搭建全过程
linux环境下redis集群的搭建全过程: 使用mount命令将光盘挂载到/mnt/cdrom目录下: [root@hadoop03 ~]# mount -t iso9660 -o ro /dev/ ...
随机推荐
- GUI tkinter (Entry) 输入框篇
"""1.其他函数不常用,这里只说get函数,get函数使用的时候不需要任何参数,它的返回值就是该输入框的内容.""" from tkint ...
- MYSQL事件隔离级别以及复读,幻读,脏读的理解
一.mysql事件隔离级别 1未提交读(READUNCOMMITTED) 另一个事务修改了数据,但尚未提交,而本事务中的SELECT会读到这些未被提交的数据(脏读)( 隔离级别最低,并发性能高 ) 2 ...
- DJango配置mysql数据库以及数据库迁移
DJango配置mysql数据库以及数据库迁移 一.Django 配置MySQL数据库 在settings.py中配置 import pymysql # 配置MySQL pymysql.install ...
- Spring Security 入门 (二)
我们在篇(一)中已经谈到了默认的登录页面以及默认的登录账号和密码. 在这一篇中我们将自己定义登录页面及账号密码. 我们先从简单的开始吧:设置自定义的账号和密码(并非从数据库读取),虽然意义不大. 上一 ...
- phpstorm格式设置不同导致的Git代码无法正常比较
多人开发代码,使用Git作为管理工具,遇到一个问题是 : IDE的格式设置不一样导致的整个文件无法正常的比较. window 和 linux 以及 mac 不同平台的换行符是导致这一个问题比较常见的原 ...
- USACO环绕岛屿Surround the Islands 并查集 枚举暴力
题目描述 Farmer John has bought property in the Caribbean and is going to try to raise dairy cows on a b ...
- [USACO14JAN]滑雪等级Ski Course Rating
题目描述 The cross-country skiing course at the winter Moolympics is described by an M x N grid of eleva ...
- opencv::Laplance算子
Laplance算子 理论:在二阶导数的时候,最大变化处的值为零即边缘是零值.通过二阶导数计算,依据此理论我们可以计算图像二阶导数,提取边缘. 拉普拉斯算子(Laplance operator) 处理 ...
- 本月16日SpringBoot2.2发布,有哪些变化先知晓
本月(2019年10月16日)Spring Boot 2.2已经正式发布了!在此篇文章中,将给大家介绍一下2.2版为大家带来了哪些重要的新变化.笔者用心书写,希望阅读完成之后转发关注,你的支持是我不竭 ...
- Hive On HBase实战
1.概述 HBase是一款非关系型.分布式的KV存储数据库.用来存储海量的数据,用于键值对操作.目前HBase是原生是不包含SQL操作,虽然说Apache Phoenix可以用来操作HBase表,但是 ...