
Eclipse的Git插件Egit: merge合并冲突具体解决方法
http://www.cnblogs.com/wavky/p/3504060.html
稍微总结下弄了半个下午的egit的merge合并冲突解决方法,网上看的都是一个模板出来的,看的糊里糊涂,花了很多时间去实验整个合并流程..
前提工作
- 创建一个普通JAVA工程Test,创建一个类Test,写点东西并加入到本地git库;
- 创建个develop分支,创建个Develop类,修改Test类的某些语句,添加新代码段,提交;
- 切换到master分支,创建个Master类,修改Test类的同一部分语句,提交;
以上三条操作不进行详细说明,很简单的。
合并过程
打开git repository exploring视图:

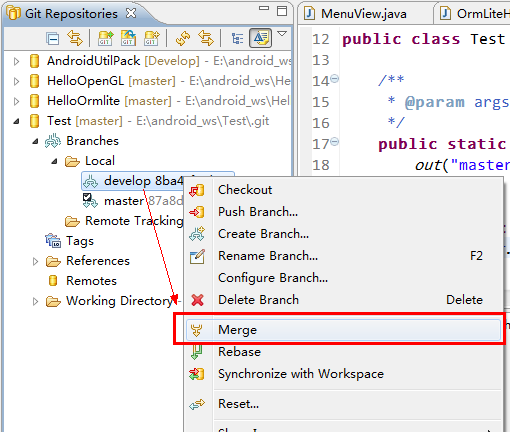
在Test库中,在develop分支上打开右键菜单,点击Merge:
出现冲突提示框:
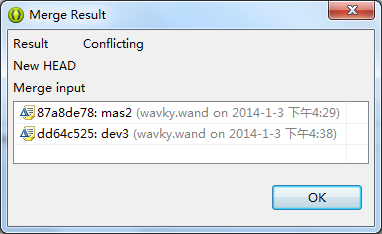
返回JAVA工程项目视图,可以看见Test工程已经自动进行了部分合并,添加了Develop类,但Test类存在冲突(有红色双箭头标记的文件才是冲突,茶色星星标记的文件没有实际冲突项),选中工程打开右键菜单,打开Merge Tool:

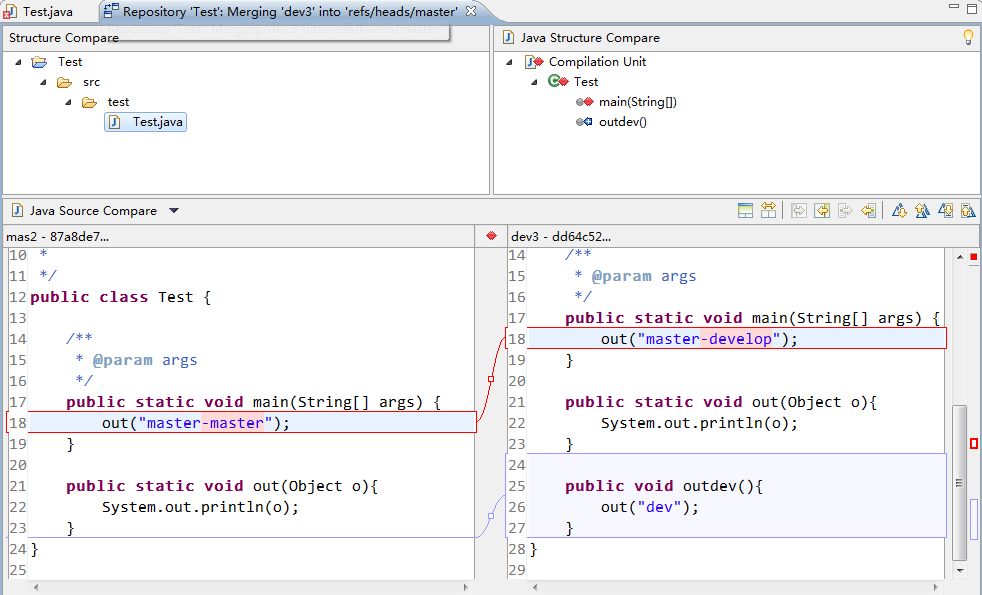
Merge Tool界面显示如下,左边为冲突文件的当前版本(master分支),右边为准备合并过来的目标版本(develop分支),手工把右边的代码copy到左边,或至少随意更改下左边的文件,保存。 注:右边的窗口有时候标题显示的版本节点不正确,可能是BUG,或者笔主理解能力不足所致。
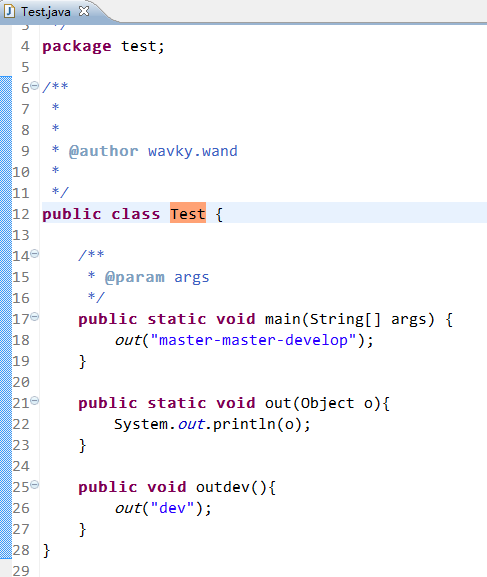
在Merge Tool中更改并保存后,当前冲突的Test类如下图中的各种神奇标记符号将自动消除:
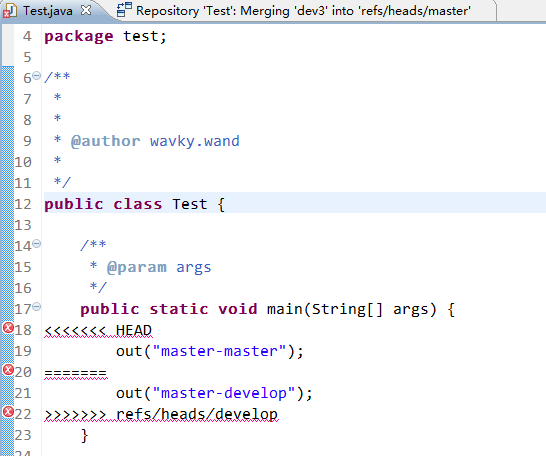
上图的红色神奇符号已经自动合并消除,并呈现类似下图的合并效果:
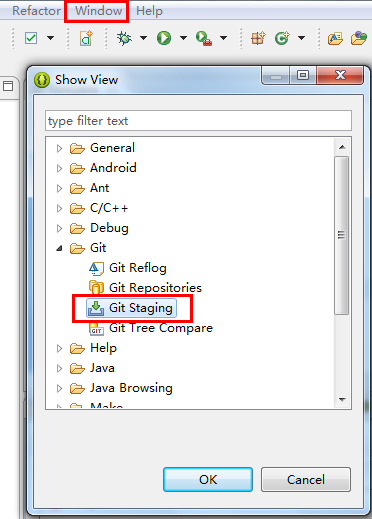
Window->Show View->Other,打开Git Staging视图:
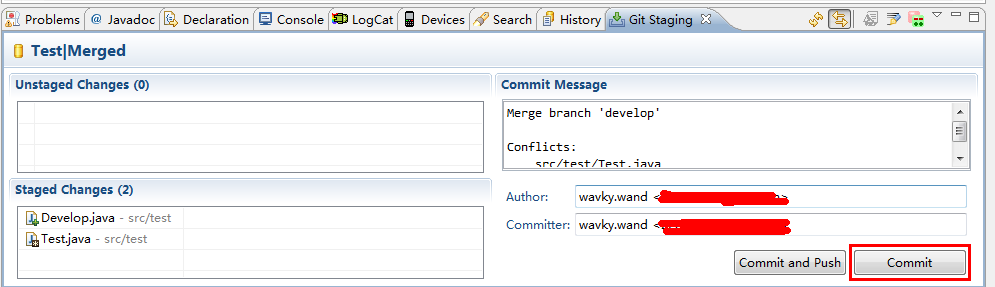
Git Staging视图中,Unstaged Changes部分包含冲突文件(包括手工合并前后),Staged Changes部分包含已经完成自动合并的文件,在已经合并完成的冲突文件Test.java上打开右键菜单,选中Add to Git Index:

Test.java被添加到Staged Changes下面,并自动生成Commit Message等内容,确认无误后点击Commit提交:
至此,Merge合并的冲突已经完全解决,从develop到master方向的合并已经完成:

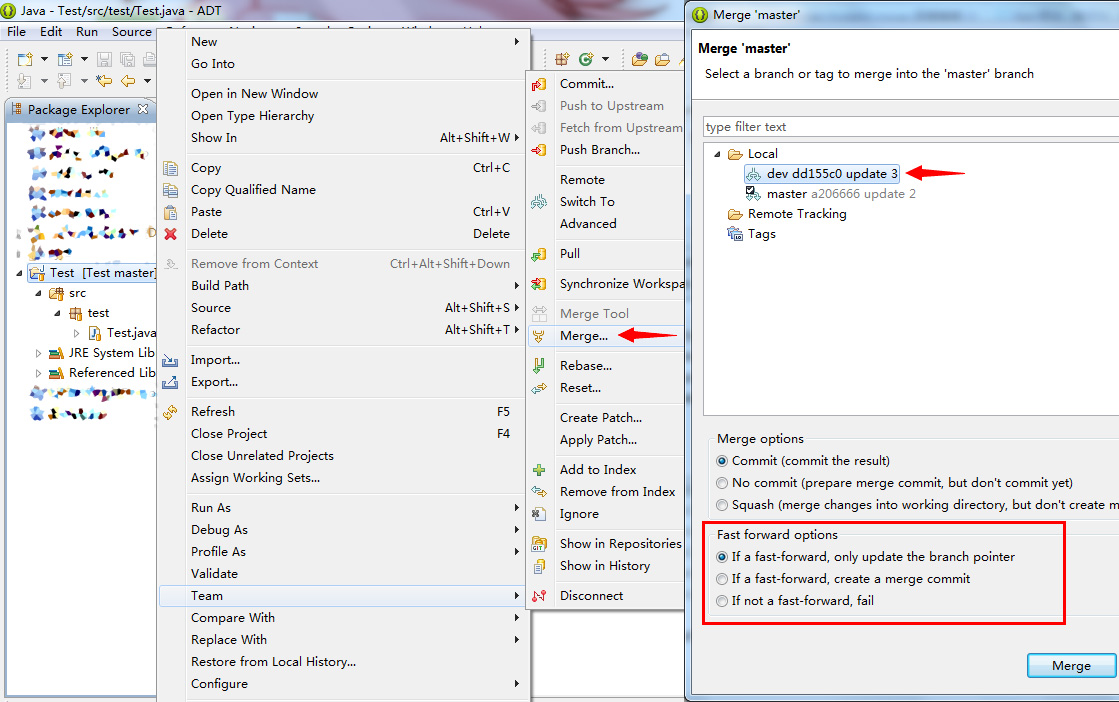
若要从master合并到develop,只需切换到develop分支,(在git repository exploring视图中)在master菜单上点击Merge即可。笔主使用的Egit2.2版本默认进行Fast-Forward方式的合并,最新的3.2版已经提供是否选择Fast-Forward的UI窗口。
* 关于Egit3.2的Fast-Forward合并:提供该选择的UI窗口仅在JAVA视图窗口中,通过项目工程右键菜单中执行Team->Merge触发显示,通过上面使用git repository exploring视图简单调用Merge的方式仍然使用默认的Fast-Forward合并:
==============================================
https://allaboutmynonexistedworld.wordpress.com/2014/02/05/eclipse-git-merging-branch-to-master/
1. Make sure the current pointer is at master.
2. Right click on the project to be merged. Select Team -> Merge
3. In the pop up window, double click on the branch you want to merge.
4. A merge conflict window should jump up. Click OK to continue
5. Right click on the project with a red mark. Select Team -> Merge Tool
6. In “Select a Merge Mode” window, select Use HEAD option and hit OK
7. Edit it in the editor however you want (play around with the options)
8. Once you decided the conflict is resolved, right click on the red mark file, select Team -> Add to Index
9. Finally, you should be able to commit the changes and push to the upstream.
===========================
Problem resolve “egit remote tracking show nothing”
有时候在用Team => Switch to => 时, 看不到想要的branch, 用如下方法解决.
How do I get a new branch to show up in Eclipse Git Remote Tracking?
I have an existing Eclipse git project, with a master and development branch present in both local, and remote tracking. I have just added a new branch in my git repository, but I can't figure out how to get it to show up in Eclipse.
I have tried to read up on the subject, but it seems like it is just expected to automatically show up. I have found a lot of similar questions, but they all seem to deal with the issues of a completely empty remote tracking folder, instead of my problem of only a single new branch missing. I already have Master and Develop present.
Here is what does not work:
- Clicking refresh in the Git repositories window.
- Any kind of synchronize, pull or other update I can find
Here is what would work:
- Right clicking the remote tracking folder, and selecting "Paste repository path or URI". If I do that, and select the exact same path as is already there, I can see my new branch. This action does require that I completely clone the whole repository to an empty folder again, and that can't be how this is intended to work.
- I believe it might work to use some kind of command line tool, but I really want an Eclipse solution to this, as I feel sure it exists, and I am just missing something.
20
In the Git Repositories view:
- Right-click the repository and choose Fetch from Upstream
- If the new branch will not shown up below Branches/Remote Tracking, you have to configure fetch:
- Right-click the fetch node below Remotes/origin and choose Configure Fetch...
- In the Configure Fetch make sure there is only the single Ref mapping
+refs/heads/*:refs/remotes/origin/*:
- "No ref to fetch from MyRepository -
origin - everything up to date." I'll update my question with screenshots– KjetilNordin Nov
20 '17 at 11:44 - 1
God damnit, in my latest attempts, I
just confused two different repositories. So this really does work. Thanks a
lot! – KjetilNordin Nov
20 '17 at 11:56
- Make sure that, in the URL field of the above dialog, your
fork's URL is shown. – not2savvy Jan
15 at 15:06
add a comment
在执行了一次上面的fetch后, 在用Team => Switch to => 时, 可以看到了branch.
Eclipse的Git插件Egit: merge合并冲突具体解决方法的更多相关文章
- Egit的merge合并冲突具体解决方法
稍微总结下弄了半个下午的egit的merge合并冲突解决方法,网上看的都是一个模板出来的,看的糊里糊涂,花了很多时间去实验整个合并流程.. 前提工作 创建一个普通JAVA工程Test,创建一个类Tes ...
- Eclipse上GIT插件EGIT使用手册
http://blog.csdn.net/luckarecs/article/details/7427605 Eclipse上GIT插件EGIT使用手册 一_安装EGIT插件 http://dow ...
- Eclipse上GIT插件EGIT使用手册ᄃ
Eclipse上GIT插件EGIT使用手册 一_安装EGIT插件 http://download.eclipse.org/egit/updates/ 或者使用Eclipse Marketplace,搜 ...
- git pull的时候发生冲突的解决方法之“error: Your local changes to the following files would be overwritten by merge”
今天在使用git pull 命令的时候发生了以下报错 目前git的报错提示已经相关友好了,可以直观的发现,这里可以通过commit的方式解决这个冲突问题,但还是想看看其他大佬是怎么解决这类问题的 在网 ...
- Eclipse上GIT插件EGIT使用
一.安装EGit插件 參考:MyEclipse8.5整合Git 二.EGit配置 配置个人信息 Window > Preferences > Team > Git > Conf ...
- Eclipse上安装GIT插件EGit及使用
一.Eclipse上安装GIT插件EGit Eclipse的版本eclipse-java-helios-SR2-win32.zip(在Eclipse3.3版本找不到对应的 EGit插件,无法安装) E ...
- Eclipse上安装GIT插件EGit
一.Eclipse上安装GIT插件EGit Eclipse的版本eclipse-java-helios-SR2-win32.zip(在Eclipse3.3版本找不到对应的 EGit插件,无法安装) E ...
- 【转】Eclipse上安装GIT插件EGit及使用
http://yufenfei.iteye.com/blog/1750124 一.Eclipse上安装GIT插件EGit Eclipse的版本eclipse-java-helios-SR2-win32 ...
- 转:Eclipse上安装GIT插件EGit及使用
一.Eclipse上安装GIT插件EGit Eclipse的版本eclipse-java-helios-SR2-win32.zip(在Eclipse3.3版本找不到对应的 EGit插件,无法安装) E ...
随机推荐
- 高版本Visual Studio和低版本ArcGIS共存 工具箱没有控件的解决方法
转载请声明.博客园/B站/CSDN/知乎/小专栏 @秋意正寒 欢迎访问小专栏,更多WebGIS开发(Cesium等)经验分享:https://xiaozhuanlan.com/gishome 众所周知 ...
- 软件开发工具(第13章: Eclipse插件的使用与开发)
一.插件简介 插件的定义(了解) 插件是一种遵循其所依附的软件的接口规范所编写出来的程序. 插件实际上是对原有软件的扩展,替应用程序增加一些所需要的特定 功能. 插件的构成(重点.记忆) 每个插件都由 ...
- oracle 字符串转为数字排序
select * from user order by to_number(dept_id) asc
- Python3-logging日志模块
日志模块 logging模块默认收集的日志是warning以上等级的 日志一共分为5个等级,从低到高分别是: 级别 说明 DEBUG 输出详细的运行情况,主要用于调试 INFO 确定一切按预期运行,一 ...
- 黑苹果 macOS 10.13.6 17G66 安装 nVidia WebDriver
目前很多N卡的WebDriver已经不支持macOS 10.14了,只能停留在10.13.6,苹果AppStore下载的 macOS High Sierra 10.13.6 版本号是17G66,遗憾的 ...
- 如何使用TG Pro for Mac的自定义控制功能完全覆盖系统
在某些情况下,可能需要完全覆盖系统风扇控制并使用自定义算法.通过将Auto Boost规则的强大功能与覆盖系统功能相结合,可以使用TG Pro.请记住,当风扇模式设置为Auto Boost时,这将完全 ...
- 面试连环炮系列(五):你们的项目为什么要用RabbitMQ
你们的项目为什么要用RabbitMQ? 消息队列的作用是系统解耦.同步改异步.请求消峰,举个下订单的例子: 前端获取用户订单信息,请求后端的订单创建接口.这个接口并不直接请求订单服务,而是首先生成唯一 ...
- C#/.Net开发入门篇(2)——第一个控制台应用程序
相信看了上一篇文章的小伙伴已经安装好自己的开发工具了VS了,这一篇文章就教大家怎么创建第一个应用程序. 下面大家跟着我的操作一起来创建自己的第一个应用程序吧 一.打开VS工具点击左上角的文件→新建→项 ...
- 更换国内pip
pip国内的一些镜像 原始地址:https://pypi.python.org/simple 国内地址: 阿里云 http://mirrors.aliyun.com/pypi/simple/ 中国科技 ...
- js-05-对象(object)
一.访问对象属性的两种方法 a:objectName.PropertyName 对象名.属性名 b:objectName["PropertyName"] 对象名[“ ...