(7)Flask微电影之会员中心页面搭建
一、添加会员中心页面的路由
修改app/home/views.py内容,追加会员有关的5个路由:
 # coding:utf8

 from . import home

 from flask import render_template, redirect, url_for

 @home.route("/")

 def index():

     return render_template("home/index.html")

 @home.route("/login/")

 def login():

     return render_template("home/login.html")

 @home.route("/logout/")

 def logout():

     return redirect(url_for("home.login"))

 @home.route("/regist/")

 def regist():

     return render_template("home/register.html")

 # 会员中心

 @home.route("/user/")

 def user():

     return render_template("home/user.html")

 @home.route("/pwd/")

 def pwd():

     return render_template("home/pwd.html")

 @home.route("/comments/")

 def comments():

     return render_template("home/comments.html")

 @home.route("/loginlog/")

 def loginlog():

     return render_template("home/loginlog.html")

 @home.route("/moviecol/")

 def moviecol():

     return render_template("home/moviecol.html")
二、首页样式调整
三、会员中心页左侧菜单部分
创建templates/home/menu.html页面:
<div class="col-md-3">
<div class="list-group">
<a href="{{url_for('home.user')}}" class="list-group-item active">
<span class="glyphicon glyphicon-user"></span> 会员中心
</a>
<a href="{{url_for('home.pwd')}}" class="list-group-item">
<span class="glyphicon glyphicon-lock"></span> 修改密码
</a>
<a href="{{url_for('home.comments')}}" class="list-group-item">
<span class="glyphicon glyphicon-comment"></span> 评论记录
</a>
<a href="{{url_for('home.loginlog')}}" class="list-group-item">
<span class="glyphicon glyphicon-calendar"></span> 登录日志
</a>
<a href="{{url_for('home.moviecol')}}" class="list-group-item">
<span class="glyphicon glyphicon-heart"></span> 收藏电影
</a>
</div>
</div>
四、创建会员中心页
创建app/templates/home/user.html文件,内容:
{% extends "home/home.html" %}
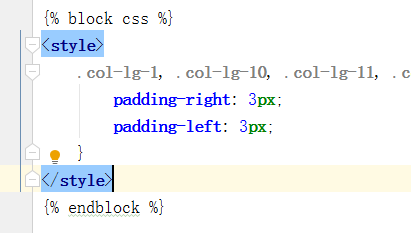
{% block css %}
<style>
.col-lg-1, .col-lg-10, .col-lg-11, .col-lg-12, .col-lg-2, .col-lg-3, .col-lg-4, .col-lg-5, .col-lg-6, .col-lg-7, .col-lg-8, .col-lg-9, .col-md-1, .col-md-10, .col-md-11, .col-md-12, .col-md-2, .col-md-3, .col-md-4, .col-md-5, .col-md-6, .col-md-7, .col-md-8, .col-md-9, .col-sm-1, .col-sm-10, .col-sm-11, .col-sm-12, .col-sm-2, .col-sm-3, .col-sm-4, .col-sm-5, .col-sm-6, .col-sm-7, .col-sm-8, .col-sm-9, .col-xs-1, .col-xs-10, .col-xs-11, .col-xs-12, .col-xs-2, .col-xs-3, .col-xs-4, .col-xs-5, .col-xs-6, .col-xs-7, .col-xs-8, .col-xs-9 {
padding-right: 3px;
padding-left: 3px;
}
</style>
{% endblock %}
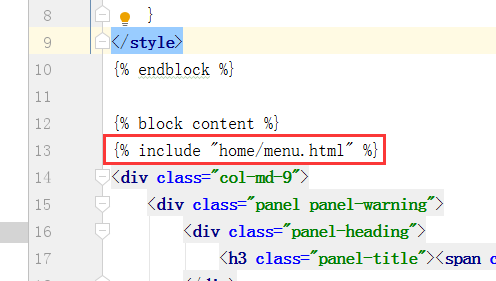
{% block content %}
{% include "home/menu.html" %}
<div class="col-md-9">
<div class="panel panel-warning">
<div class="panel-heading">
<h3 class="panel-title"><span class="glyphicon glyphicon-map-marker"></span> 会员中心</h3>
</div>
<div class="panel-body">
<form role="form">
<fieldset>
<div class="form-group">
<label for="input_name"><span class="glyphicon glyphicon-user"></span> 昵称</label>
<input id="input_name" class="form-control" placeholder="昵称" name="name" type="text" autofocus
value="jinlong">
</div>
<div class="col-md-12" id="error_name"></div>
<div class="form-group">
<label for="input_email"><span class="glyphicon glyphicon-envelope"></span> 邮箱</label>
<input id="input_email" class="form-control" placeholder="邮箱" name="email" type="email"
autofocus value="1780316635@qq.com">
</div>
<div class="col-md-12" id="error_email"></div>
<div class="form-group">
<label for="input_phone"><span class="glyphicon glyphicon-phone"></span> 手机</label>
<input id="input_phone" class="form-control" placeholder="手机" name="phone" type="text" autofocus
value="13700632835">
</div>
<div class="col-md-12" id="error_phone"></div>
<div class="form-group">
<label for="input_face"><span class="glyphicon glyphicon-picture"></span> 头像</label>
<img src="holder.js/100x100" class="img-responsive img-rounded">
<a class="btn btn-primary" style="margin-top:6px;"><span
class="glyphicon glyphicon-open"></span> 上传头像</a>
<input id="input_face" class="form-control" name="face" type="hidden" autofocus>
</div>
<div class="col-md-12" id="error_face"></div>
<div class="form-group">
<label for="input_info"><span class="glyphicon glyphicon-edit"></span> 简介</label>
<textarea class="form-control" rows="10" id="input_info">十年窗下无人问,一举成名天下知</textarea>
</div>
<div class="col-md-12" id="error_info"></div>
<a href="user.html" class="btn btn-success"><span class="glyphicon glyphicon-saved"></span> 保存修改</a>
</fieldset>
</form>
</div>
</div>
</div>
{% endblock %}
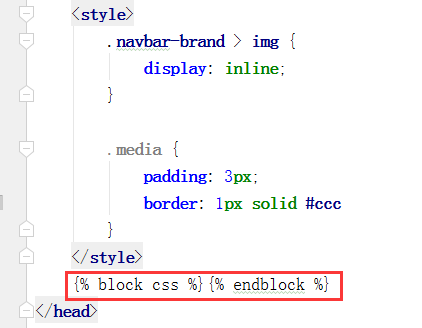
注意样式部分,和home/home.html中的{% block css %}数据块的对应关系:
另外,还要注意会员页面左侧的菜单部分被抽离出来了,使用{% include "home/menu.html" %}进行导入:
五、修改首页导航链接
修改app/templates/home/home.html页面导航中的会员按钮的URL:

六、运行查看会员中心页面的效果
运行manage.py,并在浏览器访问 http://127.0.0.1:5000/user/
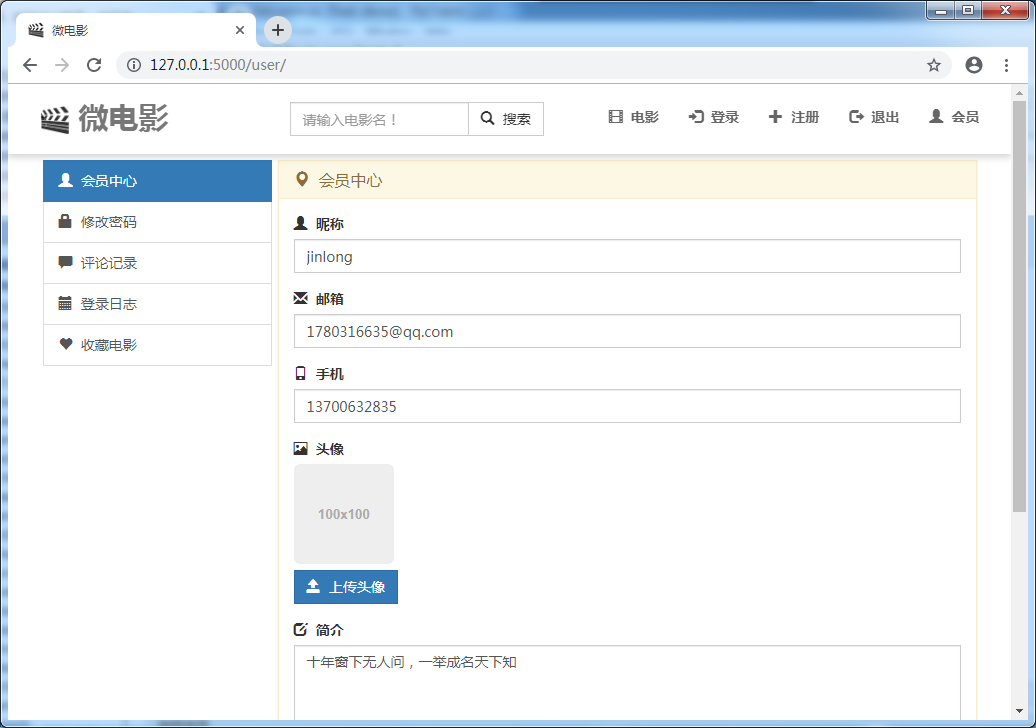
尝试点击一下导航中的会员按钮,会跳转到会员中心页。
【结束】
(7)Flask微电影之会员中心页面搭建的更多相关文章
- (8)Flask微电影项目会员中心其他页面搭建
会员中心修改密码.评论.登录日志和收藏电影4个页面的内容. 一.修改密码页面: {% extends "home/home.html" %} {% block css %} < ...
- (6)Flask项目之会员注册页面
一.添加注册页面的路由 修改app/home/views.py内容,追加注册("/regist/")页面的路由: # coding:utf8 from . import home ...
- flask 微电影网站
flask简介 轻量级web应用框架 WSGI工具箱才用Werkzeug 模版引擎则使用Jinja2 Flask使用BSD授权 1.virtualenv的使用 (1)创建虚拟环境:virtualenv ...
- flask-前台布局页面搭建3
4.前台布局的搭建 由于前端知识有限,我在网上下载的人家的前台源码,附上链接 https://link.jianshu.com/?t=https://github.com/mtianyan/movie ...
- PHPCMS登录后不是进入会员中心而是转入登录前页最新代码
phpcms比如会员在登录前是停留在下载页面的,但是下载页面是要求会员登录后才能下载,所以会员就有这个登陆过程,但是一般的会员系统是登录进会员中心的,就会有点体验不好 这里教大家修改下 能达到登录后 ...
- Ecstore 会员中心 菜单添加一项
1.会员中心 添加菜单 ecstore_合并支付总结_会员中心添加菜单_20160113 class : b2c_ctl_site_member (图 1) 第一步: (图1) ...
- ASP.NET MVC 实现页落网资源分享网站+充值管理+后台管理(14)之会员中心管理
源码下载地址:http://www.yealuo.com/Sccnn/Detail?KeyValue=c891ffae-7441-4afb-9a75-c5fe000e3d1c 会员中心,主要包含了会员 ...
- [课程设计]Scrum 3.4 多鱼点餐系统开发进度(下单详细信息页面&会员信息页面)
Scrum 3.4 多鱼点餐系统开发进度(下单详细信息页面&会员信息页面) 1.团队名称:重案组 2.团队目标:长期经营,积累客户充分准备,伺机而行 3.团队口号:矢志不渝,追求完美 4.团队 ...
- DEDECMS中,会员中心的常用知识
会员中心 引入了member/config.php,即可用$cfg_ml->fields['face'].$cfg_ml->fields['spacesta']等
随机推荐
- Xshell6和Xftp6 破解免安装版,无窗口多开限制
免安装无窗口限制破解版 链接:https://pan.baidu.com/s/1wpFE499qoTjqHrPdQmTn4g提取码:2xcn 如上面的链接失效,可使用以下的链接: https://pa ...
- C#-阿里云OSSAPI
Nuget导入包 共用类 using System; using System.Collections.Generic; using System.IO; using System.Linq; usi ...
- Set,List,Map,Collection
// JAVA集合主要分为三种类型: // // Set(集) List(列表) Map(映射) Collection 接口 // // Collection是最基本的集合接口,声明了适用于JAVA集 ...
- Linux DNS 主从复制
设置主从DNS的主要是为了冗余,分担压力,防止服务器宕机后,DNS无法正常解析. 配置 master 正常配置DNS服务. 设置主机名 [root@localhost ~]# hostnamectl ...
- null在mysql中的不同表现
在mysql中count(*)和count(id)具有不同的表现,其最大的影响是在我们进行联表的时候,如,我们现在要查询一个文章的评论数量,使用左连接查询,具体的sql语句如下: SELECT a.* ...
- ansible中的docker_container模块
docker_container模块 1.docker_container模块主要是用于ansible-playbook操作docker容器的一个模块,使用该模块可以实现批量创建docker容器 An ...
- sqlzoo易错题
https://sqlzoo.net/wiki/SELECT_names 答案在:https://github.com/codyloyd/sqlzoo-solutions/blob/master/SQ ...
- Go - IDE的选择与GoLand的安装
目录 常用编辑器的选择 IDE的选择 GoLand的下载与安装 下载 安装 常用编辑器的选择 编写go程序,可以选择的编辑软件有很多,其中包括: notepad++ sublime visual st ...
- 项目Beta冲刺(1/7)(追光的人)(2019.5.23)
所属课程 软件工程1916 作业要求 Beta冲刺博客汇总 团队名称 追光的人 作业目标 描述Beta冲刺每日的scrum和PM报告两部分 队员学号 队员博客 221600219 小墨 https:/ ...
- DT6.0框架留言模块漏洞修复
今天早上登入后台,留言被国外乱码注入一大堆,很烦人,得去数据库清空.所以仔细检查dt的留言模块,找到解决办法. 在:module/extend/guestbook.inc.php 大约第10行左右 i ...