IntelliJ IDEA自身以及maven项目打包方式
1. Idea自身打包方式
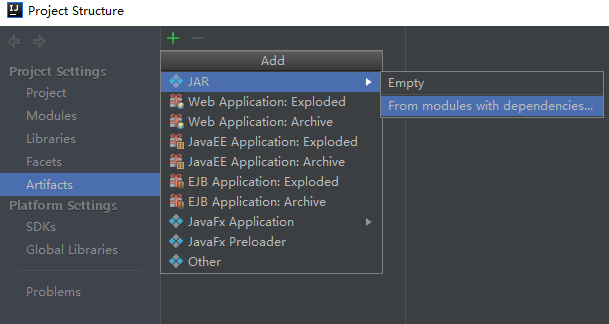
1.1 创建Artifacts
快捷键(Ctrl+Alt+Shift+S)打开项目的Project Structure。在Artifacts创建
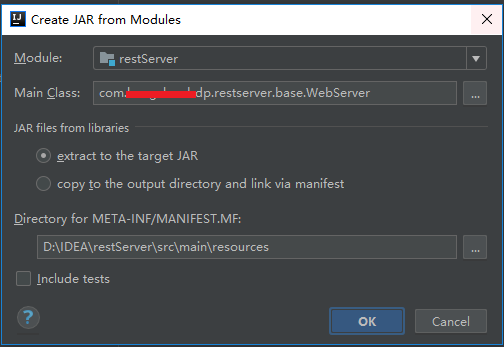
接着,指定main class,如下:
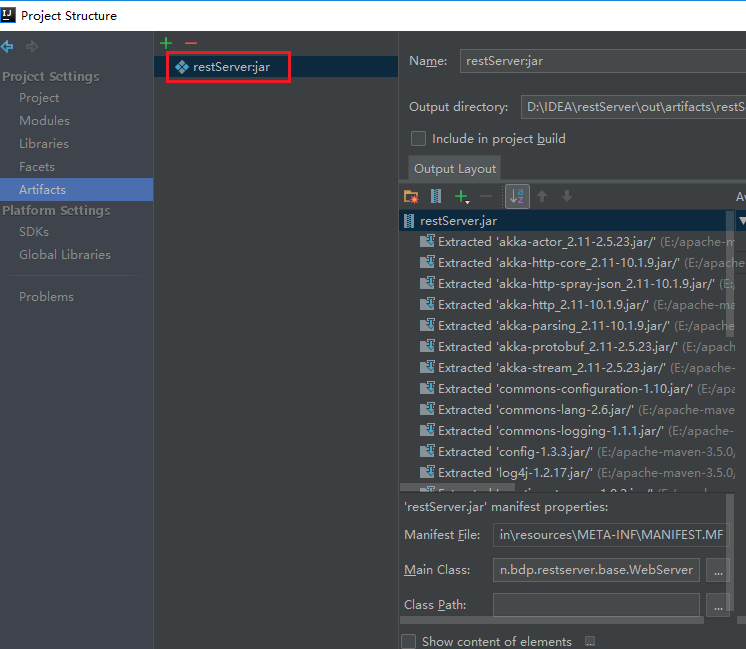
最后,得到创建得到的artifacts
注:
这里可以通过“+”或者“-”选择那些需要打入artifacts的第三方jar文件,如图:
1.2 打包Artifacts
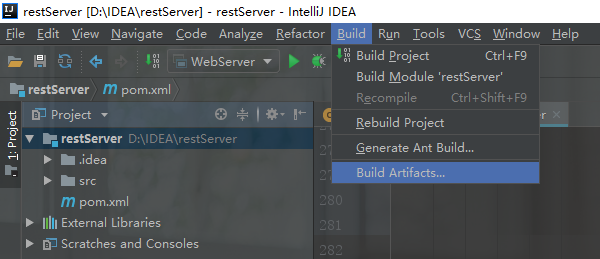
在菜单栏目选Build,最后一栏Build Artifacts
最后,在出现的窗口创建

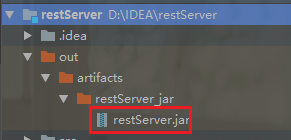
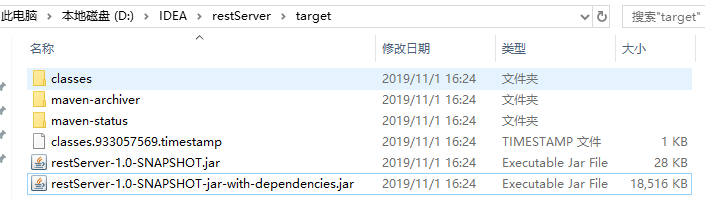
得到打包结果:
2. maven打包方式
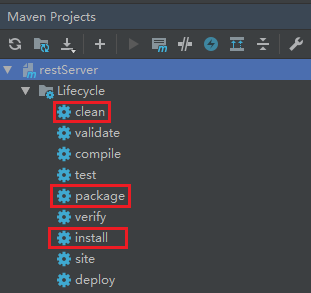
maven打包的步骤:
- 先mvn clean,再 package即可
- 如需把项目编译成jar包,打进maven仓库里面,可以运行install命令
2.1 maven-jar-plugins 无依赖第三方jar的打包
maven 默认打包插件,用来创建 project jar
pom.xml配置如下:
<!--①无依赖其他任何jar打包-->

    <build>

        <resources>

            <resource>

                <targetPath>${project.build.directory}/classes</targetPath>

                <directory>src/main/resources</directory>

                <filtering>true</filtering>

                <includes>

                    <include>**/*.xml</include>

                    <include>**/*.conf</include>

                </includes>

            </resource>

        </resources>

        <plugins>

            <!--scala编译打包插件-->

            <plugin>

                <groupId>net.alchim31.maven</groupId>

                <artifactId>scala-maven-plugin</artifactId>

                <version>3.2.1</version>

                <executions>

                    <execution>

                        <id>scala-compile-first</id>

                        <phase>process-resources</phase>

                        <goals>

                            <goal>add-source</goal>

                            <goal>compile</goal>

                        </goals>

                    </execution>

                </executions>

            </plugin>

            <!--java编译打包插件-->

            <plugin>

                <groupId>org.apache.maven.plugins</groupId>

                <artifactId>maven-compiler-plugin</artifactId>

                <version>3.1</version>

                <configuration>

                    <source>1.8</source>

                    <target>1.8</target>

                    <encoding>UTF-8</encoding>

                </configuration>

                <executions>

                    <execution>

                        <phase>compile</phase>

                        <goals>

                            <goal>compile</goal>

                        </goals>

                    </execution>

                </executions>

            </plugin>

            <plugin>

                <groupId>org.apache.maven.plugins</groupId>

                <artifactId>maven-jar-plugin</artifactId>

                <version>2.4</version>

                <configuration>

                    <archive>

                        <manifest>

                            <addClasspath>true</addClasspath>

                            <classpathPrefix>lib/</classpathPrefix>

                            <mainClass>com.swordfall.restserver.base.WebServer</mainClass>

                        </manifest>

                    </archive>

                </configuration>

            </plugin>

        </plugins>

    </build>
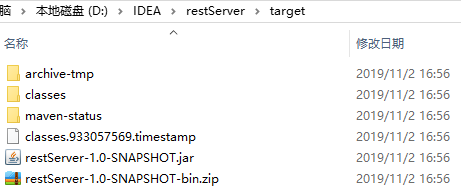
运行:在target中找到打包出来的xxx.jar包,运行java -jar xxx.jar即可,但是如果程序有依赖其他包,比如程序依赖jdbc去查询db,这时候再执行就会出现找不到jdbc依赖,因为我们并没有将依赖包打进去。
2.2 maven-assembly-plugins 解决依赖第三方jar包,并可执行jar的打包
支持定制化打包方式,更多是对项目目录的重新组装。以下方式用的比较少,因为我们依赖的jar,也会打进到我们最终生成的jar中,会导致一个jar文件过大,而且如果要给第三方使用,最好给一个纯净的。
pom.xml配置如下:
<!--②解决依赖第三方,可执行jar的打包,全量打包-->

    <build>

        <resources>

            <resource>

                <targetPath>${project.build.directory}/classes</targetPath>

                <directory>src/main/resources</directory>

                <filtering>true</filtering>

                <includes>

                    <include>**/*.xml</include>

                    <include>**/*.conf</include>

                </includes>

            </resource>

        </resources>

        <plugins>

            <!--scala编译打包插件-->

            <plugin>

                <groupId>net.alchim31.maven</groupId>

                <artifactId>scala-maven-plugin</artifactId>

                <version>3.2.1</version>

                <executions>

                    <execution>

                        <id>scala-compile-first</id>

                        <phase>process-resources</phase>

                        <goals>

                            <goal>add-source</goal>

                            <goal>compile</goal>

                        </goals>

                    </execution>

                </executions>

            </plugin>

            <!--java编译打包插件-->

            <plugin>

                <groupId>org.apache.maven.plugins</groupId>

                <artifactId>maven-compiler-plugin</artifactId>

                <version>3.1</version>

                <configuration>

                    <source>1.8</source>

                    <target>1.8</target>

                    <encoding>UTF-8</encoding>

                </configuration>

                <executions>

                    <execution>

                        <phase>compile</phase>

                        <goals>

                            <goal>compile</goal>

                        </goals>

                    </execution>

                </executions>

            </plugin>

            <plugin>

                <groupId>org.apache.maven.plugins</groupId>

                <artifactId>maven-assembly-plugin</artifactId>

                <version>2.3</version>

                <configuration>

                    <appendAssemblyId>false</appendAssemblyId>

                    <descriptorRefs>

                        <descriptorRef>jar-with-dependencies</descriptorRef>

                    </descriptorRefs>

                    <archive>

                        <manifest>

                            <mainClass>com.swordfall.restserver.base.WebServer</mainClass>

                        </manifest>

                    </archive>

                </configuration>

                <executions>

                    <execution>

                        <id>make-assembly</id>

                        <phase>package</phase>

                        <goals>

                            <goal>assembly</goal>

                        </goals>

                    </execution>

                </executions>

            </plugin>

        </plugins>

    </build>
2.3 maven-assembly-plugins zip打包
支持定制化打包方式,更多是对项目目录的重新组装。在2.2基础上,我们还可以利用assembly,将我们依赖的jar归类,打包成一个zip。发布项目的时候,将zip包copy到服务器上,直接unzip xxx.zip,里面包含要运行的jar以及依赖的lib,还有配置的config文件,还可以包括执行脚本,可以直接启动服务。
<!-- ③maven-assembly-plugin -->

    <build>

         <resources>

             <resource>

                 <directory>src/main/resources</directory>

                 <includes>

                     <include>**/*.properties</include>

                     <include>**/*.xml</include>

                 </includes>

                 <!-- 排除外置的配置文件(运行时注释上,使IDE能读到配置文件;打包时放开注释让配置文件外置,方便修改)可以不配置,maven-jar-plugin下面已配置 -->

                 <!--<excludes>

                     <exclude>config.properties</exclude>

                 </excludes>-->

             </resource>

             <!-- 配置文件外置的资源(存放到conf目录,也是classpath路径,下面会配置)-->

             <!--<resource>

                 <directory>src/main/resources</directory>

                 <includes>

                     <include>config.properties</include>

                 </includes>

                 <targetPath>${project.build.directory}/conf</targetPath>

             </resource>-->

         </resources>

        <plugins>

            <!--scala编译打包插件-->

            <plugin>

                <groupId>net.alchim31.maven</groupId>

                <artifactId>scala-maven-plugin</artifactId>

                <version>3.2.1</version>

                <executions>

                    <execution>

                        <id>scala-compile-first</id>

                        <phase>process-resources</phase>

                        <goals>

                            <goal>add-source</goal>

                            <goal>compile</goal>

                        </goals>

                    </execution>

                </executions>

            </plugin>

            <!--java编译打包插件-->

            <plugin>

                <groupId>org.apache.maven.plugins</groupId>

                <artifactId>maven-compiler-plugin</artifactId>

                <version>3.1</version>

                <configuration>

                    <source>1.8</source>

                    <target>1.8</target>

                    <encoding>UTF-8</encoding>

                </configuration>

                <executions>

                    <execution>

                        <phase>compile</phase>

                        <goals>

                            <goal>compile</goal>

                        </goals>

                    </execution>

                </executions>

            </plugin>

            <!--

                ③打成一个zip包,发布项目的时候,将zip包copy到服务器上,直接unzip xxx.zip,里面包含要运行到的jar以及依赖的lib,还有配置的config文件,即可直接启动服务

            -->

            <!--The configuration of maven-jar-plugin-->

             <plugin>

                 <groupId>org.apache.maven.plugins</groupId>

                 <artifactId>maven-jar-plugin</artifactId>

                 <version>2.4</version>

                 <!--The configuration of the plugin-->

                 <configuration>

                     <!-- 不打包资源文件(配置文件和依赖包分开) -->

                     <excludes>

                         <exclude>*.properties</exclude>

                         <exclude>*.xml</exclude>

                         <exclude>*.txt</exclude>

                     </excludes>

                     <!--Configuration of the archiver-->

                     <archive>

                         <!--生成的jar中,不要包含pom.xml和pom.properties这两个文件-->

                         <addMavenDescriptor>false</addMavenDescriptor>

                         <!--Manifest specific configuration-->

                         <manifest>

                             <!--是否把第三方jar放到manifest的classpath中-->

                             <addClasspath>true</addClasspath>

                             <!--生成的manifest中classpath的前缀,因为要把第三方jar放到lib目录下,所以classpath的前缀是lib/-->

                             <classpathPrefix>lib/</classpathPrefix>

                             <!--应用的main class-->

                             <mainClass>com.swordfall.restserver.base.WebServer</mainClass>

                         </manifest>

                         <!-- 给清单文件添加键值对,增加classpath路径,这里将conf目录也设置为classpath路径 -->

                         <manifestEntries>

                             <Class-Path>conf/</Class-Path>

                         </manifestEntries>

                     </archive>

                     <!--过滤掉不希望包含在jar中的文件-->

                    <!-- <excludes>

                         <exclude>${project.basedir}/xml/*</exclude>

                     </excludes>-->

                 </configuration>

             </plugin>

             <!--The configuration of maven-assembly-plugin-->

             <plugin>

                 <groupId>org.apache.maven.plugins</groupId>

                 <artifactId>maven-assembly-plugin</artifactId>

                 <version>2.4</version>

                 <!--The configuration of the plugin-->

                 <configuration>

                     <!--Specifies the configuration file of the assembly plugin-->

                     <descriptors>

                         <descriptor>src/main/assembly/assembly.xml</descriptor>

                     </descriptors>

                 </configuration>

                 <executions>

                     <execution>

                         <id>make-assembly</id>

                         <phase>package</phase>

                         <goals>

                             <goal>single</goal>

                         </goals>

                     </execution>

                 </executions>

             </plugin>

        </plugins>

    </build>
  maven-assembly-plugin还需要配置一个assembly.xml文件,用于过滤不必要的第三方jar包文件,或者确定自己编译的项目文件路径、项目的启动脚本文件目录,打包的类型格式zip或者tar.gz等。
  assembly.xml文件内容为:
<assembly>

    <id>bin</id>

    <includeBaseDirectory>false</includeBaseDirectory>

    <!-- 最终打包成一个用于发布的zip文件 -->

    <formats>

        <format>zip</format>

    </formats>

    <!-- Adds dependencies to zip package under lib directory -->

    <dependencySets>

        <dependencySet>

            <!-- 不使用项目的artifact,第三方jar不要解压,打包进zip文件的lib目录 -->

            <useProjectArtifact>false</useProjectArtifact>

            <outputDirectory>lib</outputDirectory>

            <unpack>false</unpack>

        </dependencySet>

    </dependencySets>

    <fileSets>

        <!-- 把项目相关的说明文件,打包进zip文件的根目录 -->

        <!--<fileSet>

            <directory>${project.basedir}</directory>

            <outputDirectory>/</outputDirectory>

        </fileSet>-->

        <!-- 把项目的配置文件,打包进zip文件的config目录 -->

        <!--<fileSet>-->

            <!--<directory>${project.basedir}/src/main/resources</directory>-->

            <!--<outputDirectory>/conf</outputDirectory>-->

            <!--<includes>-->

                <!--<include>*.xml</include>-->

                <!--<include>*.properties</include>-->

            <!--</includes>-->

        <!--</fileSet>-->

        <!-- 把项目自己编译出来的jar文件,打包进zip文件的根目录 -->

        <fileSet>

            <directory>${project.build.directory}</directory>

            <outputDirectory></outputDirectory>

            <includes>

                <include>*.jar</include>

            </includes>

        </fileSet>

        <!-- 把项目的脚本文件目录(src/main/scripts)中的启动脚本,打包进zip文件的根目录 -->

        <fileSet>

            <directory>${project.basedir}/src/main/scripts</directory>

            <outputDirectory>bin</outputDirectory>

            <includes>

                <include>startup.*</include>

            </includes>

        </fileSet>

    </fileSets>

</assembly>
打包结果为:
2.4 maven-shade-plugin 打包
用来打可执行包,包含依赖,以及对依赖进行取舍过滤。使用这种方式打出来的是揉合在一起,成为一个jar文件。这种打包方式的优点是可以利用transformer把第三方jar相同的配置文件组合成一个文件,如reference.conf文件等等。
pom.xml配置如下:
<!--④ maven-shade-plugin-->

    <build>

         <!--资源文件路径配置-->

         <resources>

             <resource>

                 <targetPath>${project.build.directory}/classes</targetPath>

                 <directory>src/main/resources</directory>

                 <filtering>true</filtering>

                 <includes>

                     <include>**/*.xml</include>

                     <include>**/*.conf</include>

                 </includes>

             </resource>

         </resources>

         <plugins>

             <!--scala编译打包插件-->

             <plugin>

                 <groupId>net.alchim31.maven</groupId>

                 <artifactId>scala-maven-plugin</artifactId>

                 <version>3.2.1</version>

                 <executions>

                     <execution>

                         <id>scala-compile-first</id>

                         <phase>process-resources</phase>

                         <goals>

                             <goal>add-source</goal>

                             <goal>compile</goal>

                         </goals>

                     </execution>

                 </executions>

             </plugin>

             <!--java编译打包插件-->

             <plugin>

                 <groupId>org.apache.maven.plugins</groupId>

                 <artifactId>maven-compiler-plugin</artifactId>

                 <version>3.1</version>

                 <configuration>

                     <source>1.8</source>

                     <target>1.8</target>

                     <encoding>UTF-8</encoding>

                 </configuration>

                 <executions>

                     <execution>

                         <phase>compile</phase>

                         <goals>

                             <goal>compile</goal>

                         </goals>

                     </execution>

                 </executions>

             </plugin>

             <!-- ④ maven-shade-plugin -->

             <plugin>

                 <groupId>org.apache.maven.plugins</groupId>

                 <artifactId>maven-shade-plugin</artifactId>

                 <version>2.4.3</version>

                 <executions>

                     <execution>

                         <phase>package</phase>

                         <goals>

                             <goal>shade</goal>

                         </goals>

                         <configuration>

                             <!--资源转换 在打包时,存在将多个构件中的class文件或资源文件聚合的需求。shade插件提供了丰富的Transformer工具类。这里介绍一些常用的Transformer-->

                             <transformers>

                                 <!--ManifestResourceTransformer可以轻松实现往MANIFEST文件中写入Main-Class,这是可执行包的必要条件-->

                                 <transformer implementation="org.apache.maven.plugins.shade.resource.ManifestResourceTransformer">

                                     <mainClass>com.hongshan.bdp.restserver.base.WebServer</mainClass>

                                 </transformer>

                                 <!--AppendingTransformer用来处理多个jar包中存在重名的配置文件的合并,尤其是spring-->

                                 <transformer implementation="org.apache.maven.plugins.shade.resource.AppendingTransformer">

                                     <resource>reference.conf</resource>

                                 </transformer>

                                 <transformer implementation="org.apache.maven.plugins.shade.resource.AppendingTransformer">

                                     <resource>version.conf</resource>

                                 </transformer>

                                 <transformer implementation="org.apache.maven.plugins.shade.resource.AppendingTransformer">

                                     <resource>akka-http-version.conf</resource>

                                 </transformer>

                                 <!--ServicesResourceTransformer JDK的服务发现机制是基于META-INF/services/目录的,如果同一接口存在多个实现需要合并 ,则可以使用此Transformer-->

                                 <!--<transformer implementation="org.apache.maven.plugins.shade.resource.ServicesResourceTransformer"/>-->

                             </transformers>

                             <shadedArtifactAttached>true</shadedArtifactAttached>

                             <shadedClassifierName>jar-with-dependencies</shadedClassifierName>

                             <!--过滤不需要的jar包-->

                             <artifactSet>

                                 <excludes>

                                     <exclude>io.spray:spray-json_2.11:jar:</exclude>

                                     <exclude>org.slf4j:slf4j-api:jar:</exclude>

                                     <exclude>org.slf4j:slf4j-log4j12:jar:</exclude>

                                     <exclude>log4j:log4j:jar:</exclude>

                                     <exclude>commons-logging:commons-logging:jar:</exclude>

                                     <exclude>commons-lang:commons-lang:jar:</exclude>

                                 </excludes>

                             </artifactSet>

                             <!--配置<minimizeJar>将项目中没有使用的依赖自动移除,使项目最小化-->

                             <minimizeJar>true</minimizeJar>

                         </configuration>

                     </execution>

                 </executions>

             </plugin>

         </plugins>

     </build>
打包结果:
2.5 其他插件
2.5.1 maven-surefire-plugin
该插件主要用于项目maven编译打包时,跳过单元测试,pom.xml配置为:
<project>

  [...]

  <build>

    <plugins>

      <plugin>

        <groupId>org.apache.maven.plugins</groupId>

        <artifactId>maven-surefire-plugin</artifactId>

        <version>2.22.2</version>

        <configuration>

          <skipTests>true</skipTests>

        </configuration>

      </plugin>

    </plugins>

  </build>

  [...]

</project>
总结
【github地址】
https://github.com/SwordfallYeung/MavenPackage
【参考资料】
https://blog.csdn.net/qq_16055765/article/details/79481258
https://www.cnblogs.com/Andrew520/p/8857603.html
https://blog.csdn.net/zzm3280/article/details/84953070
https://blog.csdn.net/hxpjava1/article/details/79711710
https://blog.csdn.net/u012834750/article/details/80937747 scala打包插件配置①
https://blog.csdn.net/tf461991046/article/details/80834685 scala打包插件配置②
https://blog.csdn.net/u013019338/article/details/83377070 spring-boot配置读取外部配置文件
https://www.cnblogs.com/hdwang/p/6627912.html 普通jar包如何读取外部的配置文件
https://www.cnblogs.com/wangfajun/p/9585530.html linux shell脚本启动或停止jar
https://blog.csdn.net/qq_18300109/article/details/80798334 IDEA如何打包可运行jar,外部引用jar包版
https://blog.csdn.net/qingfengmuzhu1993/article/details/80284739 IDEA自身打包方式
https://my.oschina.net/u/2377110/blog/1585553 shade 过滤包名
IntelliJ IDEA自身以及maven项目打包方式的更多相关文章
- IntelliJ IDEA 15 创建maven项目
说明 创建Maven项目的方式:手工创建 好处:参考IntelliJ IDEA 14 创建maven项目二(此文章描述了用此方式创建Maven项目的好处)及idea14使用maven创建web工程(此 ...
- maven项目打包运行出错问题汇总
maven项目打包时总会出现莫名其妙的错误,现总结一下. 打包方式:在maven项目底下运行cmd,输入mvn clean package,会自动按pom.xml的配置打成包.使用java -jar ...
- 十七、IntelliJ IDEA 中的 Maven 项目初体验及搭建 Spring MVC 框架
我们已经将 IntelliJ IDEA 中的 Maven 项目的框架搭建完成.接着上文,在本文中,我们更近一步,利用 Tomcat 运行我们的 Web 项目. 如上图所示,我们进一步扩展了项目的结构, ...
- 【IntelliJ 】IntelliJ IDEA 15 创建maven项目
说明 创建Maven项目的方式:手工创建 好处:参考IntelliJ IDEA 14 创建maven项目二(此文章描述了用此方式创建Maven项目的好处)及idea14使用maven创建web工程(此 ...
- maven 项目打包 及window下部署到tomcat
1.maven项目打包 2.将war文件拷贝到tomcat目录webapps下(不要再建目录)3.将必要的jar文件拷贝到tomcat目录libx下 war包 或jar 包 会生成到项目所在路径 的t ...
- Storm系列(三):创建Maven项目打包提交wordcount到Storm集群
在上一篇博客中,我们通过Storm.Net.Adapter创建了一个使用Csharp编写的Storm Topology - wordcount.本文将介绍如何编写Java端的程序以及如何发布到测试的S ...
- eclipse下将maven项目打包为jar(1.不带第三方jar,2.带第三方jar)
由于项目需要讲maven项目打包为jar包,由于之前没类似经验,百度找例子走了不少弯路,这边随手记录下,网上说的 开发工具:eclipse jar包管理:maven 一般打包出来的jar包分为两种 一 ...
- maven 项目打包到本地仓库并且推送到私服仓库
首先进入到项目文件夹下,然后进入cmd命令窗口,第一步先clean一下,输入命令 mvn clean. 第二步打包到本地,输入命令mvn clean package -Dmaven.test.skip ...
- 怎么将maven项目打包成war包
问题:我在eclipse上能运行,然后我想将这个maven项目打包成war然后放到另外一台机子上(其实是手动放在tomcat的webapp目录中),提供外部访问.现在问题是,一直maven项目打包一直 ...
随机推荐
- [IISNode] 如何在IIS7/8下,配置一个可以通过IIS访问NodeJS的web项目
参考了一下几篇很给力的文章,在每篇文章中,都学到了解决遇到的问题的答案: (1)用iisnode模块,让你的Node.js应用跑在Windows系统IIS中 (2)让IIS能够运行Nodejs (3) ...
- Anaconda3配置多版本python环境开发
关注公众号:TJHIT
- C#基础—数组
C#基础之数组 1. 数组的定义与初始化 一维数组: (1) int [] A = new int[4]{ 0,1,2,3}; (2) int[] B ...
- Python进阶(十六)----面向对象之~封装,多态,鸭子模型,super原理(单继承原理,多继承原理)
Python进阶(十六)----面向对象之~封装,多态,鸭子模型,super原理(单继承原理,多继承原理) 一丶封装 , 多态 封装: 将一些东西封装到一个地方,你还可以取出来( ...
- k8s--complete-demo.yaml
- JAVA基础之JavaEE与MVC
所谓的架构.模式都是方便开发和查看的,分工明确的,理解每层的具体的意义! 一.JavaEE: 1.Java EE,Java 平台企业版(Java Platform Enterprise Edition ...
- 数组的push()、pop()、shift()和unshift()方法
JavaScript的数组是一个拥有堆栈和队列自身优点的global对象.也就是说JavaScript数组可以表现的像栈(LIFO)和队列(FIFO)一样操作.这也是JavaScript数组强大的可操 ...
- hbase完整分布式集群搭建
简介: hadoop的单机,伪分布式,分布式安装 hadoop2.8 集群 1 (伪分布式搭建 hadoop2.8 ha 集群搭建 hbase完整分布式集群搭建 hadoop完整集群遇到问题汇总 Hb ...
- Python学习日记(二十七) 反射和几个内置函数
isinstance() 判断isinstance(obj,cls)中obj是否是cls类的对象 class Person: def __init__(self,name): self.name = ...
- MySQL- [Err] 1055 - Expression #1 of ORDER BY clause is not in GROUP BY clause and contains nonaggregated column 'information_schema.PROFILING.SEQ' which is not functionally dependent on columns in GR
新建的mysql,在查询时报异常信息,虽然有正常执行结果. [Err] 1055 - Expression #1 of ORDER BY clause is not in GROUP BY claus ...